Getting to work with GitHub and Azure DevTest Labs
In my last blog post I showed you how to add a custom GitHub repo to your Azure DevTest Labs setup. I gave a few hints about folder structure and links to the great GitHub bootcamp documentation, but if you’re new to GitHub you might still be a little confused about just exactly how you’re supposed to interact with these repo things. I know the first time someone sent me a link to a GitHub repo I spent the better part of an hour trying to figure out how to push its buttons. Nowadays, I use GitHub and interact with various repos all day long. And, after you too get comfortable with GitHub you'll be able to easily add custom artifacts to your Azure DevTest Lab setup customized to your specific needs. It’s easy once you learn the ropes—and so that’s what I’m going to show you now.
Using GitHub from the command line
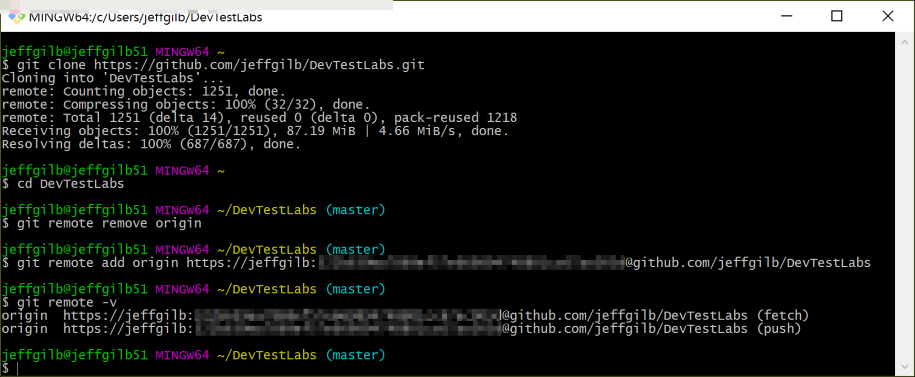
If you’re creating custom Azure DevTest Labs artifacts then you’re probably fairly familiar with scripting and comfortable working from the command line. To interact with GitHub repos via the beloved command window, go install GitBash, you can download it from here: https://git-for-windows.github.io/. Once installed, use it to clone your favorite GitHub repo locally and then tell it who you are (you’ll need a GitHub repo access token like I showed you how to get in my last blog post so hopefully you saved token that to a text file somewhere safe. Otherwise you’ll need to go regenerate a new one):
Clone the repo (use the little green box from your repo on github.com to grab the clone url):
git clone <url to your repo including the .git part>
Change the GitBash working directory (the default location will clone a repo to the C:\Users\<you>\<repo name> folder):
cd <repo-name>
Set up a remote (alias to tell Git who you are so you don’t have to do this every time you change something). The commands will show you what’s going:
git remote remove origin
git remote add origin https:// <your GitHub username> : <your GitHub access token>@github.com/<your full repo name>
git remote -v
Once those commands have completed successfully, you’ll never have to do them again unless you delete your local repo clone and start over.
Now it's time to create a new branch, which is just a different version of the same project. There’s a master branch by default and that is basically the fruit of all your collective labors. You’ll need to use a separate code branch for your development, testing, and whatnot before you’re ready to commit your final changes to the master branch. Branches are meant to help keep your sanity when multiple people are working on files from the same repo.
Tip: This is also what Azure DevTest Labs is talking about when it asks what branch in your repo to grab artifacts from (see last post). I generally make a branch called dev to use in my development environment and just use the master (default) branch for my production DevTest labs artifact location.
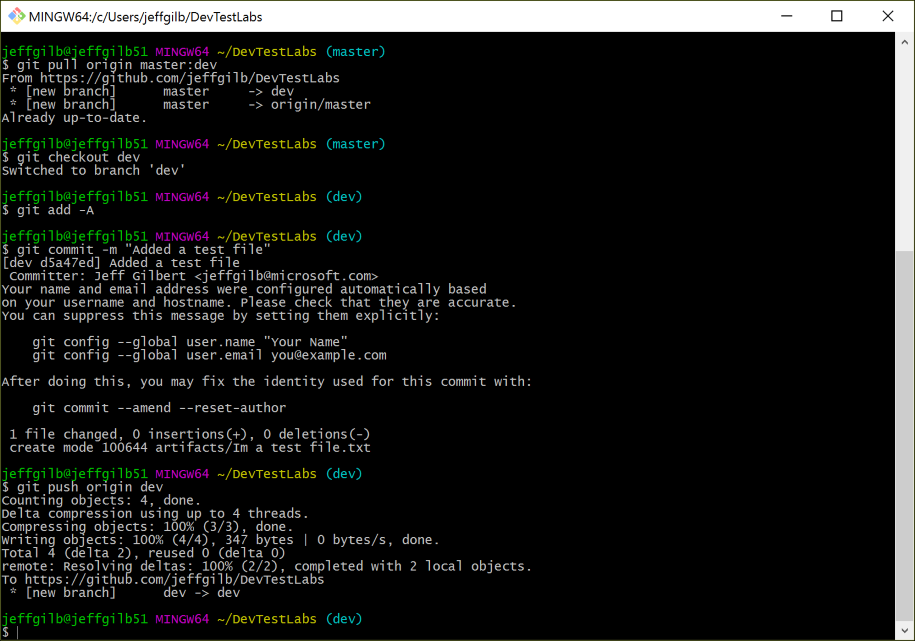
To create a new branch, make sure GitBash is operating in the right directory location (cd <repo-name> again if necessary) and then pull down a copy of the master branch. You get to name your new branch after the : in the following command:
git pull origin master: <branch name>
Now, before you do anything to the files stored in your local clone of the GitHub repo you must first use GitBash to checkout your shiny new branch. This will organize all your changes that you can push up to the master branch later.
Important: here me now, believe me later: if you forget to do this before modifying your local files and then sync with the master branch you will lose everything you’ve done since creating the local branch. Make sure you checkout the working branch!
git checkout <branch name you made earlier>
Now you’re free to make changes to your heart’s content working within your local branch. When you’ve made the changes you want to make, and are ready to upload (commit) them to your repo’s master branch, you’ll need to run the following commands:
Tell GitBash to find all the files you’ve modified that haven’t been committed to GitHub yet:
git add -A
Bundle all those changes up into a commit along with a comment that tells everyone what you have done. Sometimes these comments are to let pull request reviewers see what you’ve been up to, but for private repos it’s mostly just for your own sanity.
git commit -m " <comment> "
Lastly, tell GitBash to push your commit up to GitHub:
git push origin <branchname>
This is why you always hear people say you only have to memorize a few commands to work with GitHub: those commands we just talked about (in the screenshot above) encompass about 99.999% of everything you’ll ever need to do on a regular basis with GitBash.
Are there more commands? You bet. Do I ever really use them? No.
When things get weird with GitBash (conflicts, merge failures, etc.), I just take a deep breath, close GitBash, copy out the files I’ve changed recently from my local repo clone before deleting it and then start all over. Once my repo has been re-cloned and I'm working in a proper branch, I just paste back in my backed-up files. Probably not the best troubleshooting advice you’ll ever hear, but I’ve found that I can do all that in less time than it takes me to figure out how to undo whatever I did to make Git unhappy otherwise using GitBash commands. That’s it. That’s all the troubleshooting information I can or will give you, you’re on your own now—especially if you clone my repo and start meddling around with the files.
OK, so now your modified files are well on their way to joining the master branch club. All you have left to do is create a pull request and merge your local branch changes into the master branch up on GitHub. Let’s go do that now.
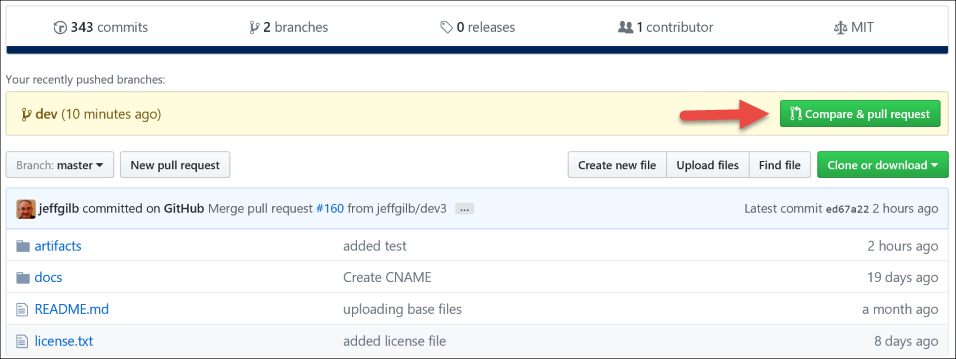
Go to your repo’s home on GitHub and you’ll probably notice that GitHub already knows you recently pushed a branch upstream (see the part in yellow below?). Now, click the Compare & pull request button:
On the resulting page, click Create pull request. That will open a screen that allows you to send a message to the pull request reviewer (the person(s) with rights to merge files to master). Generally, with private repos you have that ability so there’s no need to communicate anything to anyone else. Just click Create pull request to get the ball rolling.
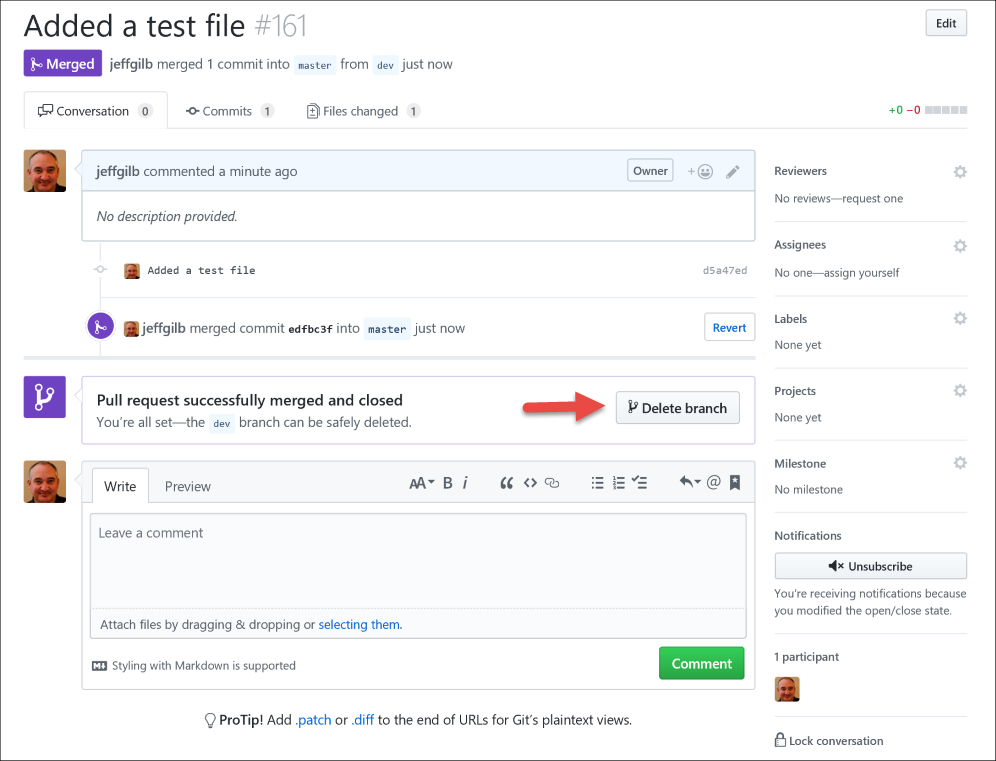
At this point if you have permissions to merge pull requests, which you most probably do for your own repo, you’ll see an option to merge the newly created pull request by clicking Merge pull request and then confirming your decision via Confirm merge.
And you’re done. Your changes have been successfully merged into the master branch. At this point you can delete the branch, but remember to keep it there if you are accessing it from DevTest Labs! If you’ve made a temporary branch for some reason and no longer need it, feel free to click the Delete branch button. You’ll just have to create a new branch in GitBash the next time you start tinkering around with your repo’s files.
So, there you have everything you need to know to get started with GitBash and working with GitHub repositories from the command line.
GitHub Desktop for the GUI lovers out there
Have no fear those of you who would rather use a GUI to work with GitHub repos. GitHub has you covered with their GitHub Desktop app. I’m not going to go into great detail in using the app because it’s right there for you to see and should also be pretty self-explanatory now that you know the ins and outs of how to clone a repo, work with branches, and create/merge pull requests.
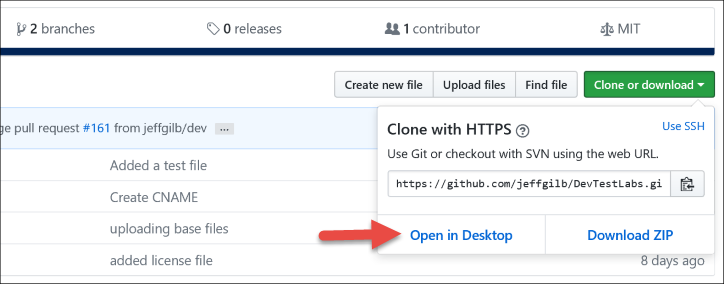
The first thing you need to do is install GitHub Desktop. Once that’s done, go to your repo’s home on GitHub, click Clone or download, and then Open in Desktop.
Tip: If you don’t have GitHub Desktop installed before you hit that option, nothing is going to happen so don’t let that confuse you if you start clicking around ahead of time.
Pick the spot on your local machine where you want GitHub Desktop to clone your repo and it will do the rest. Once your repo has been added you can get to work.
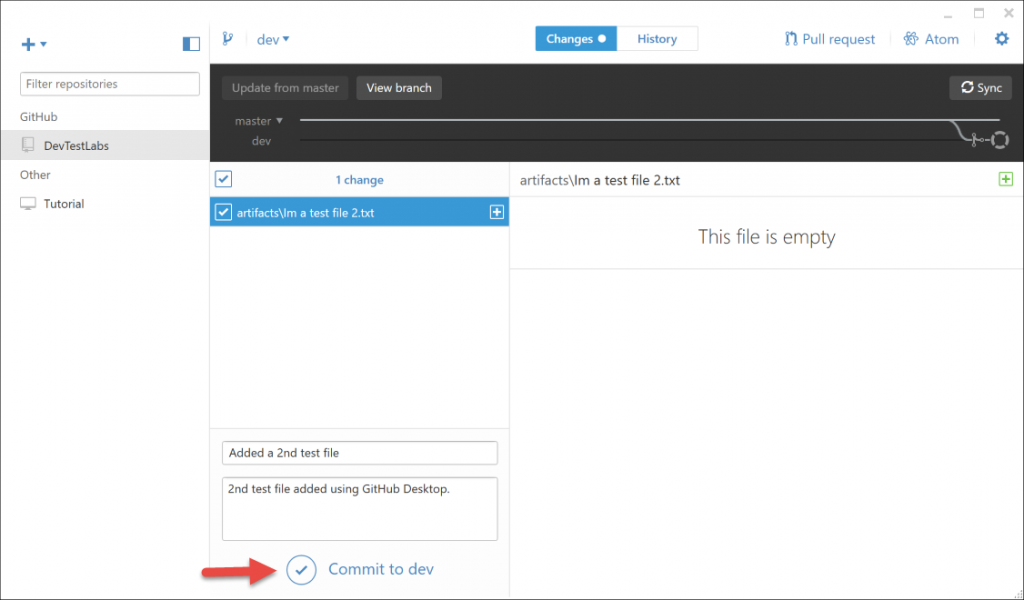
At the top of the GitHub Desktop screen, towards the left, use the drop-down to select the branch you want to work in or create a new one. Go edit the files from where you cloned them in the previous step and then come back here. Compare your working branch to the master branch to see what changes have been made, add a commit title and comment, and then commit the changes:
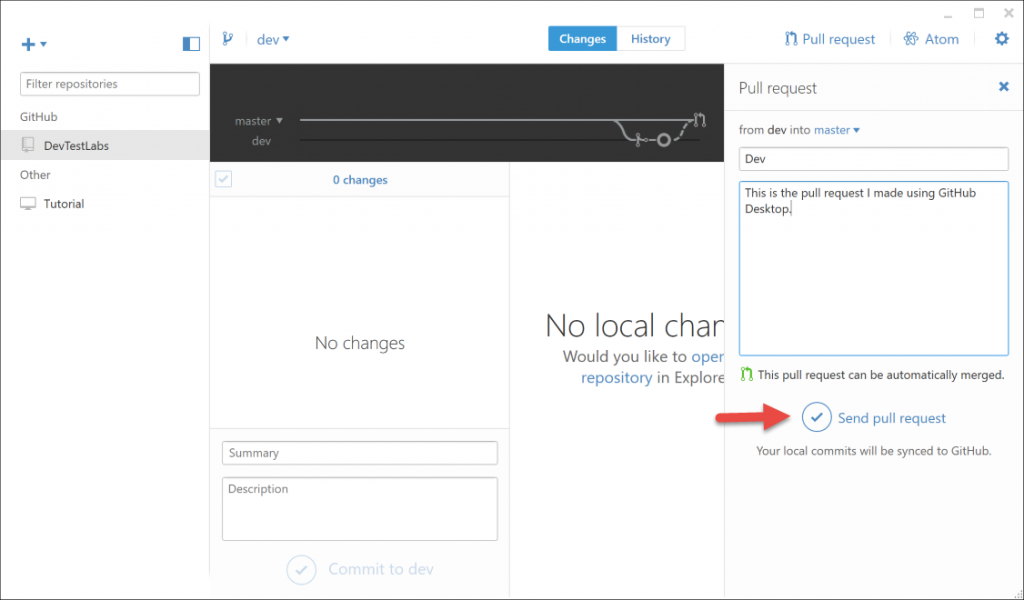
After that, you just need to create a pull request to get your committed changes where they can be merged with the master branch by clicking Send pull request up towards the top right:
Once the pull request has been created, you’ll get a message telling you so along with an offer for you to view the newly created pull request on GitHub. From there, you follow the same steps you saw earlier to merge the pull request into the master branch.
So, there you go, that's two ways to interact with GitHub. Choose the one that works for you and get cracking on some custom Azure DevTest Lab artifacts of your own! I’ll show you how make them in my next post.
You’ve seen my blog; want to follow me on Twitter too? @JeffGilb.
