Bot Framework と Microsoft Graph で DevOps その 4 : Microsoft Fakes, AutoFac, Moq で依存サービスのモック化
前回は AuthBot と Microsoft Graph を呼べるようにしました。今回は変更したものをユニットテストしてみます。
依存サービスのモック
依存サービスはモックを作り、常に意図した動作をするようにすることで、本当にテストしたい部分のユニットテストを行います。AuthBot と GraphService それぞれモック化します。
AuthBot のモック化
コード内で AuthBot の GetAccessToken メソッドを実行して、OAuth 2.0 のアクセストークンを取得していますが、ここをモック化します。ソースコードを見ると GetAccessToken は静的な部分メソッドですので、Microsoft Fakes を使います。Fakes の詳細はこちら。
1. Fake アセンブリを作るため、ユニットテストプロジェクトにも AuthBot を追加して、各種 NuGet パッケージを最新に更新します。
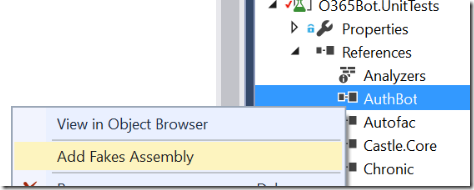
2. AuthBot 参照を右クリックして、Fakes Assembly を追加します。
3. UnitTest1.cs の ShouldReturnCount メソッドを削除して、以下のように書き換えます。
 [TestMethod]
public async Task ShouldReturnEvents()
{
    // Fakes を使うためにコンテキストを作成
    using (ShimsContext.Create())
    {
        // AuthBot の GetAccessToken メソッドを実行した際、dummyToken というトークンが返るよう設定
        AuthBot.Fakes.ShimContextExtensions.GetAccessTokenIBotContextString =
            async (a, e) => { return "dummyToken"; };

        // テストしたいダイアログのインスタンス作成
        IDialog rootDialog = new RootDialog();

        // Bot に送るメッセージを作成
        var toBot = DialogTestBase.MakeTestMessage();
        toBot.From.Id = Guid.NewGuid().ToString();
        toBot.Text = "get appointments";

        // メモリ内で実行できる環境を作成
        Func<IDialog> MakeRoot = () => rootDialog;
        using (new FiberTestBase.ResolveMoqAssembly(rootDialog))
        using (var container = Build(Options.MockConnectorFactory | Options.ScopedQueue, rootDialog))
        {
            // メッセージを送信して、結果を受信
            IMessageActivity toUser = await GetResponse(container, MakeRoot, toBot);
            // 結果の検証
            Assert.IsTrue(toUser.Text.Equals("You sent hi! which was 3 characters"));
        }
    }
}
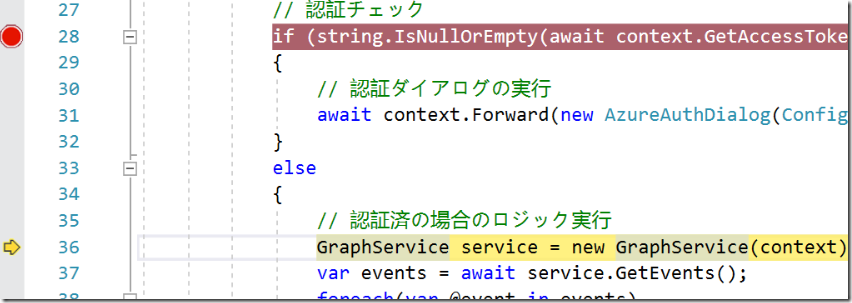
4. RootDialog.cs の 認証チェックのコードあたりにブレークポイントを置きます。
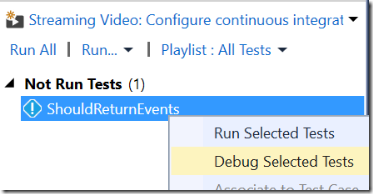
5. 一旦ソリューションをコンパイルして、テストエクスプローラーより ShouldReturnEvents テストをデバッグ実行します。
6. ブレークポイントがヒットしたらステップ実行して、認証済ロジックに遷移することを確認します。
これで AuthBot の依存は解決しました。
GraphService のモック化
AuthBot と違いソースをもっているので、サービスをインターフェース化して、Moq と AutoFac を使います。
Moq の詳細はこちら。
AutoFac の詳細はこちら。
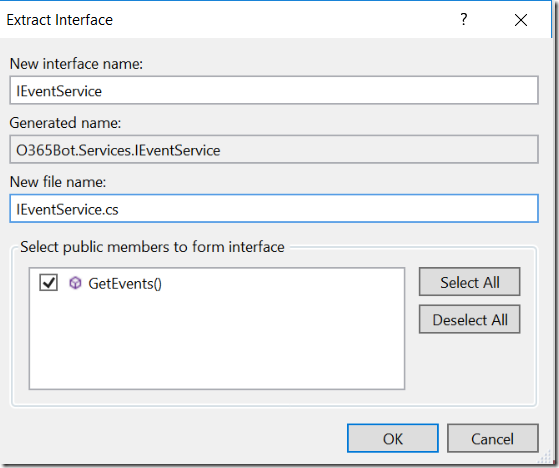
1. GraphService.cs を開き、GraphService からインターフェースを作成します。
2. インターフェース名は IEventService としました。
3. 次に AutoFac のセットアップをします。Global.asax.cs の中身を以下に差し替えます。IEventService を利用する際、GraphService を返します。
 using Autofac;
using O365Bot.Services;
using System.Configuration;
using System.Web.Http;

namespace O365Bot
{
    public class WebApiApplication : System.Web.HttpApplication
    {
        public static IContainer Container;

        protected void Application_Start()
        {
            GlobalConfiguration.Configure(WebApiConfig.Register);

            AuthBot.Models.AuthSettings.Mode = ConfigurationManager.AppSettings["ActiveDirectory.Mode"];
            AuthBot.Models.AuthSettings.EndpointUrl = ConfigurationManager.AppSettings["ActiveDirectory.EndpointUrl"];
            AuthBot.Models.AuthSettings.Tenant = ConfigurationManager.AppSettings["ActiveDirectory.Tenant"];
            AuthBot.Models.AuthSettings.RedirectUrl = ConfigurationManager.AppSettings["ActiveDirectory.RedirectUrl"];
            AuthBot.Models.AuthSettings.ClientId = ConfigurationManager.AppSettings["ActiveDirectory.ClientId"];
            AuthBot.Models.AuthSettings.ClientSecret = ConfigurationManager.AppSettings["ActiveDirectory.ClientSecret"];

            var builder = new ContainerBuilder();
            builder.RegisterType<GraphService>().As<IEventService>();
            Container = builder.Build();
        }
    }
}
4. RootDialog.cs ファイルの認証済ロジック内を以下のコードをに差し替えます。これにより実行時に動的にサービスをの実装を取得できます。
 using (var scope = WebApiApplication.Container.BeginLifetimeScope())
{
    // 認証済の場合のロジック実行
    // IEventService の実体を取得する
    // コンストラクタに IDialog context を渡す
    IEventService service = scope.Resolve<IEventService>(new TypedParameter(typeof(IDialogContext), context));
    var events = await service.GetEvents();
    foreach (var @event in events)
    {
        await context.PostAsync($"{@event.Start.DateTime}-{@event.End.DateTime}: {@event.Subject}");
    }
}
5. ユニットテストプロジェクトに戻って、Microsoft.Graph NuGet パッケージを追加します。
6. UnitTest1.cs を開き、以下 using を追加します。
 using Moq;
 using Microsoft.Graph;
7. ShouldReturnEvents テストメソッド、IDialog rootDialog = new RootDialog(); の前に以下のコードを追加します。これでテスト時にはモックのサービスを利用します。
 // サービスのモック
var mockEventService = new Mock<IEventService>();
mockEventService.Setup(x => x.GetEvents()).ReturnsAsync(new List<Event>()
{
    new Event
    {
        Subject = "dummy event",
        Start = new DateTimeTimeZone()
        {
            DateTime = "2017-05-31 12:00",
            TimeZone = "Standard Tokyo Time"
        },
        End = new DateTimeTimeZone()
        {
            DateTime = "2017-05-31 13:00",
            TimeZone = "Standard Tokyo Time"
        }
    }
});
// IEventService 解決時にモックが返るよう設定
var builder = new ContainerBuilder();
builder.RegisterInstance(mockEventService.Object).As<IEventService>();
WebApiApplication.Container = builder.Build();
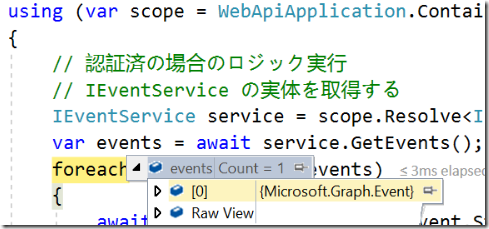
8. 先ほどと同じようにテストをデバッグ実行。指定したダミーのイベントが取得されていることを確認。
テストの改修
全てモック化できたので、最後にテストの検証個所を書き換えてテストしましょう。
1. 結果検証を以下のコードに差し替え。
 // 結果の検証
Assert.IsTrue(toUser.Text.Equals("2017-05-31 12:00-2017-05-31 13:00: dummy event"));
2. テストエクスプローラーよりテストの実行。
3. テストが成功することを確認。
まとめ
今回は依存サービスのモック化を実施しました。次回は VSTS 側での CI を設定します。コードはすべてチェックインしておいてください。
