Taking COM Shim Wizards to 64-bit
It’s been quite a while since the last update to COM Shim Wizards has taken place. Among the things that have happened since are the new versions of Visual Studio (i.e. Visual Studio 2010) and Office (Office 2010). Both products are close to go out so it is time to do some face-lifting to the wizards as well.
Ideally I would love to announce that we have released a version of COM Shim wizards that is working with VS 2010 – but this is not the case yet and in fact I haven’t started investigating yet what would it take to make this work. So, while I am looking for answers there, you can use the wizards on VS 2008 and then migrate your solutions to VS 2010. I know such solution is less than ideal so please accept my apologies…
UPDATE March 23 2010 - Version of COM Shim wizards for VS 2010 is now available
Another question is how to get a working 32-bit shim wizard to work with 64-bit of Office. That’s the question that I want to address in this post.
The environment I am working in is as follows:
- Windows 7 64-bit
- Visual Studio 2008 RTM
- Excel 2010 64-bit (Release Candidate of Microsoft Office Professional Plus 2010 64-bit)
For the information on why it is important to isolate shared add-ins using COM shim please refer to this article. You can find here all the details why and how you need to digitally sign the shim and also how shim provides certain level of isolation for the managed add-in by placing it in a separate AppDomain.
There is a separate article explaining the architecture of the shimmed solution and also shows how to use the COM Shim Wizards to easily create shim around your existing managed add-in.
The first thing I am going to do is create a simple Shared Add-In for Excel 2010 called DemoTest so if you already know how to do this then just skip this part.
Creating basic shared add-in
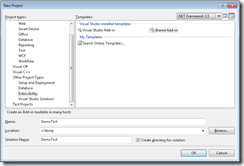
In VS 2008 I opened the “New Project” dialog and selected “Other Project Types” –> “Extensibility” –> “Shared Add-in”:
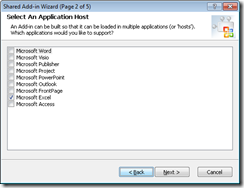
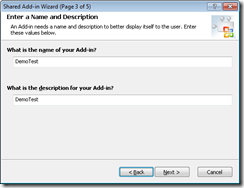
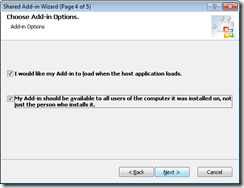
Here are the options that I have selected in the Shared Add-In Wizard :
Upon wizard completion I can see 2 projects created for me: DemoTest and DemoTestSetup
So, the first thing that I want to see is my add-in running. To do that I will add a simple message box to the OnConnection method, compile and start up Excel.
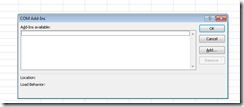
Well, I did not see the message box and looking at Excel’s “COM Add-Ins” dialog I can see that Excel has no idea it needs to load an add-in:
Calling upon my psychic powers I conclude that the add-in is only registered for 32-bit Office and so 64-bit Office is completely oblivious to it. Time to do some registry hacking!
<start registry hacking>
Open regedit tool and navigate to HKEY_LOCAL_MACHINE\SOFTWARE\Wow6432Node\Microsoft\Office\Excel\Addins\DemoTest.Connect, right click on this key and export it into a .reg file e.g. %temp%\addin.reg%
Next, let’s open HKEY_CLASSES_ROOT\DemoTest.Connect\CLSID key and notice that the (Default) value of this key on my machine is {DD16A145-E2F0-40B9-9993-5018BA8B64B3} (NOTICE: this value must be different for you. In fact, it must be unique for every add-in. During project creation such unique value is created and stored as the value of the Guid attribute on the Connect class in Connect.cs). In order to reduce the confusion I will further refer to this cryptic string as just a bunch of Xs e.g. {XXXX}.
Now let’s open HKEY_CLASSES_ROOT\Wow6432Node\CLSID\{XXXX} key and export it to %temp%\clsid.reg
Using notepad.exe open %temp%\addin.reg, remove all occurrences of Wow6432Node\ and save the file, repeat for %temp%\clsid.reg
Go back to regedit. Use File->Import command to import %temp%\addin.reg first, then repeat the same with %temp%\clsid.reg
<end registry hacking>
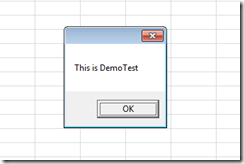
Opening Excel 2010 now produces the desired result – our little message box shows up:
This exercise shows that pure IL code is platform agnostic - same exact assembly will run without recompilation in both 32- and 64-bit Office processes. Unfortunately, this is not the case with native code and since COM shim for the managed add-in is written in native code it needs to be recompiled.
Creating a 64-bit shim for the basic shared add-in
Now, for myriad of reasons mentioned elsewhere, we need to shim the add-in. I have already re-read the article Andrew Whitechapel and I wrote a while ago (and I am assuming you’ve done so as well so that we are on the same page) and now I am able to zoom through all the options of the COM shim wizard to create my shim project. Once the wizard is completed we now have 2 new projects added to our solution:
- ManagedAggregator
- DemoTestShim
Important: check out the fixes to the code that you are getting from the wizards – COM Shim 2.3.1.0 Bug Fixes fixes are located at the very bottom of the article
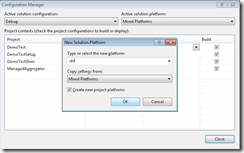
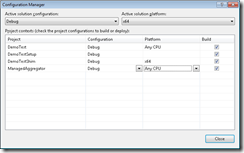
Notice that our solution builds 3 DLLs: 2 managed (both are platform agnostic) and 1 native (this one is currently targeting 32-bit platforms). Now we need to configure our solution so that we can build 64-bit native DLL . To do that we need to use Configuration Manager (available through the menu Build –> Configuration Manager …). In the “Active Solution” combo box select “<New…>” and this will bring up the New Solution Platform dialog where you need to select the platform you want to target. Here are the choices I made:
Once you press ‘OK’ all the project in your new x64 configuration will now target x64 – we want to revert both managed projects back to target Any CPU.
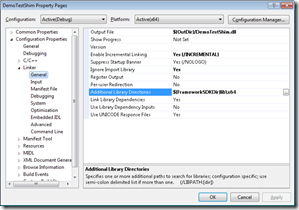
Now, we are almost ready to compile the project. One little thing that is left to do is to fix the location where Framework and Windows SDK libraries are picked up from for 64-bit compilation. So, right click on DemoTestShim project, select Properties and navigate to Configuration Properties -> Linker -> General
Find "Additional Library Properties" setting and append "\x64" to the already existing "$(FrameworkSDKDir)lib" to make it "$(FrameworkSDKDir)lib\x64"
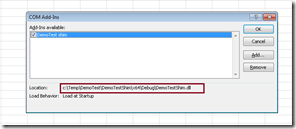
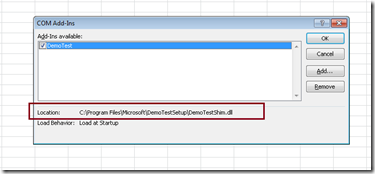
Now let’s compile and run Excel, bring up the COM Add-Ins dialog and we can see that our add-in is being loaded through the 64 bit shim we just compiled
Fixing up the deployment project
Let’s not forget about the setup project that is there for us. By making the right adjustments we can get a nice MSI that is capable of deploying our shimmed add-in to 64-bit consumers.
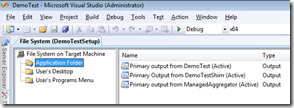
First of all, I opened the File System view for the deployment project (DemoTestSetup) and added the outputs for both the DemoTestShim and the ManagedAggregator projects to the Application Folder
I also verified that none of these components will be self-registering by setting the Register property for each one of these to vsdrpDoNotRegister.
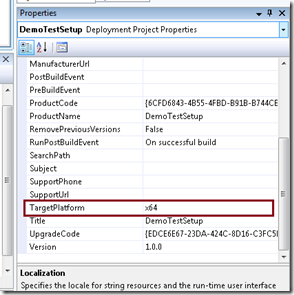
Next, I specified that my setup package is targeting x64 platform (TargetPlatform=x64). Additionally, I want this package to be installed for All Users on a machine (InstallAllUsers=True).
One last thing that is left to do is to add the correct registry keys to the Registry View. The the registry view that I currently have only contains the HKLM\Software\Microsoft\Office\Excel\AddIns\DemoTest.Connect
We are missing HKCR\DemoTest.Connect key and HKCR\CLSID\{XXXX} key. To add both of these keys:
1. Open regedit and navigate to HKCR\CLSID\{XXXX}
2. Right click and export this registry key to %temp%\clsid.reg
3. In Registry View in VS right click on Registry on Target Machine, click Import … and select %temp%\clsid.reg
4. Modify the (Default) value for CLSID\{XXXX}\InprocServer32 to point to the location where the shim will be installed. For me I need to change c :\Temp\DemoTest\DemoTestShim\x64\Debug\DemoTestShim.dll to [TARGETDIR]DemoTestShim.dll
5. Open regedit and navigate to HKCR\DemoTest.Connect and export it to %temp%\progid.reg
6. Back in VS’s Registry View import %temp%\progid.reg
That’s it! The deployment project should be ready.
Installing and Running the packaged add-in
Let’s compile the entire solution, right click on the DemoTestSetup project node in the Solution Explorer , choose “Install…” and complete the installation process.
Now open Excel and see your add-in happily loaded through the shim that was installed under %ProgramFiles% folder!
Happy shimming to everyone, now available on 64-bit! My sample solution is attached for all your exploratory needs.
Comments
Anonymous
February 25, 2010
Thanks so much for this, Misha. This will finally allow us to actually develop and deploy shimmed 64-bit addins for Office 2010 applications. This is very much appreciated. Ken Slovak MVP-OutlookAnonymous
February 25, 2010
Misha, Highly appreciated! Kind regards, DennisAnonymous
February 28, 2010
Hi; We have a copy of the shims where we added the functionality on an error that it puts up a MessageBox listing the problem. That has saved as an immense amount of time as a silent failure on a customers system is impossible to troubleshoot. I'm happt to give it to you to roll into your official release. Would you like it? thanks - daveAnonymous
March 01, 2010
Dave, Thanks, anyhelp is welcome! I am not sure when/where/how the official release will happen (if any), but if you think it is useful code you can post it as a comment here or as acomment to the MSDN blog post. I obviously will need to take a look at this first, so no guarantees.Anonymous
June 30, 2010
The comment has been removedAnonymous
July 25, 2010
Hi ,one more question plz.Is that possible to upgrade from Without Shim Project to a COm Shim ProjectAnonymous
November 04, 2010
Hi, Thank you for your very useful article and wizard software. How can I add a function in this add-in and use it in Excel 2010 x64 right inside sheet cells? Thanks, Amir.Anonymous
April 06, 2011
The comment has been removedAnonymous
June 23, 2011
Hi, Methods of ConnectProxy return HRESULT. Does Office writes down them some were? ThanksAnonymous
January 24, 2013
Thanks Misha for valuable information. Please clarify, same deployment fixes ( "adding registry keys to the Registry View") are required for 32 bit deployment setup also?.
