Register an Office Add-in that uses single sign-on (SSO) with the Microsoft identity platform
This article explains how to register an Office Add-in with the Microsoft identity platform so that you can use SSO. Register the add-in when you begin developing it so that when you progress to testing or production, you can change the existing registration or create separate registrations for development, testing, and production versions of the add-in.
The following table itemizes the information that you need to carry out this procedure and the corresponding placeholders that appear in the instructions.
| Information | Examples | Placeholder |
|---|---|---|
| A human readable name for the add-in. (Uniqueness recommended, but not required.) | Contoso Marketing Excel Add-in (Prod) |
<add-in-name> |
| An application ID which Azure generates for you as part of the registration process. | c6c1f32b-5e55-4997-881a-753cc1d563b7 |
<app-id> |
The fully qualified domain name (except for protocol) of the add-in. You must use a domain that you own. For this reason, you cannot use certain well-known domains such as azurewebsites.net or cloudapp.net. The domain must be the same, including any subdomains, as is used in the URLs in the <Resources> section of the add-in's manifest. |
localhost:6789, addins.contoso.com |
<fully-qualified-domain-name> |
The permissions to the Microsoft identity platform and Microsoft Graph that your add-in needs. (profile is always required.) |
profile, Files.Read.All |
N/A |
Caution
Sensitive information: The application ID URI (<fully-qualified-domain-name>) is logged as part of the authentication process when an add-in using SSO is activated in Office running inside of Microsoft Teams. The URI mustn't contain sensitive information.
Register the add-in with Microsoft identity platform
You need to create an app registration in Azure that represents your web server. This enables authentication support so that proper access tokens can be issued to the client code in JavaScript. This registration supports both SSO in the client, and fallback authentication using the Microsoft Authentication Library (MSAL).
Sign in to the Azure portal with the admin credentials to your Microsoft 365 tenancy. For example, MyName@contoso.onmicrosoft.com.
Select App registrations. If you don't see the icon, search for "app registration" in the search bar.
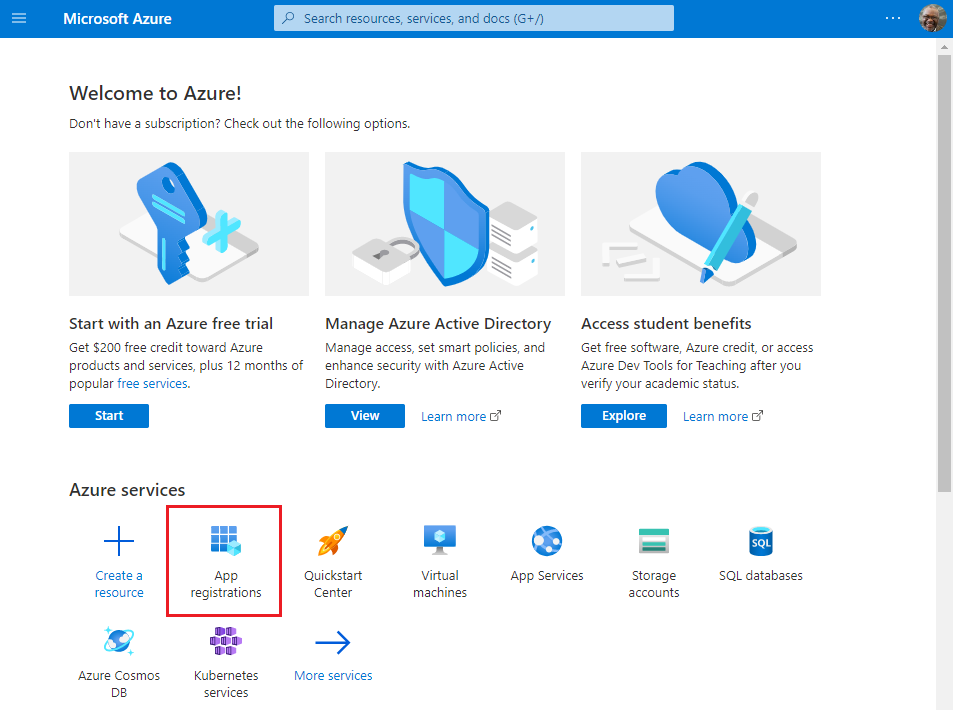
The App registrations page appears.
Select New registration.
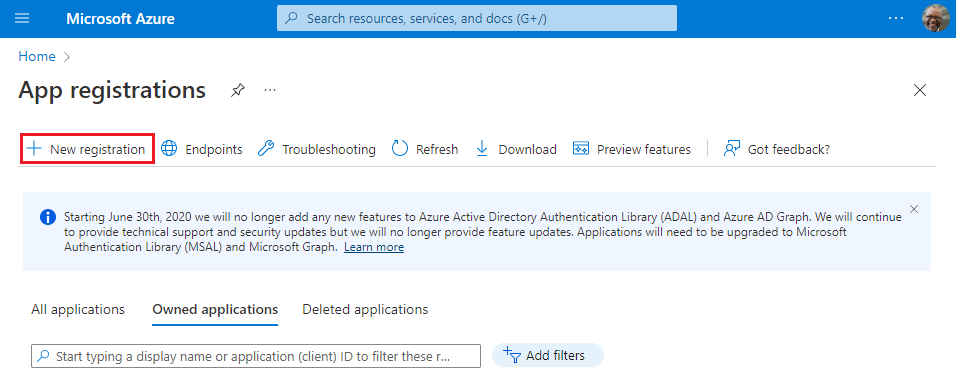
The Register an application page appears.
On the Register an application page, set the values as follows.
- Set Name to
<add-in-name>. - Set Supported account types to Accounts in any organizational directory (any Azure AD directory - multitenant) and personal Microsoft accounts (e.g. Skype, Xbox).
- Set Redirect URI to use the platform Single-page application (SPA) and the URI to
https://<fully-qualified-domain-name>/dialog.html.
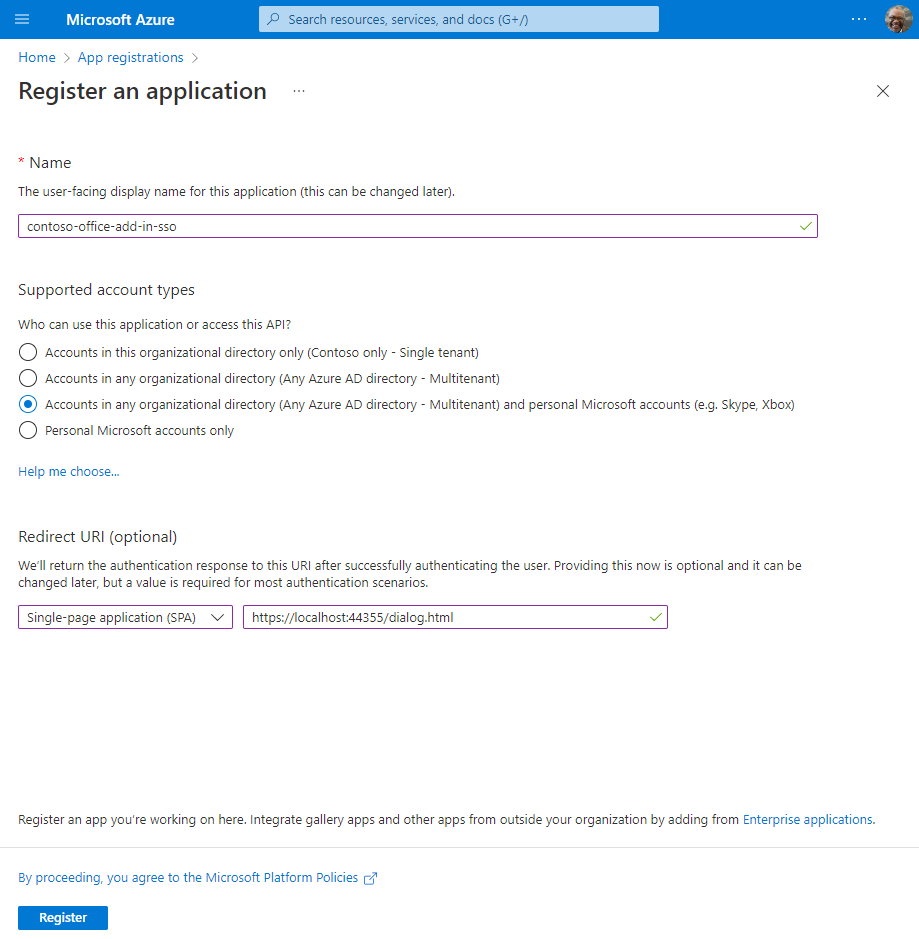
- Set Name to
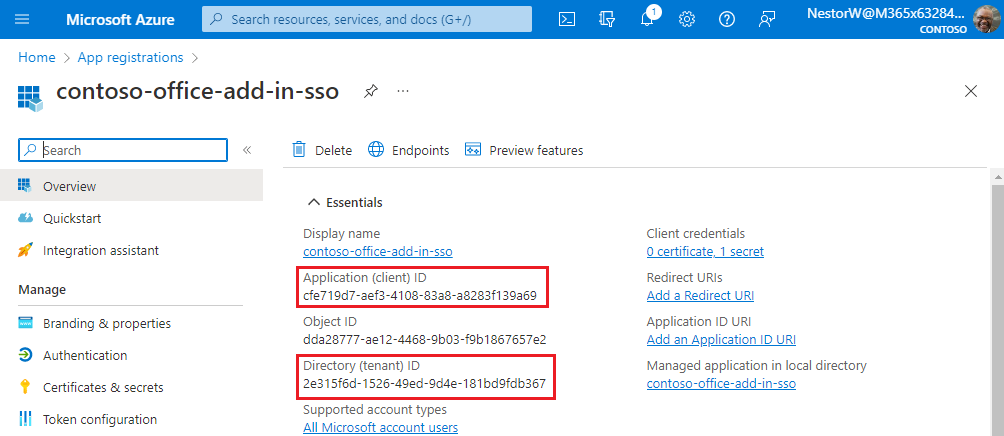
Select Register. A message is displayed stating that the application registration was created.

Copy and save the values for the Application (client) ID and the Directory (tenant) ID. You'll use both of them in later procedures.
Add a client secret
Sometimes called an application password, a client secret is a string value your app can use in place of a certificate to identity itself.
From the left pane, select Certificates & secrets. Then on the Client secrets tab, select New client secret.
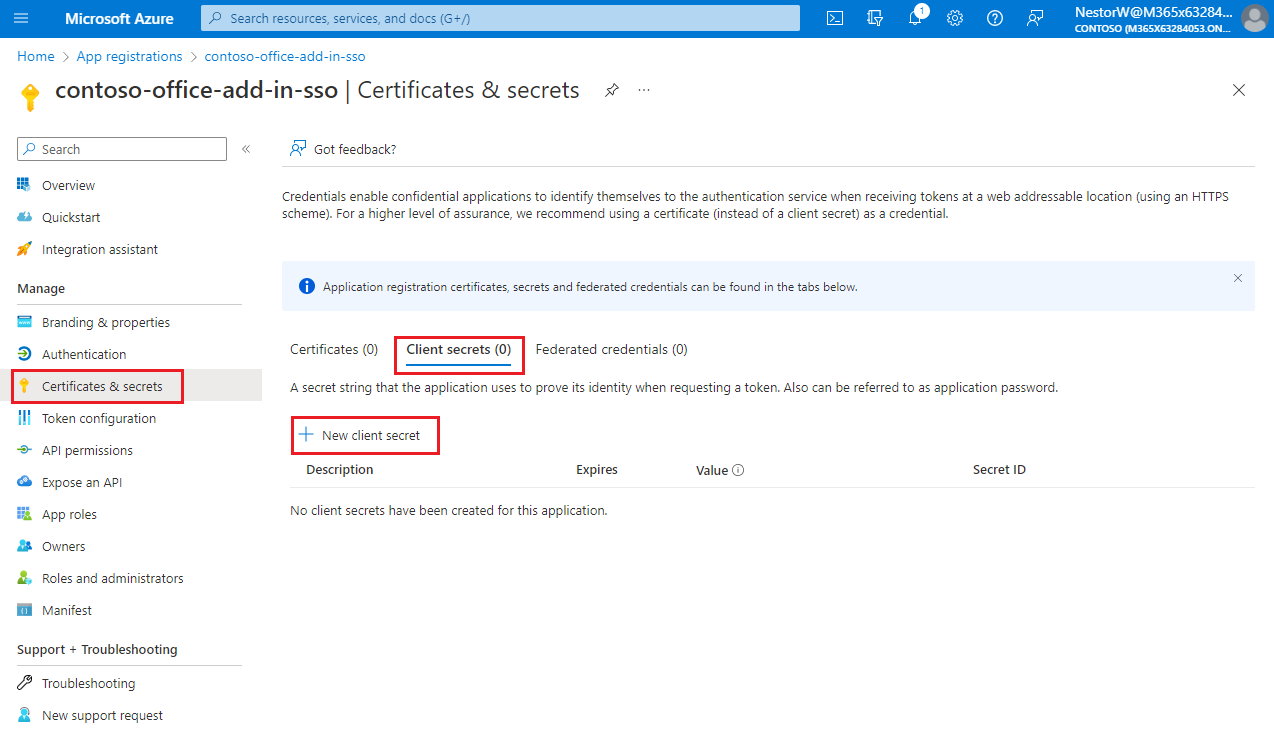
The Add a client secret pane appears.
Add a description for your client secret.
Select an expiration for the secret or specify a custom lifetime.
- Client secret lifetime is limited to two years (24 months) or less. You can't specify a custom lifetime longer than 24 months.
- Microsoft recommends that you set an expiration value of less than 12 months.

Select Add. The new secret is created and the value is temporarily displayed.
Important
Record the secret's value for use in your client application code. This secret value is never displayed again after you leave this pane.
Expose a web API
From the left pane, select Expose an API.
The Expose an API pane appears.
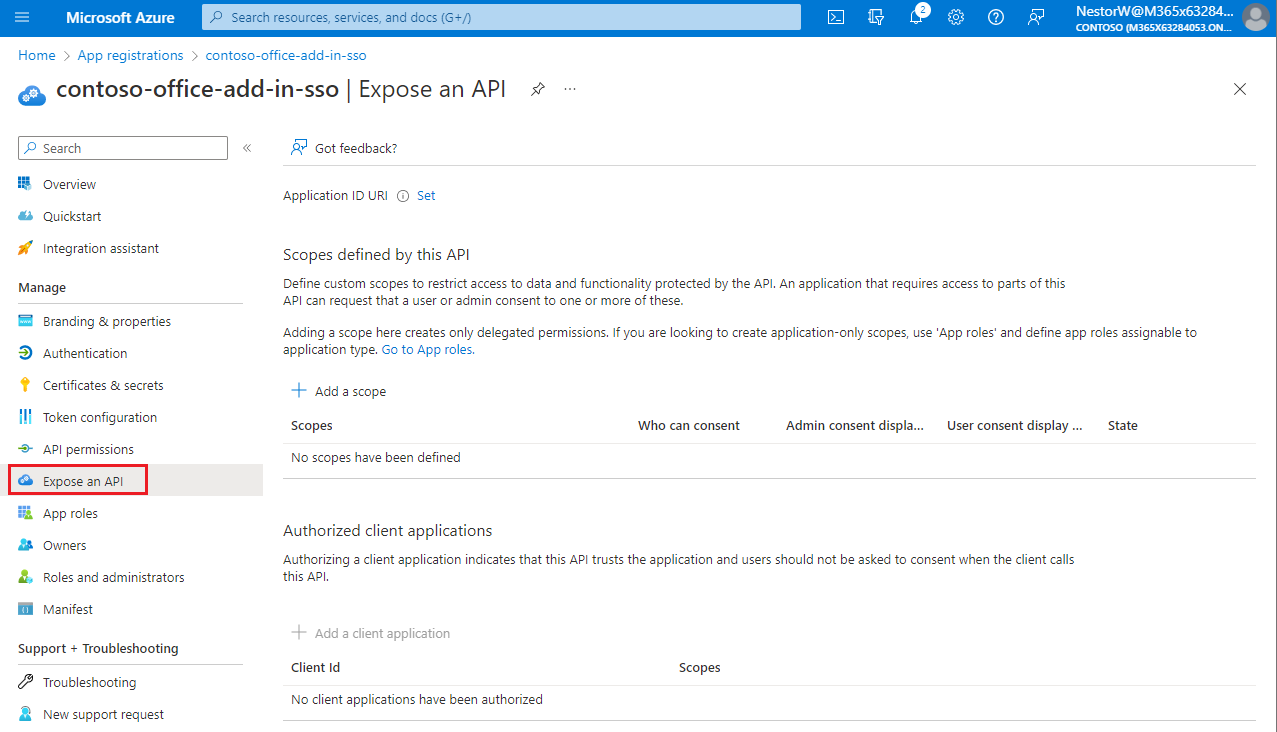
Select Set to generate an application ID URI.
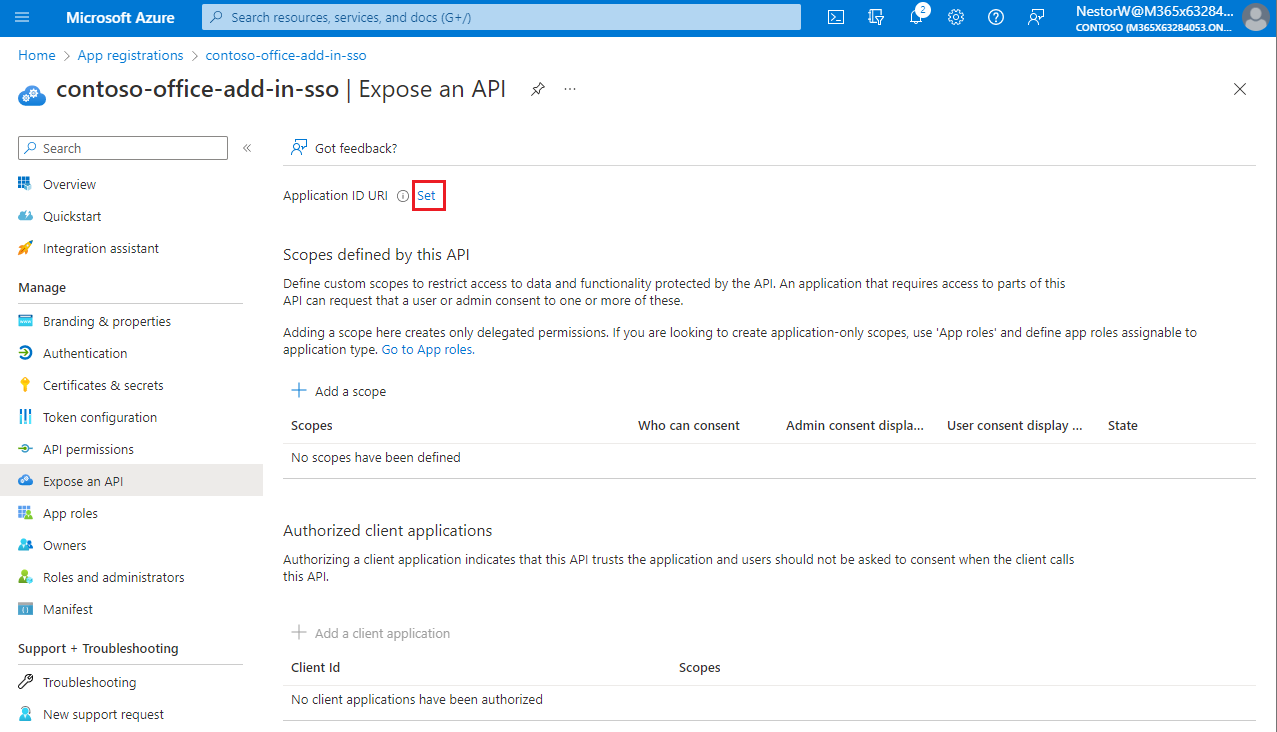
The section for setting the application ID URI appears with a generated Application ID URI in the form
api://<app-id>.Update the application ID URI to
api://<fully-qualified-domain-name>/<app-id>.
- The Application ID URI is pre-filled with app ID (GUID) in the format
api://<app-id>. - The application ID URI format should be:
api://<fully-qualified-domain-name>/<app-id> - Insert the
fully-qualified-domain-namebetweenapi://and<app-id>(which is a GUID). For example,api://contoso.com/<app-id>. - If you're using localhost, then the format should be
api://localhost:<port>/<app-id>. For example,api://localhost:3000/c6c1f32b-5e55-4997-881a-753cc1d563b7.
For additional application ID URI details, see Application manifest identifierUris attribute.
Note
If you get an error saying that the domain is already owned but you own it, follow the procedure at Quickstart: Add a custom domain name to Azure Active Directory to register it, and then repeat this step. (This error can also occur if you are not signed in with credentials of an admin in the Microsoft 365 tenancy. See step 2. Sign out and sign in again with admin credentials and repeat the process from step 3.)
- The Application ID URI is pre-filled with app ID (GUID) in the format
Add a scope
On the Expose an API page, select Add a scope.
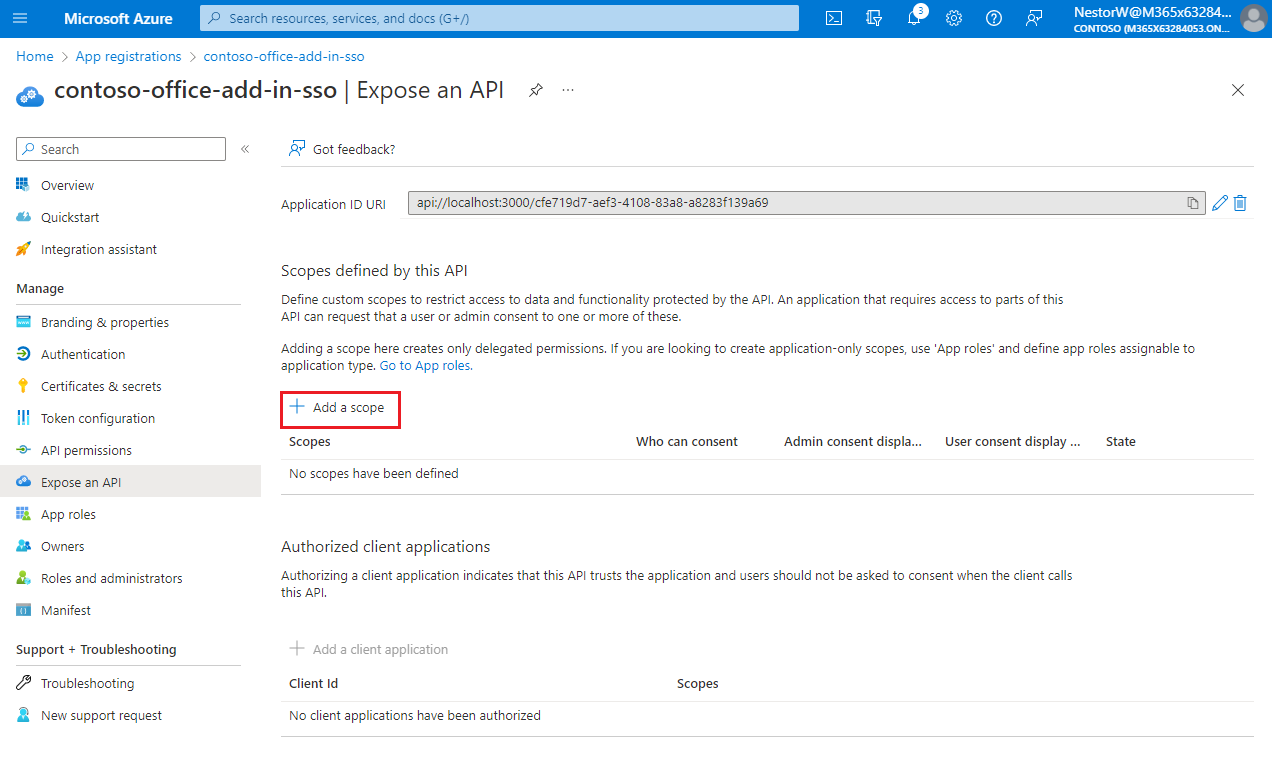
The Add a scope pane opens.
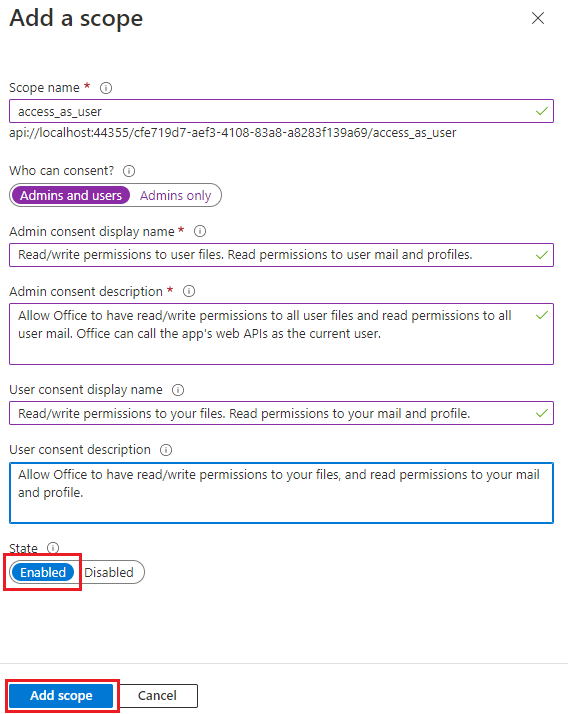
In the Add a scope pane, specify the scope's attributes. The following table shows example values for and Outlook add-in requiring the
profile,openid,Files.ReadWrite, andMail.Readpermissions. Modify the text to match the permissions your add-in needs.Field Description Values Scope name The name of your scope. A common scope naming convention is resource.operation.constraint.For SSO this must be set to access_as_user.Who can consent Determines if admin consent is required or if users can consent without an admin approval. For learning SSO and samples, we recommend you set this to Admins and users.
Select Admins only for higher-privileged permissions.Admin consent display name A short description of the scope's purpose visible to admins only. Read/write permissions to user files. Read permissions to user mail and profiles.Admin consent description A more detailed description of the permission granted by the scope that only admins see. Allow Office to have read/write permissions to all user files and read permissions to all user mail. Office can call the app's web APIs as the current user.User consent display name A short description of the scope's purpose. Shown to users only if you set Who can consent to Admins and users. Read/write permissions to your files. Read permissions to your mail and profile.User consent description A more detailed description of the permission granted by the scope. Shown to users only if you set Who can consent to Admins and users. Allow Office to have read/write permissions to your files, and read permissions to your mail and profile.Set the State to Enabled, and then select Add scope.
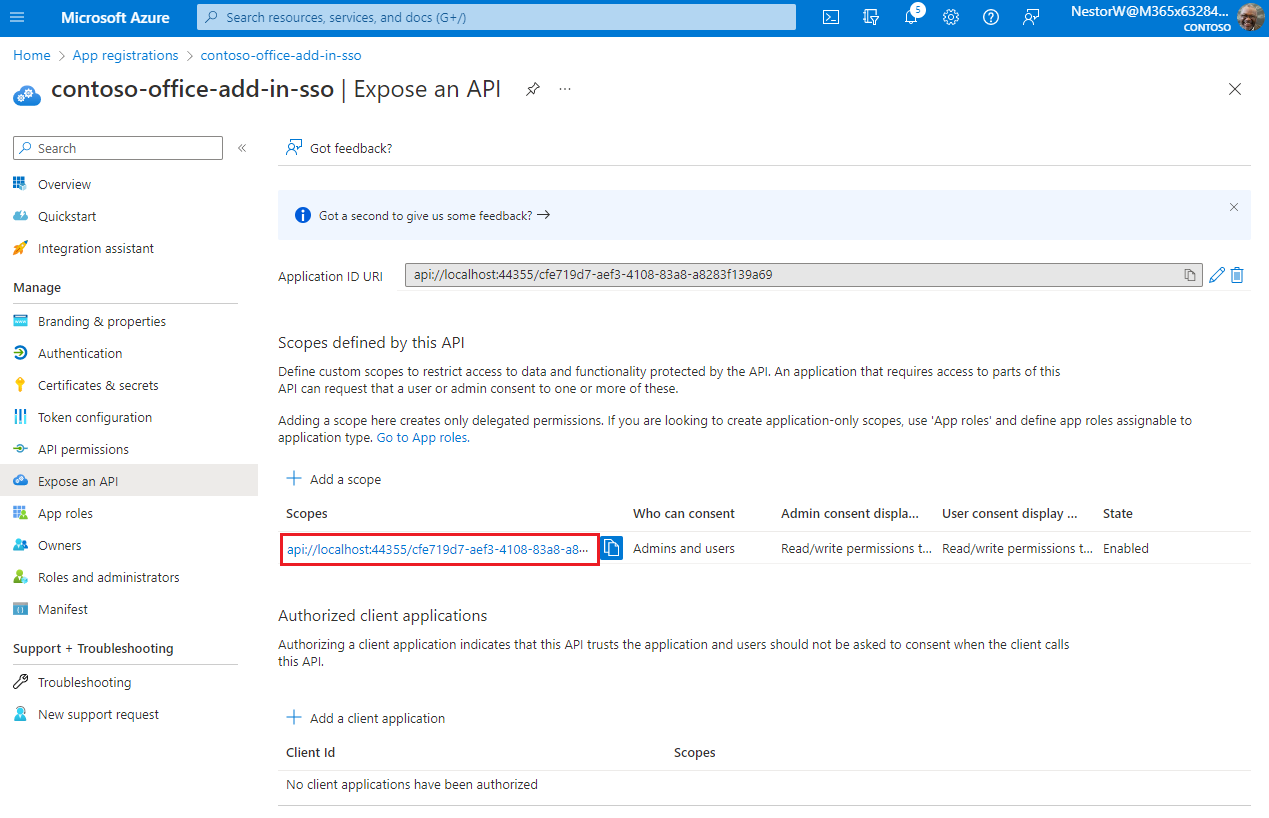
The new scope you defined displays on the pane.
Note
The domain part of the Scope name displayed just below the text field should automatically match the Application ID URI set in the previous step, with
/access_as_userappended to the end; for example,api://localhost:6789/c6c1f32b-5e55-4997-881a-753cc1d563b7/access_as_user.Select Add a client application.
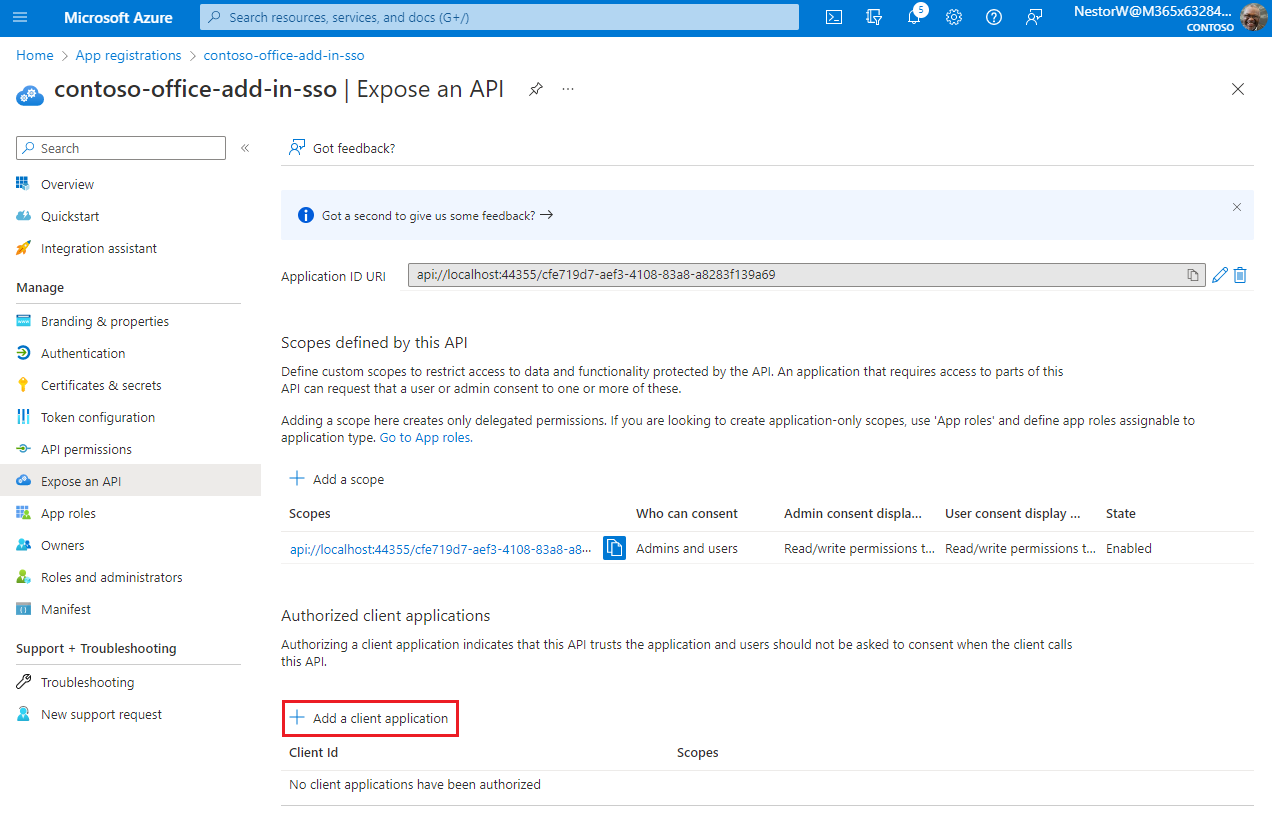
The Add a client application pane appears.
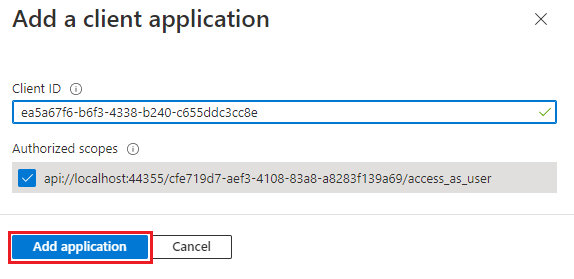
In the Client ID enter
ea5a67f6-b6f3-4338-b240-c655ddc3cc8e. This value pre-authorizes all Microsoft Office application endpoints. If you also want to pre-authorize Office when used inside of Microsoft Teams, add1fec8e78-bce4-4aaf-ab1b-5451cc387264(Microsoft Teams desktop and Teams mobile) and5e3ce6c0-2b1f-4285-8d4b-75ee78787346(Teams on the web).Note
The
ea5a67f6-b6f3-4338-b240-c655ddc3cc8eID pre-authorizes Office on all the following platforms. Alternatively, you can enter a proper subset of the following IDs if, for any reason, you want to deny authorization to Office on some platforms. If you do so, leave out the IDs of the platforms from which you want to withhold authorization. Users of your add-in on those platforms will not be able to call your Web APIs, but other functionality in your add-in will still work.d3590ed6-52b3-4102-aeff-aad2292ab01c(Microsoft Office)93d53678-613d-4013-afc1-62e9e444a0a5(Office on the web)bc59ab01-8403-45c6-8796-ac3ef710b3e3(Outlook on the web)
In Authorized scopes, select the
api://<fully-qualified-domain-name>/<app-id>/access_as_usercheckbox.Select Add application.
Add Microsoft Graph permissions
From the left pane, select API permissions.
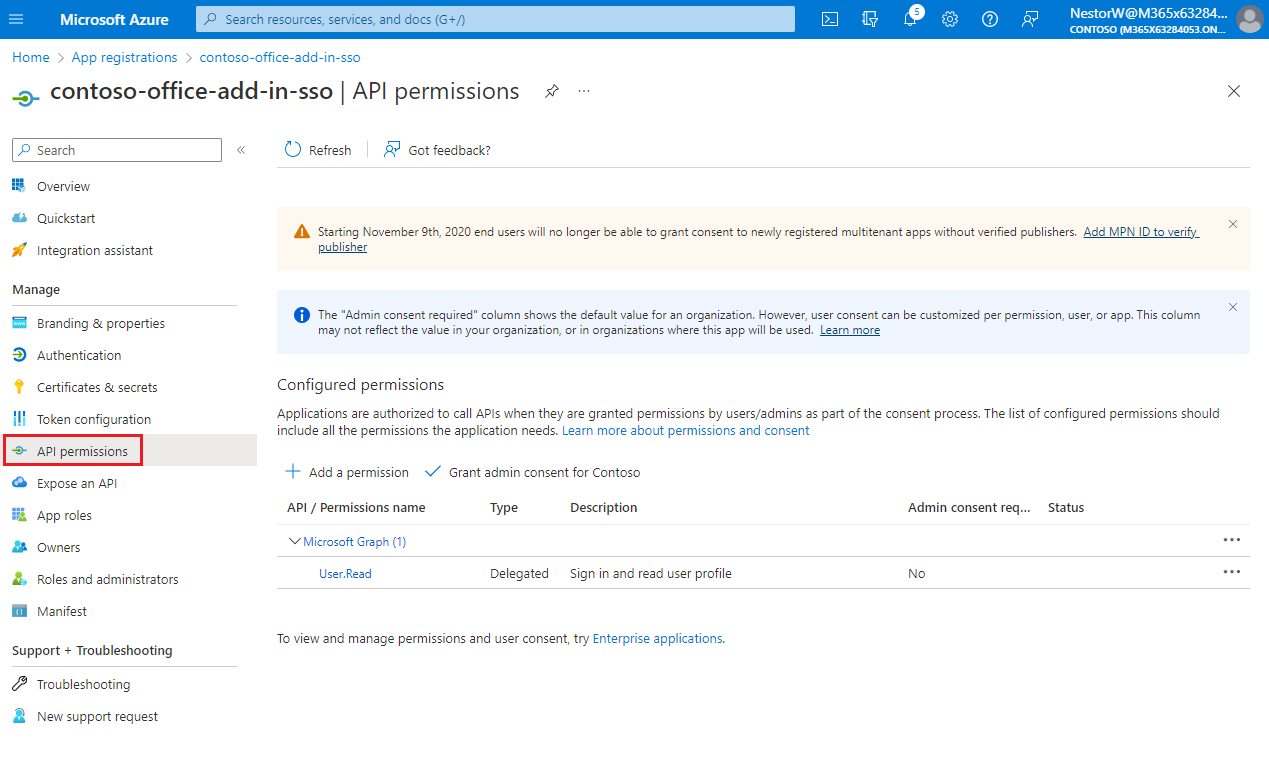
The API permissions pane opens.
Select Add a permission.
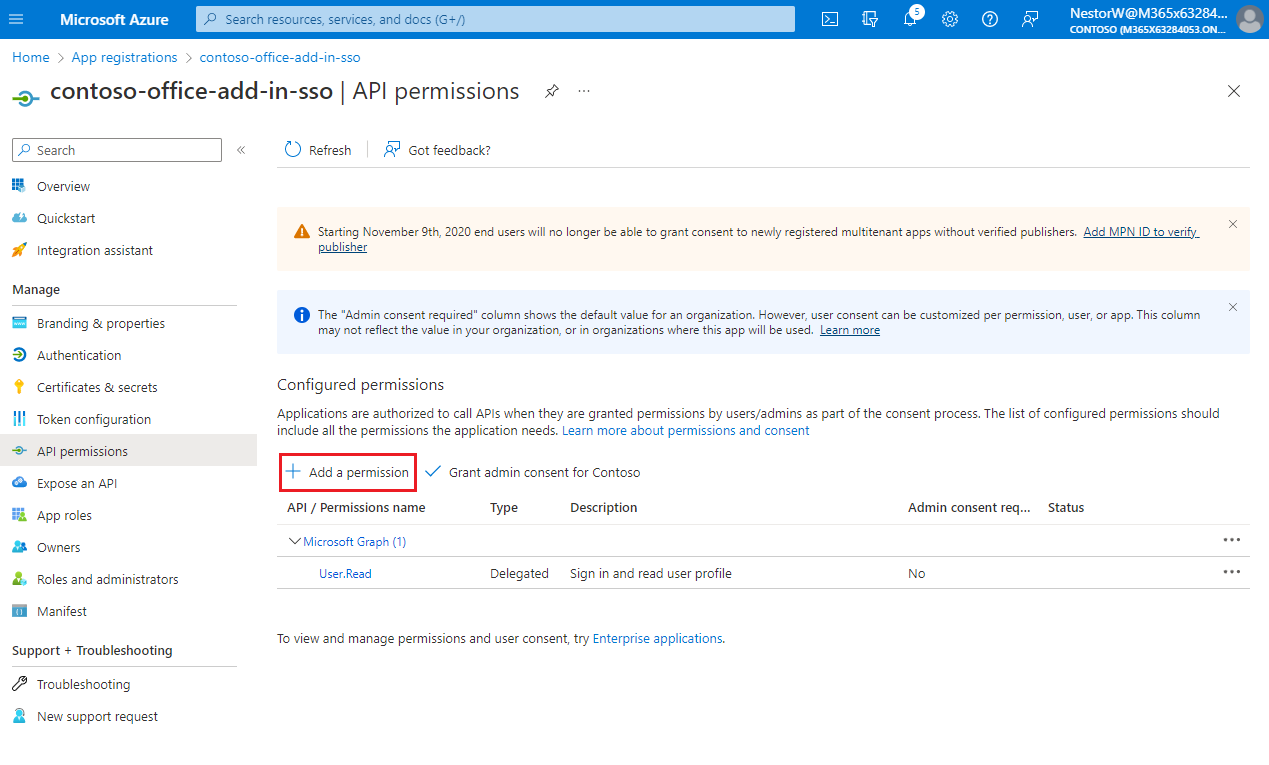
The Request API permissions pane opens.
Select Microsoft Graph.
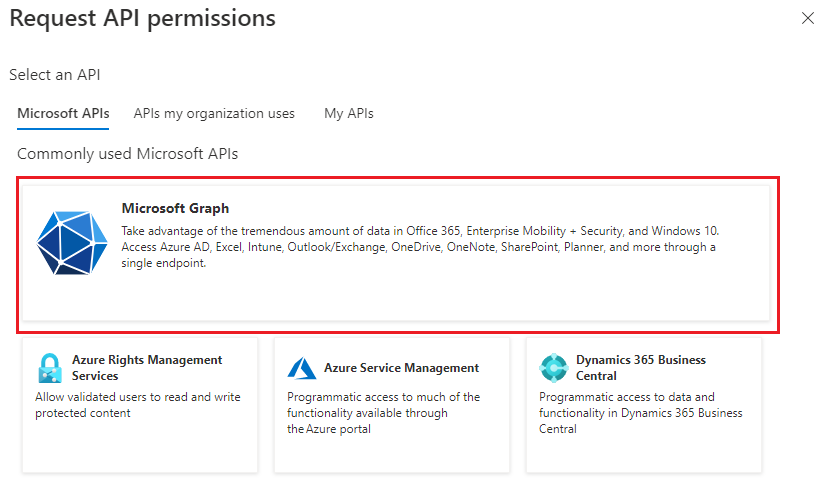
Select Delegated permissions.

In the Select permissions search box, search for the permissions your add-in needs. For example, for an Outlook add-in, you might use
profile,openid,Files.ReadWrite, andMail.Read.Note
The
User.Readpermission may already be listed by default. It's a good practice to only request permissions that are needed, so we recommend that you uncheck the box for this permission if your add-in doesn't actually need it.Select the checkbox for each permission as it appears. Note that the permissions will not remain visible in the list as you select each one. After selecting the permissions that your add-in needs, select Add permissions.
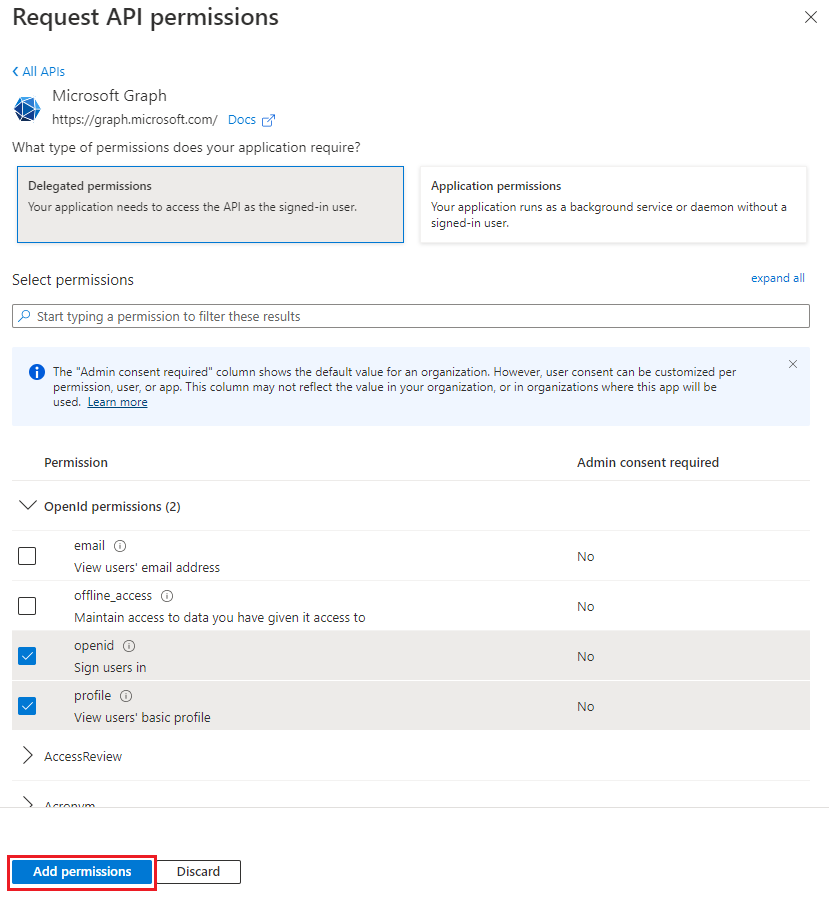
Select Grant admin consent for [tenant name]. Select Yes for the confirmation that appears.
Configure access token version
You must define the access token version that is acceptable for your app. This configuration is made in the Azure Active Directory application manifest.
Define the access token version
The access token version can change if you chose an account type other than Accounts in any organizational directory (Any Azure AD directory - Multitenant) and personal Microsoft accounts (e.g. Skype, Xbox). Use the following steps to ensure the access token version is correct for Office SSO usage.
From the left pane, select Manifest.
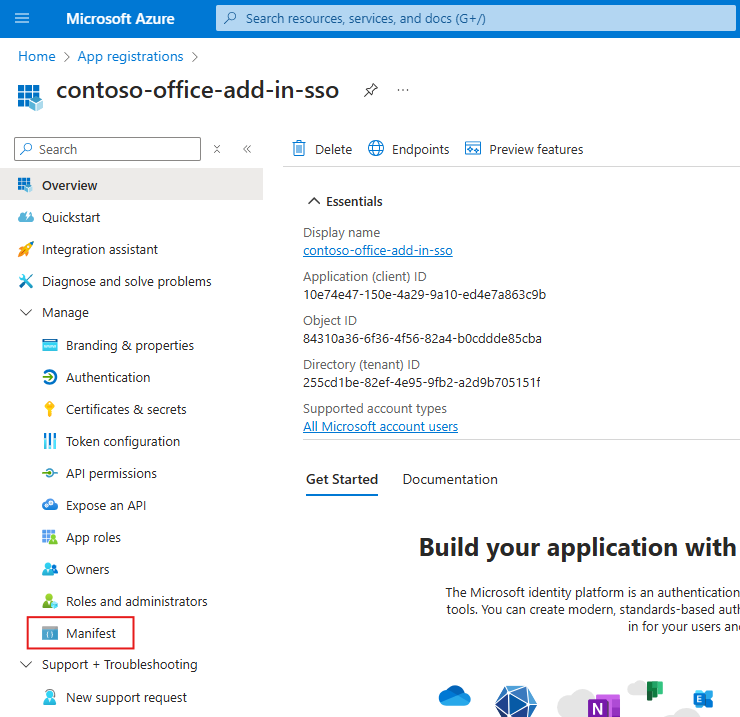
The Azure Active Directory application manifest appears.
Enter 2 as the value for the
requestedAccessTokenVersionproperty (in theapiobject).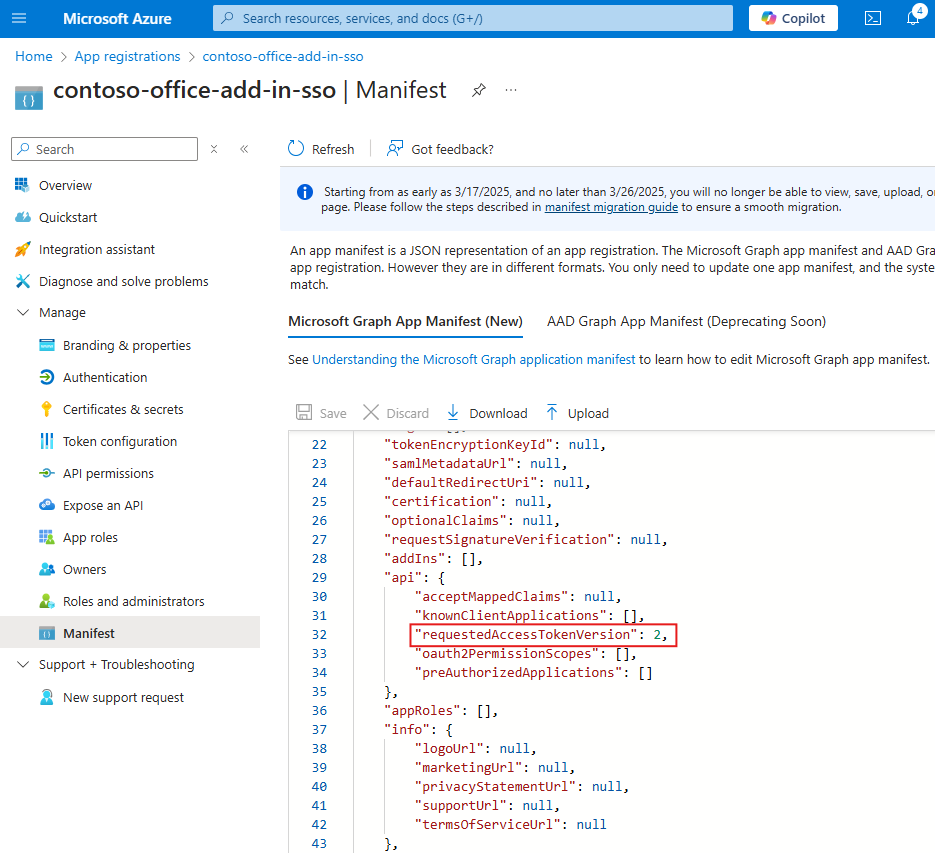
Select Save.
A message pops up on the browser stating that the manifest was updated successfully.

Congratulations! You've completed the app registration to enable SSO for your Office add-in.