Coding4Fun tutorial: creating a 3D WebGL procedural QRCode maze with Babylon.js
In this tutorial, you should have a lot of fun. You’ll learn how to create a 3D Maze using Babylon.js/WebGL based on a dynamically generated QR Code! This is based on a demo I’ve written for our big annual French conference named Techdays 2014 and more specifically for our famous Coding4Fun session. The idea was to create a maze for the one you love during the Valentine’s Day. Indeed, isn’t it cool to create a 3D procedural maze in the name for your girlfriend/wife? ![]()
Yes, this is our famous geeks’ touch in action my friend!
The name of this demo is “Le labyrinthe de l’amour”. (The love maze). I’ve kept it in French as we all know that Paris is the city of love!
Here is a video of the demo in action:
To launch & test the final result, click on the below image:

Logo Credits: Michel Rousseau
Or simply click here: Launch Le labyrinthe de l’amour.
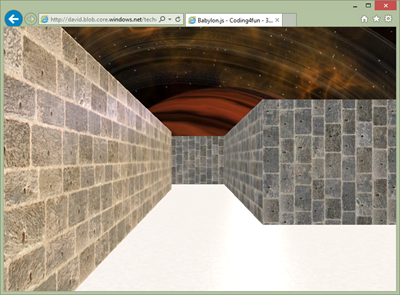
Then, enter the name of your girlfriend and click “Create”. You’ll be able to move into the maze dedicated to your beloved using the arrow keys & mouse. Press the “space” key to launch a specific camera’s animation, and you’ll be able to view the QRCode. Flash it using your smartphone and you should see “ [NameOfYourGirlFriend], I love you! ”. Your girlfriend should be impressed. ;-) It’s much better than flowers or chocolates to my point of view!
You’ll also notice also that if you click on the “isolated cube”, it will throw them into space. I’ve setup the physics engine on them to add a dramatic moment. Stay calm! Thanks to the 30% error correction algorithm, you’ll still be able to flash QR Code most of the time. ;-)
Pre-requisites
To be able to follow this tutorial, it’s better if you first read the following tutorials/articles/wiki:
- Download the last version Babylon.js: and cannon.js: https://github.com/BabylonJS/Babylon.js & https://schteppe.github.io/cannon.js/
- Learn about materials: the StandardMaterial for your babylon.js game & 04 Materials
- Learn about lights: Using lights in your babylon.js game
- Learn about basic meshes like boxes: 02 Basic elements
- Learn about skyboxes: 15 Environment
- Learn about animations: 07-Animation
- See how to enable physics: Using webgl and a physics engine (babylon.js & cannon.js)
Even, if I’ll briefly re-explain some of the concepts.
To generate the QRCode, we’re going also to use an existing very cool library named qrcode.js created by Jerome Etienne and available on github: https://jeromeetienne.github.com/jquery-qrcode/
This tutorial is just a combination of all these resources! ![]()
Step 1: creating our playground
Create a web project using your favorite tool (mine is Visual Studio 2013) on your favorite web server.
Create a new “index.html” file at the root of the project and put this code inside it:
 <!DOCTYPE html>
<html>
<head>
    <title>Babylon.js - Coding4fun - 3D QRCode Maze</title>
    <link href="css/main.css" rel="stylesheet" />
    <script src="scripts/qrcode.js"></script>
    <script src="scripts/cannon.js"></script>
    <script src="scripts/babylon.js"></script>
    <script src="scripts/coding4fun.js"></script>
</head>
<body>
    <canvas id="canvas" class="offScreen"></canvas>
</body>
</html>
Create a “scripts” folder and put the 3 library you have downloaded in the pre-requisites: babylon.js, cannon.js & qrcode.js.
Create a “css” folder and put a “main.css” file into it with the following content:
 html, body, #canvas {
    width: 100%;
    height: 100%;
    padding: 0;
    margin: 0;
    overflow: hidden;
    touch-action: none;
}
Download the “textures” folder from here: textures.zip and add it to your web project resources. These are the assets we’re going to use for this tutorial.
Create a “coding4fun.js” file into “scripts” and put this base of code into it:
 /// <reference path="babylon.js" />

"use strict";

// Size of a cube/block
var BLOCK_SIZE = 8;
// Are we inside the maze or looking at the QR Code in bird view?
var QRCodeView = false;
var freeCamera, canvas, engine, lovescene;
var camPositionInLabyrinth, camRotationInLabyrinth;

function createQRCodeMaze(nameOfYourGirlFriend) {
    //number of modules count or cube in width/height
    var mCount = 33;

    var scene = new BABYLON.Scene(engine);
    scene.gravity = new BABYLON.Vector3(0, -0.8, 0);
    scene.collisionsEnabled = true;

    freeCamera = new BABYLON.FreeCamera("free", new BABYLON.Vector3(0, 5, 0), scene);
    freeCamera.minZ = 1;
    freeCamera.checkCollisions = true;
    freeCamera.applyGravity = true;
    freeCamera.ellipsoid = new BABYLON.Vector3(1, 1, 1);

    // Ground
    var groundMaterial = new BABYLON.StandardMaterial("groundMat", scene);
    groundMaterial.emissiveTexture = new BABYLON.Texture("textures/arroway.de_tiles-35_d100.jpg", scene);
    groundMaterial.emissiveTexture.uScale = mCount;
    groundMaterial.emissiveTexture.vScale = mCount;
    groundMaterial.bumpTexture = new BABYLON.Texture("textures/arroway.de_tiles-35_b010.jpg", scene);
    groundMaterial.bumpTexture.uScale = mCount;
    groundMaterial.bumpTexture.vScale = mCount;
    groundMaterial.specularTexture = new BABYLON.Texture("textures/arroway.de_tiles-35_s100-g100-r100.jpg", scene);
    groundMaterial.specularTexture.uScale = mCount;
    groundMaterial.specularTexture.vScale = mCount;

    var ground = BABYLON.Mesh.CreateGround("ground", (mCount + 2) * BLOCK_SIZE,
                                                     (mCount + 2) * BLOCK_SIZE,
                                                      1, scene, false);
    ground.material = groundMaterial;
    ground.checkCollisions = true;

    //Skybox
    var skybox = BABYLON.Mesh.CreateBox("skyBox", 800.0, scene);
    var skyboxMaterial = new BABYLON.StandardMaterial("skyBox", scene);
    skyboxMaterial.backFaceCulling = false;
    skyboxMaterial.reflectionTexture = new BABYLON.CubeTexture("textures/skybox", scene);
    skyboxMaterial.reflectionTexture.coordinatesMode = BABYLON.Texture.SKYBOX_MODE;
    skyboxMaterial.diffuseColor = new BABYLON.Color3(0, 0, 0);
    skyboxMaterial.specularColor = new BABYLON.Color3(0, 0, 0);
    skybox.material = skyboxMaterial;

    //At Last, add some lights to our scene
    var light0 = new BABYLON.PointLight("pointlight0", new BABYLON.Vector3(28, 78, 385), scene);
    light0.diffuse = new BABYLON.Color3(0.5137254901960784, 0.2117647058823529, 0.0941176470588235);
    light0.intensity = 0.2;

    var light1 = new BABYLON.PointLight("pointlight1", new BABYLON.Vector3(382, 96, 4), scene);
    light1.diffuse = new BABYLON.Color3(1, 0.7333333333333333, 0.3568627450980392);
    light1.intensity = 0.2;

    //TO DO: create the labyrinth

    return scene;
};

window.onload = function () {
    canvas = document.getElementById("canvas");

    if (!BABYLON.Engine.isSupported()) {
        window.alert('Browser not supported');
    } else {
        engine = new BABYLON.Engine(canvas, true);

        window.addEventListener("resize", function () {
            engine.resize();
        });

        lovescene = createQRCodeMaze("Jane Doe");
        // Enable keyboard/mouse controls on the scene (FPS like mode)
        lovescene.activeCamera.attachControl(canvas);

        engine.runRenderLoop(function () {
            lovescene.render();
        });
    }
};
Well, the code should be relatively straightforward and self-explicit. We’re creating a ground and enabling collisions & gravity on the free camera. You can then move on the ground without flying into the air or falling though the ground. We’re also creating a skybox to create our universe surrounding us as well as 2 lights with colors taken from the skybox.
You can test this first scene here in your WebGL browser: Love Maze - Step 1
It’s currently a simple & boring scene. Let’s add some fun to it.
Step 2: it’s all about cubes
Our maze is going to be built from a set of simple cubes. 1 cube will be associated to 1 dark pixel of the QR Code.
But let’s first create a unique simple cube. Add this code after the “TODO”:
 // The position of our cube:
var row = 15;
var col = 20;

var cubeWallMaterial = new BABYLON.StandardMaterial("cubeWalls", scene);
cubeWallMaterial.emissiveTexture = new BABYLON.Texture("textures/masonry-wall-texture.jpg", scene);
cubeWallMaterial.bumpTexture = new BABYLON.Texture("textures/masonry-wall-bump-map.jpg", scene);
cubeWallMaterial.specularTexture = new BABYLON.Texture("textures/masonry-wall-normal-map.jpg", scene);

var mainCube = BABYLON.Mesh.CreateBox("mainCube", BLOCK_SIZE, scene);
mainCube.material = cubeWallMaterial;
mainCube.checkCollisions = true;
mainCube.position = new BABYLON.Vector3(BLOCK_SIZE / 2 + (row - (mCount / 2)) * BLOCK_SIZE, BLOCK_SIZE / 2,
                                        BLOCK_SIZE / 2 + (col - (mCount / 2)) * BLOCK_SIZE);
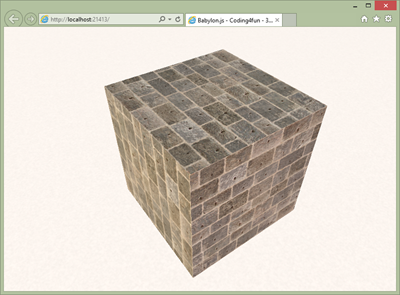
You’ll see this cube and by moving the camera, you shouldn’t be able to go through thanks to the native collisions engine embedded into babylon.js:
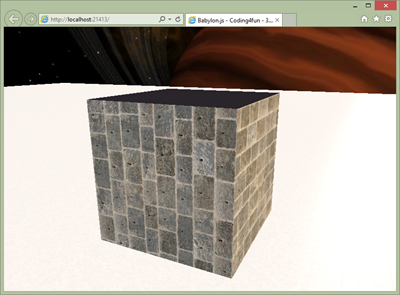
But if you’re disabling the gravity on the freeCamera object and you’re moving the camera above the cube, you’ll see that its top doesn’t have the proper material set yet for our future QR Code recognition algorithm:
We need to have a different material for the top. For that, we’re going to use the multi-materials approach of babylon.js: Using multi-materials using this code:
 var row = 15;
var col = 20;

var cubeTopMaterial = new BABYLON.StandardMaterial("cubeTop", scene);
cubeTopMaterial.emissiveColor = new BABYLON.Color3(0.1, 0.1, 0.15);

var cubeWallMaterial = new BABYLON.StandardMaterial("cubeWalls", scene);
cubeWallMaterial.emissiveTexture = new BABYLON.Texture("textures/masonry-wall-texture.jpg", scene);
cubeWallMaterial.bumpTexture = new BABYLON.Texture("textures/masonry-wall-bump-map.jpg", scene);
cubeWallMaterial.specularTexture = new BABYLON.Texture("textures/masonry-wall-normal-map.jpg", scene);

var cubeMultiMat = new BABYLON.MultiMaterial("cubeMulti", scene);
cubeMultiMat.subMaterials.push(cubeTopMaterial);
cubeMultiMat.subMaterials.push(cubeWallMaterial);

var soloCube = BABYLON.Mesh.CreateBox("mainCube", BLOCK_SIZE, scene);
soloCube.subMeshes = [];
soloCube.subMeshes.push(new BABYLON.SubMesh(0, 0, 4, 0, 6, soloCube));
soloCube.subMeshes.push(new BABYLON.SubMesh(1, 4, 20, 6, 30, soloCube));

// same as soloCube.rotation.x = -Math.PI / 2;
// but cannon.js needs rotation to be set via Quaternion
soloCube.rotationQuaternion = BABYLON.Quaternion.RotationYawPitchRoll(0, -Math.PI / 2, 0);
soloCube.material = cubeMultiMat;
soloCube.checkCollisions = true;
soloCube.position = new BABYLON.Vector3(BLOCK_SIZE / 2 + (row - (mCount / 2)) * BLOCK_SIZE, BLOCK_SIZE / 2,
                                        BLOCK_SIZE / 2 + (col - (mCount / 2)) * BLOCK_SIZE);
Note: as you can read, I’m turning the cube using Quaternion rather directly working on rotation.x. It’s because cannon.js needs to have the information set this way. If you’re setting it the other way, cannon.js will not take into account your rotation transformations. Oh yes, and I’m doing a rotation of the cube because otherwise the specific face with the top material associated is pointing down.
And here is the result:
Test the result of this step 2 here: Love Maze - Step 2
Step 3: creating the 3D QRCode maze
We’re now going to call the qrcode.js library to build the QR Code based on a specific text. This library normally needs a div to inject into. We’ll give it a fake div element. Then, it builds the QR Code and draw the output into the div. I was more interested in the 2-D array built inside it. This array represents the complete QR Code by a series of rather dark or white pixels.
In conclusion, replace in your code the mCount variable declaration by this:
 // It needs a HTML element to work with
var qrcode = new QRCode(document.createElement("div"), { width: 400, height: 400 });

qrcode.makeCode(nameOfYourGirlFriend + ", I love you!");

// needed to set the proper size of the playground
var mCount = qrcode._oQRCode.moduleCount;
Then, here is the loop creating the complete maze:
 for (var row = 0; row < mCount; row++) {
    for (var col = 0; col < mCount; col++) {
        if (qrcode._oQRCode.isDark(row, col)) {
            var soloCube = BABYLON.Mesh.CreateBox("mainCube", BLOCK_SIZE, scene);
            soloCube.subMeshes = [];
            soloCube.subMeshes.push(new BABYLON.SubMesh(0, 0, 4, 0, 6, soloCube));
            soloCube.subMeshes.push(new BABYLON.SubMesh(1, 4, 20, 6, 30, soloCube));
            // same as soloCube.rotation.x = -Math.PI / 2;
            // but cannon.js needs rotation to be set via Quaternion
            soloCube.rotationQuaternion = BABYLON.Quaternion.RotationYawPitchRoll(0, -Math.PI / 2, 0);
            soloCube.material = cubeMultiMat;
            soloCube.checkCollisions = true;
            soloCube.position = new BABYLON.Vector3(BLOCK_SIZE / 2 + (row - (mCount / 2)) * BLOCK_SIZE,
                                                    BLOCK_SIZE / 2,
                                                    BLOCK_SIZE / 2 + (col - (mCount / 2)) * BLOCK_SIZE);
        }
    }
}

var x = BLOCK_SIZE / 2 + (7 - (mCount / 2)) * BLOCK_SIZE;
var y = BLOCK_SIZE / 2 + (1 - (mCount / 2)) * BLOCK_SIZE;
freeCamera.position = new BABYLON.Vector3(x, 5, y);
I’m setting the camera position to a specific place in the QR Code I know it will always be empty.
Test the result of this step 3 here: Love Maze - Step 3
Step 4: optimization with cloning
Currently, in our loop, we’re creating the very same object up to 500 times. A better approach is to create the geometry once and then clone it. It’s better for the memory consumption and for the performance. The CPU will send a unique geometry to the GPU. GPU will then clone this geometry as needed without asking more information from the CPU. It could be an important point especially on mobile devices. It could also have an impact on the rendering performance. In my case, my base geometry (a cube) is far too simple to have an immediate performance boost just thanks to cloning. But this doesn’t mean you shouldn’t do it every time you will duplicate the very same mesh.
More interestingly, during a game, it’s also much faster to instantiate a clone (of an enemy for instance) rather than creating it again from scratch. If you’re spawning a new enemy during your game by creating it without the cloning mechanism, you’ll probably have some fps drops. In conclusion, this is really a best practice to use cloning if you need to duplicate several times the very same mesh.
Here is the code for that:
 var soloCube = BABYLON.Mesh.CreateBox("mainCube", BLOCK_SIZE, scene);
soloCube.subMeshes = [];
soloCube.subMeshes.push(new BABYLON.SubMesh(0, 0, 4, 0, 6, soloCube));
soloCube.subMeshes.push(new BABYLON.SubMesh(1, 4, 20, 6, 30, soloCube));
soloCube.rotationQuaternion = BABYLON.Quaternion.RotationYawPitchRoll(0, -Math.PI / 2, 0);
soloCube.material = cubeMultiMat;
soloCube.checkCollisions = true;
soloCube.setEnabled(false);

var cube;

for (var row = 0; row < mCount; row++) {
    for (var col = 0; col < mCount; col++) {
        if (qrcode._oQRCode.isDark(row, col)) {
            cube = soloCube.clone("ClonedCube" + row + col);
            cube.position = new BABYLON.Vector3(BLOCK_SIZE / 2 + (row - (mCount / 2)) * BLOCK_SIZE,
                                                BLOCK_SIZE / 2,
                                                BLOCK_SIZE / 2 + (col - (mCount / 2)) * BLOCK_SIZE);
        }
    }
}
Step 5: performance optimization by merging meshes
Maybe you’ll notice than even if we don’t have a lot of triangles currently being displayed, the performance are not stellar. This is because we have a lot of small objects and thus small operations associated to them. We’re then spending too much time between the CPU and the GPU. The CPU is doing a lot of roundtrips with the GPU to send the orders for the 500+ potential cubes to be displayed. It’s much more efficient to send a big mesh from the CPU to the GPU and then ask for specific operations on this big mesh (rotation, scaling, lights, etc.).
The idea is then to merge all the generated cubes into a big mesh. It will really enhance the global rendering performance.
Let’s launch the F12 UI Responsiveness tool of IE11 to check the current results before merging meshes:
The average fps is around 30 fps. And the CPU usage reaches 100% which tends to prove that the CPU is doing more work than expected.
Insert the merging function into your code by copy/pasting it from our wiki: How to merge meshes.
And now use this code to generate the optimized maze:
 var topCube = BABYLON.Mesh.CreatePlane("ground", BLOCK_SIZE, scene, false);
topCube.material = cubeTopMaterial;
topCube.rotation.x = Math.PI / 2;
topCube.setEnabled(false);

var cube, top;
var cubesCollection = [];
var cubesTopCollection = [];

for (var row = 0; row < mCount; row++) {
    for (var col = 0; col < mCount; col++) {
        if (qrcode._oQRCode.isDark(row, col)) {
            cube = soloCube.clone("ClonedCube" + row + col);
            cube.position = new BABYLON.Vector3(BLOCK_SIZE / 2 + (row - (mCount / 2)) * BLOCK_SIZE,
                                                BLOCK_SIZE / 2,
                                                BLOCK_SIZE / 2 + (col - (mCount / 2)) * BLOCK_SIZE);

            top = topCube.clone("TopClonedCube" + row + col);
            top.position = new BABYLON.Vector3(BLOCK_SIZE / 2 + (row - (mCount / 2)) * BLOCK_SIZE,
                                                BLOCK_SIZE + 0.05,
                                                BLOCK_SIZE / 2 + (col - (mCount / 2)) * BLOCK_SIZE);

            cubesCollection.push(cube);
            cubesTopCollection.push(top);
        }
    }
}

var maze = mergeMeshes("maze", cubesCollection, scene);
maze.checkCollisions = true;
maze.material = cubeWallMaterial;

var mazeTop = mergeMeshes("mazeTop", cubesTopCollection, scene);
mazeTop.material = cubeTopMaterial;
Note: as you can see, I’m creating a special merged mesh with some plane elements to put just above the merged cubes. It’s to have a simple solution to handle multi-materials in this case.
Now, let’s analyze the gain with IE11 F12:
You’ll immediately see that the CPU usage has drop dramatically and we now have an average fps around 60 fps.
Test the result of this step 5 here: Love Maze - Step 5
You can verify the performance boost in your browser/machine with the previous version in step 3.
Step 6: animating the camera
To be able to view the QR Code from the space and flash it with your smartphone, we need to change the current camera position and rotation to a specific place. Rather than jumping directly to this specific position, let’s animate the camera from its current place in the maze to the best position in the space for flashing.
For that, let’s add this simple function:
 var animateCameraPositionAndRotation = function (freeCamera, fromPosition, toPosition,
                                                 fromRotation, toRotation) {

    var animCamPosition = new BABYLON.Animation("animCam", "position", 30,
                              BABYLON.Animation.ANIMATIONTYPE_VECTOR3,
                              BABYLON.Animation.ANIMATIONLOOPMODE_CYCLE);

    var keysPosition = [];
    keysPosition.push({
        frame: 0,
        value: fromPosition
    });
    keysPosition.push({
        frame: 100,
        value: toPosition
    });

    animCamPosition.setKeys(keysPosition);

    var animCamRotation = new BABYLON.Animation("animCam", "rotation", 30,
                              BABYLON.Animation.ANIMATIONTYPE_VECTOR3,
                              BABYLON.Animation.ANIMATIONLOOPMODE_CYCLE);

    var keysRotation = [];
    keysRotation.push({
        frame: 0,
        value: fromRotation
    });
    keysRotation.push({
        frame: 100,
        value: toRotation
    });

    animCamRotation.setKeys(keysRotation);
    freeCamera.animations.push(animCamPosition);
    freeCamera.animations.push(animCamRotation);

    scene.beginAnimation(freeCamera, 0, 100, false);
};
Let’s now call this function to animate our camera when the user will press the “space” key:
 window.addEventListener("keydown", function (event) {
    if (event.keyCode === 32) {
        if (!QRCodeView) {
            QRCodeView = true;
            // Saving current position & rotation in the maze
            camPositionInLabyrinth = freeCamera.position;
            camRotationInLabyrinth = freeCamera.rotation;
            animateCameraPositionAndRotation(freeCamera, freeCamera.position,
                new BABYLON.Vector3(16, 400, 15),
                freeCamera.rotation,
                new BABYLON.Vector3(1.4912565104551518, -1.5709696842019767,freeCamera.rotation.z));
        }
        else {
            QRCodeView = false;
            animateCameraPositionAndRotation(freeCamera, freeCamera.position,
                camPositionInLabyrinth, freeCamera.rotation, camRotationInLabyrinth);
        }
        freeCamera.applyGravity = !QRCodeView;
    }
}, false);
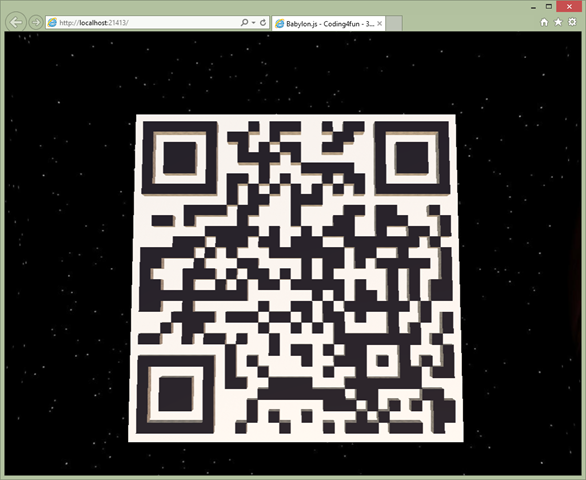
Now, launch your code and press the “space” bar, you should obtain this view:
Using my Windows Phone native QR Code app, it works! ![]()
Step 7: enabling physics on isolated cubes
In this last part of the tutorial, we’re going to see how to enable some physics on isolated cubes (cubes without direct neighbors on their left/right/up/down direction). Then, we’ll see how to select a mesh by clicking it and apply some impulse force to throw these isolated cubes in the space.
First, you need to enable physics on the scene:
scene.enablePhysics(new BABYLON.Vector3(0, 0, 0));
In my case, I’m setting a zero gravity as we’re supposed to be in space. Then, you need to define the various impostor for the ground and the isolated boxes.
Enabling physics on our ground:
 ground.setPhysicsState({ impostor: BABYLON.PhysicsEngine.PlaneImpostor, mass: 0,
                         friction: 0.5, restitution: 0.7 });
And here is the new loop checking if the cube is isolated and setting up physics properties on it:
 var mainCube = BABYLON.Mesh.CreateBox("mainCube", BLOCK_SIZE, scene);
mainCube.material = cubeWallMaterial;
mainCube.checkCollisions = true;
mainCube.setEnabled(false);

var cube, top;
var cubesCollection = [];
var cubesTopCollection = [];
var cubeOnLeft, cubeOnRight, cubeOnUp, cubeOnDown;

for (var row = 0; row < mCount; row++) {
    for (var col = 0; col < mCount; col++) {
        if (qrcode._oQRCode.isDark(row, col)) {
            var cubePosition = new BABYLON.Vector3(BLOCK_SIZE / 2 + (row - (mCount / 2)) * BLOCK_SIZE,
                                                    BLOCK_SIZE / 2,
                                                    BLOCK_SIZE / 2 + (col - (mCount / 2)) * BLOCK_SIZE);

            cubeOnLeft = cubeOnRight = cubeOnUp = cubeOnDown = false;
            if (col > 0) {
                cubeOnLeft = qrcode._oQRCode.isDark(row, col - 1)
            }
            if (col < mCount - 1) {
                cubeOnRight = qrcode._oQRCode.isDark(row, col + 1)
            }
            if (row > 0) {
                cubeOnUp = qrcode._oQRCode.isDark(row - 1, col)
            }
            if (row < mCount - 1) {
                cubeOnDown = qrcode._oQRCode.isDark(row + 1, col)
            }

            if (cubeOnLeft || cubeOnRight || cubeOnUp || cubeOnDown) {
                cube = mainCube.clone("Cube" + row + col);
                cube.position = cubePosition.clone();
                top = topCube.clone("TopCube" + row + col);
                top.position = cubePosition.clone();
                top.position.y = BLOCK_SIZE + 0.05;
                cubesCollection.push(cube);
                cubesTopCollection.push(top);
            }
            else {
                cube = soloCube.clone("SoloCube" + row + col);
                cube.position = cubePosition.clone();
                cube.setPhysicsState({ impostor: BABYLON.PhysicsEngine.BoxImpostor, mass: 2,
                                       friction: 0.4, restitution: 0.3 });
            }
        }
    }
}
Finally, we need to send a ray against the scene targeted by the mouse pointer during the mouse down event. If a mesh is selected, we’re applying a force impulse:
 canvas.addEventListener("mousedown", function (evt) {
    var pickResult = scene.pick(evt.clientX, evt.clientY);
    if (pickResult.hit) {
        var dir = pickResult.pickedPoint.subtract(scene.activeCamera.position);
        dir.normalize();
        pickResult.pickedMesh.applyImpulse(dir.scale(50), pickResult.pickedPoint);
    }
});
If it’s an isolated cube, it will fly into the space forever! Some cubes could interact between each other’s also.
You’ll still be able to flash the QR Code however as I’ve used the default encoding using 30% error correction. Even with some missing flying isolated cube, you can still impressed your girlfriend. ![]()
That’s all folks!
You can download the complete source code contained in this ZIP archive: finalcode.zip
Comments
Anonymous
March 04, 2014
Amazing!Anonymous
December 07, 2014
OMG !!! Thank You So MuchAnonymous
December 12, 2014
The comment has been removedAnonymous
September 29, 2015
ReferenceError: $ is not defined coding4fun.js:196:4Anonymous
March 25, 2016
This is a great tutorial. But there is one thing I cannot figure out:soloCube.subMeshes = [];soloCube.subMeshes.push(new BABYLON.SubMesh(0, 0, 4, 0, 6, soloCube));soloCube.subMeshes.push(new BABYLON.SubMesh(1, 4, 20, 6, 30, soloCube));Can someone explain what exactly happens there?How can I set the right side of the cube to a different color?


