Push Avançado dos Hubs de Notificação do Azure
Visão geral
Para atrair os usuários com conteúdo elaborado instantâneo, um aplicativo talvez queira enviar por push além do texto sem formatação. Essas notificações promovem interações do usuário e apresentam conteúdo, como URLs, sons, imagens/cupons e muito mais. Esse tutorial se baseia no tutorial sobre Notificar Usuários e mostra como enviar notificações por push que incorporam conteúdo (por exemplo, imagem).
Esse tutorial é compatível com iOS 7 e 8.

Em um alto nível:
- O back-end do aplicativo:
- Armazena o conteúdo avançado (nesse caso, imagem) no armazenamento local ou do banco de dados do back-end.
- Envia a ID da notificação avançada para o dispositivo.
- Aplicativo no dispositivo:
- Entra em contato com o back-end solicitando o conteúdo avançado com a ID recebida.
- Envia notificações de usuários no dispositivo quando a recuperação de dados estiver concluída e mostra o conteúdo imediatamente quando os usuários tocam para saber mais.
Projeto WebAPI
No Visual Studio, abra o projeto AppBackend que você criou no tutorial Notificar Usuários .
Obter uma imagem para notificar usuários e colocá-la em uma pasta img no diretório do projeto.
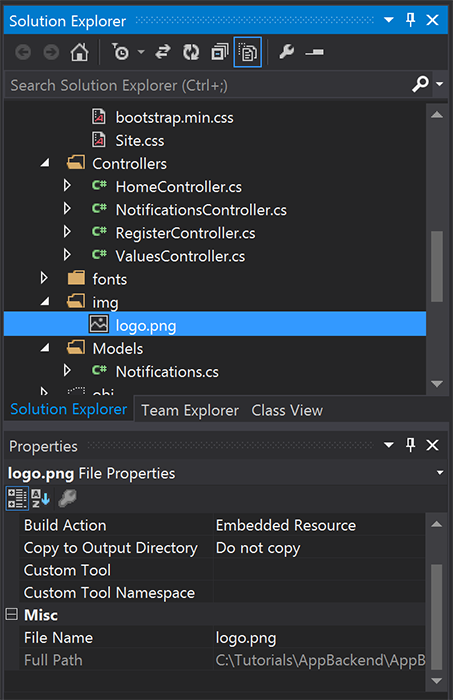
Clique em Mostrar Todos os Arquivos no Gerenciador de Soluções e clique com o botão direito na pasta para Incluir no Projeto.
Com a imagem selecionada, altere a Ação de Compilação na janela Propriedades para Recurso Inserido.

Em
Notifications.cs, adicione a seguinte instruçãousing:using System.Reflection;Substitua a classe
Notificationspelo código a seguir. Certifique-se de substituir os espaços reservados pelas suas credenciais do hub de notificações e o nome do arquivo de imagem:public class Notification { public int Id { get; set; } // Initial notification message to display to users public string Message { get; set; } // Type of rich payload (developer-defined) public string RichType { get; set; } public string Payload { get; set; } public bool Read { get; set; } } public class Notifications { public static Notifications Instance = new Notifications(); private List<Notification> notifications = new List<Notification>(); public NotificationHubClient Hub { get; set; } private Notifications() { // Placeholders: replace with the connection string (with full access) for your notification hub and the hub name from the Azure Classics Portal Hub = NotificationHubClient.CreateClientFromConnectionString("{conn string with full access}", "{hub name}"); } public Notification CreateNotification(string message, string richType, string payload) { var notification = new Notification() { Id = notifications.Count, Message = message, RichType = richType, Payload = payload, Read = false }; notifications.Add(notification); return notification; } public Stream ReadImage(int id) { var assembly = Assembly.GetExecutingAssembly(); // Placeholder: image file name (for example, logo.png). return assembly.GetManifestResourceStream("AppBackend.img.{logo.png}"); } }Em
NotificationsController.cs, redefinaNotificationsControllercom o código a seguir. Isso envia uma ID de notificação avançada silenciosa inicial ao dispositivo e permite a recuperação da imagem pelo cliente:// Return http response with image binary public HttpResponseMessage Get(int id) { var stream = Notifications.Instance.ReadImage(id); var result = new HttpResponseMessage(HttpStatusCode.OK); result.Content = new StreamContent(stream); // Switch in your image extension for "png" result.Content.Headers.ContentType = new System.Net.Http.Headers.MediaTypeHeaderValue("image/{png}"); return result; } // Create rich notification and send initial silent notification (containing id) to client public async Task<HttpResponseMessage> Post() { // Replace the placeholder with image file name var richNotificationInTheBackend = Notifications.Instance.CreateNotification("Check this image out!", "img", "{logo.png}"); var usernameTag = "username:" + HttpContext.Current.User.Identity.Name; // Silent notification with content available var aboutUser = "{\"aps\": {\"content-available\": 1, \"sound\":\"\"}, \"richId\": \"" + richNotificationInTheBackend.Id.ToString() + "\", \"richMessage\": \"" + richNotificationInTheBackend.Message + "\", \"richType\": \"" + richNotificationInTheBackend.RichType + "\"}"; // Send notification to apns await Notifications.Instance.Hub.SendAppleNativeNotificationAsync(aboutUser, usernameTag); return Request.CreateResponse(HttpStatusCode.OK); }Reimplante o aplicativo em um Site do Azure para torná-lo acessível em todos os dispositivos. Clique com o botão direito do mouse no projeto AppBackend e selecione Publicar.
Selecione Site do Azure como o destino de publicação. Entre com a conta do Azure, selecione um site novo ou existente e anote a propriedade URL de destino na guia Conexão. Essa URL será referida como ponto de extremidade de back-end posteriormente neste tutorial. Selecione Publicar.
Modificar o projeto iOS
Após modificar o back-end do aplicativo para enviar apenas a ID de notificação, altere o aplicativo iOS para lidar com essa ID e recuperar a mensagem avançada do seu back-end:
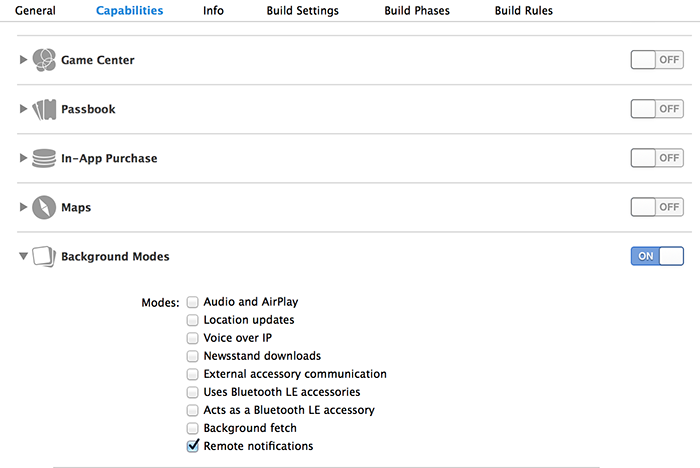
Abra o projeto do iOS e habilite notificações remotas indo para o destino do aplicativo principal na seção Destinos .
Selecione Recursos, habilite os Modos de Segundo Plano e marque a caixa de seleção Notificações Remotas.

Abra o
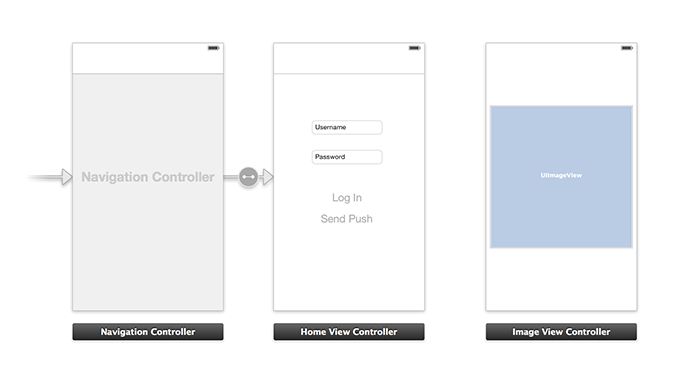
Main.storyboarde verifique se você tem um Controlador de Exibição (chamado neste tutorial de Controlador de Exibição Doméstico) do tutorial Notificar Usuário.Adicione um Controlador de Navegação ao storyboard, mantenha a tecla Control pressionada e arraste o Controlador de Exibição Doméstica para torná-lo a visualização raiz da navegação. Verifique se É o Controlador de Exibição Inicial no Inspetor de atributos está selecionado somente para o Controlador de Navegação.
Adicione um Controlador de Exibição ao storyboard e adicione uma Visualização de Imagem. Esta é a página que os usuários verão quando desejarem saber mais e clicarem na notificação. O storyboard deve ter a seguinte aparência:

Clique no Controlador de Exibição Doméstica no storyboard, verifique se tem homeViewController como a Classe Personalizada e ID do Storyboard abaixo do Inspetor de identidade.
Faça o mesmo para o Controlador de Exibição de Imagem como imageViewController.
Em seguida, crie uma classe de Controlador de Exibição denominada imageViewController para lidar com a interface do usuário que você acabou de criar.
Em imageViewController.h, adicione o código a seguir às declarações de interface do controlador. Certifique-se de manter Control pressionado e arrastar da exibição de imagem do storyboard para essas propriedades para vincular as duas:
@property (weak, nonatomic) IBOutlet UIImageView *myImage;
@property (strong) UIImage* imagePayload;
Em
imageViewController.m, adicione o seguinte ao final deviewDidload:// Display the UI Image in UI Image View [self.myImage setImage:self.imagePayload];Em
AppDelegate.m, importe o controlador de imagem criado:#import "imageViewController.h"Adicione uma seção de interface com a seguinte declaração:
@interface AppDelegate ()

@property UIImage* imagePayload;
@property NSDictionary* userInfo;
@property BOOL iOS8;

// Obtain content from backend with notification id
- (void)retrieveRichImageWithId:(int)richId completion: (void(^)(NSError*)) completion;

// Redirect to Image View Controller after notification interaction
- (void)redirectToImageViewWithImage: (UIImage *)img;

@end
Em
AppDelegate, verifique se o aplicativo está registrado para notificações silenciosas emapplication: didFinishLaunchingWithOptions:// Software version self.iOS8 = [[UIApplication sharedApplication] respondsToSelector:@selector(registerUserNotificationSettings:)] && [[UIApplication sharedApplication] respondsToSelector:@selector(registerForRemoteNotifications)]; // Register for remote notifications for iOS8 and previous versions if (self.iOS8) { NSLog(@"This device is running with iOS8."); // Action UIMutableUserNotificationAction *richPushAction = [[UIMutableUserNotificationAction alloc] init]; richPushAction.identifier = @"richPushMore"; richPushAction.activationMode = UIUserNotificationActivationModeForeground; richPushAction.authenticationRequired = NO; richPushAction.title = @"More"; // Notification category UIMutableUserNotificationCategory* richPushCategory = [[UIMutableUserNotificationCategory alloc] init]; richPushCategory.identifier = @"richPush"; [richPushCategory setActions:@[richPushAction] forContext:UIUserNotificationActionContextDefault]; // Notification categories NSSet* richPushCategories = [NSSet setWithObjects:richPushCategory, nil]; UIUserNotificationSettings *settings = [UIUserNotificationSettings settingsForTypes:UIUserNotificationTypeSound | UIUserNotificationTypeAlert | UIUserNotificationTypeBadge categories:richPushCategories]; [[UIApplication sharedApplication] registerUserNotificationSettings:settings]; [[UIApplication sharedApplication] registerForRemoteNotifications]; } else { // Previous iOS versions NSLog(@"This device is running with iOS7 or earlier versions."); [[UIApplication sharedApplication] registerForRemoteNotificationTypes: UIRemoteNotificationTypeAlert | UIRemoteNotificationTypeBadge | UIRemoteNotificationTypeSound | UIRemoteNotificationTypeNewsstandContentAvailability]; } return YES;Substitua a seguinte implementação por
application:didRegisterForRemoteNotificationsWithDeviceTokenpara considerar as alterações da interface do usuário do storyboard:// Access navigation controller which is at the root of window UINavigationController *nc = (UINavigationController *)self.window.rootViewController; // Get home view controller from stack on navigation controller homeViewController *hvc = (homeViewController *)[nc.viewControllers objectAtIndex:0]; hvc.deviceToken = deviceToken;Em seguida, adicione os métodos a seguir a
AppDelegate.mpara recuperar a imagem do ponto de extremidade e enviar uma notificação local quando a recuperação estiver concluída. Não deixe de substituir o espaço reservado{backend endpoint}pelo seu ponto de extremidade do back-end:NSString *const GetNotificationEndpoint = @"{backend endpoint}/api/notifications"; // Helper: retrieve notification content from backend with rich notification id - (void)retrieveRichImageWithId:(int)richId completion: (void(^)(NSError*)) completion { UINavigationController *nc = (UINavigationController *)self.window.rootViewController; homeViewController *hvc = (homeViewController *)[nc.viewControllers objectAtIndex:0]; NSString* authenticationHeader = hvc.registerClient.authenticationHeader; // Check if authenticated if (!authenticationHeader) return; NSURLSession* session = [NSURLSession sessionWithConfiguration:[NSURLSessionConfiguration defaultSessionConfiguration] delegate:nil delegateQueue:nil]; NSURL* requestURL = [NSURL URLWithString:[NSString stringWithFormat:@"%@/%d", GetNotificationEndpoint, richId]]; NSMutableURLRequest* request = [NSMutableURLRequest requestWithURL:requestURL]; [request setHTTPMethod:@"GET"]; NSString* authorizationHeaderValue = [NSString stringWithFormat:@"Basic %@", authenticationHeader]; [request setValue:authorizationHeaderValue forHTTPHeaderField:@"Authorization"]; NSURLSessionDataTask* dataTask = [session dataTaskWithRequest:request completionHandler:^(NSData *data, NSURLResponse *response, NSError *error) { NSHTTPURLResponse* httpResponse = (NSHTTPURLResponse*) response; if (!error && httpResponse.statusCode == 200) { // From NSData to UIImage self.imagePayload = [UIImage imageWithData:data]; completion(nil); } else { NSLog(@"Error status: %ld, request: %@", (long)httpResponse.statusCode, error); if (error) completion(error); else { completion([NSError errorWithDomain:@"APICall" code:httpResponse.statusCode userInfo:nil]); } } }]; [dataTask resume]; } // Handle silent push notifications when id is sent from backend - (void)application:(UIApplication *)application didReceiveRemoteNotification:(NSDictionary *)userInfo fetchCompletionHandler:(void (^)(UIBackgroundFetchResult result))handler { self.userInfo = userInfo; int richId = [[self.userInfo objectForKey:@"richId"] intValue]; NSString* richType = [self.userInfo objectForKey:@"richType"]; // Retrieve image data if ([richType isEqualToString:@"img"]) { [self retrieveRichImageWithId:richId completion:^(NSError* error) { if (!error){ // Send local notification UILocalNotification* localNotification = [[UILocalNotification alloc] init]; // "5" is arbitrary here to give you enough time to quit out of the app and receive push notifications localNotification.fireDate = [NSDate dateWithTimeIntervalSinceNow:5]; localNotification.userInfo = self.userInfo; localNotification.alertBody = [self.userInfo objectForKey:@"richMessage"]; localNotification.timeZone = [NSTimeZone defaultTimeZone]; // iOS8 categories if (self.iOS8) { localNotification.category = @"richPush"; } [[UIApplication sharedApplication] scheduleLocalNotification:localNotification]; handler(UIBackgroundFetchResultNewData); } else{ handler(UIBackgroundFetchResultFailed); } }]; } // Add "else if" here to handle more types of rich content such as url, sound files, etc. }Para tratar da notificação local anterior, abra o controlador de exibição de imagem em
AppDelegate.mcom os seguintes métodos:// Helper: redirect users to image view controller - (void)redirectToImageViewWithImage: (UIImage *)img { UINavigationController *navigationController = (UINavigationController*) self.window.rootViewController; UIStoryboard *mainStoryboard = [UIStoryboard storyboardWithName:@"Main" bundle: nil]; imageViewController *imgViewController = [mainStoryboard instantiateViewControllerWithIdentifier: @"imageViewController"]; // Pass data/image to image view controller imgViewController.imagePayload = img; // Redirect [navigationController pushViewController:imgViewController animated:YES]; } // Handle local notification sent above in didReceiveRemoteNotification - (void)application:(UIApplication *)application didReceiveLocalNotification:(UILocalNotification *)notification { if (application.applicationState == UIApplicationStateActive) { // Show in-app alert with an extra "more" button UIAlertView *alert = [[UIAlertView alloc] initWithTitle:@"Notification" message:notification.alertBody delegate:self cancelButtonTitle:@"OK" otherButtonTitles:@"More", nil]; [alert show]; } // App becomes active from user's tap on notification else { [self redirectToImageViewWithImage:self.imagePayload]; } } // Handle buttons in in-app alerts and redirect with data/image - (void)alertView:(UIAlertView *)alertView clickedButtonAtIndex:(NSInteger)buttonIndex { // Handle "more" button if (buttonIndex == 1) { [self redirectToImageViewWithImage:self.imagePayload]; } // Add "else if" here to handle more buttons } // Handle notification setting actions in iOS8 - (void)application:(UIApplication *)application handleActionWithIdentifier:(NSString *)identifier forLocalNotification:(UILocalNotification *)notification completionHandler:(void (^)())completionHandler { // Handle richPush related buttons if ([identifier isEqualToString:@"richPushMore"]) { [self redirectToImageViewWithImage:self.imagePayload]; } completionHandler(); }
Executar o aplicativo
- No XCode, execute o aplicativo em um dispositivo iOS físico (as notificações por push não funcionarão no simulador).
- Na IU de aplicativo do iOS, insira um nome de usuário e senha do mesmo valor para a autenticação e clique em Fazer Logon.
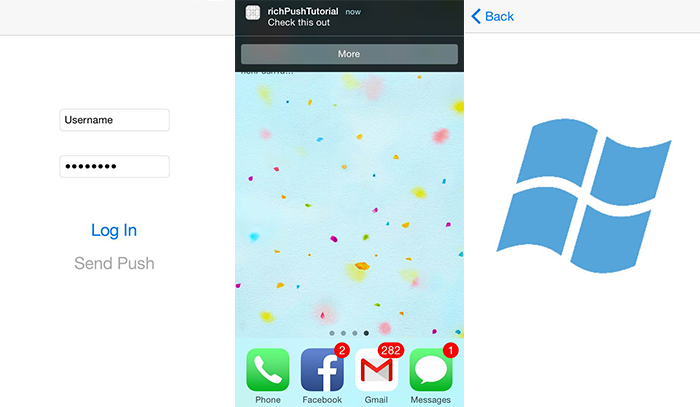
- Clique em Enviar por push e você verá um alerta no aplicativo. Se você clicar em Mais, você será levado à imagem que optou por incluir no back-end do aplicativo.
- Você pode também clicar em Enviar por push e imediatamente pressionar o botão Início do seu dispositivo. Em alguns momentos, você receberá uma notificação por push. Se você tocar nela ou clicar em Mais, será levado para seu aplicativo e o conteúdo da imagem avançado.