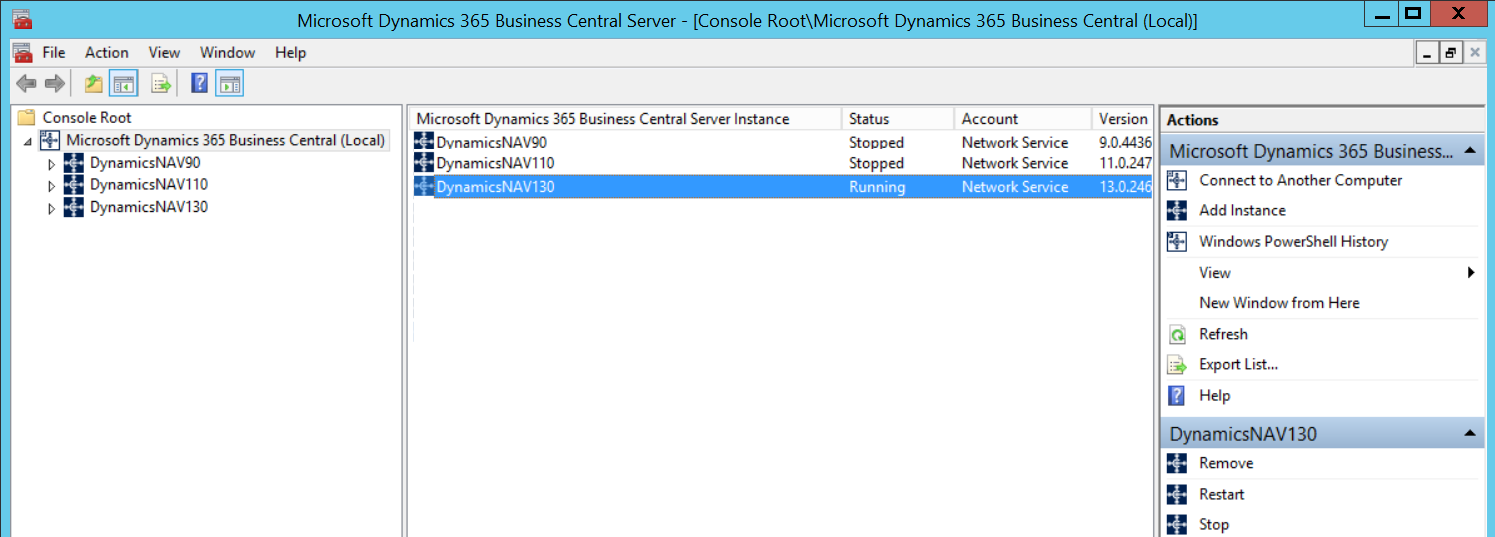
Business Central Server Administration tool
Important
Starting in Business Central 2022 release wave 2 (v21), the Business Central Server Administration tool is no longer available. Use the Business Central Administration Shell instead.
The Business Central Server Administration tool is a Microsoft Management Console (MMC) snap-in for creating and managing Business Central Server instances.
Tip
You can also administrate your Business Central deployment using Windows PowerShell cmdlets. For more information, see Microsoft Dynamics 365 Windows PowerShell Cmdlets.
Install the Business Central Server Administration tool
To install Business Central Server Administration tool, use the Business Central Setup and choose either Server Option or Administration Tool under the custom options page. For more information, see Installing Business Central Using Setup.
Run the Business Central Server Administration tool
You typically run the Business Central Server Administration tool by choosing Business Central Administration from the Start menu. Or, you can open the MMC first and then add the Business Central snap-in. In this case, choose Run from the Start menu and then specify the Microsoft Management Console:
mmc
Important
Only members of the Administrator group on the computer are able to use the Business Central Server Administration tool.
The Business Central Server Administration tool is not supported for multi-user environments.
Navigating the Business Central Server Administration tool
Business Central Server Administration tool is divided into panes:
The left pane shows a tree view that lists all Business Central Server computers that you are administering from this computer and all Business Central Server instances on those computers.

The center pane shows information about the item that you have selected in the left pane. When the selected item is a computer running Business Central Server, the center pane shows a list of Business Central Server instances on that computer and the status of each instance (running or stopped), and the name of the account the instance is running under.
When the item selected in the left pane is a Business Central Server instance, the center pane shows the settings for that instance. For information about a specific setting, see Configuring Business Central Server Instances.
If the Business Central Server is configured for multitenancy, then you can expand the Business Central Server instance items in the left pane to display a Tenants item. Select the Tenants item to display all the tenants that are mounted on a Business Central Server instance in the center pane. For more information, see Multitenant Deployment Architecture
The right pane displays available actions for the object that is selected in the left pane. These options differ depending on whether a Business Central Server computer or a Business Central Server instance is selected.
The Windows PowerShell History pane lists the Windows PowerShell commands that the equivalent of the tasks you perform in the Business Central Server Administration tool. You can access the Windows PowerShell History pane from the Actions menu and from the right pane. To run a command that is shown in the Windows PowerShell History pane, you can copy the command and paste it into the Dynamics NAV Administration Shell, for example.
Connect to remote computers and multiple server instances
You can use the Business Central Server Administration tool to connect to other computers on your network where Business Central Server instances are installed, and then manage those instances.
Configure the remote computers to receive Windows PowerShell remote commands by running the Enable-PSRemoting cmdlet on each computer.
Next, you can start the Business Central Server Administration tool.
If you want to connect to a single remote computer, you can start the Business Central Server Administration tool from the Start menu of your computer.
If you want to connect to multiple remote computers, you must start the Business Central Server Administration tool from the Run program that you can access in the Start menu,
- Enter the command
mmc. - In the Management Console, on the File menu, choose Add/Remove Snap-in to open the Add or remove Snap-ins dialog box.
- In the Available snap-ins list, double-click Microsoft Dynamics 365 Business Central.
- In the Connect to another computer dialog box, type the name of a Business Central Server computer in the Server Name box, and then choose OK.
- Double-click Microsoft Dynamics 365 Business Central* again, and then enter the name of a different Business Central Server computer in the Server Name box. Choose OK.
You can also accept the default value, which is (Local), if this is one of the Business Central Server computers that you will be administering.
- Continue selecting Business Central Server computers as needed. When you are finished selecting computers, choose OK to close the Add or remove Snap-ins dialog box.
Now you see multiple Business Central Server computers listed in the tree view pane of the Business Central Server Administration tool.
Tip
When you close MMC, you are prompted to save your settings to a Microsoft Management Console (.msc) file. If you save your settings, then you can use this file to open MMC with your Business Central Server computers already listed
- Enter the command
Related information
Configuring Business Central Server Instances
Administration Center API