Loading SQL Data
Message Analyzer enables you to retrieve data from a SQL database table by using a built-in interface to provide connection information, SQL query code, and a reference timestamp. After you complete the input configuration and Start a Data Retrieval Session, you can display the data in the default Analysis Grid viewer in rows of information, with the SQL table data in the Summary column of the grid. The data in this column will be in a format that is typical of comma-separated value (CSV) or tab-separated value (TSV) delimiting. This means that you can view the values of the delimited data as separate fields in the Details Tool Window for any row of information that you select in the Analysis Grid viewer.
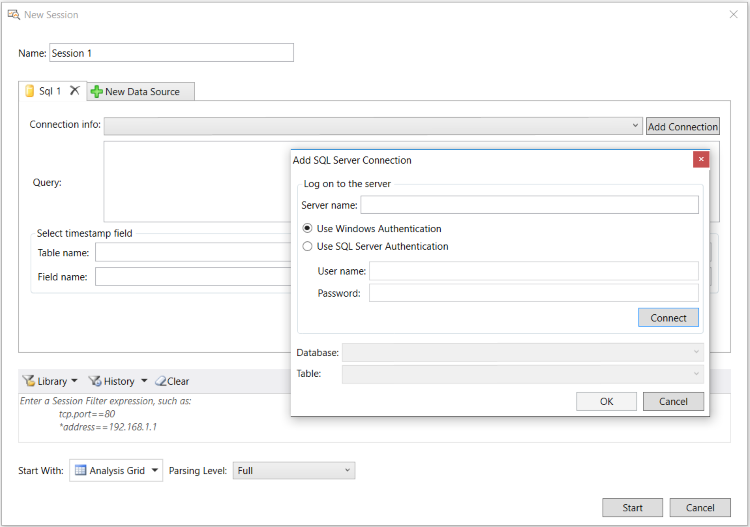
The figure that follows shows the interface from which you will work when loading SQL table data into Message Analyzer.

Figure 36: SQL table data retrieval interface
To load data from a specified SQL table, perform the following procedure:
Important
Before you perform the following steps, ensure that the SQL Table Import preview feature is selected on the Features tab of the Options dialog, which is accessible from the global Message Analyzer Tools menu. If not, select it and then restart Message Analyzer to enable the Sql option to appear in the New Session dialog under Add Data Source.
To load data from a SQL table into Message Analyzer
From the Message Analyzer Start Page, click the New Session button to display the New Session dialog.
Under Add Data Source, click the Sql button to display the Sql tab in the New Session dialog.
Create a SQL connection string by clicking the Add Connection button to display the Add SQL Server Connection dialog that is shown in the above figure. In the dialog, specify the following information:
Server name — specify the name of the SQL server you want to connect to by using the following format: "serverName", without the quotes.
Authentication — authentication options consist of the following:
Use Windows Authentication — the default selection, which uses your current logon credentials to authenticate to the SQL server.
Use SQL Server Authentication — specify this option if you want to provide an account with appropriate permissions on the server instead.
If you use this option, then you will need to specify the User name in the following format: "domain\Username" without the quotes, along with the account Password.
Click the Connect button to validate a successful connection with your credentials, in which case, the Database and Table drop-down lists in the Add SQL Server Connection dialog will be populated with data.
From these lists, select an appropriate Database and Table from which you want to retrieve data.
When complete, click OK to create a new connection string, which should then appear and persist in the Connection Info drop-down list on the Sql tab of the New Session dialog.
In the Query box on the Sql tab of the New Session dialog, specify the SQL code that locates and manipulates the data you wish to extract from the previously specified Database and Table.
In the Select Timestamp Field pane on the Sql tab, select the appropriate Table Name and then specify the Field Name that contains the Timestamp you wish to use as a reference for your data.
When you finish with the input configuration, click the Start button in the New Session dialog to begin loading data from the selected SQL database table into Message Analyzer.