SQL Server databases for Azure DevOps Server
Azure DevOps Server 2022 | Azure DevOps Server 2020 | Azure DevOps Server 2019 | TFS 2018
You can manage Azure DevOps Server more easily if you understand SQL Server, SQL Server Reporting Services, and how they interact with Azure DevOps Server.
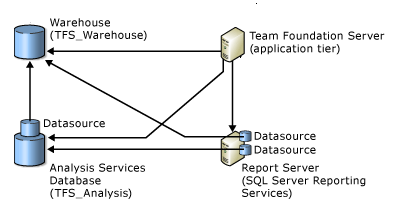
The following diagram illustrates the logical architecture of a deployment of Azure DevOps Server that is integrated with SQL Server Reporting Services.

One advantage of storing all your data in a database is that it simplifies data management because you don’t have to back up individual client computers. If you are familiar with backing up SQL Server databases, backing up and restoring Azure DevOps Server databases is similar.
Interactions between Azure DevOps Server and SQL Server databases
The following table describes the databases that might be present in your deployment of Azure DevOps Server.
Database
Used when
Description
Tfs_Configuration
Always
Stores data that describes your deployment of Azure DevOps Server, including the name and location of the other databases.
Tfs_Collection
Always
One database for each project collection. Each database stores the data for the projects (version control, builds, and work items) in that collection.
Tfs_Warehouse
SQL Server Reporting is configured
Data from all project collections is collected and stored in tables that are optimized for reporting.
Tfs_Analysis
SQL Server Reporting is configured
Analysis Services database that organizes the data from the warehouse database into a cube structure.
ReportServer
SQL Server Reporting is configured
Stores reports and report configuration data for SQL Server Reporting Services.
ReportServer_TempDB
SQL Server Reporting is configured
Stores temporary reporting data for SQL Server Reporting Services.
Tip
Azure DevOps Server requires that collation settings are case insensitive, are accent sensitive, and are not binary. If you want to use an existing installation of SQL Server with Azure DevOps Server, you must verify that the collation settings meet these requirements. If they don't, installation of Azure DevOps Server fails. For more information, see SQL Server collation requirements for Azure DevOps Server
SQL Server must be installed on a server (or servers) that has the appropriate trust levels configured between it and the server (or servers) that hosts the logical Azure DevOps application tier.
Interactions between Azure DevOps Server and SQL Server Reporting Services
SQL Server Reporting Services is considered part of the logical application tier for Azure DevOps Server. However, Reporting Services does not have to be installed on the same physical server as other logical aspects of that application tier, such as SharePoint Products.
When you configure user and group permissions and group membership in Azure DevOps Server, you must also manually configure role membership and permissions appropriately for those users and groups in Reporting Services. For more information, see SQL Server Reporting Services roles.
In addition to configuring role membership and permissions in Reporting Services, you must also manage the report reader account that Azure DevOps Server uses to communicate with the report server. This account is frequently referred to as the data sources account for Reporting Services, or TFSREPORTS. Like the service account for Azure DevOps Server, the report reader account must be a member of a workgroup or domain that is trusted by every computer that connects to Azure DevOps Server. For more information, see Accounts required for installation of Azure DevOps Server.
Tip
Even when you are logged on with administrative credentials, you might have trouble accessing Report Manager or the http://localhost/Reports sites unless you add these sites as Trusted Sites in Internet Explorer or start Internet Explorer as an administrator. To start Internet Explorer as an administrator, choose Start, enter Internet Explorer, right-click on the result, and then choose Run as administrator.