Set a unique automation property for UWP controls for testing
Applies to: ![]() Visual Studio
Visual Studio ![]() Visual Studio for Mac
Visual Studio for Mac
Note
This article applies to Visual Studio 2017. If you're looking for the latest Visual Studio documentation, see Visual Studio documentation. We recommend upgrading to the latest version of Visual Studio. Download it here
If you want to run coded UI tests for your XAML-based UWP application, each control must be identified by a unique automation property. You can assign a unique automation property based on the type of XAML control in your application.
Note
Coded UI Test for automated UI-driven functional testing is deprecated. Visual Studio 2019 is the last version where Coded UI Test will be fully available. We recommend using Playwright for testing web apps and Appium with WinAppDriver for testing desktop and UWP apps. Consider Xamarin.UITest for testing iOS and Android apps using the NUnit test framework. To reduce the impact on users some minimum support will still be available in Visual Studio 2022 Preview 4 or later.
Static XAML definition
To specify a unique automation property for a control that is defined in your XAML file, you can set the AutomationProperties.AutomationId or AutomationProperties.Name implicitly or explicitly, as shown in the examples that follow. Setting either of these values gives the control a unique automation property that can be used to identify the control when you create a coded UI test or action recording.
Set the property implicitly
Set AutomationProperties.AutomationId to ButtonX using the Name property in the XAML for the control.
<Button Name="ButtonX" Height="31" HorizontalAlignment="Left" Margin="23,26,0,0" VerticalAlignment="Top" Width="140" Click="ButtonX_Click" />
Set AutomationProperties.Name to ButtonY using the Content property in the XAML for the control.
<Button Content="ButtonY" Height="31" HorizontalAlignment="Left" Margin="23,76,0,0" VerticalAlignment="Top" Width="140" Click="ButtonY_Click" />
Set the property explicitly
Set AutomationProperties.AutomationId to ButtonX explicitly in the XAML for the control.
<Button AutomationProperties.AutomationId="ButtonX" Height="31" HorizontalAlignment="Left" Margin="23,26,0,0" VerticalAlignment="Top" Width="140" Click="ButtonX_Click" />
Set the AutomationProperties.Name to ButtonY explicitly in the XAML for the control.
<Button AutomationProperties.Name="ButtonY" Height="31" HorizontalAlignment="Left" Margin="23,76,0,0" VerticalAlignment="Top" Width="140" Click="ButtonY_Click" />
Assign unique names
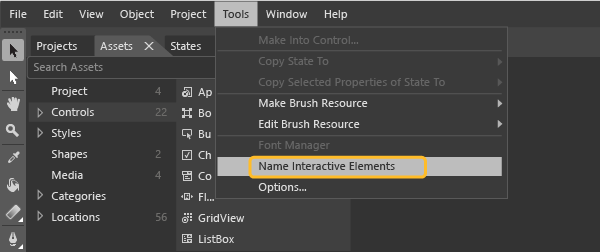
In Blend for Visual Studio, you can select an option to assign unique names to interactive elements such as buttons, list boxes, combo boxes, and text boxes, which gives the controls unique values for AutomationProperties.Name.
To assign unique names to existing controls, select Tools > Name Interactive Elements.

To automatically give unique names to new controls that you add, select Tools > Options to open the Options dialog. Select XAML Designer and then select Automatically name interactive elements on creation. Select OK to close the dialog box.
Use a data template
You can define a simple template using ItemTemplate to bind the values in a list box to variables:
<ListBox Name="listBox1" ItemsSource="{Binding Source={StaticResource employees}}">
   <ListBox.ItemTemplate>
      <DataTemplate>
         <StackPanel Orientation="Horizontal">
            <TextBlock Text="{Binding EmployeeName}" />
            <TextBlock Text="{Binding EmployeeID}" />
         </StackPanel>
      </DataTemplate>
   </ListBox.ItemTemplate>
</ListBox>
You can also use a template with ItemContainerStyle to bind the values to variables:
<ListBox Name="listBox1" ItemsSource="{Binding Source={StaticResource employees}}">
   <ListBox.ItemContainerStyle>
      <Style TargetType="ListBoxItem">
         <Setter Property="Template">
            <Setter.Value>
               <ControlTemplate TargetType="ListBoxItem">
                  <Grid>
                     <Button Content="{Binding EmployeeName}" AutomationProperties.AutomationId="{Binding EmployeeID}"/>
                  </Grid>
               </ControlTemplate>
            </Setter.Value>
         </Setter>
      </Style>
   </ListBox.ItemContainerStyle>
</ListBox>
For both of these examples, you must then override the ToString() method of ItemSource, as shown using the code example that follows. This code makes sure that the AutomationProperties.Name value is set and is unique, because you cannot set a unique automation property for each data-bound list item using binding. Setting a unique value for the Automation Properties.Name is sufficient in this case.
Note
Using this approach, the inner contents of the list item can also be set to a string in the Employee class through binding. As shown in the example, the button control inside each list item is assigned a unique automation id, which is the Employee ID.
Employee[] employees = new Employee[]
{
   new Employee("john", "4384"),
   new Employee("margaret", "7556"),
   new Employee("richard", "8688"),
   new Employee("george", "1293")
};

listBox1.ItemsSource = employees;

public override string ToString()
{
    return EmployeeName + EmployeeID; // Unique Identification to be set as the AutomationProperties.Name
}
Use a control template
You can use a control template so that each instance of a specific type obtains a unique automation property when it is defined in the code. Create the template so that the AutomationProperty binds to a unique ID in the control instance. The following XAML demonstrates one approach to create this binding with a control template:
<Style x:Key="MyButton" TargetType="Button">
<Setter Property="Template">
   <Setter.Value>
<ControlTemplate TargetType="Button">
   <Grid>
      <CheckBox HorizontalAlignment="Left" AutomationProperties.AutomationId="{TemplateBinding Content}"></CheckBox>
      <Button Width="90" HorizontalAlignment="Right" Content="{TemplateBinding Content}" AutomationProperties.AutomationId="{TemplateBinding Content}"></Button>
   </Grid>
</ControlTemplate>
   </Setter.Value>
</Setter>
</Style>
When you define two instances of a button using this control template, the automation ID is set to the unique content string for the controls in the template, as shown in the following XAML:
<Button Content="Button1" Style="{StaticResource MyButton}" Width="140"/>
<Button Content="Button2" Style="{StaticResource MyButton}" Width="140"/>
Dynamic controls
If you have controls that are created dynamically from your code and not created statically or through templates in XAML files, you must set the Content or Name properties for the control. This action makes sure that each dynamic control has a unique automation property. For example, if you have a check box that must be displayed when you select a list item, you can set these properties, as shown here:
private void CreateCheckBox(string txt, StackPanel panel)
{
   CheckBox cb = new CheckBox();
   cb.Content = txt; // Sets the AutomationProperties.Name
   cb.Height = 50;
   cb.Width = 100;
   cb.Name = "DynamicCheckBoxAid"+ txt; // Sets the AutomationProperties.AutomationId
   panel.Children.Add(cb);
}