Secure the Cloud with Azure Security Center
 FOR THE LATEST BLOG POST ON AZURE SECURITY CENTER - GO HERE .
Security is a top level concern when it comes to cloud computing for organizations of all types. While security concerns aren’t nearly as fierce as they were during the early days of public cloud computing, they still weigh heavily on the minds of many cloud adopters. That’s reasonable, given the frequent cadence front page reports about some cloud security incident.
We in Azure Security Engineering understand how critical it is for you to be confident that your cloud deployments are secure. You need to:
- Understand the security state of your Azure resources and have clear visibility into that state
- Take control by being able to assign security policies to your Azure resources, which you can monitor and receive alerts if anything falls out of compliance
- Prevent and detect threats by taking advantage of advanced security-event analysis
- And soon you'll be able to Export security events to a SIEM for further analysis
To help you meet these security requirements, we’d like to introduce you to a new Azure service (which will public preview later this year) that we’re really excited about - Azure Security Center.
As explained in Michal Braverman-Blunmenstyk’s article, Azure Security Center stands on four security pillars:
- Provide visibility and control across your distributed cloud deployments
- Unlock agility so that IT pros, security professionals and DevOps teams can quickly take advantage of cloud efficiencies through policy-driven security recommendations
- Prevent threats by providing you with enlightened security signals and alerts that are based on context-correlated threat intelligence derived from Microsoft’s vast global intelligence assets and expertise.
- Deploy with confidence so that you trust development, operations and infrastructure on Azure
Azure Security Center was announced at AzureCon 2015 this week and there are a number of resources you can use to get more information about it:
- Scott Guthrie’s Keynote (Security Center is featured around 49:25m)
- Jason Zander’s Keynote (Security Center is featured around 36:16m)
- Azure Security Center Deep Dive
- Azure Platform Security and Compliance
- Encryption and key management with Azure Key Vault
I highly recommend all of these, as you’ll get a good feel for what Azure Security Center has to offer you after reading and watching these.
Walk-through of Azure Security Center Features
In the rest of this blog post we’re going to take a look at some of the components of Azure Security Center; this is by no means a comprehensive walkthrough. You’ll see that there are a lot of screenshots and descriptions of what you’re seeing in the screenshots.
Some people like to read and look at pictures. If you’re one of those people, the rest of this blog is for you.
Other people like to watch videos. If you prefer videos, then you can see the same features covered in this article in Sarah Fender’s 21-minute Azure Security Center video, something I highly recommend! (BTW – I typically like to watch videos first and then read to reinforce what I saw).
The following is a walkthrough that covers a subset of features and capabilities that Azure Security Center has today. Keep in mind that this is pre-release information and a lot is going to change by the time the service reaches public preview later this year.
Just a reminder: when you see a word in BOLD type, it means the bolded text can be found on the screenshot. This will help you find the bolded element on the graphic.
So without further delay, let’s get to the walkthrough!
Security Policy
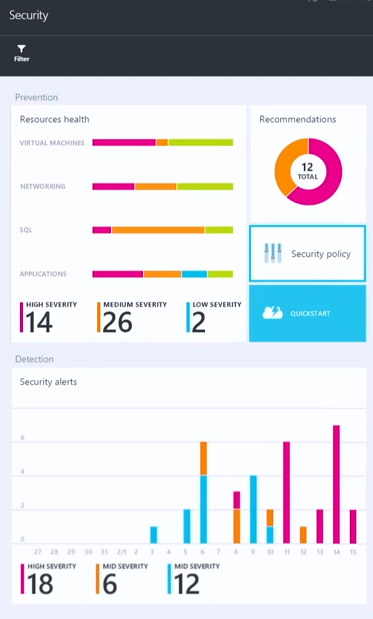
When Azure Security Center goes into public preview, you’re be able to find it within the Azure Preview Portal. When you enter the Azure Security Center, the first place you’ll land is the Security tile. There are two sections:
- Prevention (on the top)
- Detection (on the bottom)
Let’s start with the Prevention section and click Security Policy.
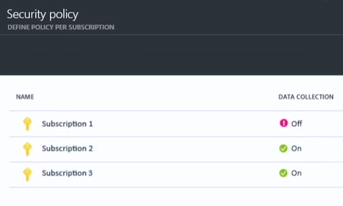
Here you’ll see a list of existing subscriptions. You can set different security policies for each of your subscriptions. This gives you per-subscription granularity so that you don’t have to commit to a “one security policy fits all” approach, which wouldn’t work very well when you have production and dev/test environments in different subscriptions.
Notice that Subscription 1 shows a purple exclamation point and that DATA COLLECTION is currently off. We’ll click on Subscription 1 and fix that.
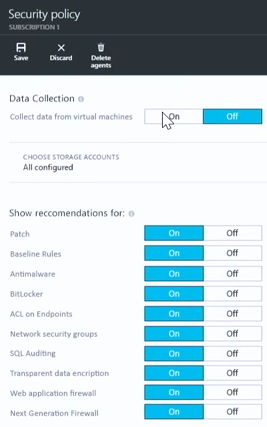
A new blade appears and provides you the option to turn Data Collection on. When data collection is turned it, it automatically collects security configuration and event information from across your Azure environment. This includes valuable security information about your Azure virtual machines, partner security solutions you’re running in Azure, and a lot more. All this information is aggregated so that analysis can be performed on it. In addition, this makes it possible for you to receive reports and be alerted in real time.
It's important to note that you also can choose where that security information is stored. Many of you are concerned, often for compliance reasons, about where your data is stored. You might also want to keep the log data close to where your Azure resources are located.
You can also choose which kind of recommendations you’d like to see as part of your security policy. You can see a list of these in the Show recommendations for section. Policy recommendations currently center around: patches, baseline rules, antimalware, BitLocker (disk encryption), ACLs on endpoints, Network Security Groups (NSGs), SQL Auditing, Transparent Data Encryption (used in SQL databases), Web Application Firewalls and Next Generation Firewalls.
How you configure policy will depend on your security requirements, which will probably differ for deployments across subscriptions. For example, you would probably have different security policies for your dev/test environments, internal production deployments, and public facing services.
Resource Health
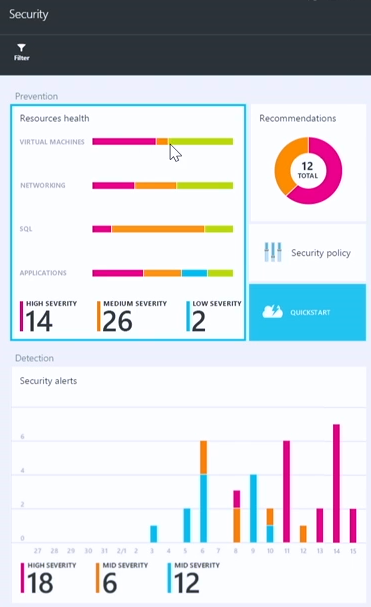
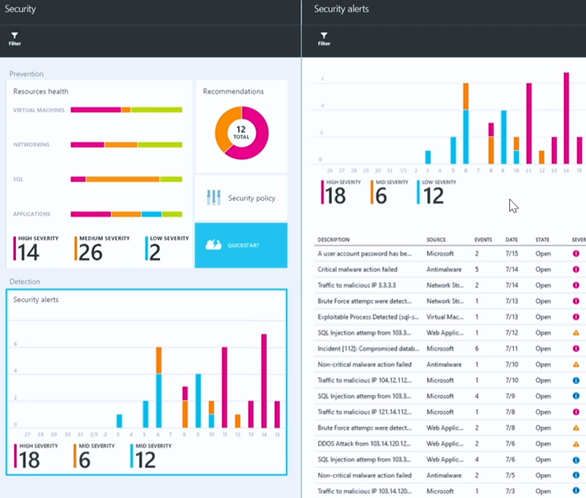
Once you configure a security policy in Azure Security Center, you have the capability to monitor the health of your Azure resources against the policy. Notice on the Security blade below, in the Resources health section that we have lines next to VIRTUAL MACHINES, NETWORKING, SQL and APPLICATIONS. Those lines are divided into several colors, such as pink for HIGH SEVERITY, orange for MEDIUM SEVERITY and blue for LOW SEVERITY. This provides you a nice global view of your current Azure resource health in these four major areas.
It’s clear that there are some things that require our attention here. We’ll click the Resources health section and see what we can do.
Resource Health – Virtual Machines
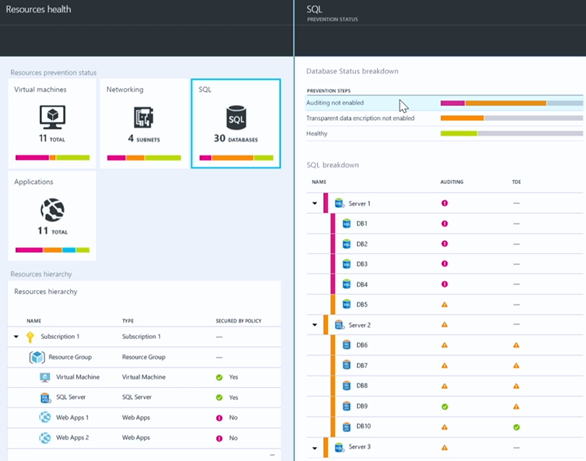
This brings up the Resources health blade. In the Resources prevention status section at the top it gives us the option to drill down on the health of Virtual machines, Networking, SQL and Applications. Notice the health status lines under each of these resource types.
On the bottom you can see the Resource hierarchy section. This provides a unified, hierarchical view of the resources in each of your subscriptions and information about their current health status. For example, you can see that we have some issues with our Web Apps 1 and Web Apps 2 resources – we’ll check into those later.
Let’s click on Virtual machines in the Resources prevention status section to get some more details.
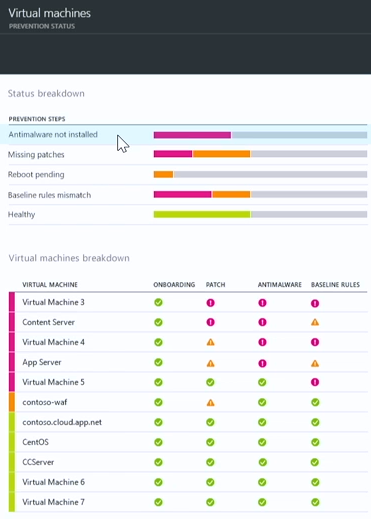
This brings up the Virtual Machines – PREVENTION STATUS blade. There are two sections here: Status breakdown and Virtual machines breakdown.
In the Status breakdown section, you get a summarized list of issues that exist across all the virtual machines, such as Antimalware not installed, Missing patches, Reboot pending, Baseline rules mismatch and Healthy (which isn’t a problem, but it’s nice to see). Also notice a status indicator line next to each of these issues that lets you know the level of severity of the problems in each of these areas.
In the Virtual machines breakdown section on lower part of the blade, you get a list of the virtual machines and an assessment of the current security status for each of these in the areas of: ONBOARDING, PATCH, ANTIMALWARE and BASELINE RULES.
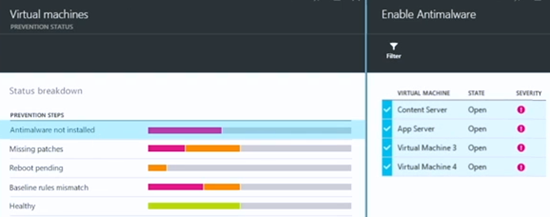
Let’s find out what virtual machines don’t have antimalware installed. It’s easy to do that – just click on the Antimalware not installed entry in the Status breakdown section
Let’s find out what virtual machines don’t have antimalware installed. No problem! – just click on Antimalware not installed in the Status breakdown section.
This brings up the Enable Antimalware blade, which shows you which virtual machines lack antimalware. It’s great to know that antimalware isn’t enabled on these virtual machines, but what’s even better is that you can enable it without having to leave Azure Security Center. And best of all, you can enable it for all the virtual machines at the same time!
We’ll do that by clicking on the Enable button on the bottom of the Enable Antimalware blade.
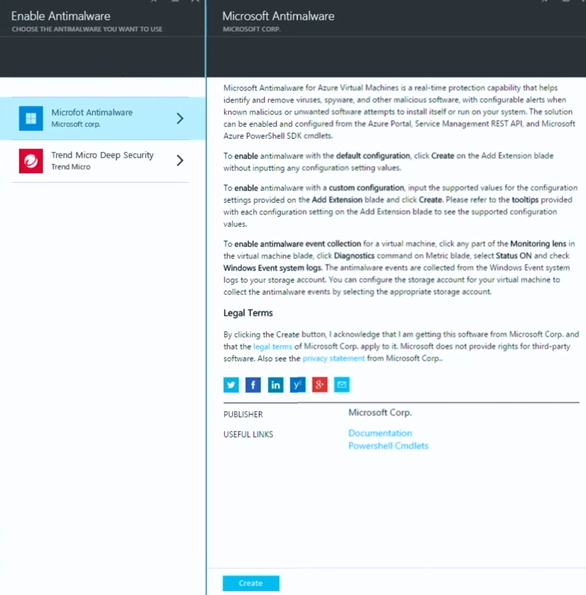
This brings up the Enable Antimalware – CHOOSE THE ANTIMALWARE YOU WANT TO USE blade where you can choose which antimalware solution you want to install. In this example you have a choice between the Microsoft antimalware solution and a partner solution; over time there will be more partner solutions included.
We’ll select the Microsoft Antimalware option. This brings up information about the antimalware solution. Click Create at the bottom of the blade to install it on all the virtual machines that don’t have antimalware currently installed.
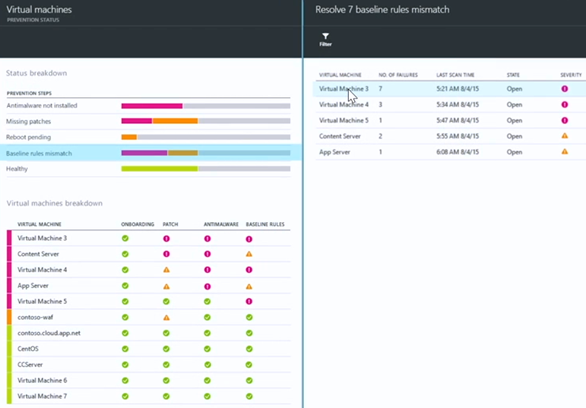
Let’s go back to the Status breakdown section. This time we’ll click on Baseline rules mismatch. Here we see information about what virtual machines have security configurations that don’t conform with the recommended configurations based on the applied security policy.
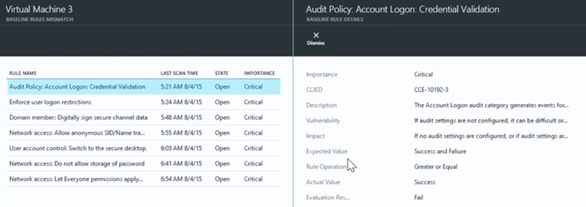
A new blade appears that surfaces a list of virtual machines with baseline rule mismatches and info about the SEVERITY of the mismatch. It looks like Virtual Machine 3 has 7 baseline rule mismatches (NO. OF FAILURES). We’ll click on that virtual machine to get more information on what the specific configuration mismatches are.
This brings up the Virtual Machine 3 - BASELINE RULES MISMATCH blade, which displays a detailed list of the mismatches. You can get more information about the mismatch by clicking on it. In this example we clicked on the Audit Policy: Account Logon: Credential Validation. This brings up a blade that explains the nature of the mismatch, the expected value required to match policy, the current setting, and other information.
Resource Health – Networking
When we go back to the Resources health blade and click the Networking icon, it will bring up the Networking – PREVENTION STATUS blade. Similar to the Virtual machines resource health information, this blade provides a summarized list of issues on the top of the blade and a list of monitored resources on the bottom.
In the Networking Status breakdown section, PREVENTION STEPS such as ACLs on endpoints not enabled, Network security groups not enabled and Healthy are listed. You can click on any of these and get more details about which machines are involved.
Resource Health – SQL
For SQL we can see recommendations related to issues such as Auditing not enabled, Transparent data encryption not enabled and Healthy. Again, just click on any of these entries to see which virtual machines are suffering from any of these issues.
Resource Health – Applications
We see a number of policy issues detected for Applications, such as Unsecured Web Applications, Web Application Firewall is down, Reroute pending, WAF provision in progress, WAF reroute in progress and Healthy. Again, just click on any of these to get information about which machines need to be addressed.
Security Recommendations
So far, we can imagine that IT has come in and set some security policies and they’re able to monitor security state using the views we’ve seen so far.
We’ll return to the Security blade and click the Recommendations icon. This view focuses on the resource owners, those who take on the DevOps roles. Think of this as their “to-do” list – a collection of things they need to do in order to get their environment in compliance with security policy. The goal here is to remove the guesswork from security and make it as easy as possible to reach a compliant state (that is to say, compliant with Azure Security Center security policy).
In the Recommendations – PREVENTION STEPS blade, you can see a number of recommendations. Some of these include: Secure your Web App using Web Application Firewall, Update 5 missing patches, Resolve 7 baseline rules mismatches, and others.
We’ll click on the recommendation Secure your Web App using Web Application Firewall. This brings up the Add a Web Application Firewall – CHOOSE THE WEB APPLICATION FIREWALL YOU WANT TO USE blade.
This blade is broken into two sections; the top section Use existing web application firewall lets you choose from Web Application Firewalls you already have configured in your subscription. The bottom section, Create a new web application firewall, let’s you create a new web application firewall from a list of partner offerings. You can see that we have Barracuda and F5 here and we expect this list to grow over time.
In this example we’ll create a new web application firewall using the Barracuda solution.
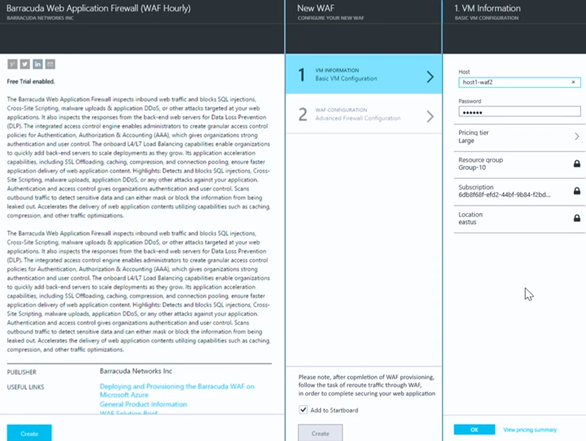
A new blade appears that provides you information about the Barracuda Web Application Firewall (WAF Hourly) . When we click the Create button in the information blade, the New WAF blade appears, where we can provide some VM INFORMATION and perform WAF CONFIGURATION steps.
In the VM Information – BASIC VM CONFIGURATION blade we enter some basic information required to spin up the virtual machine that will run the WAF.
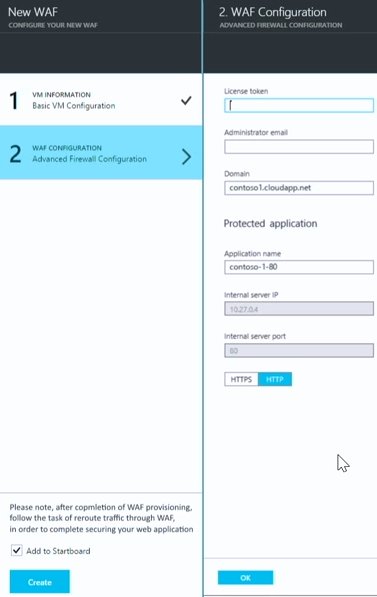
When we click the WAF CONFIGURATION – Advanced Firewall Configuration step, a blade appears that allows us to configure the WAF itself.
So, the first step allows us to configure the virtual machine on which the WAF will run and the second step enables us provision the WAF itself.
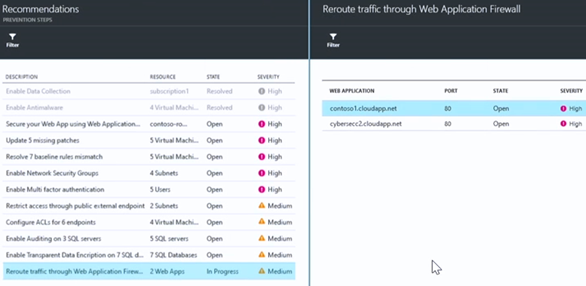
When we return to the Recommendations – PREVENTION STEPS blade we see a new entry that was generated after we created the WAF – Reroute traffic through Web Application Firewall. This lets us know that we need to complete the process of actually wiring up the WAF within the Azure Virtual Network so that it can protect the application.
After clicking that entry we can see that we have a couple of applications that need the traffic rerouted.
Now here’s where some real Azure Security Center magic takes place! We’ll click on one of the applications and a blade appears that gives you information on the application needing the traffic rerouted. Just click OK and Azure Security Center does the wiring-up for you. Does it get much easier than that?
Not only that, but the logs from that WAF are now fully integrated as well, so that Azure Security Center can start automatically gathering and analyzing the logs so that it can surface important security alerts to you.
Security Alerts
Speaking of security alerts, let’s go back to the Security blade and focus on the lower part, which is the Detections section. The graphic provides a summary of Security alerts and provides a color coded bar chart that provides information about frequency and severity.
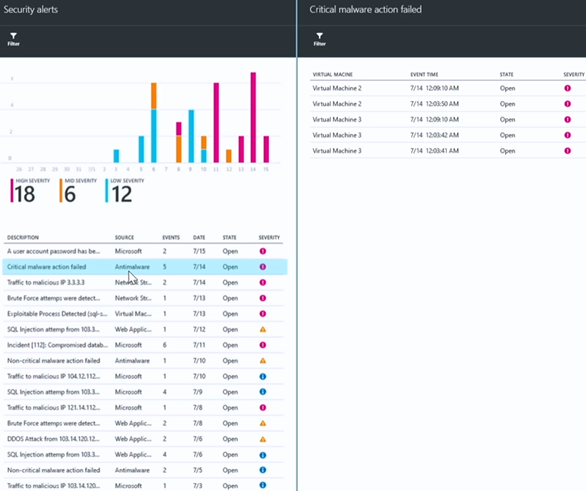
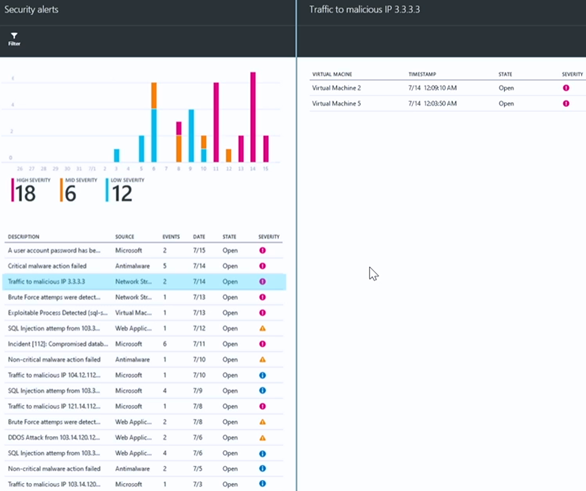
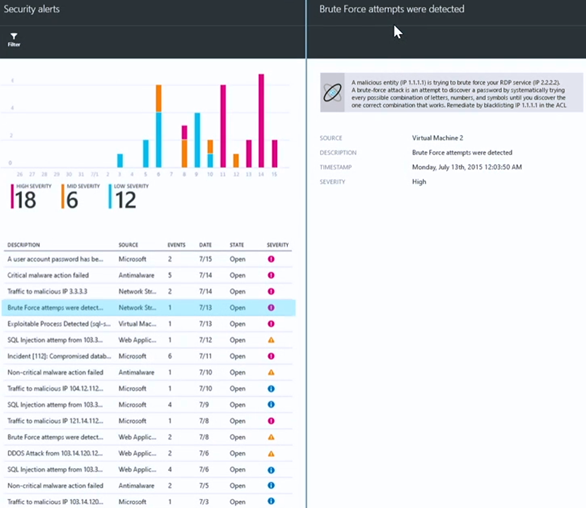
When we click the Security alerts chart in the Security blade, it will bring up the Security alerts blade. Here you see a prioritized list of security alerts. Some of these will be high-fidelity alerts, such as Critical malware action failed (high-fidelity because there is little doubt regarding what the nature of the alert is and its specificity).
When we click on Critical malware action failed, a new blade appears that shows you which virtual machines generated this alert.
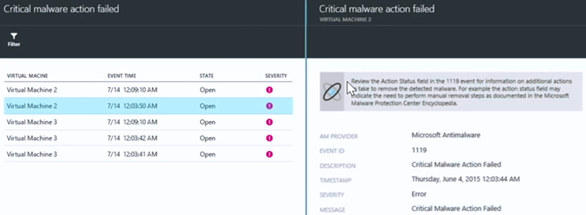
When we click on one of the virtual machines that generated this alert, another blade appears that provides additional details and some recommendations for remediation.
There are other alerts that are generated based on threat intelligence information that Azure Security Center has access to. For example, in the Security alerts pane we can see the Traffic to malicious IP 3.3.3.3 alert. This is traffic destined to what Azure Security Center has determined to be a known malicious IP address.
When we click that alert, a new blade appears that shows which machines are communicating with the malicious IP address.
We can drill down even more by clicking on one of the affected virtual machines. This brings up a blade that provides details about the malicious IP address. In this example, the malicious IP address was identified as a member of the Simda botnet, indicating that the virtual machine may have been compromised and is sending information to a bot controller. The recommendation is to run an anti-virus scan and to blacklist the malicious IP address.
Let’s take a look at another alert – Brute Force attempts were detected. When we click on it a new blade appears showing that a malicious entity at IP address 1.1.1.1 is trying to brute force an RDP connection listening on IP address 2.2.2.2. A recommendation to blacklist the offending IP address is given.
The Exploitable process detected (sql-server.exe) alert is an interesting one. When we click that, we can see that a SQL Server was attacked which lead to the Sql-server.exe process crashing and the detection of shellcode residues. Recommendations for mitigation are to run anti-virus and installing the latest SQL Server patches.
There’s a lot more you can do with Azure Security Center and this was just an introductory walkthrough to give you a taste of the Azure Security Center value. We’ll have a lot more information in the future regarding all the things that Azure Security Center can do and how you can get the most out of this fantastic new Azure service.
Please let us know what you think of what you’ve seen so far! You can use the comments section at the bottom of this blog post to tell us your thoughts, ideas and wishes for Azure Security Center. As a cloud service, it will continuously evolve and gain new features and capabilities. Your input will help us decide how to move this service forward. We look forward to your influence on the future of this product.
If you want an early look at Azure Security Center, then make sure to register for Azure Security Center private preview. You’ll be glad you did!
Thanks!
Tom
Tom Shinder
Program Manager, Azure Security Engineering
@tshinder | Facebook | LinkedIn | Email | Web | Bing me! | GOOG me! 
Comments
Anonymous
October 01, 2015
Are you considering integrating this functionality in OMS to allow on premise assets as well?Anonymous
October 05, 2015
Hi Mathieu - Is this something you'd like to see in the product in the future? Thanks! -Tom.
