A UI Wrapper for TFS Rollback Using a Visual Studio Package
I’ve been using Team Foundation Server since the initial release of TFS 2005. TFS provides a great set of tools that make the process of Application Lifecycle Management much easier. However, one piece of functionality that was initially non-existent and still cumbersome to use at best is the process of rolling back a changeset in TFS version control.
Rollback functionality was initially provided via a separate install of the Team Foundation Power Tools. With the release of TFS 2010, rollback functionality is now available out of the box as an operation of the tf.exe command line tool. In both cases though the functionality is performed via the command line and requires that you enter a version control path, changeset number and possibly a local file path (in the case of TFS 2008) as arguments. If you’ve had to perform more than a couple of rollbacks using this approach, you know it is very clumsy and obviously prone to error.
Wouldn’t it be nice if we had a user interface for performing rollbacks that was integrated directly with the Visual Studio IDE? The UI would allow you to easily browse TFS for the version control path and changeset, thereby making the entire process a little more straightforward. Well, that’s what I’ve attempted to do with the result of this post. I wanted to build something that integrated directly into Visual Studio 2010, so the natural result was to create an extension for Visual Studio via a Visual Studio Package provided with the Visual Studio 2010 SDK.
Before we delve into the extension, let me start by saying that my objective is not to re-write the rollback functionality provided by the command line utilities. The folks in the product group have provided a tool that does that job quite adequately and I’m certain is not trivial in nature to implement. My goal is simply to provide a UI wrapper around the rollback functionality and make things a little more user friendly in the process.
Now let’s get into the details of the extension. The output of any Visual Studio Package project is a VSIX file which you can run to install the package and make it available in Visual Studio 2010 (NOTE: If Visual Studio 2010 is running during the install you’ll need to restart it to see the changes). Installation of the TFS Rollback VSIX will add a new option to the Tools menu as shown.
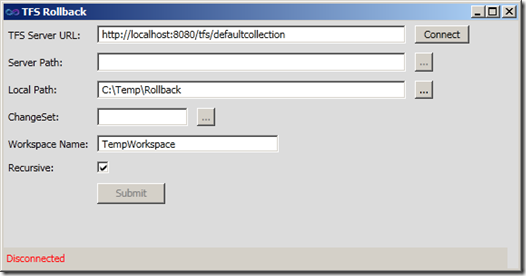
Executing the TFS Rollback option from the Tools menu will display the primary dialog window for the rollback operation as shown in the following screen shot.
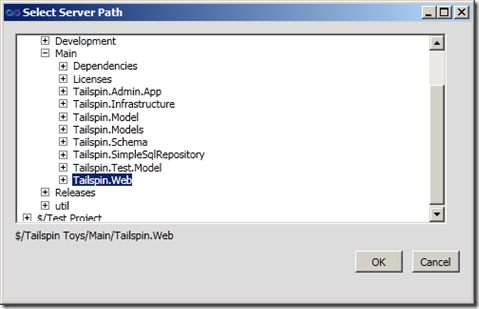
As you can see, the UI is pretty straight forward. Before you can browse for a version control path and changeset, you must first you provide a URL for your TFS server and click the Connect button. Once you are connected to the TFS Server, the status bar will indicate the URL of the server you are currently connected to. At this point you can now browse for the Server Path and the corresponding changeset that you want to rollback as shown below.
While tf.exe will allow you to specify multiple changesets for rollback only a single changeset is currently supported by the extension.
You’ll also note from the main dialog that a workspace name must be provided to perform the rollback. Specifying a temporary workspace is more of a legacy requirement for working with TFS 2008 where you needed to download the entire source tree for the selected Server Path in order to perform the rollback. While this is no longer required with TFS 2010, the process of using a temporary workspace mapping still seems like the right approach, so the same method is applied. The temporary workspace name is mapped to the local path that you specify and then the source files are downloaded to this temporary workspace in order to perform the rollback. Then once you indicate that the rollback is complete (e.g. you’ve checked in the corresponding changes) the temporary workspace and corresponding source files are removed from your local machine.
So once you’ve provided all the necessary inputs to perform the rollback, simply click the Submit button to kick off the rollback. This will make all the necessary calls via TFS’s VersionControlServer class in order to set up the workspace and create the mapping (by the way, this is the same class that is used for browsing the source control tree and for querying for the changeset). Once the workspace and the associated mapping are established, the Process class is used to execute the command line utility as shown below.
    1: private int PerformRollback()
    2: {
    3:     int exitCode = 0;
    4:
    5:     Process tfProcess = new Process();
    6:     tfProcess.StartInfo.UseShellExecute = false;
    7:     tfProcess.StartInfo.WorkingDirectory = _localPath;
    8:     tfProcess.StartInfo.FileName = CommandPath;
    9:     tfProcess.StartInfo.Arguments = String.Format("rollback /changeset:{0}~{0} \"{1}\" {2}",
   10:                                                   _changeSet,
   11:                                                   _serverPath,
   12:                                                   (_recursive == true) ? "/recursive" : string.Empty);
   13:     tfProcess.Start();
   14:     tfProcess.WaitForExit();
   15:
   16:     exitCode = tfProcess.ExitCode;
   17:
   18:     return exitCode;
   19: }
As mentioned above, since the rollback is creating pending changes in the temporary workspace, you need to indicate when the operation is complete so that the package knows when to perform its cleanup tasks (e.g. removing the temporary workspace and files). So once the Process instance for the rollback operation completes, you’ll see the following dialog indicating that further action is required on your part to complete the rollback. At this point you should either check in the pending changes from the rollback operation or undo those changes if you decide the changes should not be committed.
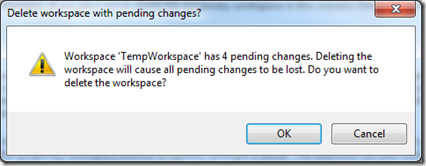
If you elect not to check in the changes you can choose to undo the pending changes manually. Otherwise, when the extension attempts to remove the workspace it will check for any pending changes. If any pending changes are found it will prompt you as to whether or not you want to delete the temporary workspace (thereby undoing the changes). If you elect not to delete the temporary workspace in this scenario then your pending changes will be preserved locally.
I won’t go into all the details around writing the VS Package. The package is responsible for creating the new menu command that gets added to the Tools menu. The event handler for the menu command is then responsible for launching the main dialog which is implemented as a WPF window. The main dialog and the browsing dialogs then make the necessary calls through the TFS version control API to browse the version control folders, etc. There is a detailed walkthrough on MSDN that discusses creating a menu command using the VSPackage template.
One interesting item of note with respect to the implementation is maintaining the user’s settings. First of all, I anticipate that the end user will re-use the same values for the TFS URL, the local path used for the temporary workspace and the temporary workspace name. The extension will also look for tf.exe in the default installation path (C:\Program Files (x86)\Microsoft Visual Studio 10.0\Common7\IDE) and if not found will prompt the user for the path to the executable. Rather than have the user re-enter the values every time they launch the extension, you can use the ShellSettingsManager to create a collection of user settings that can be persisted. The retrieval of these settings is also performed in the event handler for the menu command as shown. The user’s settings are saved in the Closing event handler for the rollback window.
    1: WritableSettingsStore userSettingsStore = null;
    2: TfsRollback.MainWindow rollbackWindow;
    3:
    4: private void MenuItemCallback(object sender, EventArgs e)
    5: {
    6:     SettingsManager settingsManager = new ShellSettingsManager(this);
    7:     userSettingsStore = settingsManager.GetWritableSettingsStore(SettingsScope.UserSettings);
    8:
    9:     rollbackWindow = new TfsRollback.MainWindow();
   10:
   11:     // Get any saved settings
   12:     if (userSettingsStore.CollectionExists(SettingsName))
   13:     {
   14:         if (userSettingsStore.PropertyExists(SettingsName, TfsUrlPropertyName))
   15:             rollbackWindow.TfsUrl = userSettingsStore.GetString(SettingsName, TfsUrlPropertyName);
   16:         if (userSettingsStore.PropertyExists(SettingsName, WorkspacePropertyName))
   17:             rollbackWindow.WorkspaceName = userSettingsStore.GetString(SettingsName, WorkspacePropertyName);
   18:         if (userSettingsStore.PropertyExists(SettingsName, LocalPathPropertyName))
   19:             rollbackWindow.LocalPath = userSettingsStore.GetString(SettingsName, LocalPathPropertyName);
   20:         if (userSettingsStore.PropertyExists(SettingsName, CommandPathPropertyName))
   21:             rollbackWindow.CommandPath = userSettingsStore.GetString(SettingsName, CommandPathPropertyName);
   22:     }
   23:
   24:     // Show the rollback dialog
   25:     rollbackWindow.Closing += new System.ComponentModel.CancelEventHandler(rollbackWindow_Closing);
   26:     rollbackWindow.Show();
   27: }
   28:
   29: void rollbackWindow_Closing(object sender, System.ComponentModel.CancelEventArgs e)
   30: {
   31:     // Save any settings
   32:     if (userSettingsStore.CollectionExists(SettingsName) == false)
   33:         userSettingsStore.CreateCollection(SettingsName);
   34:     if (!String.IsNullOrEmpty(rollbackWindow.TfsUrl))
   35:         userSettingsStore.SetString(SettingsName, TfsUrlPropertyName, rollbackWindow.TfsUrl);
   36:     if (!String.IsNullOrEmpty(rollbackWindow.WorkspaceName))
   37:         userSettingsStore.SetString(SettingsName, WorkspacePropertyName, rollbackWindow.WorkspaceName);
   38:     if (!String.IsNullOrEmpty(rollbackWindow.LocalPath))
   39:         userSettingsStore.SetString(SettingsName, LocalPathPropertyName, rollbackWindow.LocalPath);
   40:     if (!String.IsNullOrEmpty(rollbackWindow.CommandPath))
   41:         userSettingsStore.SetString(SettingsName, CommandPathPropertyName, rollbackWindow.CommandPath);
   42: }
One additional feature that I might look to add in a subsequent release would be providing connectivity to TFS 2008. I’ve run into scenarios where customers have upgraded to Visual Studio 2010, but their TFS installation is still running on 2008. I’d expect those situations won’t last much longer, but if you have interest in the extension supporting this scenario let me know.
You can install the extension by downloading it from the Visual Studio Gallery or by installing it from Extension Manager in Visual Studio.
Comments
- Anonymous
June 06, 2015
Thanks for this post. I used it to successfully save my settings in my open source Visual Studio extension, MVVM Tools, on GitHub! :)


