Using the InkToolbar with Custom Dry Ink in Windows Anniversary Edition
I have been experimenting with the new InkToolbar control in the new Windows Anniversary Update and wanted to walk through a common scenario for using the InkToolbar with “Custom Dry Ink”. The InkToolbar was designed to work with an InkCanvas control that manages its own ink data. It is so easy to use – and the functionality that you get with it is great: pens, pencils, highlighters, erasers and a ruler. In two lines of Xaml with no code behind, you have the beginning of a very powerful drawing app. You can see this in use with the new Sketchpad in the Ink Workspace that is now part of Windows 10 Anniversary Update.
<InkCanvas x:Name=”InkCanvas”/>
<InkToolbar TargetInkCanvas=”{x:Bind InkCanvas}”/>
In more sophisticated scenarios, app developers will want to draw their own ink. Those types of scenarios include:
- Interleave visual elements with ink
- Applying effects to ink using toolkits like Win2D
- Sketching applications that will likely have lots of ink strokes
- Large canvas apps that can scroll and zoom
Once an app developer decides to manage their own ink in the InkCanvas, they need write code for a few things:
- Storing ink once the user completes a stroke
- Drawing ink
- Erasing ink (including erasing all ink on the canvas)
I wrote a sample that demonstrates how to do each of these tasks.
Storing Ink
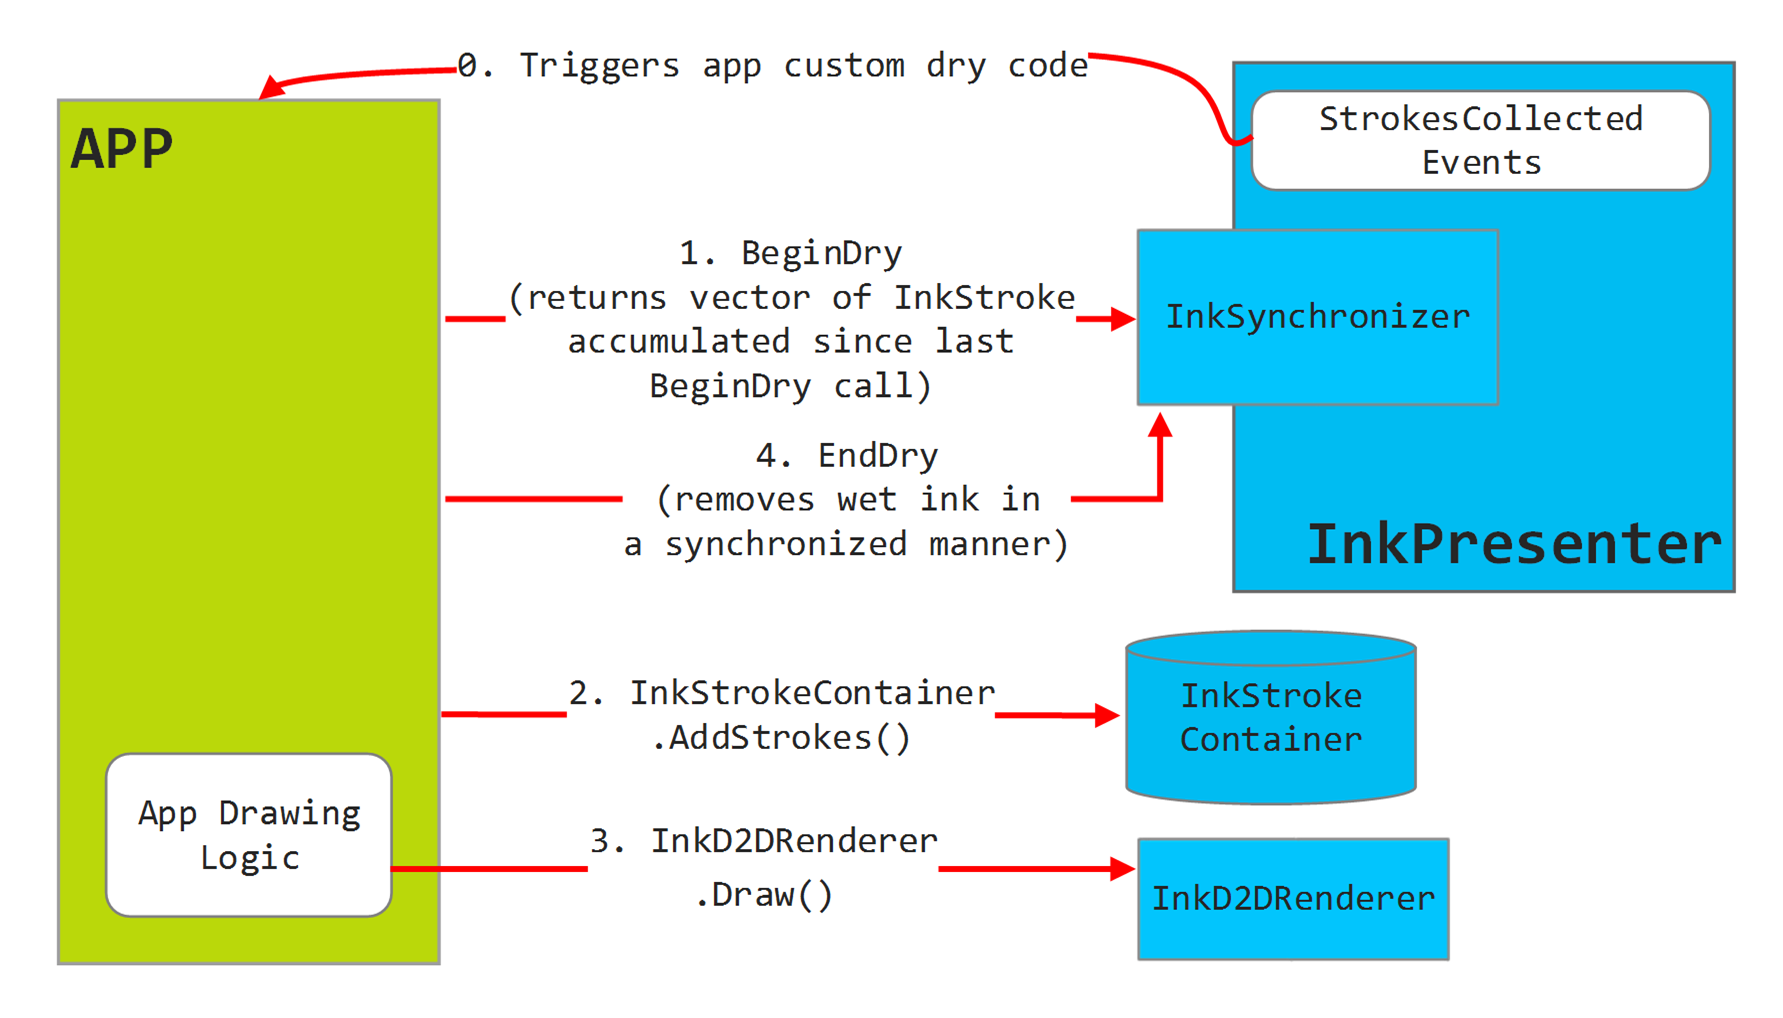
Windows Ink Platform (DirectInk) has two different types of ink, “wet ink” and “dry ink”. The engineers on the Windows team did lots of work to make ink flow from the pen with as little latency as possible, even predictively rendering where the ink is going to go.
The InkCanvas Control in Xaml processes input and routes rendering to the InkPresenter which renders “wet ink” in its own high-priority thread. Once the pen is lifted from the screen, that is then rendered by the InkCanvas’s “dry ink” renderer. App developers can hook into this event by activating custom drying and then waiting for strokes to be collected:
private void MainPage_Loaded(object sender, RoutedEventArgs e)
{
var inkPresenter = InkCanvas.InkPresenter;
_inkSynchronizer = inkPresenter.ActivateCustomDrying();
inkPresenter.StrokesCollected += InkPresenter_StrokesCollected;
}
Then each time the user draws on the screen, the StrokesCollected event is triggered, use the Ink Synchronizer to get the strokes to add and add them to the your app’s storage – in this case, _strokes is a List<InkStrokeContainer>. Once that is done, the Ink Synchronizer is used to tell the InkCanvas that it can remove the wet strokes, and then the DrawingCanvas is invalidated – the DrawingCanvas is the Win2d CanvasControl where the dry ink will get rendered.
private void InkPresenter_StrokesCollected(InkPresenter sender, InkStrokesCollectedEventArgs args)
{
var strokes = _inkSynchronizer.BeginDry();
var container = new InkStrokeContainer();
container.AddStrokes(from item in strokes
select item.Clone());
_strokes.Add(container);
_inkSynchronizer.EndDry();
DrawingCanvas.Invalidate();
}Drawing Dry Ink with Win2D
On Windows, if you want to draw 2D graphics with the fastest, most powerful API, you will want to use Direct2D, a COM-based API that is used under the hood for most graphics on Windows but is a bit hard to use, especially for C# developers. To remedy that, Microsoft created Win2D as a UWP class-oriented wrapper for Direct2D that is meant to work great in Xaml-based apps. Win2d has a very easy to use API for drawing Ink that makes it a great match for custom dry ink: CanvasDrawingSession.DrawInk(). Add the Win2D.UWP package to the app project and then you can add the Win2D CanvasControl to the Xaml behind the InkCanvas:
<Page
x:Class="InkToolbarTest.MainPage"
xmlns="https://schemas.microsoft.com/winfx/2006/xaml/presentation"
xmlns:x="https://schemas.microsoft.com/winfx/2006/xaml"
xmlns:canvas="using:Microsoft.Graphics.Canvas.UI.Xaml"
xmlns:d="https://schemas.microsoft.com/expression/blend/2008"
xmlns:mc="https://schemas.openxmlformats.org/markup-compatibility/2006"
mc:Ignorable="d">
<Grid>
<canvas:CanvasControl Draw="DrawCanvas"ClearColor="Beige" x:Name="DrawingCanvas"/>
<InkCanvas x:Name="InkCanvas"/>
<InkToolbar TargetInkCanvas="{x:Bind InkCanvas}"VerticalAlignment="Top" x:Name="InkToolbar"/>
</Grid>
</Page>
The CanvasControl has a Draw event which is triggered every time the control needs to draw itself. The event is also triggered by the CanvasControl.Invalidate() method in the InkPresenter_StrokesCollected event handler. The code to draw the ink in that DrawCanvas() method can be as simple as calling CanvasDrawingSession.DrawInk() on the lists of InkStrokes in the InkStrokeContainers, but I wanted to show how easy it is to use Win2d Effects to jazz up the ink – adding a drop shadow to each stroke:
private void DrawCanvas(CanvasControl sender, CanvasDrawEventArgs args)
{
DrawInk(args.DrawingSession);
}private void DrawInk(CanvasDrawingSession session)
{
foreach (var item in _strokes)
{
var strokes = item.GetStrokes();
using (var list = new CanvasCommandList(session))
{
using (var listSession = list.CreateDrawingSession())
{
listSession.DrawInk(strokes);
}using (var shadowEffect = new ShadowEffect
{
ShadowColor = Colors.DarkRed,
Source = list
})
{
session.DrawImage(shadowEffect, new Vector2(2, 2));
}
}session.DrawInk(strokes);
}
}
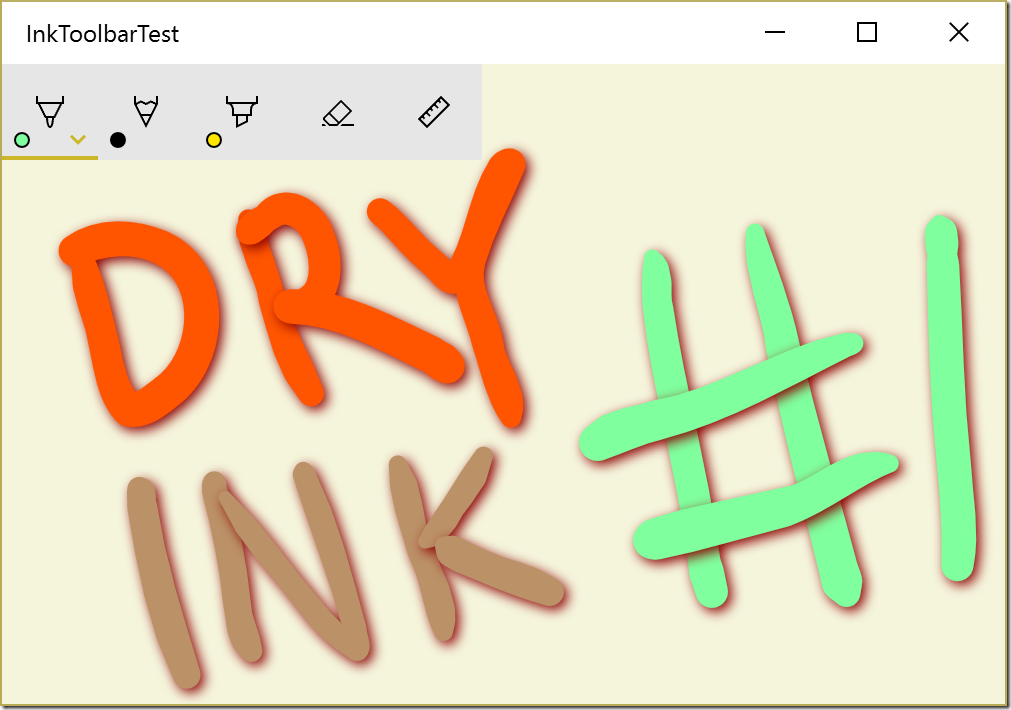
The end result of the drop shadows is most visible with thick pen strokes. The end result is that the shadow appears to pops in under the strokes as the pen is lifted from the screen.
This works great – now you can use all of the drawing tools and the ruler to draw, but when you try using the eraser, nothing happens.
Erasing Dry Ink
This is because the InkToolbar eraser doesn’t know about any of the dry ink; the application has taken control of dry ink rendering. Now if you want to implement erasing you have to handle that yourself by doing two things:
- When the user has selected the eraser tool, handle pointer events and do hit-testing on the ink. The InkStrokeContainer make this easy to do.
- If you hold your pointer (finger, mouse, or pen) over the eraser button, you will see an option to “Erase All Ink”. You will need to override this behavior to erase all the ink that has been collected.
Once the page has loaded, get the eraser button and handle the Checked and Unchecked events (it’s just a styled radio button)
var eraser = InkToolbar.GetToolButton(InkToolbarTool.Eraser) as InkToolbarEraserButton;
if (eraser != null)
{
eraser.Checked += Eraser_Checked;
eraser.Unchecked += Eraser_Unchecked;
}
Then in the Checked event handler, attach pointer events and set the input processing mode; in the Unchecked event to the opposite:
private void Eraser_Checked(object sender, RoutedEventArgs e)
{
var unprocessedInput = InkCanvas.InkPresenter.UnprocessedInput;unprocessedInput.PointerPressed += UnprocessedInput_PointerPressed;
unprocessedInput.PointerMoved += UnprocessedInput_PointerMoved;
unprocessedInput.PointerReleased += UnprocessedInput_PointerReleased;
unprocessedInput.PointerExited += UnprocessedInput_PointerExited;
unprocessedInput.PointerLost += UnprocessedInput_PointerLost;InkCanvas.InkPresenter.InputProcessingConfiguration.Mode = InkInputProcessingMode.None;
}private void Eraser_Unchecked(object sender, RoutedEventArgs e)
{
var unprocessedInput = InkCanvas.InkPresenter.UnprocessedInput;unprocessedInput.PointerPressed -= UnprocessedInput_PointerPressed;
unprocessedInput.PointerMoved -= UnprocessedInput_PointerMoved;
unprocessedInput.PointerReleased -= UnprocessedInput_PointerReleased;
unprocessedInput.PointerExited -= UnprocessedInput_PointerExited;
unprocessedInput.PointerLost -= UnprocessedInput_PointerLost;InkCanvas.InkPresenter.InputProcessingConfiguration.Mode = InkInputProcessingMode.Inking;
}
All of the pointer event handlers are trivial, except for the PointerMoved event handler which does the hit testing using the InkStrokeContainer.SelectWithLine() API. If the stroke of the eraser crosses any of the strokes, the bounding box of the selected stroke will be returned otherwise it would be empty In the pointer moved event handler, items in the _strokes list are removed if the eraser intersects them:
private void UnprocessedInput_PointerMoved(InkUnprocessedInput sender, PointerEventArgs args)
{
if (!_isErasing)
{
return;
}var invalidate = false;
foreach (var item in _strokes.ToArray())
{
var rect = item.SelectWithLine(_lastPoint, args.CurrentPoint.Position);if (rect.IsEmpty)
{
continue;
}if (rect.Width * rect.Height > 0)
{
_strokes.Remove(item);invalidate = true;
}
}_lastPoint = args.CurrentPoint.Position;
args.Handled = true;
if (invalidate)
{
DrawingCanvas.Invalidate();
}
}private void UnprocessedInput_PointerLost(InkUnprocessedInput sender, PointerEventArgs args)
{
if (_isErasing)
{
args.Handled = true;
}_isErasing = false;
}private void UnprocessedInput_PointerExited(InkUnprocessedInput sender, PointerEventArgs args)
{
if (_isErasing)
{
args.Handled = true;
}_isErasing = true;
}private void UnprocessedInput_PointerPressed(InkUnprocessedInput sender, PointerEventArgs args)
{
_lastPoint = args.CurrentPoint.Position;args.Handled = true;
_isErasing = true;
}private void UnprocessedInput_PointerReleased(InkUnprocessedInput sender, PointerEventArgs args)
{
if (_isErasing)
{
args.Handled = true;
}_isErasing = false;
}
The last thing to do with erasing is to implement the Erase All Ink button. Since in custom dry mode, the InkToolbar has no control over the application-owned InkStrokeContainer, you need to override some of its built-in behavior. The control template for the InkToolbarEraserButton uses a Button in an attached Flyout to trigger the InkCanvas erase all function. In this code, the button is replaced with another button that has a different event handler:
var eraser = InkToolbar.GetToolButton(InkToolbarTool.Eraser) as InkToolbarEraserButton;
if (eraser != null)
{
eraser.Checked += Eraser_Checked;
eraser.Unchecked += Eraser_Unchecked;
}var flyout = FlyoutBase.GetAttachedFlyout(eraser) as Flyout;
if (flyout != null)
{
var button = flyout.Content as Button;if (button != null)
{
var newButton = new Button();
newButton.Style = button.Style;
newButton.Content = button.Content;newButton.Click += EraseAllInk;
flyout.Content = newButton;
}
}
Then the EraseAllInk is trivial:
private void EraseAllInk(object sender, RoutedEventArgs e)
{
_strokes.Clear();DrawingCanvas.Invalidate();
}
Simultaneous Pen and Touch
One new feature in the Windows 10 anniversary edition is the ability for apps to use pen and touch simultaneously. This can be most easily seen with the new Ruler tool that can be shown on the InkCanvas. An easy way to take advantage of simultaneous pen and touch is to put the InkCanvas into a ScrollViewer and enable zooming in the ScrollViewer. Doing this enables one-finger panning and two finger pinch to zoom. I’ve implemented the ScrollViewer zooming and panning features via a Style, “ZoomableScrollViewer” and by using that and giving the contents of the ScrollViewer a size, you get panning and scrolling. For fun, try drawing a horizontal or vertical line by putting the pen down and then flicking the canvas with your finger up, down, left or right. The scroll “rails” will keep the scrolling to a single axis at a time. See the Xaml changes here:
<Page
x:Class="InkToolbarTest.MainPage"
xmlns="https://schemas.microsoft.com/winfx/2006/xaml/presentation"
xmlns:x="https://schemas.microsoft.com/winfx/2006/xaml"
xmlns:canvas="using:Microsoft.Graphics.Canvas.UI.Xaml"
xmlns:d="https://schemas.microsoft.com/expression/blend/2008"
xmlns:mc="https://schemas.openxmlformats.org/markup-compatibility/2006"
mc:Ignorable="d">
<Page.Resources>
<Style TargetType="ScrollViewer" x:Key="ZoomableScrollViewer">
<Setter Property="ZoomMode" Value="Enabled"/>
<Setter Property="HorizontalScrollMode" Value="Enabled"/>
<Setter Property="VerticalScrollMode" Value="Enabled"/>
<Setter Property="HorizontalScrollBarVisibility" Value="Auto"/>
<Setter Property="VerticalScrollBarVisibility" Value="Auto"/>
</Style>
</Page.Resources>
<Grid Background="{ThemeResource ApplicationPageBackgroundThemeBrush}">
<ScrollViewer Style="{StaticResource ZoomableScrollViewer}">
<Grid Width="3000" Height="2000">
<canvas:CanvasControl Draw="DrawCanvas" ClearColor="Beige" x:Name="DrawingCanvas"/>
<InkCanvas x:Name="InkCanvas"/>
</Grid>
</ScrollViewer>
<InkToolbar TargetInkCanvas="{x:Bind InkCanvas}" VerticalAlignment="Top" x:Name="InkToolbar">
<InkToolbarCustomToolButton Content="" FontFamily="Segoe MDL2 Assets" Click="OnShare" ToolTipService.ToolTip="Share"/>
</InkToolbar>
</Grid>
</Page>
Sharing Ink
I added a custom button to the InkToolbar to enable sharing the rendered ink to other apps. This code re-uses the DrawInk() method but renders to an offscreen bitmap that is then put into the sharing DataPackage. Because the InkToolbar buttons are meant to act as radio buttons, I needed to override the default behavior of pressed state:
private async void OnShare(object sender, RoutedEventArgs e)
{
var activeTool = InkToolbar.ActiveTool;// Show the share UI
DataTransferManager.ShowShareUI();await Task.Delay(TimeSpan.FromSeconds(0.1));
// reset the active tool after pressing the share button
InkToolbar.ActiveTool = activeTool;
}Helpful Links
- Get the full source here for the project.
- InkCanvas control
- InkToolbar control
- Win2D library
- Pen and Ink: Inking at the Speed of Thought from //Build 2016
I have been drawing my whole life – my career in software started over 20 years ago when I was in architecture school and I experimented with a computer that I could draw on. I am very excited about the possibilities of combining the great UX (InkToolbar and InkCanvas) with great graphic processing power (Win2D) with great hardware (Surface). The future is bright for someone who draws with a pen. Take a look at my latest pen drawings that I did on a Surface Pro 3. How do they compare with drawings I did in a traditional journal? What new experiences can you craft with Ink on Windows?

