Step 2: Configure the Ports

Time to complete: 15 minutes
Objective: In this step, you create the physical ports in BizTalk Server Administration console. You create a physical port for each logical port you created in the orchestration. You will create the following ports:
A one-way WCF-Custom receive port to receive notification messages for changes to Employee table in a SQL Server database.
A request-response WCF-Custom send port to send request messages and receive response for invoking the UPDATE_EMPLOYEE stored procedure and for performing the Insert operation on the Purchase_Order table. In the orchestration, you used the same send port to perform both the operations. Similarly, in the BizTalk Server Administration console, you will use a single send port for both operations.
A one-way send port to send the response for the Insert operation. In this tutorial, because you need to inform the Purchases department through an e-mail, you create this send port as an SMTP port.
Prerequisites
You must have completed Step 1: Deploy the Orchestration).
To create a physical one-way receive port
Start the BizTalk Server Administration console.
In the console tree on the left hand side, expand BizTalk Server Administration, right-click BizTalk Group, and then click Refresh.
Expand BizTalk Group, expand Applications, and expand SampleApplication. For this tutorial, you create all the ports and application within the SampleApplication application.
Follow the instructions under the “Deploying Adapters for Receiving Messages from SQL Server” section of Configure a port using the WCF-custom adapter and SQL adapter. Name the port as NotifyReceivePort.
Make sure you set the following binding properties to configure the adapter to receive notifications for changes to the Employee table.
Binding property Value InboundOperationType Set this to Notification. NotificationStatement Set this to:
SELECT Employee_ID, Name FROM dbo.Employee WHERE Status=0
Note: You must specifically specify the column names in the statement as shown in this Select statement. Also, you must always specify the table name along with the schema name, for example,dbo.Employee.NotifyOnListenerStart Set this to True. For more information about the different binding properties, see Read about the BizTalk Adapter for SQL Server adapter binding properties.
To create a request-response send port for two operations
Follow the instructions under the “Deploying Adapters for Sending Messages to SQL Server” section of Configure a port using the WCF-custom adapter and SQL adapter. Name the port as SQLOutboundPort.
Because you are performing two operations using the same send port, you must use dynamic action mapping to specify the action for the operation. While configuring the port, in the Action box, specify the action mapping in the following manner:
<BtsActionMapping xmlns:xsi="http://www.w3.org/2001/XMLSchema-instance" xmlns:xsd="http://www.w3.org/2001/XMLSchema">
  <Operation Name="UpdateEmp" Action="TypedProcedure/dbo/UPDATE_EMPLOYEE" />
  <Operation Name="InsertPO" Action="TableOp/Insert/dbo/Purchase_Order" />
</BtsActionMapping>
Note that in the orchestration, you created two operations for the request-response send port: UpdateEmp and InsertPO. So, in the physical port configuration you provide the same operation names in the dynamic action mapping. In the above excerpt, the action for UpdateEmp operation is
TypedProcedure/dbo/UPDATE_EMPLOYEE. Similarly, the action for InsertPO operation isTableOp/Insert/dbo/Purchase_Order.You must also configure the send port to use the Mapper you created in the orchestration to map the response message of UPDATE_EMPLOYEE stored procedure to the request message for the Insert operation on Purchase_Order table. To do so:
Right-click the SQLOutboundPort in BizTalk Server Administration console, and then click Properties.
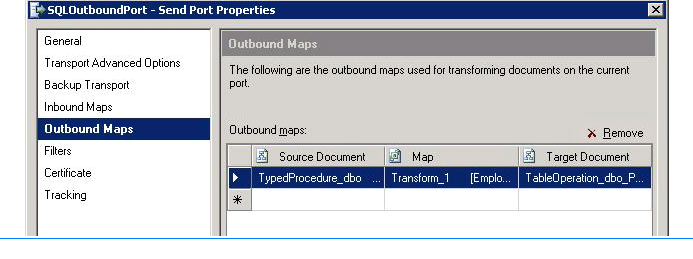
From the SQLOutboundPort – Send Port Properties dialog box, from the left pane, click Outbound Maps.
From the right-pane, in the Outbound Maps box, click the cell under the Map column, and from the drop-down list, select Transform_1. This is the name of the map you created in the BizTalk orchestration in Visual Studio.
Click OK.

To create an SMTP send port
Follow the How to Configure an SMTP Send Port steps. Name the port as EmailResponse.
As part of the port configuration, specify the e-mail address for the Purchases department for the To property.
What did I just do?
In this step you created a WCF-Custom receive port for receiving notifications from SQL Server, WCF-Custom send port for performing operations on SQL Server, and an SMTP port for sending the response from SQL Server as an e-mail to the Purchases department.
Next Steps
You configure and start the BizTalk application, as described in Step 3: Configure and Start the Application.
See Also
Step 1: Deploy the Orchestration Step 3: Configure and Start the Application Lesson 5: Deploy the Solution