Create a guaranteed delivery line item
Important
This option is available only to Microsoft Advertising Ad Server customers.
Note
For Guaranteed Delivery Augmented Line Items (GDALI), see Create a Guaranteed Delivery Line Item (GDALI).
For direct-sold business, where Sales has secured an insertion order from a buyer with a committed impression volume, the most important performance indicator is that the line item delivers its budget in full and evenly across its flight dates. We call this type a Guaranteed Delivery (or "guaranteed") line item, and it has the following properties:
- Delivers budget in full across its flight dates
- Delivers budget evenly across its flight dates
- Delivers on guaranteed goals while still (optionally) competing in the auction with other demand such as RTB.
This page contains instructions for setting up a Guaranteed Delivery line item. We assume you are already familiar with the instructions in Create a Standard Line Item.
Tip
If you need an introduction to what guaranteed line items are and how they work, see Guaranteed Delivery.
To understand how the priority settings described below work in the context of Guaranteed Delivery line items, see Guaranteed Delivery Auction Mechanics and Open Dynamic Allocation and Flexible Priorities.
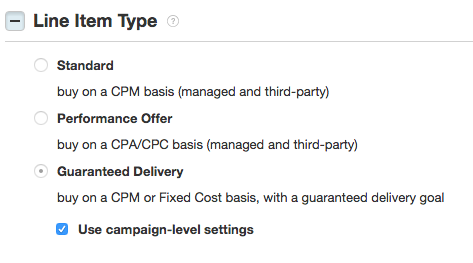
Step 1. Select the line item type
Under Line Item Type, select Guaranteed Delivery.
If you want to have more than one campaign running under your guaranteed line item, also check the Use campaign-level settings checkbox (shown below). This will add a new section Campaign Shells to the page, where you will set up date range targeting for these campaigns.
The main use cases for campaign shells are:
- When an advertiser needs a line item to deliver during only certain date ranges within the overall flight.
- When an advertiser needs to implement multiple targeting strategies for a single guaranteed line item.
For more information about leveraging multiple campaigns, see Using Multiple Campaigns with a Guaranteed Line Item.
Step 2. Basic setup
If you're using insertion orders, click Edit next to Insertion Orders to add or modify the insertion orders you want to associate with this line item. (You will not see this option if your advertiser is not using insertion orders.)
Warning
Currently, to use a guaranteed delivery line item, you need to pair it with a legacy insertion order. If you use the standard setup for insertion orders (formerly the seamless insertion order), you will receive the following error when you attempt to save the line item:
"There was a problem saving this line item. lifetime_budget_imps must be greater than 0 if set."
Provide a descriptive Name for your line item. The name must be unique within an advertiser.
Set the State to Active or Inactive, depending on whether you want to line item to begin delivering on the selected start date.
Step 3. Select the delivery type
The available delivery types are:
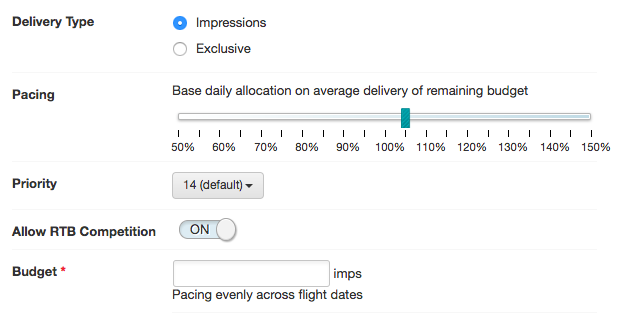
- Impressions Delivery Type
- Exclusive Delivery Type
Impressions delivery type
The Impressions Delivery Type sets an impression-based goal.
The Pacing slider is used to adjust the daily budget for the line item. To "front-load" delivery earlier in the flight, increase the percentage. By default, line items are configured for slightly front-loaded delivery (105%) as a precaution against under-delivery. For more information about guaranteed line item pacing and delivery, see Guaranteed Delivery Pacing.
You can change the default campaign Priority depending on your needs.
By default, your guaranteed line item is set to Allow RTB Competition. We recommend you leave this switch set to ON since not including RTB demand can negatively affect yield. Note that this switch will only have an effect if your Network Admin has set the network-wide Reselling Priority value to be higher than the priority of your managed campaigns.
Warning
Guaranteed Delivery line items are designed to deliver their budgets evenly across their flight dates. Although budgets of any size may be configured on the line item, setting daily impression budgets of 1,000 impressions or less may result in the line item spending its lifetime budget prior to its designated end date.
Recommended settings for Guaranteed Delivery line items that compete with RTB:
If you have RTB competition enabled for multiple guaranteed line items at different priorities, the higher-priority line items will almost always serve ahead of the lower-priority ones. This is because priority is used to rank guaranteed line items against each other.
- Therefore, we recommend setting all of your guaranteed line items that will compete with RTB at the same priority.
- If you have line items that need special consideration, book them at a higher priority than the line items that compete with RTB.
For more information about how guaranteed line items compete against each other in the auction, see Guaranteed Delivery Auction Mechanics and Open Dynamic Allocation and Flexible Priorities.
Enter the number of impressions you want to allocate to the line item in the Budget field.
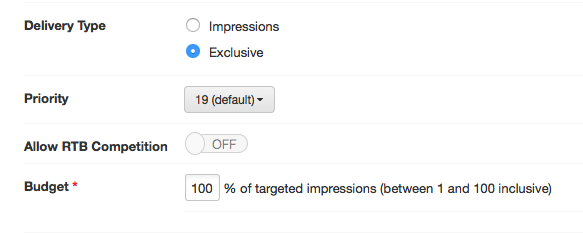
Exclusive delivery type
The Exclusive delivery type sets a percentage, or "share of voice", goal.
You can change the default campaign Priority depending on your needs. In most cases, you can just leave it at the default setting.
Enter the percentage of matching impressions you want this line item to buy in the Budget field.
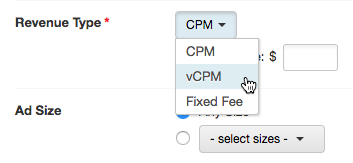
Step 4. Set revenue type
Guaranteed line items can have a CPM, vCPM, or Fixed Fee revenue type. vCPM is like CPM, except that it represents the cost per thousand viewable impressions.
vCPM
If you select the vCPM revenue type for a line item, several things happen:
- Delivery and contention forecasts for this line item are based on viewable impressions. For more information about viewability, see our Introduction to Viewability.
- The Expected Delivery column in this line item grid's stats is calculated using viewable impressions. For more information about line item stats, see Explore Line Items.
- The Guaranteed Delivery Pacing algorithm takes viewability into account when determining how to pace this line item to meet your delivery goals.
Important
vCPM and the exclusive delivery type
A line item with an Exclusive delivery type and a vCPM revenue type will not restrict itself to serving only on impressions marked as viewable. It will attempt to serve on all eligible impressions to meet its delivery goal.
However, you'll still be able to check reporting to see how many of the impressions purchased by the line item were viewable. For instructions on reporting on viewable impressions, see Reporting on Viewability.
Fixed fee
If you select the Fixed Fee revenue type for a line item, you must select one of the following options:
- Cost per day - Allocates a fixed amount of revenue evenly across the flight dates
- One time allocation - Applies the entire fixed fee amount on a specified date within the flight dates
Note
The line item's flight dates must be 30 days or less to use One time allocation.
For more information about the other available revenue types, see Create a Standard Line Item.
Note
Guaranteed delivery line items with a Fixed Fee revenue type must have a start date time of 12:00 AM.
Step 5. Set targeting
In order to provide you with accurate forecasting (see the next step), we need to know how you plan to target the line item and (optionally) any child campaigns.
For instructions on setting most of your line item's targeting, see the targeting settings section of Create a Standard Line Item.
Ad size
When you first create a guaranteed line item, it's possible (and often probable) that you won't have the creatives on hand for that line item or its campaigns. To enable you to forecast on your line item before you have creatives, you can use the Ad Size field to identify the size (or sizes) of the impression you're targeting. You can select Any Size, or select a size from the dropdown list. The size you select will be added to the targeting profile for the line item.
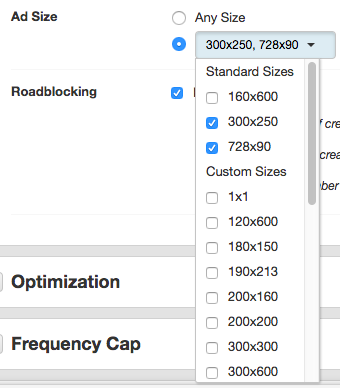
Because the Ad Size values you choose are added to your targeting profile, the values you enter here could have an impact on delivery if you leave them after you add creatives. When you select ad sizes, you're targeting impressions of that size. If you then add creatives that don't match the Ad Size values you entered, you may be preventing your line item from serving. For example, suppose you select the ad sizes shown in the screen above (300x250 and 728x90), then add creatives to the line item that are sizes 300x250 and 640x480. If the ad call does not include a 728x90 impression, your line item won't serve. You don't have a creative of that size, but because you targeted a 728x90 ad size and the ad call doesn't contain that size, your line item won't serve because it didn't find its target.
If you choose to enable roadblocking, forecasts will take into account the Ad Size specified here, as well as the sizes of any actual creatives associated with the line item or any of its campaigns. Forecasting will check availability for each of these sizes and return the value of the impression availability for the creative size with the lowest availability. Using the same example as in the preceding paragraph, forecasting would check for impressions with the sizes 300x250, 728x90, and 640x480. The size that returns the lowest number of impressions will be the forecasted value for a line item with roadblocking enabled.
Campaign shell targeting
If you selected Use campaign-level settings earlier, the Campaign Shells section will be visible. Campaign shells provide a lightweight way to configure campaigns during guaranteed line item creation. Campaign shells also allow you to check availability and reserve inventory at line item creation time.
To configure campaign shells, click the toggle next to Campaign Shells and an area will appear where you can create several campaigns to associate with this line item. For each campaign you want to create, enter a name and the start and end dates for its flight. By default, two campaign shells are present; add more by clicking the Add New Campaign button at the bottom of the section.
Important
Not all campaign settings are available within the Campaign Shells view. Additional targeting settings must be configured directly on the campaign object after saving the line item. When additional targeting settings are configured directly on the campaign, you can re-check availability and/or re-reserve inventory for the line item by going back to the line item edit screen.
Note
The budget allocation and pacing of your line item will be determined based on the flight dates of the underlying campaigns. As a result, we recommend that you have campaigns running for the entire duration of the parent line item's billing periods/flight dates.
For more information about using multiple campaigns with a guaranteed line item, see Using Multiple Campaigns with a Guaranteed Line Item.
Roadblocking
If you're using multi-tag auctions via Microsoft Advertising's seller tag to make a single request for multiple ad slots on a page, you can serve multiple linked creatives, known as roadblocking. For more information, see Target Your Inventory with Roadblocking.
To enable roadblocking on the line item, perform the following actions:
- Select Enable roadblocking.
- Select the type of roadblock:
- Normal - The number of creatives is greater than or equal to the number of ad slots.
- Partial - One creative for each size must be eligible to serve on the page. All creatives will serve if ad slots are available. If more than one creative per size exists, creative will rotate through a single slot.
- Exact - The number of creatives is exactly equal to the number of ad slots.
- Select the budgeting, pacing, and frequency capping option for the line item. Under Count an impression (for budgeting, pacing and frequency capping) on delivery of, select either:
- Each creative - Count each creative delivered as part of the roadblock as a unique impression. For example, if your insertion order is budgeted for 100 impressions and 4 impressions are delivered to a user as a roadblock, your budget will have 96 impressions remaining.
- The line item - Count only the master creative as a delivered impression, regardless of how many creatives were delivered for the roadblock. If your insertion order is budgeted for 100 impressions and 4 impressions are delivered to the user as part of this roadblock, your budget will have 99 impressions remaining. Note that if the master creative is not one of those 4 impressions delivered, you budget remains at 100 impressions.
- If you opt to budget based on the line item, you must select a size from the Master size list. Select the size of the creative you want to act as the master (the creative that will be used to count impressions). If you have more than one creative of this size, one will be chosen at the time of auction to be the master.
Step 6. Check forecasting availability
Now that you've set your targeting, you can use our forecasting tools to see how much inventory you have available that meets that targeting. Click the Check Availability button on the lower left of the screen, next to the Save and Reserve button.

The forecasting pane will appear, showing you a chart with delivery goals and capacity for the current line item. Click on Contending Line Items to expand that section and see other line items that are contending for the same inventory.
For more information about forecasting, see Inventory Forecasting.
Step 7. Finish setting up
At this point, you can finish setting up your line item as usual, including your creatives, reporting labels, etc.
For detailed instructions on setting up line items, see Create a Standard Line Item.