Work with the Python Interactive Window in Visual Studio
Visual Studio provides an interactive read-evaluate-print loop (REPL) window for each of your Python environments, which improves upon the REPL you get with the python.exe command on the command line. The Python Interactive Window lets you enter arbitrary Python code and see immediate results. This approach to coding helps you learn and experiment with APIs and libraries and interactively develop working code to include in your projects.
Visual Studio has many Python REPL modes to choose from:
| REPL | Description | Editing | Debugging | Images |
|---|---|---|---|---|
| Standard | Default REPL talks to Python directly | Standard editing (multiline and more) | Yes, via $attach |
No |
| Debug | Default REPL talks to debugged Python process | Standard editing | Only debugging | No |
| IPython | REPL talks to IPython backend | IPython commands, Pylab conveniences | No | Yes, inline in REPL |
| IPython without Pylab | REPL talks to IPython backend | Standard IPython | No | Yes, separate window |
This article describes the Standard and Debug REPL modes. For details on IPython modes, see Use the IPython REPL.
For a detailed walkthrough with examples, including the interactions with the editor such as Ctrl+Enter, see Use the Interactive REPL window.
Prerequisites
- Visual Studio on Windows installed with support for Python workloads. For more information, see Install Python support in Visual Studio.
Visual Studio for Mac isn't supported. For more information, see What's happening to Visual Studio for Mac? Visual Studio Code on Windows, Mac, and Linux works well with Python through available extensions.
Open the Interactive Window
There are several ways to open the Interactive Window for a Python environment.
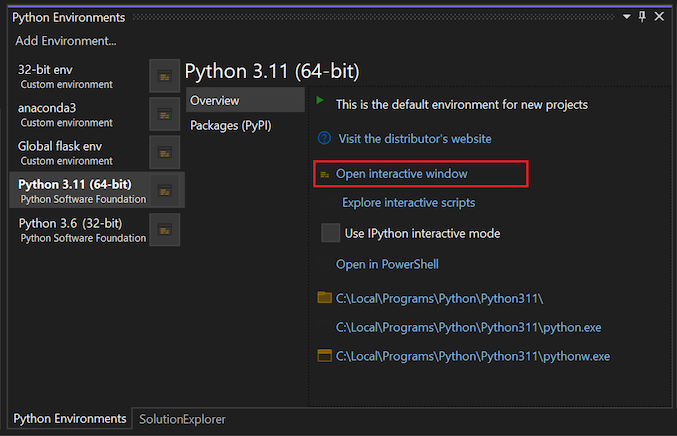
From the Python Environments window:
Select View > Other Windows > Python Environments to open the Python Environments window (or use the keyboard Ctrl+K > Ctrl+`).
In the Python Environments window, select an environment, and switch to the Overview page for the environment.
In the Overview page, select the Open Interactive Window option.
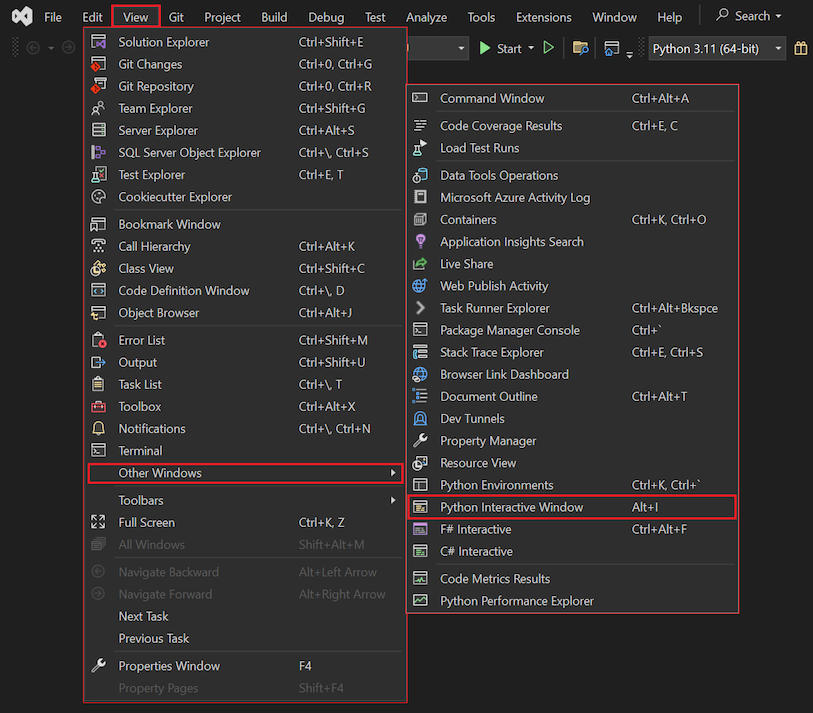
From the View menu on the Visual Studio tool, select Other Windows > Python Interactive Window:
From the Debug menu on the Visual Studio toolbar, select Execute <Project | File> in Python Interactive or use the keyboard shortcut Shift+Alt+F5. You can open an Interactive Window for the Startup File in your project, or for any stand-alone file:
Another option is to send the code you're writing in the Visual Studio editor to the Interactive Window. This approach is described in Send code to the Interactive Window.
Explore Interactive Window options
You can control various aspects of the Interactive Window, such as the location of startup script files and how the arrow keys work within the window environment. To access the options, select Tools > Options > Python > Interactive Windows:
The options are described in detail in Python Interactive Window options for Visual Studio.
Use the Interactive Window
In the Interactive Window, you can start to enter code line-by-line at the REPL Python command prompt >>>. As you enter each line, Visual Studio executes the code, including importing necessary modules and defining variables.
When Visual Studio detects that a line of code doesn't form a complete statement, the code prompt changes to the REPL continuation .... This prompt indicates that you need to enter more lines of code to complete the statement block. Visual Studio waits for the closing syntax before it attempts to execute the code block.
When you define a for statement, the first line of code starts the for block and ends in a colon. The block can consist of one or more lines of code that define the tasks to complete during the for loop. When you select Enter on a blank line, the Interactive Window closes the block and Visual Studio executes the code.
Command-line REPL comparison
The Interactive Window improves upon the usual Python command-line REPL experience by automatically indenting statements that belong to a surrounding scope. Both approaches let you use the arrow keys to scroll through your entered code. The Interactive Window also provides multiline items, whereas the command-line REPL provides only single lines.
Meta-commands
The Interactive Window supports several meta-commands. All meta-commands start with the dollar symbol $. You can enter $help to see a list of meta-commands and $help <command> to get usage details for a specific command. The following table summarizes the meta-commands.
| Meta-command | Description |
|---|---|
$$ |
Insert a comment, which is helpful to comment code throughout your session. |
$cls, $clear |
Clear the contents of the editor window, but leave history and execution context intact. |
$help |
Display a list of commands, or help on a specific command. |
$load |
Load commands from file and execute until complete. |
$mod |
Switch the current scope to the specified module name. |
$reset |
Reset the execution environment to the initial state, but keep the history. |
$wait |
Wait for at least the specified number of milliseconds. |
You can also extend the commands with Visual Studio extensions by implementing and exporting the IInteractiveWindowCommand class. For more information, review an (example on GitHub).
Switch Interactive Window scope
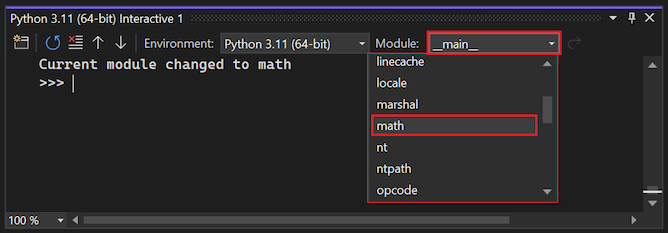
By default, the Interactive Window for a project is scoped to the project's Startup File as if you ran the program file from the command prompt. For a stand-alone file, the scope is set to that file. At any time during your REPL session, you can use the Module scope dropdown to change the scope:
After you import a module, such as import importlib, options appear in the Module scope dropdown menu to switch into any scope in that module. A message in the Interactive Window reports the change to the new scope, so you can track how you got to a certain state during your session by reviewing the command history.
If you enter the dir() command in a scope, Visual Studio displays valid identifiers in that scope, including function names, classes, and variables. The following image shows the result of the dir() command for the importlib scope:
Send code to Interactive Window
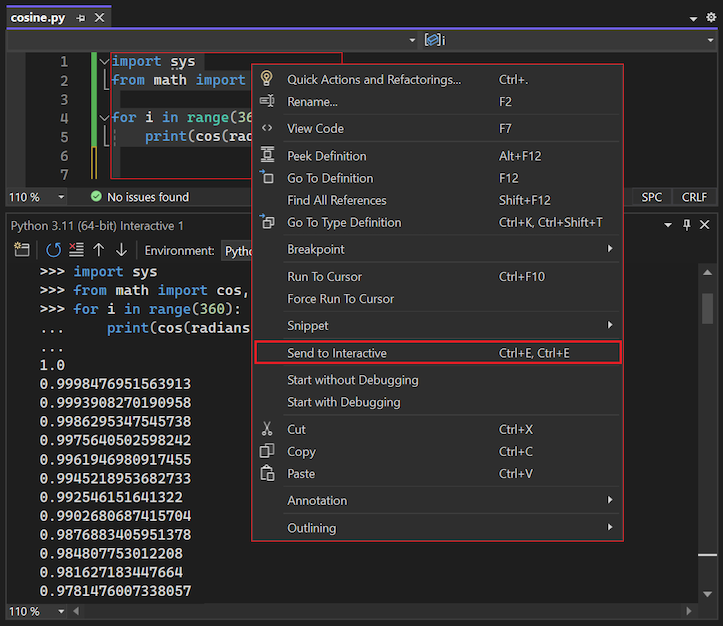
In addition to working within the Interactive Window directly, you can send code in the Visual Studio editor to the window. This command is useful for iterative or evolutionary code development, including testing your code as you develop it.
Open a code file in the Visual Studio editor, and select some or all of the code.
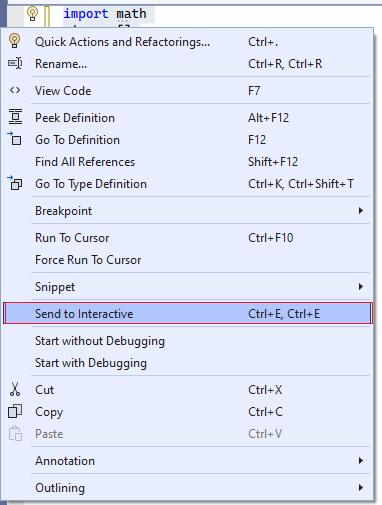
Right-click the selected code and select Send to Interactive (or use the keyboard shortcut Ctrl+E, E).
Modify and run code
After you send code to the Interactive Window and view the output, you can modify the code and test the changes. Use the up and down arrows to scroll to the code in the command history for the window. Modify the code and run the updated code by selecting Ctrl+Enter.
When you make changes, if you select Enter at the end of a complete code statement, Visual Studio executes the code. If the code statement isn't complete, Visual Studio inserts a newline into the window.
Save code and remove prompts
After you complete your work on the code, you can select the updated code in the Interactive Window and paste it back into your project file to save your work.
When you paste code from the Interactive Window into the editor, Visual Studio removes the REPL command prompt >>> and continuation prompt ... by default. This behavior allows you to easily transfer code from the window to the editor.
You can change the behavior with the Paste removes REPL prompts option for the Interactive Window:
Select Tools > Options to open the Options dialog.
Expand the Text Editor > Python > Formatting section.
Clear the Paste removes REPL prompts option.
Select Tools > Options to open the Options dialog.
Expand the Text Editor > Python > Advanced section.
Clear the Paste removes REPL prompts option.
When you clear the option, the prompt characters are retained in code pasted from the window. For more information, see Options - Miscellaneous options.
Review IntelliSense behavior
The Interactive Window includes IntelliSense suggestions based on the live objects, unlike the code editor where IntelliSense is based on source code analysis only. As a result, IntelliSense suggestions in the Interactive Window are more correct, especially with dynamically generated code. The drawback is that functions with side-effects like logging messages might affect your development experience.
You can adjust the Intellisense behavior through the Completion options:
Select Tools > Options to open the Options dialog.
Expand the Python > Interactive Windows section.
Adjust settings in the Completion Mode group, such as Never evaluate expressions or Hide static analysis suggestions.
For more information, see Options - Interactive Windows options.


