Use the Cookiecutter extension
Cookiecutter provides a graphical user interface to discover templates, input template options, and create projects and files. Visual Studio 2017 and later includes the Cookiecutter extension. It can be installed separately in earlier versions of Visual Studio.
In Visual Studio, the Cookiecutter extension is available under View > Cookiecutter Explorer:
Prerequisites
Visual Studio. To install the product, follow the steps in Install Visual Studio.
Python 3.3 or later (32-bit or 64-bit) or Anaconda 3 4.2 or later (32-bit or 64-bit).
If a suitable Python interpreter isn't available, Visual Studio displays a warning.
If you install a Python interpreter while Visual Studio is running, select the Home option on the Cookiecutter Explorer toolbar to detect the newly installed interpreter. For more information, see Create and manage Python environments in Visual Studio.
Work with Cookiecutter Explorer
In Cookiecutter Explorer, you can browse and select templates, clone templates to your local computer, set template options, and create code from templates.
Browse templates
You can browse templates in Cookiecutter Explorer to see what's already installed and what's available.
In Cookiecutter Explorer, select the Home option on the toolbar to view the available templates.
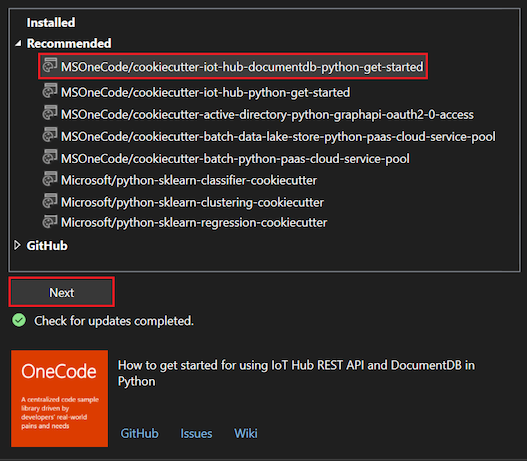
The home page displays a list of templates to choose from, organized into four possible groups:
Group Description Notes Installed Templates installed to your local computer. When an online template is used, its repository is automatically cloned to a subfolder of ~/.cookiecutters. You can remove an installed template from your system by selecting Delete on the Cookiecutter Explorer toolbar. Recommended Templates loaded from the recommended feed. Microsoft curates the default feed. You can customize the feed by following the steps in Set Cookiecutter options. GitHub GitHub search results for the "cookiecutter" keyword. The list of git repositories are returned in paginated form. When the list of results exceeds the current view, you can select the Load More option to show the next set of paginated results in the list. Custom Any custom templates defined through Cookiecutter Explorer. When a custom template location is entered in the Cookiecutter Explorer search box, the location appears in this group. You can define a custom template by entering the full path to the git repository, or the full path to a folder on your local disk. To show or hide the list of available templates for a specific category, select the arrow next to the category.
Clone templates
You can work with available templates in Cookiecutter Explorer to make local copies to work from.
In Cookiecutter Explorer, select a template. Information about the selected template is displayed at the bottom of the Cookiecutter Explorer home page.
The template summary includes links for more information about the template. You can go to the GitHub repository page for the template, view the template Wiki, or find reported Issues.
To clone the selected template, select Next. Cookiecutter makes a local copy of the template.
The cloning behavior depends on the type of template you select:
| Template type | Behavior |
|---|---|
| Installed | If the selected template was installed in a previous session of Visual Studio, it's automatically deleted and the latest version is installed and cloned on your local computer. |
| Recommended | The selected template is cloned and installed on your local computer. |
| GitHub | The selected template is cloned and installed on your local computer. |
| Custom search | - URL: If you enter a custom URL for a git repository into the Cookiecutter Explorer search box, and then select the template, the selected template is cloned and installed on your local computer. - Folder path: If you enter a custom folder path into the search box, and select the template, Visual Studio loads that template without cloning. |
Important
Cookiecutter templates are cloned under a single folder ~/.cookiecutters. Each subfolder is named after the git repository name, which doesn't include the GitHub user name. Conflicts can arise if you clone different templates with the same name that come from different authors. In this case, Cookiecutter prevents you from overwriting the existing template with a different template of the same name. To install the other template, you must first delete the existing one.
Set template options
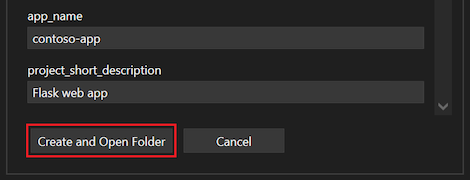
After you install and clone a template locally, Cookiecutter displays the Options page. On this page, you can specify settings, such as the folder path location for generated files:
Each Cookiecutter template defines its own set of options. When a default value is available for a setting, the Options page shows suggested text in the corresponding field. A default value might be a code snippet, often when it's a dynamic value that uses other options.
For this example, the template name is defined as cookiecutter-flask/cookiecutter-flask. When a setting value can be changed, the field text is available for editing.
In the Create to field, enter the folder path location for any files generated by Cookiecutter.
Next, set other desired options for the template, such as:
- full_name: The full name to apply to the template.
- email: The email address of the template author.
- github_username: The GitHub alias of the template author.
- python_version: The target Python version for web apps created from the template.
Set defaults with a configuration file
You can customize default values for specific options with a user configuration file. When the Cookiecutter extension detects a user configuration file, it overwrites the template's default values with the configuration file values. For more information about this behavior, see the User Config section of the Cookiecutter documentation.
Opt out of specified tasks
Some templates identify specific Visual Studio tasks to run after code generation. Common tasks include opening a web browser, opening files in the editor, and installing dependencies. When a template identifies specific tasks, the Run additional tasks on completion setting is added to the list of options. You can configure this setting to opt out of the specified Visual Studio tasks.
Create code from templates
After you set your template options, you're ready for Cookiecutter to create the project files and generate the code.
The dialog displays a button after the list of options. The text for the button depends on the template. You might see Create and Open folder, Add to Solution, and so on.
On the Options page, select the button that follows the list of options, such as Create and Open folder or Add to Solution.

Cookiecutter generates the code. If the output folder isn't empty, a warning displays.
If you're familiar with the template's output and don't mind overwriting files, select OK to dismiss the warning.
Otherwise, select Cancel, specify an empty folder, and then manually copy the created files to your nonempty output folder.
After Cookiecutter successfully creates the files, Visual Studio opens the template project files in Solution Explorer.
Set Cookiecutter options
Cookiecutter options are available through Tools > Options > Cookiecutter:
| Option | Description |
|---|---|
| Check for updated templates | Controls whether Cookiecutter automatically checks online for updates to the installed templates. |
| Recommended feed URL | The location of the recommended templates feed file. The location can be a URL or a path to a local file. Leave the URL empty to use the default Microsoft curated feed. The feed provides a simple list of template locations, separated by newlines. To request changes to the curated feed, make a pull request against the source on GitHub. |
| Show Help | Controls the visibility of the help information bar at the top of the Cookiecutter window. |
Optimize Cookiecutter templates for Visual Studio
The Cookiecutter extension for Visual Studio supports templates created for Cookiecutter v1.4. For more information about authoring Cookiecutter templates, see the Cookiecutter documentation.
The default rendering of template variables depends on the type of data (string or list):
- String: The String data type uses a label for the variable name, a text box for entering the value, and a watermark that shows the default value. A tooltip on the text box shows the default value.
- List: The List data type uses a label for the variable name and a combo box for selecting a value. A tooltip on the combo box shows the default value.
You can improve on the rendering by specifying other metadata in your cookiecutter.json file that's specific to Visual Studio (and ignored by the Cookiecutter CLI). All properties are optional:
| Property | Description |
|---|---|
label |
Specifies the text to display above the editor for the variable, instead of the name of the variable. |
description |
Specifies the tooltip to display on the edit control, instead of the default value for that variable. |
url |
Changes the label into a hyperlink with a tooltip that shows the URL. Selecting the hyperlink opens the user's default browser to that URL. |
selector |
Allows customization of the editor for a variable. The following selectors are currently supported: - string: Standard text box, default for strings. - list: Standard combo box, default for lists. - yesno: Combo box to choose between y and n, for strings. - odbcConnection: Text box with an ellipse button (...) that opens a database connection dialog. |
The following example shows how to set rendering properties:
{
    "site_name": "web-app",
    "python_version": ["3.5.2"],
    "use_azure": "y",

    "_visual_studio": {
        "site_name": {
            "label": "Site name",
            "description": "E.g. <site-name>.azurewebsites.net (can only contain alphanumeric characters and `-`)"
        },
        "python_version": {
            "label": "Python version",
            "description": "The version of Python to run the site on"
        },
        "use_azure" : {
            "label": "Use Azure",
            "description": "Include Azure deployment files",
            "selector": "yesno",
            "url": "https://azure.microsoft.com"
        }
    }
}
Run Visual Studio tasks
Cookiecutter has a feature called Post-Generate Hooks that lets you run arbitrary Python code after the files are generated. Although the feature is flexible, it doesn't allow easy access to Visual Studio.
You can use this feature to open a file in the Visual Studio editor or its web browser. You can also trigger the Visual Studio UI that prompts the user to create a virtual environment and install package requirements.
To allow these scenarios, Visual Studio looks for extended metadata in the cookiecutter.json file. It searches for the commands to run after the user opens the generated files in Solution Explorer or after the files are added to an existing project. (Again, the user can opt out of running the tasks by clearing the Run additional tasks on completion template option.)
The following example shows how to set extended metadata in the cookiecutter.json file:
"_visual_studio_post_cmds": [
    {
        "name": "File.OpenFile",
        "args": "{{cookiecutter._output_folder_path}}\\readme.txt"
    },
    {
        "name": "Cookiecutter.ExternalWebBrowser",
        "args": "https://zcusa.951200.xyz"
    },
    {
        "name": "Python.InstallProjectRequirements",
        "args": "{{cookiecutter._output_folder_path}}\\dev-requirements.txt"
    }
]
Specify the commands by name and use the nonlocalized (English) name to work on localized installs of Visual Studio. You can test and discover command names in the Visual Studio Command window.
If you want to pass a single argument, specify the argument as a string as shown for the name metadata in the previous example.
If you don't need to pass an argument, leave the value as an empty string or omit it from the JSON file:
"_visual_studio_post_cmds": [
    {
        "name": "View.WebBrowser"
    }
]
For multiple arguments, use an array. For switches, split the switch and its value into separate arguments and use proper quoting, as shown in this example:
"_visual_studio_post_cmds": [
    {
        "name": "File.OpenFile",
        "args": [
            "{{cookiecutter._output_folder_path}}\\read me.txt",
            "/e:",
            "Source Code (text) Editor"
        ]
    }
]
Arguments can refer to other Cookiecutter variables. In the previous example, the internal _output_folder_path variable is used to form an absolute path to generate files.
The Python.InstallProjectRequirements command works only when adding files to an existing project. This limitation exists because the command is processed by the Python project in Solution Explorer, and there's no project to receive the message while in Solution Explorer - Folder View.
Troubleshoot template issues
Review the following sections for tips about troubleshooting your Python environment and code when working with Cookiecutter.
Error loading template
Some templates might use invalid data types in their cookiecutter.json file, such as boolean. You can report these instances to the template author by selecting the Issues link in the template information pane.
Hook script failed
Some templates might use post-generation scripts that aren't compatible with the Cookiecutter UI. For example, scripts that query the user for input can fail due to lack of a terminal console.
Hook script not supported on Windows
If the post script file is .sh, it might not be associated with an application on your Windows computer. You might see a Windows dialog prompt to find a compatible application in the Windows store.
Templates with known issues
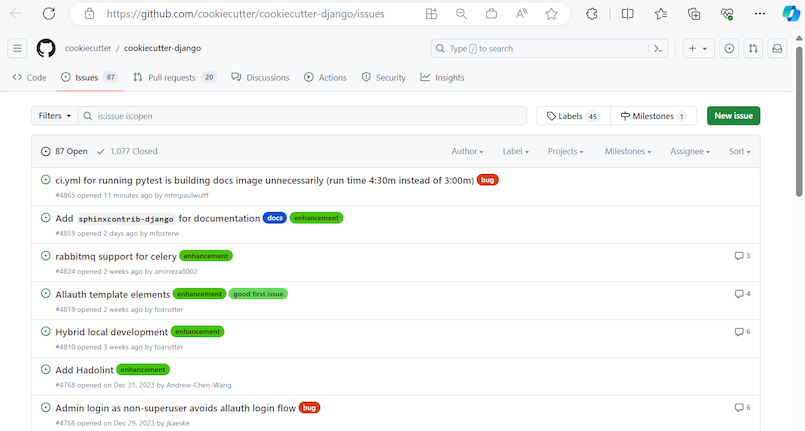
You can find out if a template has known issues by using the Issues link in the template summary in Cookiecutter Explorer:

The link opens the GitHub issues page for the template:


