How to write and submit Hive queries using Visual Studio
Now HDInsight Tools for Visual Studio supports generic Hadoop clusters, so you can use HDInsight Tools for Visual Studio to connect to your own Hadoop cluster (Yes! Even on-prem ones!) with a free version Visual Studio and do the following:
- Write a Hive query with enhanced IntelliSense/auto-completion support
- Connect to your cluster, view all the jobs and associated resources (queries, job output an job logs) in your cluster with an intuitive UI
- In the future we plan to bring more Hive performance investigation capabilities!
This blog describes how to connect HDInsight Tools for Visual Studio to your generic Hadoop cluster. It can be an on-prem cluster, or a cloud hosted cluster (as long as you have access to several endpoints, more details below).
Please be noted that this feature is currently in preview so it only supports the Basic Auth (the username/password combination) - it does not support Kerberos now.
Basically there are three steps we need to take:
- Install Visual Studio and the tool
- Configure your Hadoop cluster
- Make sure your Hadoop cluster is reachable from client
- Make sure your cluster has the right configurations
- Configure HDInsight Tools for Visual Studio
I will describe each steps in detail.
Step 1: Installation
The tool is compatible with two free Visual Studio versions: Visual Studio 2015 (now RC) Community and Visual Studio 2013 Community.
If you haven't installed them before, just click the links below, so Visual Studio and Azure SDK will be installed in your machine:
Visual Studio 2015 Community Release Candidate with Microsoft Azure SDK - 2.6
Visual Studio Community 2013 with Microsoft Azure SDK - 2.6
If you have ever installed the Visual Studio community version before, you need to install Azure SDK to get the latest HDInsight Tools:
Azure SDK for .NET (VS 2015) - 2.6
Azure SDK for .NET (VS 2013) - 2.6
Step 2: Configure your Hadoop cluster
Step 2.1 Make sure your Hadoop cluster is reachable from client
- If you are using a cloud based Hadoop cluster (for example Hortonworks Sandbox on Azure), you should make sure that the ports of the Azure VMs are reachable from Visual Studio. Normally the cloud service provider will block the Hadoop ports (for example, WebHCat by default is using port 50111) so you must open the ports in the VM configuration page.
- Different services might run in different machines on your Hadoop cluster so please make sure that you know exactly which machine is running WebHCat, WebHDFS and HiveServer2. Normally you could get the information from Ambari (adopted by Hortonworks HDP) or Cloudera Manager (adopted by Cloudera CDH), or consulting your system administrator.
- Having confirmed 1# and 2# above, you should open at least 3 service ports: WebHCat Service (by default on port 50111) used to submit queries as well as list jobs; HiveServer2 (by default on port 10000) used to preview the table; WebHDFS (by default on Name Node 50070 and Data Node 50075) used to store queries.
- Please make sure that all the HDFS Data Node port is accessible to HDInsight Tools for Visual Studio. The default value is 50075. The reason is that when HDInsight Tools for Visual Studio writes file to HDFS, it is using WebHDFS APIs which require a two phase write. Generally speaking, HDInsight Tools for Visual Studio will first contact the Name Node, and the Name Node returns the address of the Data Node to write, and then the tool reaches the corresponding Data Node and write files. For more details about WebHDFS please refer to the document here.
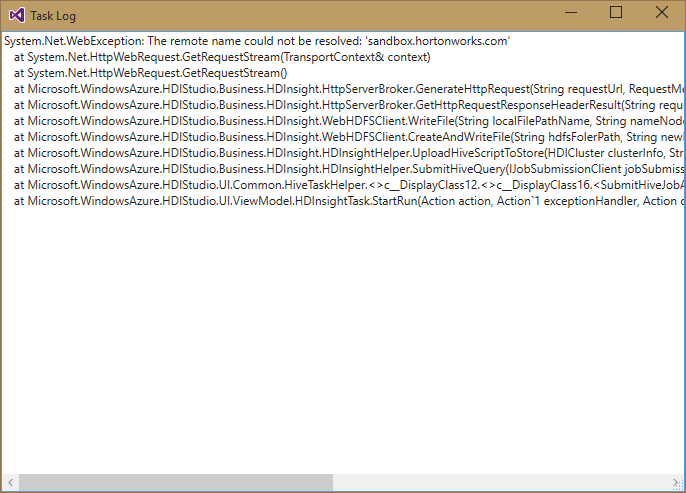
- The Data Node address is not configurable in HDInsight Tools for Visual Studio, and sometimes the address returned by the Name Node might not be reachable directly by HDInsight Tools for Visual Studio due to the two-phase write using WebHDFS API. You might need to modify the hosts file of the development machine on which HDInsight Tools for Visual Studio is running in order to redirect that address to the real IP address. For example, if you are using Hortonworks Sandbox on Azure, then the Data Node address returned by the Name Node is actually sandbox.hortonworks.com (you can get the Data Node host address by using Ambari or other management tools). You will see the error like:
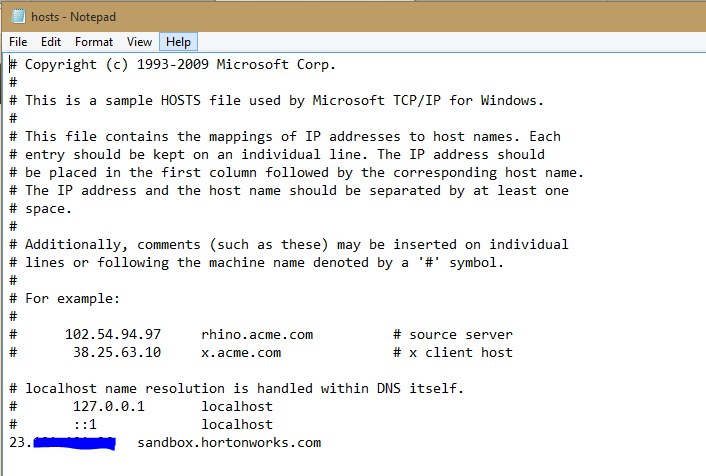
This address (sandbox.hortonworks.com) actually does not exist and is not reachable for HDInsight Tools for Visual Studio, so you need to edit the hosts file and make sandbox.hortonworks.com to point to the correct public IP address.
Step 2.2 Make sure the Hadoop cluster has the right configurations
- Make sure the user which will be used in Visual Studio could be impersonated by WebHCat since HDInsight Tools for Visual Studio is using WebHCat to submit jobs. You need to update the configuration hadoop.proxyuser.hcat.groups in core-site.xmlto reflect the changes. For example, if you want to use user foo in Visual Studio, and foo belongs to a group named grpfoo, then grpfoo should be part of hadoop.proxyuser.hcat.groups . Also, you need to make sure that the IP address you are using should appear in hadoop.proxyuser.hcat.hosts. (or set * to this configuration to allow all IPs to access your cluster)
- Make sure the user which will be used in Visual Studio could access a folder named /Portal-Queriesunder root folder of HDFS. HDInsight Tools for Visual Studio uses that folder to store the queries you submitted. There are several ways to do this:
- Recommended: You could achieve this by creating a folder named /Portal-Queries under HDFS root folder and set its permission to 777 (i.e. everyone could write to that folder)
- Add the user which will be used in Visual Studio to HDFS supergroup (you could find the configurations in dfs.permissions.superusergroup in hdfs-site.xml)
- Turn off the HDFS security check (set dfs.permissions.enabled to false in hdfs-site.xml) which might make your HDFS unsecure.
Step 3: Configure HDInsight Tools for Visual Studio
After installation, open Visual Studio, click VIEW > Server Explorer. Then right click on the “HDInsight” Node, select “Connect to a Hadoop Cluster (Preview)”.
- Configure the required endpoints (WebHCat, WebHDFS, and HiveServer2) of your Hadoop cluster. If you have gateways, be sure to input the correct address that could route over the gateway.
- After adding the Hadoop cluster you could see it in Server explorer (under HDInsight Node). You could right click on the cluster to see all the job histories on the emulator, or write queries with word completion and IntelliSense support. You can also create a Hive project and use other version management tools to cooperate within teams. For more information on how to use HDInsight for Visual Studio, you could refer the user manual here.
- Note: the user name and password are stored in clear text under the folder: C:\Users\<your user name>\AppData\Roaming\Microsoft\HDInsight Tools for Visual Studio\Local Emulator
Feedbacks
If you have any suggestions or feedback to the tool, feel free to reach us at hdivstool at microsoft dot com! We also have a preview bits which has several cool features for Hive on Tez/improved Hive authoring experience, so if you are interested in trying that, please also email us!
.png)


