Görüntüler, Çizimler ve Görsellerle Boyama
Bu konu başlığında , DrawingBrushve nesnelerini kullanarak bir alanı resim, Drawing, veya Visualile boyama işlemleri açıklanmaktadırImageBrushVisualBrush.
Ön koşullar
Bu konuyu anlamak için Windows Presentation Foundation'ın (WPF) sağladığı farklı fırça türlerini ve bunların temel özelliklerini biliyor olmanız gerekir. Giriş için bkz . WPF Fırçalarına Genel Bakış.
Görüntü ile bir Alanı Boyama
bir ImageBrush alanı ile ImageSourceboyar. ile kullanılacak en yaygın tür, bit eşlem ImageBrushBitmapImagegrafiğini açıklayan bir türüdürImageSource. Bir nesneyi kullanarak Drawing boyamak için kullanabilirsinizDrawingImage, ancak bunun yerine bir DrawingBrush kullanmak daha kolaydır. Nesneler hakkında ImageSource daha fazla bilgi için bkz. Görüntülemeye Genel Bakış.
ile ImageBrushboyamak için bir BitmapImage oluşturun ve bit eşlem içeriğini yüklemek için kullanın. Ardından özelliğini ayarlamak ImageSourceImageBrushiçin öğesini kullanınBitmapImage. Son olarak, öğesini boyamak istediğiniz nesneye uygulayın ImageBrush . Genişletilebilir Uygulama Biçimlendirme Dili'nde (XAML), öğesinin ImageSourceImageBrush özelliğini yüklenecek görüntünün yoluyla da ayarlayabilirsiniz.
Tüm Brush nesneler gibi, şekiller, ImageBrush paneller, denetimler ve metin gibi nesneleri boyamak için de kullanılabilir. Aşağıdaki çizimde ile ImageBrushelde edilebilecek bazı efektler gösterilmektedir.
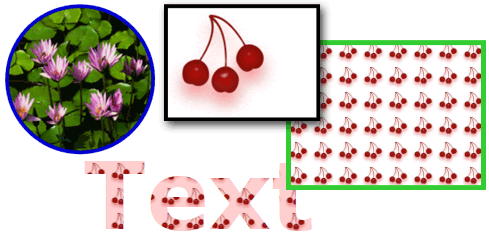
ImageBrush tarafından boyanan nesneler
Varsayılan olarak, bir ImageBrush resim boyanmakta olan alanı tamamen dolduracak şekilde görüntüyü genişletir ve boyanmış alanın görüntüden farklı bir en boy oranı varsa büyük olasılıkla görüntüyü bozabilir. Özelliğini varsayılan değeri FillNoneolan , Uniformveya UniformToFillolarak değiştirerek Stretch bu davranışı değiştirebilirsiniz. ImageBrush türü olduğundan, bir görüntü fırçasının TileBrushçıkış alanını tam olarak nasıl dolduracağını belirtebilir ve hatta desenler oluşturabilirsiniz. Gelişmiş TileBrush özellikler hakkında daha fazla bilgi için bkz. TileBrush'a Genel Bakış.
Örnek: Bir Nesneyi Bit Eşlem Görüntüsüyle Boyama
Aşağıdaki örnek, bir ImageBrush öğesini boyamak Background için bir Canvaskullanır.
<Page
  xmlns="http://schemas.microsoft.com/winfx/2006/xaml/presentation"
  xmlns:x="http://schemas.microsoft.com/winfx/2006/xaml"
  x:Class="Microsoft.Samples.BrushExamples.ImageBrushExample"
  WindowTitle="ImageBrush Example"
  Background="White">

  <StackPanel>

    <Canvas
      Height="200" Width="300">
      <Canvas.Background>
        <ImageBrush ImageSource="sampleImages\Waterlilies.jpg" />
      </Canvas.Background>
    </Canvas>


  </StackPanel>
</Page>
using System;
using System.Windows;
using System.Windows.Controls;
using System.Windows.Media;
using System.Windows.Media.Imaging;

namespace Microsoft.Samples.BrushExamples
{

    public class ImageBrushExample : Page
    {

        public ImageBrushExample()
        {

            StackPanel mainPanel = new StackPanel();
            canvasBackgroundExample(mainPanel);
            this.Content = mainPanel;
        }

        private void canvasBackgroundExample(Panel mainPanel)
        {

            BitmapImage theImage = new BitmapImage
                (new Uri("sampleImages\\Waterlilies.jpg", UriKind.Relative));

            ImageBrush myImageBrush = new ImageBrush(theImage);

            Canvas myCanvas = new Canvas();
            myCanvas.Width = 300;
            myCanvas.Height = 200;
            myCanvas.Background = myImageBrush;

            mainPanel.Children.Add(myCanvas);
        }
    }
}
Imports System.Windows
Imports System.Windows.Controls
Imports System.Windows.Media
Imports System.Windows.Media.Imaging

Namespace Microsoft.Samples.BrushExamples

    Public Class ImageBrushExample
        Inherits Page

        Public Sub New()

            Dim mainPanel As New StackPanel()
            canvasBackgroundExample(mainPanel)
            Me.Content = mainPanel

        End Sub


        Private Sub canvasBackgroundExample(ByVal mainPanel As Panel)

            Dim theImage As New BitmapImage(New Uri("sampleImages\Waterlilies.jpg", UriKind.Relative))

            Dim myImageBrush As New ImageBrush(theImage)

            Dim myCanvas As New Canvas()
            myCanvas.Width = 300
            myCanvas.Height = 200
            myCanvas.Background = myImageBrush

            mainPanel.Children.Add(myCanvas)


        End Sub

    End Class

End Namespace
Çizim ile bir Alanı Boyama
A DrawingBrush , bir alanı şekiller, metinler, resimler ve videolarla boyamanızı sağlar. Çizim fırçasının içindeki şekiller düz bir renkle, gradyanla, görüntüyle, hatta başka DrawingBrushbir renkle boyanabilir. Aşağıdaki çizimde, bazı DrawingBrushkullanımları gösterilmektedir.
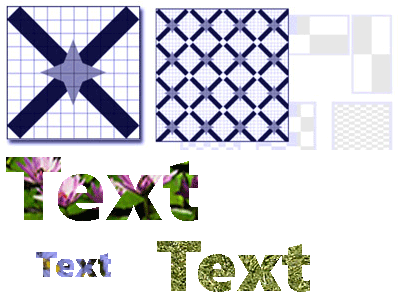
DrawingBrush tarafından boyanan nesneler
Bir DrawingBrush alanı nesneyle Drawing boyar. Nesne Drawing şekil, bit eşlem, video veya metin satırı gibi görünür içeriği açıklar. Farklı çizim türleri farklı içerik türlerini açıklar. Aşağıda, farklı çizim nesnelerinin listesi yer alır.
GeometryDrawing – Bir şekil çizer.
ImageDrawing – Bir resim çizer.
GlyphRunDrawing – Metin çizer.
VideoDrawing – Bir ses veya video dosyası çalar.
DrawingGroup – Diğer çizimleri çizer. Diğer çizimleri tek bir bileşik çizimde birleştirmek için bir çizim grubu kullanın.
Nesneler hakkında Drawing daha fazla bilgi için bkz. Çizim Nesnelerine Genel Bakış.
gibi, ImageBrushçıkış DrawingBrush alanını doldurmak için öğesini genişletir Drawing . özelliğini varsayılan ayarından Filldeğiştirerek Stretch bu davranışı geçersiz kılabilirsiniz. Daha fazla bilgi için özelliğine Stretch bakın.
Örnek: Çizimle Nesne Boyama
Aşağıdaki örnekte, üç üç noktanın çizimiyle bir nesnenin nasıl boyanacakları gösterilmektedir. Üç noktayı tanımlamak için A GeometryDrawing kullanılır.
<Button Content="A Button">
  <Button.Background>
    <DrawingBrush>
      <DrawingBrush.Drawing>
        <GeometryDrawing Brush="LightBlue">
          <GeometryDrawing.Geometry>
            <GeometryGroup>
              <EllipseGeometry RadiusX="12.5" RadiusY="25" Center="25,50" />
              <EllipseGeometry RadiusX="12.5" RadiusY="25" Center="50,50" />
              <EllipseGeometry RadiusX="12.5" RadiusY="25" Center="75,50" />
            </GeometryGroup>
          </GeometryDrawing.Geometry>
          <GeometryDrawing.Pen>
            <Pen Thickness="1" Brush="Gray" />
          </GeometryDrawing.Pen>
        </GeometryDrawing>
      </DrawingBrush.Drawing>
    </DrawingBrush>
  </Button.Background>
</Button>
// Create a DrawingBrush.
DrawingBrush myDrawingBrush = new DrawingBrush();

// Create a drawing.
GeometryDrawing myGeometryDrawing = new GeometryDrawing();
myGeometryDrawing.Brush = Brushes.LightBlue;
myGeometryDrawing.Pen = new Pen(Brushes.Gray, 1);
GeometryGroup ellipses = new GeometryGroup();
ellipses.Children.Add(new EllipseGeometry(new Point(25,50), 12.5, 25));
ellipses.Children.Add(new EllipseGeometry(new Point(50,50), 12.5, 25));
ellipses.Children.Add(new EllipseGeometry(new Point(75,50), 12.5, 25));

myGeometryDrawing.Geometry = ellipses;
myDrawingBrush.Drawing = myGeometryDrawing;

Button myButton = new Button();
myButton.Content = "A Button";

// Use the DrawingBrush to paint the button's background.
myButton.Background = myDrawingBrush;
' Create a DrawingBrush.
Dim myDrawingBrush As New DrawingBrush()

' Create a drawing.
Dim myGeometryDrawing As New GeometryDrawing()
myGeometryDrawing.Brush = Brushes.LightBlue
myGeometryDrawing.Pen = New Pen(Brushes.Gray, 1)
Dim ellipses As New GeometryGroup()
ellipses.Children.Add(New EllipseGeometry(New Point(25,50), 12.5, 25))
ellipses.Children.Add(New EllipseGeometry(New Point(50,50), 12.5, 25))
ellipses.Children.Add(New EllipseGeometry(New Point(75,50), 12.5, 25))

myGeometryDrawing.Geometry = ellipses
myDrawingBrush.Drawing = myGeometryDrawing

Dim myButton As New Button()
myButton.Content = "A Button"

' Use the DrawingBrush to paint the button's background.
myButton.Background = myDrawingBrush
Görsel ile bir Alanı Boyama
Tüm fırçaların en çok yönlü ve güçlü olan, VisualBrush ile bir alanı Visualboyar. A Visual , birçok kullanışlı grafik bileşenin atası olarak hizmet veren düşük düzeyli bir grafik türüdür. Örneğin, Window, FrameworkElementve Control sınıfları tüm nesne türleridir Visual . kullanarak VisualBrush, neredeyse tüm Windows Presentation Foundation (WPF) grafik nesneleriyle alanları boyayabilirsiniz.
Dekont
Nesne türü olmasına rağmenVisualBrush, özelliği dışında nullbir değere ayarlandığında dondurulamaz (salt Visual okunur hale getirilemez).Freezable
bir öğesinin içeriğini VisualBrushbelirtmenin Visual iki yolu vardır.
Yeni Visual bir oluşturun ve özelliğini VisualBrushayarlamak Visual için kullanın. Örnek için, aşağıdaki Örnek: Bir Nesneyi Görselle Boyama bölümüne bakın.
Hedef Visualöğesinin yinelenen görüntüsünü oluşturan mevcut Visualbir kullanın. Daha sonra yansıma ve büyütme gibi ilginç efektler oluşturmak için öğesini VisualBrush kullanabilirsiniz. Örnek için Örnek: Düşünceler ion oluşturma bölümüne bakın.
ve (panel veya denetim gibi) için VisualVisualBrushUIElement yeni Visual bir tanımladığınızda, özellik olarak ayarlandığında truedüzen sistemi ve alt öğeleri AutoLayoutContent üzerinde UIElement çalışır. Ancak kök UIElement temelde sistemin geri kalanından yalıtılmış durumdadır: stiller ve dış düzen bu sınırın içinde yer alamıyor. Bu nedenle, kök UIElementboyutunu açıkça belirtmeniz gerekir, çünkü tek üst öğesidir VisualBrush ve bu nedenle kendisini otomatik olarak boyanacak alana boyutlandıramaz. Windows Presentation Foundation'daki (WPF) düzen hakkında daha fazla bilgi için bkz . Düzen.
ve DrawingBrushgibiImageBrush, çıkış VisualBrush alanını doldurmak için içeriğini genişletir. özelliğini varsayılan ayarından Filldeğiştirerek Stretch bu davranışı geçersiz kılabilirsiniz. Daha fazla bilgi için özelliğine Stretch bakın.
Örnek: Görselle Nesne Boyama
Aşağıdaki örnekte, dikdörtgeni boyamak için çeşitli denetimler ve paneller kullanılmıştır.
<Rectangle Width="150" Height="150" Stroke="Black" Margin="5,0,5,0">
  <Rectangle.Fill>
    <VisualBrush>
      <VisualBrush.Visual>
        <StackPanel Background="White">
          <Rectangle Width="25" Height="25" Fill="Red" Margin="2" />
          <TextBlock FontSize="10pt" Margin="2">Hello, World!</TextBlock>
          <Button Margin="2">A Button</Button>
        </StackPanel>
      </VisualBrush.Visual>
    </VisualBrush>
  </Rectangle.Fill>
</Rectangle>
VisualBrush myVisualBrush = new VisualBrush();

// Create the visual brush's contents.
StackPanel myStackPanel = new StackPanel();
myStackPanel.Background = Brushes.White;

Rectangle redRectangle = new Rectangle();
redRectangle.Width = 25;
redRectangle.Height =25;
redRectangle.Fill = Brushes.Red;
redRectangle.Margin = new Thickness(2);
myStackPanel.Children.Add(redRectangle);

TextBlock someText = new TextBlock();
FontSizeConverter myFontSizeConverter = new FontSizeConverter();
someText.FontSize = (double)myFontSizeConverter.ConvertFrom("10pt");
someText.Text = "Hello, World!";
someText.Margin = new Thickness(2);
myStackPanel.Children.Add(someText);

Button aButton = new Button();
aButton.Content = "A Button";
aButton.Margin = new Thickness(2);
myStackPanel.Children.Add(aButton);

// Use myStackPanel as myVisualBrush's content.
myVisualBrush.Visual = myStackPanel;

// Create a rectangle to paint.
Rectangle myRectangle = new Rectangle();
myRectangle.Width = 150;
myRectangle.Height = 150;
myRectangle.Stroke = Brushes.Black;
myRectangle.Margin = new Thickness(5,0,5,0);

// Use myVisualBrush to paint myRectangle.
myRectangle.Fill = myVisualBrush;
Dim myVisualBrush As New VisualBrush()

' Create the visual brush's contents.
Dim myStackPanel As New StackPanel()
myStackPanel.Background = Brushes.White

Dim redRectangle As New Rectangle()
With redRectangle
    .Width = 25
    .Height = 25
    .Fill = Brushes.Red
    .Margin = New Thickness(2)
End With
myStackPanel.Children.Add(redRectangle)

Dim someText As New TextBlock()
Dim myFontSizeConverter As New FontSizeConverter()
someText.FontSize = CDbl(myFontSizeConverter.ConvertFrom("10pt"))
someText.Text = "Hello, World!"
someText.Margin = New Thickness(2)
myStackPanel.Children.Add(someText)

Dim aButton As New Button()
aButton.Content = "A Button"
aButton.Margin = New Thickness(2)
myStackPanel.Children.Add(aButton)

' Use myStackPanel as myVisualBrush's content.
myVisualBrush.Visual = myStackPanel

' Create a rectangle to paint.
Dim myRectangle As New Rectangle()
With myRectangle
    .Width = 150
    .Height = 150
    .Stroke = Brushes.Black
    .Margin = New Thickness(5, 0, 5, 0)
End With

' Use myVisualBrush to paint myRectangle.
myRectangle.Fill = myVisualBrush
Örnek: Düşünceler oluşturma
Yukarıdaki örnekte, arka plan olarak kullanmak üzere yeni Visual bir oluşturma işleminin nasıl oluşturulacağı gösterildi. Var olan bir görseli görüntülemek için de kullanabilirsiniz VisualBrush ; bu özellik yansımalar ve büyütme gibi ilginç görsel efektler üretmenizi sağlar. Aşağıdaki örnekte, VisualBrush birkaç öğe içeren bir yansıması oluşturmak için bir Border kullanılır. Aşağıdaki çizimde bu örneğin ürettiği çıkış gösterilmektedir.
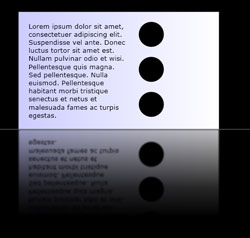
Yansıtılmış Bir Visual nesnesi
using System;
using System.Windows;
using System.Windows.Data;
using System.Windows.Controls;
using System.Windows.Media;
using System.Windows.Media.Effects;
using System.Windows.Media.Imaging;
using System.IO;
using System.Collections.ObjectModel;
using System.Windows.Shapes;
namespace SDKSample
{
    public partial class ReflectionExample : Page
    {
        public ReflectionExample()
        {
            // Create a name scope for the page.
            NameScope.SetNameScope(this, new NameScope());

            this.Background = Brushes.Black;
            StackPanel myStackPanel = new StackPanel();
            myStackPanel.Margin = new Thickness(50);

            Border myReflectedBorder = new Border();
            this.RegisterName("ReflectedVisual", myReflectedBorder);

            // Create a gradient background for the border.
            GradientStop firstStop = new GradientStop();
            firstStop.Offset = 0.0;
            Color firstStopColor = new Color();
            firstStopColor.R = 204;
            firstStopColor.G = 204;
            firstStopColor.B = 255;
            firstStopColor.A = 255;
            firstStop.Color = firstStopColor;
            GradientStop secondStop = new GradientStop();
            secondStop.Offset = 1.0;
            secondStop.Color = Colors.White;

            GradientStopCollection myGradientStopCollection = new GradientStopCollection();
            myGradientStopCollection.Add(firstStop);
            myGradientStopCollection.Add(secondStop);

            LinearGradientBrush myLinearGradientBrush = new LinearGradientBrush();
            myLinearGradientBrush.StartPoint = new Point(0, 0.5);
            myLinearGradientBrush.EndPoint = new Point(1, 0.5);
            myLinearGradientBrush.GradientStops = myGradientStopCollection;

            myReflectedBorder.Background = myLinearGradientBrush;

            // Add contents to the border.
            StackPanel borderStackPanel = new StackPanel();
            borderStackPanel.Orientation = Orientation.Horizontal;
            borderStackPanel.Margin = new Thickness(10);

            TextBlock myTextBlock = new TextBlock();
            myTextBlock.TextWrapping = TextWrapping.Wrap;
            myTextBlock.Width = 200;
            myTextBlock.Text = "Lorem ipsum dolor sit amet, consectetuer adipiscing elit." +
                               " Suspendisse vel ante. Donec luctus tortor sit amet est." +
                               " Nullam pulvinar odio et wisi." +
                               " Pellentesque quis magna. Sed pellentesque." +
                               " Nulla euismod." +
                               "Pellentesque habitant morbi tristique senectus et netus et malesuada fames ac turpis egestas.";

            borderStackPanel.Children.Add(myTextBlock);

            StackPanel ellipseStackPanel = new StackPanel();

            Ellipse ellipse1 = new Ellipse();
            ellipse1.Margin = new Thickness(10);
            ellipse1.Height = 50;
            ellipse1.Width = 50;
            ellipse1.Fill = Brushes.Black;
            ellipseStackPanel.Children.Add(ellipse1);
            Ellipse ellipse2 = new Ellipse();
            ellipse2.Margin = new Thickness(10);
            ellipse2.Height = 50;
            ellipse2.Width = 50;
            ellipse2.Fill = Brushes.Black;
            ellipseStackPanel.Children.Add(ellipse2);
            Ellipse ellipse3 = new Ellipse();
            ellipse3.Margin = new Thickness(10);
            ellipse3.Height = 50;
            ellipse3.Width = 50;
            ellipse3.Fill = Brushes.Black;
            ellipseStackPanel.Children.Add(ellipse3);
            borderStackPanel.Children.Add(ellipseStackPanel);

            myReflectedBorder.Child = borderStackPanel;

            // Create divider rectangle
            Rectangle dividerRectangle = new Rectangle();
            dividerRectangle.Height = 1;
            dividerRectangle.Fill = Brushes.Gray;
            dividerRectangle.HorizontalAlignment = HorizontalAlignment.Stretch;

            // Create the object to contain the reflection.
            Rectangle reflectionRectangle = new Rectangle();

            // Bind the height of the rectangle to the border height.
            Binding heightBinding = new Binding();
            heightBinding.ElementName = "ReflectedVisual";
            heightBinding.Path = new PropertyPath(Rectangle.HeightProperty);
            BindingOperations.SetBinding(reflectionRectangle, Rectangle.HeightProperty, heightBinding);

            // Bind the width of the rectangle to the border width.
            Binding widthBinding = new Binding();
            widthBinding.ElementName = "ReflectedVisual";
            widthBinding.Path = new PropertyPath(Rectangle.WidthProperty);
            BindingOperations.SetBinding(reflectionRectangle, Rectangle.WidthProperty, widthBinding);

            // Creates the reflection.
            VisualBrush myVisualBrush = new VisualBrush();
            myVisualBrush.Opacity = 0.75;
            myVisualBrush.Stretch = Stretch.None;
            Binding reflectionBinding = new Binding();
            reflectionBinding.ElementName = "ReflectedVisual";
            BindingOperations.SetBinding(myVisualBrush, VisualBrush.VisualProperty, reflectionBinding);

            ScaleTransform myScaleTransform = new ScaleTransform();
            myScaleTransform.ScaleX = 1;
            myScaleTransform.ScaleY = -1;
            TranslateTransform myTranslateTransform = new TranslateTransform();
            myTranslateTransform.Y = 1;

            TransformGroup myTransformGroup = new TransformGroup();
            myTransformGroup.Children.Add(myScaleTransform);
            myTransformGroup.Children.Add(myTranslateTransform);

            myVisualBrush.RelativeTransform = myTransformGroup;

            reflectionRectangle.Fill = myVisualBrush;

            // Create a gradient background for the border.
            GradientStop firstStop2 = new GradientStop();
            firstStop2.Offset = 0.0;
            Color c1 = new Color();
            c1.R = 0;
            c1.G = 0;
            c1.B = 0;
            c1.A = 255;
            firstStop2.Color = c1;
            GradientStop secondStop2 = new GradientStop();
            secondStop2.Offset = 0.5;
            Color c2 = new Color();
            c2.R = 0;
            c2.G = 0;
            c2.B = 0;
            c2.A = 51;
            firstStop2.Color = c2;
            GradientStop thirdStop = new GradientStop();
            thirdStop.Offset = 0.75;
            Color c3 = new Color();
            c3.R = 0;
            c3.G = 0;
            c3.B = 0;
            c3.A = 0;
            thirdStop.Color = c3;

            GradientStopCollection myGradientStopCollection2 = new GradientStopCollection();
            myGradientStopCollection2.Add(firstStop2);
            myGradientStopCollection2.Add(secondStop2);
            myGradientStopCollection2.Add(thirdStop);

            LinearGradientBrush myLinearGradientBrush2 = new LinearGradientBrush();
            myLinearGradientBrush2.StartPoint = new Point(0.5, 0);
            myLinearGradientBrush2.EndPoint = new Point(0.5, 1);
            myLinearGradientBrush2.GradientStops = myGradientStopCollection2;

            reflectionRectangle.OpacityMask = myLinearGradientBrush2;

            BlurBitmapEffect myBlurBitmapEffect = new BlurBitmapEffect();
            myBlurBitmapEffect.Radius = 1.5;

            reflectionRectangle.BitmapEffect = myBlurBitmapEffect;

            myStackPanel.Children.Add(myReflectedBorder);
            myStackPanel.Children.Add(dividerRectangle);
            myStackPanel.Children.Add(reflectionRectangle);
            this.Content = myStackPanel;
        }
        /*
    <Rectangle
      Height="{Binding Path=ActualHeight, ElementName=ReflectedVisual}"
      Width="{Binding Path=ActualWidth, ElementName=ReflectedVisual}">

      <Rectangle.OpacityMask>
        <LinearGradientBrush StartPoint="0.5,0" EndPoint="0.5,1">
          <GradientStop Color="#FF000000" Offset="0.0" />
          <GradientStop Color="#33000000" Offset="0.5" />
          <GradientStop Color="#00000000" Offset="0.75" />
        </LinearGradientBrush>
      </Rectangle.OpacityMask>

      <Rectangle.BitmapEffect>
        <BlurBitmapEffect Radius="1.5" />
      </Rectangle.BitmapEffect>

    </Rectangle>
  </StackPanel>
</Page>

*/
    }
}
Imports System.Windows
Imports System.Windows.Data
Imports System.Windows.Controls
Imports System.Windows.Media
Imports System.Windows.Media.Effects
Imports System.Windows.Media.Imaging
Imports System.IO
Imports System.Collections.ObjectModel
Imports System.Windows.Shapes
Namespace SDKSample
    Partial Public Class ReflectionExample
        Inherits Page
        Public Sub New()
            ' Create a name scope for the page.
            NameScope.SetNameScope(Me, New NameScope())

            Me.Background = Brushes.Black
            Dim myStackPanel As New StackPanel()
            myStackPanel.Margin = New Thickness(50)

            Dim myReflectedBorder As New Border()
            Me.RegisterName("ReflectedVisual", myReflectedBorder)

            ' Create a gradient background for the border.
            Dim firstStop As New GradientStop()
            firstStop.Offset = 0.0
            Dim firstStopColor As New Color()
            firstStopColor.R = 204
            firstStopColor.G = 204
            firstStopColor.B = 255
            firstStopColor.A = 255
            firstStop.Color = firstStopColor
            Dim secondStop As New GradientStop()
            secondStop.Offset = 1.0
            secondStop.Color = Colors.White

            Dim myGradientStopCollection As New GradientStopCollection()
            myGradientStopCollection.Add(firstStop)
            myGradientStopCollection.Add(secondStop)

            Dim myLinearGradientBrush As New LinearGradientBrush()
            myLinearGradientBrush.StartPoint = New Point(0, 0.5)
            myLinearGradientBrush.EndPoint = New Point(1, 0.5)
            myLinearGradientBrush.GradientStops = myGradientStopCollection

            myReflectedBorder.Background = myLinearGradientBrush

            ' Add contents to the border.
            Dim borderStackPanel As New StackPanel()
            borderStackPanel.Orientation = Orientation.Horizontal
            borderStackPanel.Margin = New Thickness(10)

            Dim myTextBlock As New TextBlock()
            myTextBlock.TextWrapping = TextWrapping.Wrap
            myTextBlock.Width = 200
            myTextBlock.Text = "Lorem ipsum dolor sit amet, consectetuer adipiscing elit." & " Suspendisse vel ante. Donec luctus tortor sit amet est." & " Nullam pulvinar odio et wisi." & " Pellentesque quis magna. Sed pellentesque." & " Nulla euismod." & "Pellentesque habitant morbi tristique senectus et netus et malesuada fames ac turpis egestas."

            borderStackPanel.Children.Add(myTextBlock)

            Dim ellipseStackPanel As New StackPanel()

            Dim ellipse1 As New Ellipse()
            ellipse1.Margin = New Thickness(10)
            ellipse1.Height = 50
            ellipse1.Width = 50
            ellipse1.Fill = Brushes.Black
            ellipseStackPanel.Children.Add(ellipse1)
            Dim ellipse2 As New Ellipse()
            ellipse2.Margin = New Thickness(10)
            ellipse2.Height = 50
            ellipse2.Width = 50
            ellipse2.Fill = Brushes.Black
            ellipseStackPanel.Children.Add(ellipse2)
            Dim ellipse3 As New Ellipse()
            ellipse3.Margin = New Thickness(10)
            ellipse3.Height = 50
            ellipse3.Width = 50
            ellipse3.Fill = Brushes.Black
            ellipseStackPanel.Children.Add(ellipse3)
            borderStackPanel.Children.Add(ellipseStackPanel)

            myReflectedBorder.Child = borderStackPanel

            ' Create divider rectangle
            Dim dividerRectangle As New Rectangle()
            dividerRectangle.Height = 1
            dividerRectangle.Fill = Brushes.Gray
            dividerRectangle.HorizontalAlignment = HorizontalAlignment.Stretch

            ' Create the object to contain the reflection.
            Dim reflectionRectangle As New Rectangle()

            ' Bind the height of the rectangle to the border height.
            Dim heightBinding As New Binding()
            heightBinding.ElementName = "ReflectedVisual"
            heightBinding.Path = New PropertyPath(Rectangle.HeightProperty)
            BindingOperations.SetBinding(reflectionRectangle, Rectangle.HeightProperty, heightBinding)

            ' Bind the width of the rectangle to the border width.
            Dim widthBinding As New Binding()
            widthBinding.ElementName = "ReflectedVisual"
            widthBinding.Path = New PropertyPath(Rectangle.WidthProperty)
            BindingOperations.SetBinding(reflectionRectangle, Rectangle.WidthProperty, widthBinding)

            ' Creates the reflection.
            Dim myVisualBrush As New VisualBrush()
            myVisualBrush.Opacity = 0.75
            myVisualBrush.Stretch = Stretch.None
            Dim reflectionBinding As New Binding()
            reflectionBinding.ElementName = "ReflectedVisual"
            BindingOperations.SetBinding(myVisualBrush, VisualBrush.VisualProperty, reflectionBinding)

            Dim myScaleTransform As New ScaleTransform()
            myScaleTransform.ScaleX = 1
            myScaleTransform.ScaleY = -1
            Dim myTranslateTransform As New TranslateTransform()
            myTranslateTransform.Y = 1

            Dim myTransformGroup As New TransformGroup()
            myTransformGroup.Children.Add(myScaleTransform)
            myTransformGroup.Children.Add(myTranslateTransform)

            myVisualBrush.RelativeTransform = myTransformGroup

            reflectionRectangle.Fill = myVisualBrush

            ' Create a gradient background for the border.
            Dim firstStop2 As New GradientStop()
            firstStop2.Offset = 0.0
            Dim c1 As New Color()
            c1.R = 0
            c1.G = 0
            c1.B = 0
            c1.A = 255
            firstStop2.Color = c1
            Dim secondStop2 As New GradientStop()
            secondStop2.Offset = 0.5
            Dim c2 As New Color()
            c2.R = 0
            c2.G = 0
            c2.B = 0
            c2.A = 51
            firstStop2.Color = c2
            Dim thirdStop As New GradientStop()
            thirdStop.Offset = 0.75
            Dim c3 As New Color()
            c3.R = 0
            c3.G = 0
            c3.B = 0
            c3.A = 0
            thirdStop.Color = c3

            Dim myGradientStopCollection2 As New GradientStopCollection()
            myGradientStopCollection2.Add(firstStop2)
            myGradientStopCollection2.Add(secondStop2)
            myGradientStopCollection2.Add(thirdStop)

            Dim myLinearGradientBrush2 As New LinearGradientBrush()
            myLinearGradientBrush2.StartPoint = New Point(0.5, 0)
            myLinearGradientBrush2.EndPoint = New Point(0.5, 1)
            myLinearGradientBrush2.GradientStops = myGradientStopCollection2

            reflectionRectangle.OpacityMask = myLinearGradientBrush2

            Dim myBlurBitmapEffect As New BlurBitmapEffect()
            myBlurBitmapEffect.Radius = 1.5

            reflectionRectangle.BitmapEffect = myBlurBitmapEffect

            myStackPanel.Children.Add(myReflectedBorder)
            myStackPanel.Children.Add(dividerRectangle)
            myStackPanel.Children.Add(reflectionRectangle)
            Me.Content = myStackPanel

        End Sub
    End Class
End Namespace
<Page
  xmlns="http://schemas.microsoft.com/winfx/2006/xaml/presentation"
  xmlns:x="http://schemas.microsoft.com/winfx/2006/xaml"
  Background="Black">


  <StackPanel Margin="50">

    <!-- The object to reflect. -->
    <Border Name="ReflectedVisual" Width="400">
      <Border.Background>
        <LinearGradientBrush StartPoint="0,0.5" EndPoint="1,0.5">
          <GradientStop Offset="0.0" Color="#CCCCFF" />
          <GradientStop Offset="1.0" Color="White" />
        </LinearGradientBrush>
      </Border.Background>
      <StackPanel Orientation="Horizontal" Margin="10">
        <TextBlock TextWrapping="Wrap" Width="200" Margin="10">
          Lorem ipsum dolor sit amet, consectetuer adipiscing elit.
          Suspendisse vel ante. Donec luctus tortor sit amet est.
          Nullam pulvinar odio et wisi.
          Pellentesque quis magna. Sed pellentesque.
          Nulla euismod.
          Pellentesque habitant morbi tristique senectus et netus et malesuada fames ac turpis egestas.
        </TextBlock>
        <StackPanel>
          <Ellipse Margin="10" Height="50" Width="50" Fill="Black" />
          <Ellipse Margin="10" Height="50" Width="50" Fill="Black" />
          <Ellipse Margin="10" Height="50" Width="50" Fill="Black" />
        </StackPanel>
      </StackPanel>
    </Border>

    <Rectangle Height="1" Fill="Gray" HorizontalAlignment="Stretch" />

    <!-- The object to contain the reflection.-->
    <Rectangle
      Height="{Binding Path=ActualHeight, ElementName=ReflectedVisual}"
      Width="{Binding Path=ActualWidth, ElementName=ReflectedVisual}">
      <Rectangle.Fill>

        <!-- Creates the reflection. -->
        <VisualBrush
          Opacity="0.75" Stretch="None"
          Visual="{Binding ElementName=ReflectedVisual}">
          <VisualBrush.RelativeTransform>

            <!-- Flip the reflection. -->
            <TransformGroup>
              <ScaleTransform ScaleX="1" ScaleY="-1" />
              <TranslateTransform  Y="1" />
            </TransformGroup>
          </VisualBrush.RelativeTransform>
        </VisualBrush>
      </Rectangle.Fill>

      <Rectangle.OpacityMask>
        <LinearGradientBrush StartPoint="0.5,0" EndPoint="0.5,1">
          <GradientStop Color="#FF000000" Offset="0.0" />
          <GradientStop Color="#33000000" Offset="0.5" />
          <GradientStop Color="#00000000" Offset="0.75" />
        </LinearGradientBrush>
      </Rectangle.OpacityMask>

      <Rectangle.BitmapEffect>
        <BlurBitmapEffect Radius="1.5" />
      </Rectangle.BitmapEffect>

    </Rectangle>
  </StackPanel>
</Page>
Ekranın bölümlerini büyütmeyi ve yansıma oluşturmayı gösteren ek örnekler için bkz . VisualBrush Örneği.
TileBrush Özellikleri
ImageBrush, DrawingBrushve VisualBrush nesne türleridir TileBrush . TileBrush nesneler, bir alanın resim, çizim veya görselle nasıl boyanmış olduğu konusunda size çok fazla denetim sağlar. Örneğin, bir alanı tek bir esnetilmiş görüntüyle boyamak yerine, desen oluşturan bir dizi resim kutucuklu bir alanı boyayabilirsiniz.
A'nın TileBrush üç birincil bileşeni vardır: içerik, kutucuklar ve çıkış alanı.
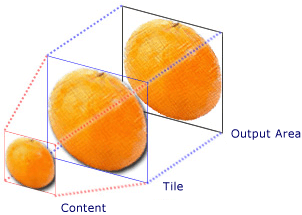
Tek bir kutucukla TileBrush bileşenleri
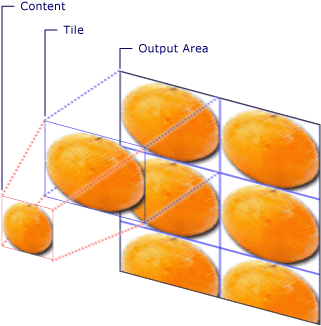
Birden çok kutucuk içeren TileBrush bileşenleri
Nesnelerin döşeme özellikleri TileBrush hakkında daha fazla bilgi için bkz. TileBrush'a Genel Bakış.
Ayrıca bkz.
.NET Desktop feedback
