Create tables (Database Engine)
Applies to:
SQL Server 2016 (13.x) and later
Azure SQL Database
Azure SQL Managed Instance
Azure Synapse Analytics
Analytics Platform System (PDW)
You can create a new table, name it, and add it to an existing database, by using the table designer in SQL Server Management Studio (SSMS), or Transact-SQL.
Permissions
This task requires CREATE TABLE permission in the database, and ALTER permission on the schema in which the table is being created.
If any columns in the CREATE TABLE statement are defined as a CLR user-defined type, either ownership of the type, or REFERENCES permission on it is required.
If any columns in the CREATE TABLE statement have an XML schema collection associated with them, either ownership of the XML schema collection or REFERENCES permission on it is required.
Use table designer in SQL Server Management Studio
In SSMS, in Object Explorer, connect to the instance of Database Engine that contains the database to be modified.
In Object Explorer, expand the Databases node and then expand the database that will contain the new table.
In Object Explorer, right-click the Tables node of your database and then select New Table.
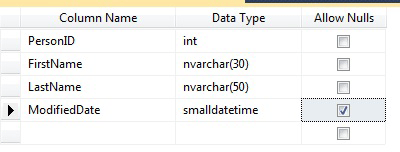
Type column names, choose data types, and choose whether to allow nulls for each column as shown in the following illustration:

To specify more properties for a column, such as identity or computed column values, select the column and in the column properties tab, choose the appropriate properties. For more information about column properties, see Table Column Properties (SQL Server Management Studio).
To specify a column as a primary key, right-click the column and select Set Primary Key. For more information, see Create Primary Keys.
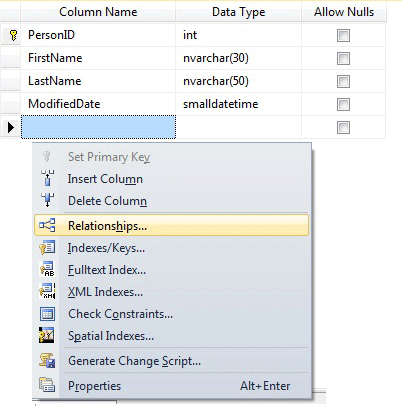
To create foreign key relationships, check constraints, or indexes, right-click in the Table Designer pane and select an object from the list as shown in the following illustration:

For more information about these objects, see Create Foreign Key Relationships, Create Check Constraints and Indexes.
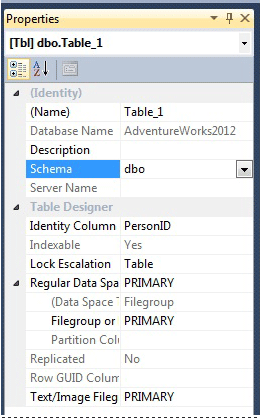
By default, the table is contained in the
dboschema. To specify a different schema for the table, right-click in the Table Designer pane and select Properties as shown in the following illustration. From the Schema dropdown list, select the appropriate schema.
For more information about schemas, see Create a Database Schema.
From the File menu, choose Save table name.
In the Choose Name dialog box, type a name for the table and select OK.
To view the new table, in Object Explorer, expand the Tables node and press F5 to refresh the list of objects. The new table is displayed in the list of tables.
Use Transact-SQL
In Object Explorer, connect to an instance of Database Engine.
On the Standard bar, select New Query.
Copy and paste the following example into the query window and select Execute.
CREATE TABLE dbo.PurchaseOrderDetail (
    PurchaseOrderID INT NOT NULL,
    LineNumber SMALLINT NOT NULL,
    ProductID INT NULL,
    UnitPrice MONEY NULL,
    OrderQty SMALLINT NULL,
    ReceivedQty FLOAT NULL,
    RejectedQty FLOAT NULL,
    DueDate DATETIME NULL
);