你当前正在访问 Microsoft Azure Global Edition 技术文档网站。 如果需要访问由世纪互联运营的 Microsoft Azure 中国技术文档网站,请访问 https://docs.azure.cn。
如何使用批处理终结点来操作训练管道
适用范围: Azure CLI ml 扩展 v2(最新版)
 Python SDK azure-ai-ml v2(最新版)
本文介绍如何在批处理终结点下操作训练管道。 管道使用多个组件(或步骤),包括模型训练、数据预处理和模型评估。
你将了解以下内容:
- 创建和测试训练管道
- 将管道部署到批处理终结点
- 修改管道并在同一终结点中创建新部署
- 测试新部署,并将其设置为默认部署
关于此示例
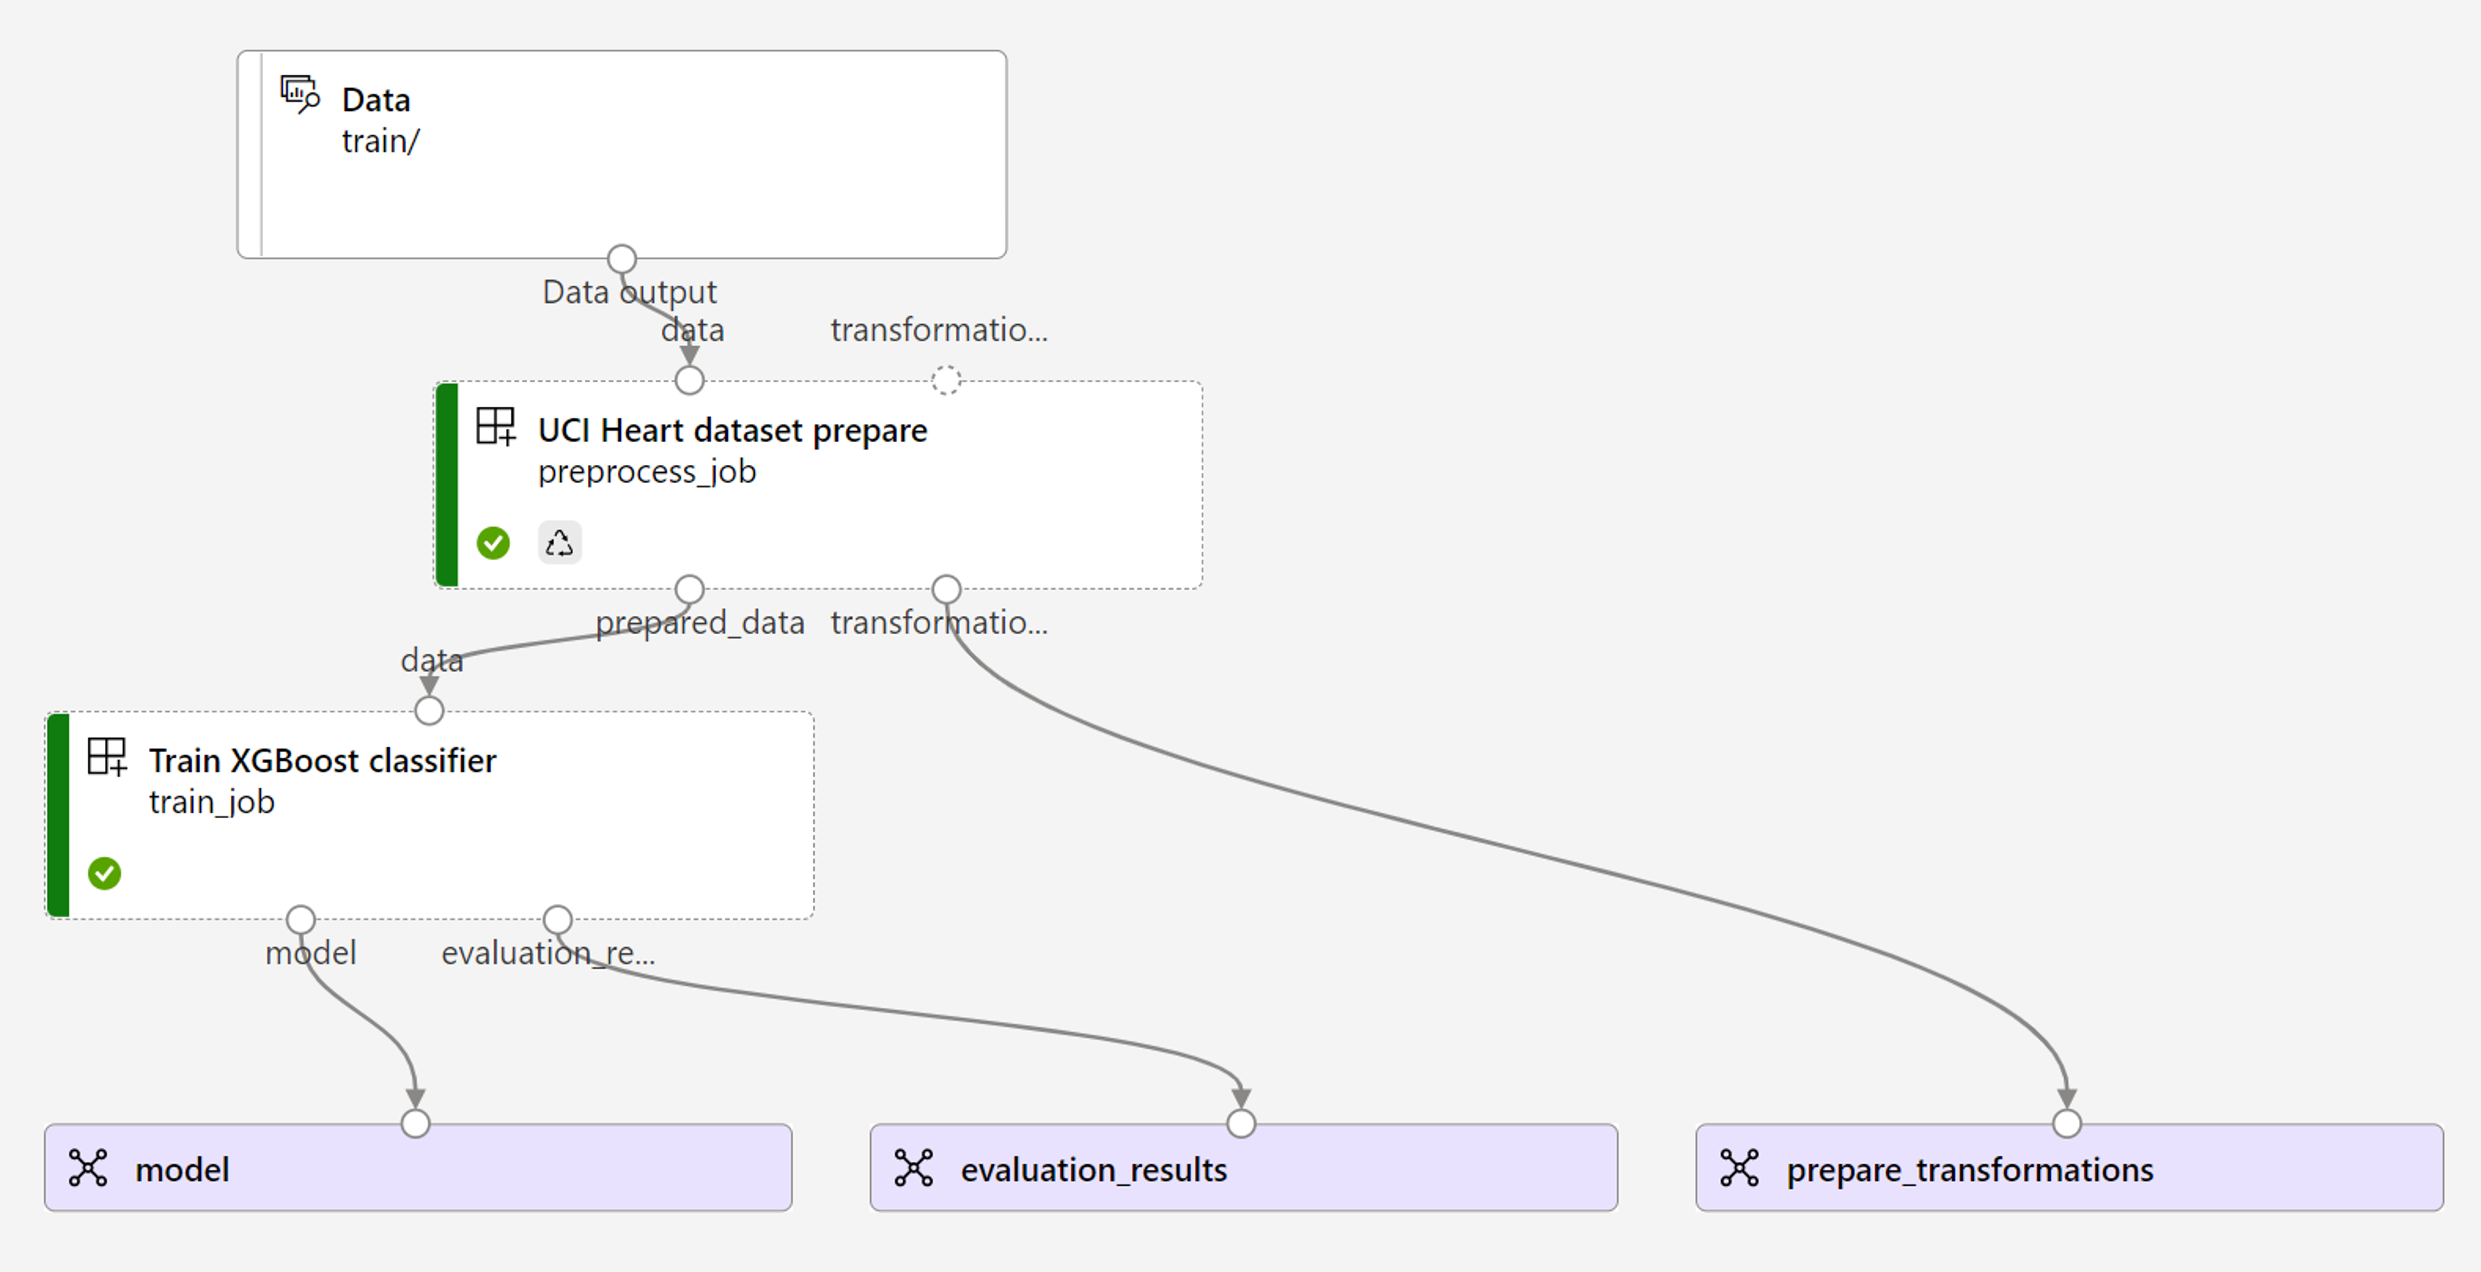
此示例部署了一个训练管道,该管道将获取输入训练数据(已标记)并生成预测模型,以及评估结果和预处理期间应用的转换。 该管道将使用 UCI 心脏病数据集中的表格数据来训练 XGBoost 模型。 在将数据发送到训练组件以拟合和评估模型之前,我们使用数据预处理组件对其进行预处理。
管道的可视化效果如下所示:
本文中的示例基于 azureml-examples 存储库中包含的代码示例。 要在本地运行命令而无需复制或粘贴 YAML 和其他文件,请使用以下命令克隆存储库并转到你的编码语言所对应的文件夹:
git clone https://github.com/Azure/azureml-examples --depth 1
cd azureml-examples/cli
此示例的文件位于以下位置:
cd endpoints/batch/deploy-pipelines/training-with-components
在 Jupyter Notebook 中继续操作
可以通过在克隆的存储库中打开 sdk-deploy-and-test.ipynb 笔记本来遵循此示例的 Python SDK 版本。
先决条件
Azure 订阅。 如果没有 Azure 订阅,请在开始之前创建一个免费帐户。
一个 Azure 机器学习工作区。 若要创建工作区,请参阅管理 Azure 机器学习工作区。
Azure 机器学习工作区中的以下权限:
- 对于创建或管理批处理终结点和部署:使用已分配有
Microsoft.MachineLearningServices/workspaces/batchEndpoints/*权限的“所有者”角色、“参与者”角色或自定义角色。 - 对于在工作区资源组中创建 Azure 资源管理器部署:使用在部署了工作区的资源组中已分配有
Microsoft.Resources/deployments/write权限的“所有者”角色、“参与者”角色或自定义角色。
- 对于创建或管理批处理终结点和部署:使用已分配有
Azure 机器学习 CLI 或适用于 Python 的 Azure 机器学习 SDK:
运行以下命令,以安装 Azure CLI 和 Azure 机器学习的
ml扩展:az extension add -n mlAzure CLI 的
ml扩展版本 2.7 中引入了批处理终结点的管道组件部署。 使用az extension update --name ml命令获取最新版本。
连接到工作区
工作区是 Azure 机器学习的顶级资源。 它提供了一个集中的位置,用于处理你在使用 Azure 机器学习时创建的所有项目。 在本部分,你将连接到要在其中执行部署任务的工作区。
在以下命令中,输入你的订阅 ID、工作区名称、资源组名称以及位置:
az account set --subscription <subscription>
az configure --defaults workspace=<workspace> group=<resource-group> location=<location>
创建训练管道组件
在此部分,我们将创建训练管道所需的所有资产。 首先,我们将创建一个环境,其中包含训练模型所需的库。 然后,我们将创建一个要在其上运行批处理部署的计算群集,最后,将输入数据注册为数据资产。
创建环境
此示例中的组件将使用包含 XGBoost 和 scikit-learn 库的环境。 environment/conda.yml 文件包含环境的配置:
environment/conda.yml
channels:
- conda-forge
dependencies:
- python=3.8.5
- pip
- pip:
  - mlflow
  - azureml-mlflow
  - datasets
  - jobtools
  - cloudpickle==1.6.0
  - dask==2023.2.0
  - scikit-learn==1.1.2
  - xgboost==1.3.3
  - pandas==1.4
name: mlflow-env
按如下所示创建环境:
定义环境:
environment/xgboost-sklearn-py38.yml
$schema: https://azuremlschemas.azureedge.net/latest/environment.schema.json name: xgboost-sklearn-py38 image: mcr.microsoft.com/azureml/openmpi4.1.0-ubuntu20.04:latest conda_file: conda.yml description: An environment for models built with XGBoost and Scikit-learn.创建环境:
创建计算群集
批处理终结点和部署在计算群集上运行。 它们可以运行在工作区中已存在的任何 Azure 机器学习计算群集上。 因此,多个批处理部署可以共享相同的计算基础结构。 在此示例中,我们将在名为 batch-cluster 的 Azure 机器学习计算群集上工作。 让我们验证工作区上是否存在计算,如果不存在,则创建计算。
az ml compute create -n batch-cluster --type amlcompute --min-instances 0 --max-instances 5
将训练数据注册为数据资产
我们的训练数据以 CSV 文件表示。 为了模拟更多生产级别的工作负载,我们将 heart.csv 文件中的训练数据注册为工作区中的数据资产。 此数据资产稍后将指示为终结点的输入。
az ml data create --name heart-classifier-train --type uri_folder --path data/train
创建管道
要操作的管道将获取一个输入(即训练数据)并生成三个输出:已训练的模型、评估结果以及作为预处理应用的数据转换。 此管道包含两个组件:
preprocess_job:此步骤将读取输入数据并返回准备好的数据和已应用的转换。 该步骤将接收三个输入:data:包含要转换和评分的输入数据的文件夹transformations:(可选)将要应用的转换路径(如果可用)。 如果未提供路径,则将从输入数据中学习转换。 由于输入transformations是可选的,因此可以在训练和评分期间使用preprocess_job组件。categorical_encoding:分类特征的编码策略(ordinal或onehot)。
train_job:此步骤将基于准备好的数据来训练 XGBoost 模型,并返回评估结果和已训练的模型。 该步骤将接收三个输入:data:预处理的数据。target_column:我们要预测的列。eval_size:指示用于评估的输入数据的比例。
管道配置是在 deployment-ordinal/pipeline.yml 文件中定义的:
deployment-ordinal/pipeline.yml
$schema: https://azuremlschemas.azureedge.net/latest/pipelineComponent.schema.json
type: pipeline

name: uci-heart-train-pipeline
display_name: uci-heart-train
description: This pipeline demonstrates how to train a machine learning classifier over the UCI heart dataset.

inputs:
  input_data:
    type: uri_folder

outputs:
  model:
    type: mlflow_model
    mode: upload
  evaluation_results:
    type: uri_folder
    mode: upload
  prepare_transformations:
    type: uri_folder
    mode: upload

jobs:
  preprocess_job:
    type: command
    component: ../components/prepare/prepare.yml
    inputs:
      data: ${{parent.inputs.input_data}}
      categorical_encoding: ordinal
    outputs:
      prepared_data:
      transformations_output: ${{parent.outputs.prepare_transformations}}

  train_job:
    type: command
    component: ../components/train_xgb/train_xgb.yml
    inputs:
      data: ${{parent.jobs.preprocess_job.outputs.prepared_data}}
      target_column: target
      register_best_model: false
      eval_size: 0.3
    outputs:
      model:
        mode: upload
        type: mlflow_model
        path: ${{parent.outputs.model}}
      evaluation_results:
        mode: upload
        type: uri_folder
        path: ${{parent.outputs.evaluation_results}}
注意
在 pipeline.yml 文件中,preprocess_job 中缺少 transformations 输入;因此,脚本将从输入数据中学习转换参数。
该管道的可视化效果如下所示:
测试管道
我们可使用一些示例数据来测试管道。 为此,我们将使用之前创建的管道和 batch-cluster 计算群集创建一个作业。
以下 pipeline-job.yml 文件包含了管道作业的配置:
deployment-ordinal/pipeline-job.yml
$schema: https://azuremlschemas.azureedge.net/latest/pipelineJob.schema.json
type: pipeline

experiment_name: uci-heart-train-pipeline
display_name: uci-heart-train-job
description: This pipeline demonstrates how to train a machine learning classifier over the UCI heart dataset.

compute: batch-cluster
component: pipeline.yml
inputs:
  input_data:
    type: uri_folder
outputs:
  model:
    type: mlflow_model
    mode: upload
  evaluation_results:
    type: uri_folder
    mode: upload
  prepare_transformations:
    mode: upload
创建测试作业:
az ml job create -f deployment-ordinal/pipeline-job.yml --set inputs.input_data.path=azureml:heart-classifier-train@latest
创建批处理终结点
为终结点提供名称。 批处理终结点的名称在每个区域中必须是唯一的,因为该名称将用于构造调用 URI。 为了确保唯一性,请在以下代码中指定的名称后面追加任何尾随字符。
配置终结点:
创建终结点:
查询终结点 URI:
部署管道组件
要部署管道组件,必须创建批处理部署。 部署是承载执行实际工作的资产所需的一组资源。
配置部署:
deployment-ordinal/deployment.yml文件包含部署的配置。 可以检查额外属性中的完整批处理终结点 YAML 架构。deployment-ordinal/deployment.yml
$schema: https://azuremlschemas.azureedge.net/latest/pipelineComponentBatchDeployment.schema.json name: uci-classifier-train-xgb description: A sample deployment that trains an XGBoost model for the UCI dataset. endpoint_name: uci-classifier-train type: pipeline component: pipeline.yml settings: continue_on_step_failure: false default_compute: batch-cluster创建部署:
部署已就绪,可供使用。
测试部署
创建部署后,即可接收作业。 按照以下步骤对其进行测试:
我们的部署要求指示一个数据输入。
inputs.yml文件包含了输入数据资产的定义:inputs.yml
inputs: input_data: type: uri_folder path: azureml:heart-classifier-train@latest提示
要详细了解如何指示输入,请参阅《为批处理终结点创建作业和输入数据》。
可以按如下所示调用默认部署:
可以使用以下方法监视演示进度并流式传输日志:
值得一提的是,只有管道的输入才会在批处理终结点中作为输入发布。 例如,categorical_encoding 是管道步骤的输入,而不是管道本身的输入。 利用这一点可以控制要向客户端公开的输入以及要隐藏的输入。
访问作业输出
作业完成后,可以访问它的某些输出。 此管道将为其组件生成以下输出:
preprocess job:输出为transformations_outputtrain job:输出为model和evaluation_results
可以使用以下方法下载关联结果:
az ml job download --name $JOB_NAME --output-name transformations
az ml job download --name $JOB_NAME --output-name model
az ml job download --name $JOB_NAME --output-name evaluation_results
在终结点中创建新部署
终结点可以同时托管多个部署,而默认情况下只会保留一个部署。 因此,可以循环访问不同的模型,将不同的模型部署到终结点并对其进行测试,最后,将默认部署切换为最适合你的模型部署。
让我们更改在管道中完成预处理的方式,看看是否可获得一个性能更好的模型。
更改管道预处理组件中的参数
预处理组件具有名为 categorical_encoding 的输入,后者可以具有值 ordinal 或 onehot。 这些值对应于两种不同的分类特征编码方式。
ordinal:使用[1:n]中的数值(序号)对特征值进行编码,其中n是特征中的类别数。 序号编码意味着特征类别之间存在自然排序。onehot:并不表示自然排序关系,但如果类别数很大,则会导致维度问题。
默认情况下,我们在前面使用了 ordinal。 现在,让我们将分类编码更改为使用 onehot,并查看模型的性能。
提示
或者,我们可以向客户端公开 categorial_encoding 输入作为管道作业本身的输入。 但是,我们选择在预处理步骤中更改参数值,以便能够隐藏和控制部署内部的参数,并利用机会在同一终结点下包含多个部署。
修改管道。 它如下所示:
管道配置是在
deployment-onehot/pipeline.yml文件中定义的:deployment-onehot/pipeline.yml
$schema: https://azuremlschemas.azureedge.net/latest/pipelineComponent.schema.json type: pipeline name: uci-heart-train-pipeline display_name: uci-heart-train description: This pipeline demonstrates how to train a machine learning classifier over the UCI heart dataset. inputs: input_data: type: uri_folder outputs: model: type: mlflow_model mode: upload evaluation_results: type: uri_folder mode: upload prepare_transformations: type: uri_folder mode: upload jobs: preprocess_job: type: command component: ../components/prepare/prepare.yml inputs: data: ${{parent.inputs.input_data}} categorical_encoding: onehot outputs: prepared_data: transformations_output: ${{parent.outputs.prepare_transformations}} train_job: type: command component: ../components/train_xgb/train_xgb.yml inputs: data: ${{parent.jobs.preprocess_job.outputs.prepared_data}} target_column: target eval_size: 0.3 outputs: model: type: mlflow_model path: ${{parent.outputs.model}} evaluation_results: type: uri_folder path: ${{parent.outputs.evaluation_results}}配置部署:
deployment-onehot/deployment.yml文件包含部署的配置。 可以检查额外属性中的完整批处理终结点 YAML 架构。deployment-onehot/deployment.yml
$schema: https://azuremlschemas.azureedge.net/latest/pipelineComponentBatchDeployment.schema.json name: uci-classifier-train-onehot description: A sample deployment that trains an XGBoost model for the UCI dataset using onehot encoding for variables. endpoint_name: uci-classifier-train type: pipeline component: pipeline.yml settings: continue_on_step_failure: false default_compute: batch-cluster创建部署:
部署已准备就绪,可供使用。
测试非默认部署
创建部署后,即可接收作业。 我们可以像以前一样测试它,但现在将调用一个特定部署:
按如下所示调用部署,指定部署参数以触发该特定部署
uci-classifier-train-onehot:可以使用以下方法监视演示进度并流式传输日志:
将新部署配置为默认部署
如果对新部署的性能感到满意,则可以将此新部署设置为默认部署:
az ml batch-endpoint update --name $ENDPOINT_NAME --set defaults.deployment_name=$DEPLOYMENT_NAME
删除旧部署
完成后,如果不再需要旧部署,则可以将其删除:
az ml batch-deployment delete --name uci-classifier-train-xgb --endpoint-name $ENDPOINT_NAME --yes
清理资源
完成后,从工作区中删除关联的资源:
运行以下代码以删除批处理终结点及其基础部署。 --yes 用于确认删除。
az ml batch-endpoint delete -n $ENDPOINT_NAME --yes
(可选)除非计划在以后的部署中重用计算群集,否则请删除计算。

