练习 - 部署链接和嵌套 ARM 模板
注意
首次激活沙盒并接受这些条款后,你的 Microsoft 帐户将与名为“Microsoft Learn 沙盒”的新 Azure 目录相关联。 你会被添加到名为“Concierge 订阅”的特殊订阅中。
在此处,你将部署一个模板,该模板在所提供的沙盒环境中包含两个链接模板。
本练习使用适用于 Visual Studio Code 的 Azure 资源管理器工具。 请务必在 Visual Studio Code 中安装此扩展。
使用提供的 Azure 沙盒订阅设置测试环境
若要执行本单元的每个部署,需要从 Visual Studio Code 终端登录到 Azure 帐户。
确保登录的是与激活沙盒相同的帐户。
登录到 Azure
从 Visual Studio Code 中的终端运行以下命令以登录到 Azure。 运行此命令时,系统会打开一个浏览器,使你能够登录到你的帐户。
Connect-AzAccount登录后,你会在终端中看到与此帐户关联的订阅的列表。 如果已激活沙盒,则 Concierge 订阅应在此列表中。
获取订阅 ID。 以下命令将以易于阅读的表格格式列出你的订阅及其 ID。 订阅 ID 位于第二列。 查找
Concierge Subscription并复制第二列。 它类似于aaaa0a0a-bb1b-cc2c-dd3d-eeeeee4e4e4e。Get-AzSubscription将处于活动状态的订阅更改为 Concierge 订阅。 确保将
{Your subscription ID}替换为在上一个命令中获得的 Concierge 订阅的 ID。$context = Get-AzSubscription -SubscriptionId {Your subscription ID} Set-AzContext $context
设置默认资源组
现在需要将在沙盒中创建的资源组设置为默认资源组。 若要执行此操作,首先需要使用以下命令获取资源组名称:
Get-AzResourceGroup
在此命令中,使用从上一个命令中获得的资源名称。 它类似于 learn-a73131a1-b618-48b8-af70-21af7ca420c4。 此命令使你能够在本练习的其余 Azure PowerShell 命令中省略该参数。
注意
通常,使用 PowerShell 或 Azure CLI 命令部署模板时,需要指定目标资源组名称。 在本模块中的练习中,我们通过设置部署的上下文来绕过这一要求。 在下一步中,我们将使用 Set-AzDefault PowerShell 命令来指定沙盒资源组名称。
Set-AzDefault -ResourceGroupName {Resource Group Name}
部署已链接的模板
在本练习中,我们将查看并部署一个包含两个链接模板的模板。
若要将链接模板添加到 ARM 模板,请添加
Microsoft.Resources/deployments资源和配置了模板位置的templateLink属性。在以下示例模板中,你会注意到有两个变量,用于定义位于 GitHub 存储库中的远程或外部模板。
查看模板,并留意
"type": "Microsoft.Resources/deployments"部分,该部分定义了链接模板的部署位置和部署方式。第一个链接模板部署存储帐户。 它使用父参数并部署存储模板。
第二个链接模板配置为依赖于存储部署,用于部署虚拟网络模板。
{
"$schema": "https://schema.management.azure.com/schemas/2019-04-01/deploymentTemplate.json#",
"contentVersion": "1.0.0.0",
"parameters": {
    "name": {
        "type": "string",
        "defaultValue": "linkeddemo001"
    }
},
"variables": {
    "linked-template": "https://raw.githubusercontent.com/Azure/azure-quickstart-templates/master/quickstarts/microsoft.storage/storage-account-create/azuredeploy.json",
    "linked-template-2": "https://raw.githubusercontent.com/Azure/azure-docs-json-samples/master/azure-resource-manager/what-if/what-if-before.json"
},
"resources": [
    {
        "name": "storage",
        "type": "Microsoft.Resources/deployments",
        "apiVersion": "2019-10-01",
        "properties": {
            "mode": "Incremental",
            "templateLink": {
                "uri": "[variables('linked-template')]",
                "contentVersion": "1.0.0.0"
            },
            "parameters": {
                "location": { "value": "[resourceGroup().location]" }
            }
        }
    },
    {
        "name": "identity",
        "type": "Microsoft.Resources/deployments",
        "apiVersion": "2019-10-01",
        "dependsOn": [
            "[resourceId('Microsoft.Resources/deployments','storage')]"
        ],
        "properties": {
            "mode": "Incremental",
            "templateLink": {
                "uri": "[variables('linked-template-2')]",
                "contentVersion": "1.0.0.0"
            }
        }
    }
],
"outputs": {}
}
将上述模板的内容复制并粘贴到本地目录中的文件中。 例如,使用
C:\JSON\linkedtemplate.json格式。将文件保存在本地后,使用以下 PowerShell 命令在上一单元中讨论的资源组级别进行部署。 即使用 New-AzResourceGroupDeployment
    $templateFile="C:\JSON\linkedtemplate.json"
    $today=Get-Date -Format "MM-dd-yyyy"
    $DeploymentName="DeployLinkedTemplate-"+"$today"

    New-AzResourceGroupDeployment `
    -Name $DeploymentName `
    -TemplateFile $templateFile
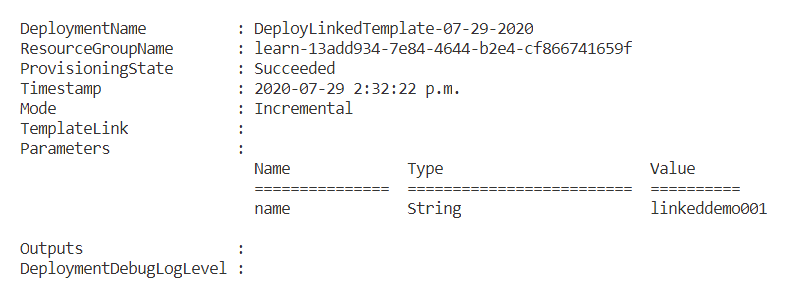
完成后,应会得到类似于以下示例的结果。

验证结果。
转到 Azure 门户并确保你位于沙盒订阅中。 为此,请选择页面右上角的头像。 选择“切换目录”。 在列表中,选择“Microsoft Learn 沙盒”目录。
在左侧面板上,选择“资源组”。
选择
[沙盒资源组名称] 。在“概述”区域中,你会看到部署已成功。 选择“3 个已成功”以查看部署的详细信息。 (可能会有更多已完成的部署,具体取决于你是否执行了前面单元的练习。)

你会注意到,你只部署了一个模板,但门户的“部署”窗格中列出了三个模板。 这三个部署对应于主模板和两个链接模板。

登录 Azure
从 Visual Studio Code 中的终端运行以下命令以登录到 Azure。 运行此命令时,系统会打开一个浏览器,使你能够登录到你的帐户。
az login登录后,你会在终端中看到与此帐户关联的订阅的 JSON 列表。 如果已激活沙盒,则 Concierge 订阅应在此列表中。
获取订阅 ID。 以下命令将列出你的订阅及其 ID。 订阅 ID 位于第三列。 查找
Concierge Subscription并复制第三列。 它类似于aaaa0a0a-bb1b-cc2c-dd3d-eeeeee4e4e4e。az account list -o table将处于活动状态的订阅更改为 Concierge 订阅。 确保将
{Your subscription ID}替换为在上一个命令中获得的 Concierge 订阅的 ID。az account set -s {Your subscription ID}
设置默认资源组
现在需要将在沙盒中创建的资源组设置为默认资源组。 若要执行此操作,首先需要使用以下命令获取资源组名称:
az group list -o table
在此命令中,使用从上一个命令中获得的资源组名称。 (该资源名称类似于 learn-a73131a1-b618-48b8-af70-21af7ca420c4。)设置此默认值使你能够在本练习的其余 Azure CLI 命令中省略该参数。
注意
通常,使用 Azure CLI 命令部署模板时,需要指定目标资源组名称。 在本模块中的练习中,我们通过设置部署的上下文来绕过这一要求。 在下一步中,我们将使用 az configure Azure CLI 命令来指定沙盒资源组名称。
az configure --defaults group={Resource Group Name}
部署已链接的模板
在本练习中,我们将查看并部署一个包含两个链接模板的模板。
若要将链接模板添加到 ARM 模板,请添加
Microsoft.Resources/deployments资源和配置了模板位置的templateLink属性。在以下示例模板中,你会注意到有两个变量,用于定义位于 GitHub 存储库中的远程或外部模板。
查看模板,并留意
"type": "Microsoft.Resources/deployments"部分,该部分定义了链接模板的部署位置和部署方式。第一个链接模板部署存储帐户。 它使用父参数并部署存储模板。
第二个链接模板配置为依赖于存储部署,用于部署虚拟网络模板。
{
"$schema": "https://schema.management.azure.com/schemas/2019-04-01/deploymentTemplate.json#",
"contentVersion": "1.0.0.0",
"parameters": {
    "name": {
        "type": "string",
        "defaultValue": "linkeddemo001"
    }
},
"variables": {
    "linked-template": "https://raw.githubusercontent.com/Azure/azure-quickstart-templates/master/quickstarts/microsoft.storage/storage-account-create/azuredeploy.json",
    "linked-template-2": "https://raw.githubusercontent.com/Azure/azure-docs-json-samples/master/azure-resource-manager/what-if/what-if-before.json"
},
"resources": [
  {
      "name": "storage",
      "type": "Microsoft.Resources/deployments",
      "apiVersion": "2019-10-01",
      "properties": {
          "mode": "Incremental",
          "templateLink": {
              "uri": "[variables('linked-template')]",
              "contentVersion": "1.0.0.0"
          },
          "parameters": {
              "location": { "value": "[resourceGroup().location]" }
          }
      }
  },
  {
      "name": "identity",
      "type": "Microsoft.Resources/deployments",
      "apiVersion": "2019-10-01",
      "dependsOn": [
          "[resourceId('Microsoft.Resources/deployments','storage')]"
      ],
      "properties": {
          "mode": "Incremental",
          "templateLink": {
              "uri": "[variables('linked-template-2')]",
              "contentVersion": "1.0.0.0"
          }
      }
  }
],
"outputs": {}
}
将上述模板的内容复制并粘贴到本地目录中的文件中。 例如,使用
C:\JSON\linkedtemplate.json or /mnt/c/Users/you/json/linkedtemplate.json格式。在本地保存该文件后,请使用以下 Azure CLI 命令在资源组级别部署该文件。 即使用 az deployment group create。
templateFile=/mnt/c/Users/<UserName>/json/linkedtemplate.json
today=$(date +"%Y-%m-%d")
deploymentname="DeployLocalTemplate-3-"$today

az deployment group create \
--name $deploymentname \
--template-file $templateFile
完成后,应会得到类似于以下示例的结果。 检查
"provisioningState"值以确保部署成功。{- Finished .. "id": "/subscriptions/aaaa0a0a-bb1b-cc2c-dd3d-eeeeee4e4e4e/resourceGroups/learn-bbbb1b1b-cc2c-dd3d-ee4e-ffffff5f5f5f/providers/Microsoft.Resources/deployments/DeployLocalTemplate-3-2020-08-19", "location": null, "name": "DeployLocalTemplate-3-2020-08-19", "properties": { "correlationId": "aaaa0000-bb11-2222-33cc-444444dddddd", "debugSetting": null, "dependencies": [ { "dependsOn": [ { "id": "/subscriptions/aaaa0a0a-bb1b-cc2c-dd3d-eeeeee4e4e4e/resourceGroups/learn-bbbb1b1b-cc2c-dd3d-ee4e-ffffff5f5f5f/providers/Microsoft.Resources/deployments/storage", "resourceGroup": "learn-bbbb1b1b-cc2c-dd3d-ee4e-ffffff5f5f5f", "resourceName": "storage", "resourceType": "Microsoft.Resources/deployments" } ], "id": "/subscriptions/aaaa0a0a-bb1b-cc2c-dd3d-eeeeee4e4e4e/resourceGroups/learn-bbbb1b1b-cc2c-dd3d-ee4e-ffffff5f5f5f/providers/Microsoft.Resources/deployments/identity", "resourceGroup": "learn-bbbb1b1b-cc2c-dd3d-ee4e-ffffff5f5f5f", "resourceName": "identity", "resourceType": "Microsoft.Resources/deployments" } ], "duration": "PT16.4639167S", "error": null, "mode": "Incremental", "onErrorDeployment": null, "outputResources": [ { "id": "/subscriptions/aaaa0a0a-bb1b-cc2c-dd3d-eeeeee4e4e4e/resourceGroups/learn-bbbb1b1b-cc2c-dd3d-ee4e-ffffff5f5f5f/providers/Microsoft.Network/virtualNetworks/vnet-001", "resourceGroup": "learn-bbbb1b1b-cc2c-dd3d-ee4e-ffffff5f5f5f" }, { "id": "/subscriptions/aaaa0a0a-bb1b-cc2c-dd3d-eeeeee4e4e4e/resourceGroups/learn-bbbb1b1b-cc2c-dd3d-ee4e-ffffff5f5f5f/providers/Microsoft.Storage/storageAccounts/store7zk7eyqew54l4", "resourceGroup": "learn-bbbb1b1b-cc2c-dd3d-ee4e-ffffff5f5f5f" } ], "outputs": {}, "parameters": { "name": { "type": "String", "value": "linkeddemo001" } }, "parametersLink": null, "providers": [ { "id": null, "namespace": "Microsoft.Resources", "registrationPolicy": null, "registrationState": null, "resourceTypes": [ { "aliases": null, "apiVersions": null, "capabilities": null, "locations": [ null ], "properties": null, "resourceType": "deployments" } ] } ], "provisioningState": "Succeeded", "templateHash": "12700491000282730217", "templateLink": null, "timestamp": "2020-08-19T21:07:18.729310+00:00", "validatedResources": null }, "resourceGroup": "learn-bbbb1b1b-cc2c-dd3d-ee4e-ffffff5f5f5f", "tags": null, "type": "Microsoft.Resources/deployments" }验证结果。
转到 Azure 门户并确保你位于沙盒订阅中。 为此,请选择页面右上角的头像。 选择“切换目录”。 在列表中,选择“Microsoft Learn 沙盒”目录。
在左侧面板上,选择“资源组”。
选择
[沙盒资源组名称] 。在“概述”区域中,你会看到部署已成功。 选择“3 个已成功”以查看部署的详细信息。 (可能会有更多已完成的部署,具体取决于你是否执行了前面单元的练习。)

你会注意到,你只部署了一个模板,但门户的“部署”窗格中列出了三个模板。 这三个部署对应于主模板和两个链接模板。
