在容器中创建、更新和删除文件
在本练习中,你将更新现有项目以将文件存储在 SharePoint Embedded 容器中。
向项目添加 Microsoft Graph 类型声明
在创建新的 React 组件之前,让我们先更新项目。
在本练习中,我们将使用 Microsoft Graph 提供的类型。 由于尚未安装包含它们的 npm 包,因此需要首先安装。
在命令行中,从项目的根文件夹运行以下命令:
npm install @microsoft/microsoft-graph-types -DE
更新 React 容器组件以显示文件
回顾上一练习,我们在容器组件中留下了一个占位符,该占位符将用于显示所选容器的内容。
我们尚未创建 Files 组件,但首先更新组件, Containers 将占位符 Files 替换为要创建的组件。
找到并打开 ./src/components/containers.tsx 文件。
将以下 import 语句添加到文件顶部的现有导入列表:
import { Files } from "./files";
接下来,在文件末尾附近找到以下占位符代码...
{selectedContainer && (`[[TOOD]] container "${selectedContainer.displayName}" contents go here`)}
… 并将其替换为以下代码:
{selectedContainer && (<Files container={selectedContainer} />)}
创建 Files React 组件
让我们首先创建一个新的 React 组件来显示和管理容器的内容。
创建一个新文件 ./src/components/files.tsx,并添加以下代码。 这是样板组件,包括组件的所有导入和主干:
import React, {
  useState,
  useEffect,
  useRef
} from 'react';
import { Providers } from "@microsoft/mgt-element";
import {
  AddRegular, ArrowUploadRegular,
  FolderRegular, DocumentRegular,
  SaveRegular, DeleteRegular,
} from '@fluentui/react-icons';
import {
  Button, Link, Label, Spinner,
  Input, InputProps, InputOnChangeData,
  Dialog, DialogActions, DialogContent, DialogBody, DialogSurface, DialogTitle, DialogTrigger,
  DataGrid, DataGridProps,
  DataGridHeader, DataGridHeaderCell,
  DataGridBody, DataGridRow,
  DataGridCell,
  TableColumnDefinition, createTableColumn,
  TableRowId,
  TableCellLayout,
  OnSelectionChangeData,
  SelectionItemId,
  Toolbar, ToolbarButton,
  makeStyles
} from "@fluentui/react-components";
import {
  DriveItem
} from "@microsoft/microsoft-graph-types-beta";
import { IContainer } from "./../common/IContainer";
require('isomorphic-fetch');

interface IFilesProps {
  container: IContainer;
}

interface IDriveItemExtended extends DriveItem {
  isFolder: boolean;
  modifiedByName: string;
  iconElement: JSX.Element;
  downloadUrl: string;
}

export const Files = (props: IFilesProps) => {

  // BOOKMARK 1 - constants & hooks

  // BOOKMARK 2 - handlers go here

  // BOOKMARK 3 - component rendering return (
  return
  (
    <div>
    </div>
  );
}

export default Files;
注意
// BOOKMARK #请注意组件中的注释。 这些可确保在正确的位置添加代码。
显示所选容器内容的列表
我们需要解决的第一件事是显示所选容器的内容。 为此,我们将使用 DataGrid Fluent UI React 库中的 组件。
在 注释后的 // BOOKMARK 3 语句中的 return() 元素内<div>添加以下标记:
<DataGrid
  items={driveItems}
  columns={columns}
  getRowId={(item) => item.id}
  resizableColumns
  columnSizingOptions={columnSizingOptions}
  >
  <DataGridHeader>
    <DataGridRow>
      {({ renderHeaderCell }) => (
        <DataGridHeaderCell>{renderHeaderCell()}</DataGridHeaderCell>
      )}
    </DataGridRow>
  </DataGridHeader>
  <DataGridBody<IDriveItemExtended>>
    {({ item, rowId }) => (
      <DataGridRow<IDriveItemExtended> key={rowId}>
        {({ renderCell, columnId }) => (
          <DataGridCell>
            {renderCell(item)}
          </DataGridCell>
        )}
      </DataGridRow>
    )}
  </DataGridBody>
</DataGrid>
包含 DataGrid 对我们需要设置的集合、设置和方法的一些引用。 让我们从视觉对象开始,然后获取数据。
可以根据我们设置的属性调整 中的 DataGrid 列的大小。 创建一个新的常量 columnSizingOptions,并在注释前面 // BOOKMARK 3 添加代码:
const columnSizingOptions = {
  driveItemName: {
    minWidth: 150,
    defaultWidth: 250,
    idealWidth: 200
  },
  lastModifiedTimestamp: {
    minWidth: 150,
    defaultWidth: 150
  },
  lastModifiedBy: {
    minWidth: 150,
    defaultWidth: 150
  },
  actions: {
    minWidth: 250,
    defaultWidth: 250
  }
};
接下来,定义 中的所有 DataGrid列的结构和呈现设置。 为此, columns请创建一个新集合 ,并将其紧接在创建的 之前 columnSizingOptions 添加:
const columns: TableColumnDefinition<IDriveItemExtended>[] = [
  createTableColumn({
    columnId: 'driveItemName',
    renderHeaderCell: () => {
      return 'Name'
    },
    renderCell: (driveItem) => {
      return (
        <TableCellLayout media={driveItem.iconElement}>
          <Link href={driveItem!.webUrl!} target='_blank'>{driveItem.name}</Link>
        </TableCellLayout>
      )
    }
  }),
  createTableColumn({
    columnId: 'lastModifiedTimestamp',
    renderHeaderCell: () => {
      return 'Last Modified'
    },
    renderCell: (driveItem) => {
      return (
        <TableCellLayout>
          {driveItem.lastModifiedDateTime}
        </TableCellLayout>
      )
    }
  }),
  createTableColumn({
    columnId: 'lastModifiedBy',
    renderHeaderCell: () => {
      return 'Last Modified By'
    },
    renderCell: (driveItem) => {
      return (
        <TableCellLayout>
          {driveItem.modifiedByName}
        </TableCellLayout>
      )
    }
  }),
  createTableColumn({
    columnId: 'actions',
    renderHeaderCell: () => {
      return 'Actions'
    },
    renderCell: (driveItem) => {
      return (
        <>
          <Button aria-label="Download"
            disabled={!selectedRows.has(driveItem.id as string)}
            icon={<SaveRegular />}>Download</Button>
          <Button aria-label="Delete"
            icon={<DeleteRegular />}>Delete</Button>
        </>
      )
    }
  }),
];
此代码将使用实用工具方法 createTableColumn() 为每个列指定 ID,并指定表中标题和正文单元格的呈现方式。
配置 后 DataGrid ,添加以下常量以使用现有代码使用的属性管理 React 应用的状态。 在 // BOOKMARK 1 注释前添加以下代码:
const [driveItems, setDriveItems] = useState<IDriveItemExtended[]>([]);
const [selectedRows, setSelectedRows] = useState<Set<SelectionItemId>>(new Set<TableRowId>([1]));
现在,让我们添加一些处理程序来提取和显示容器中的数据。
添加以下处理程序和 React 挂钩以获取所选容器的内容。 挂钩 useEffect 将在首次呈现组件时以及组件的输入属性更改时 <Files />运行。
在 // BOOKMARK 2 注释前添加以下代码:
useEffect(() => {
  (async () => {
    loadItems();
  })();
}, [props]);

const loadItems = async (itemId?: string) => {
  try {
    const graphClient = Providers.globalProvider.graph.client;
    const driveId = props.container.id;
    const driveItemId = itemId || 'root';

    // get Container items at current level
    const graphResponse = await graphClient.api(`/drives/${driveId}/items/${driveItemId}/children`).get();
    const containerItems: DriveItem[] = graphResponse.value as DriveItem[]
    const items: IDriveItemExtended[] = [];
    containerItems.forEach((driveItem: DriveItem) => {
      items.push({
        ...driveItem,
        isFolder: (driveItem.folder) ? true : false,
        modifiedByName: (driveItem.lastModifiedBy?.user?.displayName) ? driveItem.lastModifiedBy!.user!.displayName : 'unknown',
        iconElement: (driveItem.folder) ? <FolderRegular /> : <DocumentRegular />,
        downloadUrl: (driveItem as any)['@microsoft.graph.downloadUrl']
      });
    });
    setDriveItems(items);
  } catch (error: any) {
    console.error(`Failed to load items: ${error.message}`);
  }
};
函数 loadItems 使用 Microsoft Graph 客户端获取当前文件夹中所有文件的列表,如果尚未选择任何文件夹,则默认 root 为 。
然后,它采用 Microsoft Graph 返回的 的 DriveItems 集合,并添加一些更多属性,以便稍后简化代码。 在 方法结束时,它会调用 setDriveitems() 状态访问器方法,该方法将触发组件的重新呈现。
driveItems在 属性上DataGrid.items设置 ,用于解释表显示某些信息的原因。
测试列出容器内容的呈现
现在,让我们测试客户端 React 应用, <Files /> 以确保组件显示所选容器的内容。
在项目的根文件夹中的命令行中运行以下命令:
npm run start
当浏览器加载时,请使用你一直使用的相同 工作和学校 帐户登录。
登录后,选择现有容器。 如果该容器中已有一些内容,则其显示方式如下:
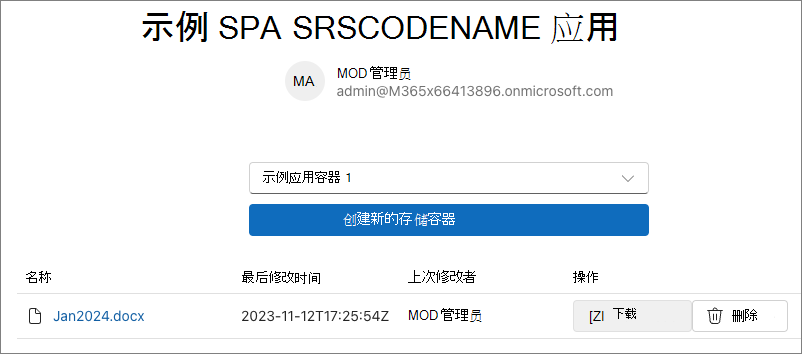
如果选择文件(在本例中为 Word 文档),它将打开一个新选项卡并加载项目的 URL。 对于此示例,文件在 Word online 中打开。
添加对下载文件的支持
内容显示功能完成后,让我们更新组件以支持下载文件。
首先,在注释前面 // BOOKMARK 1 添加以下代码:
const downloadLinkRef = useRef<HTMLAnchorElement>(null);
接下来,我们希望先确保选中 中的 DataGrid 项,然后他们才能下载该项目。 否则,将按当前状态禁用 “下载 ”按钮。
在 中 DataGrid,添加三个属性以将其设置为支持单个项目选择模式 (selectionMode) ,跟踪 () selectedItems 选择哪些项目,以及 () 更改 onSelectionChange 时应执行的操作。
<DataGrid
  ...
  selectionMode='single'
  selectedItems={selectedRows}
  onSelectionChange={onSelectionChange}>
接下来,紧接在注释之前 // BOOKMARK 2 添加以下处理程序:
const onSelectionChange: DataGridProps["onSelectionChange"] = (event: React.MouseEvent | React.KeyboardEvent, data: OnSelectionChangeData): void => {
  setSelectedRows(data.selectedItems);
}
现在,选中列表中的项后,你将看到 “下载 ”按钮不再被禁用。
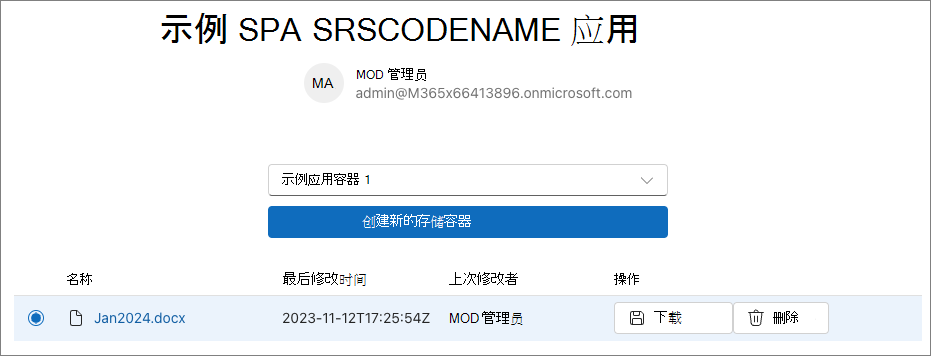
下载选项将使用隐藏的超链接,我们将首先以编程方式设置所选项目的下载链接,然后以编程方式执行以下操作:
- 将超链接的 URL 设置为项的下载 URL。
- 选择超链接。
这将触发用户的下载。
在 方法中return()打开 <div> 后添加以下标记:
<a ref={downloadLinkRef} href="" target="_blank" style={{ display: 'none' }} />
现在,找到之前添加的现有 columns 常量,并找到 createTableColumn 引用 的 columnId: 'actions'。
renderCell在 属性中,添加将onClick调用 的onDownloadItemClick处理程序。 完成后,该按钮应如下所示:
<Button aria-label="Download"
        disabled={!selectedRows.has(driveItem.id as string)}
        icon={<SaveRegular />}
        onClick={() => onDownloadItemClick(driveItem.downloadUrl)}>Download</Button>
最后,在前面添加的现有 onSelectionChange 事件处理程序之后立即添加以下处理程序。 这将处理前面提到的这两个编程步骤:
const onDownloadItemClick = (downloadUrl: string) => {
  const link = downloadLinkRef.current;
  link!.href = downloadUrl;
  link!.click();
}
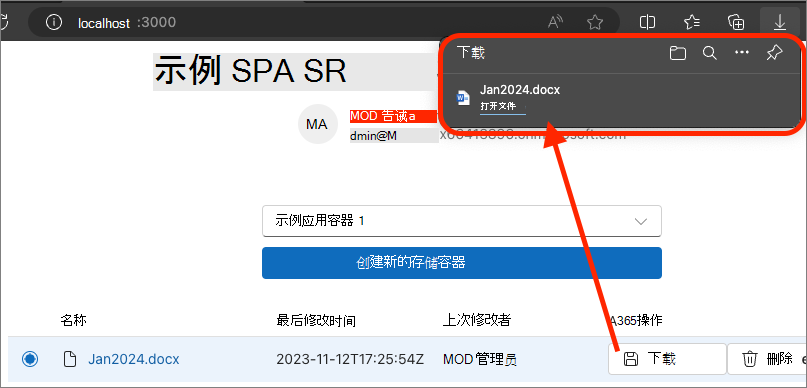
保存更改,刷新浏览器,然后选择 “下载 ”链接以查看下载文件。
添加在容器中创建文件夹的功能
让我们通过添加对创建和显示文件夹的支持来继续构建 <Files /> 组件。
首先,在注释前面 // BOOKMARK 1 添加以下代码。 这将添加我们将使用的必要 React 状态值:
const [folderId, setFolderId] = useState<string>('root');
const [folderName, setFolderName] = useState<string>('');
const [creatingFolder, setCreatingFolder] = useState<boolean>(false);
const [newFolderDialogOpen, setNewFolderDialogOpen] = useState(false);
若要创建新文件夹,当用户选择工具栏中的按钮时,我们将向用户显示一个对话框。
return()在 方法中,紧跟在 <DataGrid>之前添加以下代码来实现对话框:
<Toolbar>
  <ToolbarButton vertical icon={<AddRegular />} onClick={() => setNewFolderDialogOpen(true)}>New Folder</ToolbarButton>
</Toolbar>

<Dialog open={newFolderDialogOpen}>
  <DialogSurface>
    <DialogBody>
      <DialogTitle>Create New Folder</DialogTitle>
      <DialogContent className={styles.dialogContent}>
        <Label htmlFor={folderName}>Folder name:</Label>
        <Input id={folderName} className={styles.dialogInputControl} autoFocus required
          value={folderName} onChange={onHandleFolderNameChange}></Input>
        {creatingFolder &&
          <Spinner size='medium' label='Creating folder...' labelPosition='after' />
        }
      </DialogContent>
      <DialogActions>
        <DialogTrigger disableButtonEnhancement>
          <Button appearance="secondary" onClick={() => setNewFolderDialogOpen(false)} disabled={creatingFolder}>Cancel</Button>
        </DialogTrigger>
        <Button appearance="primary"
          onClick={onFolderCreateClick}
          disabled={creatingFolder || (folderName === '')}>Create Folder</Button>
      </DialogActions>
    </DialogBody>
  </DialogSurface>
</Dialog>
对话框使用我们尚未添加的一些自定义样式。 现在,请先在组件的声明 Files 之前添加以下代码:立即执行此操作:
const useStyles = makeStyles({
  dialogInputControl: {
    width: '400px',
  },
  dialogContent: {
    display: 'flex',
    flexDirection: 'column',
    rowGap: '10px',
    marginBottom: '25px'
  }
});
然后,在 组件中的 方法前面 return() 添加以下代码:
const styles = useStyles();
设置 UI 后,现在需要添加一些处理程序。 在注释前面 // BOOKMARK 2 添加以下处理程序。 这些操作将处理打开对话框、保存新文件夹名称的值以及选择对话框中的按钮时发生的情况:
const onFolderCreateClick = async () => {
  setCreatingFolder(true);

  const currentFolderId = folderId;
  const graphClient = Providers.globalProvider.graph.client;
  const endpoint = `/drives/${props.container.id}/items/${currentFolderId}/children`;
  const data = {
    "name": folderName,
    "folder": {},
    "@microsoft.graph.conflictBehavior": "rename"
  };
  await graphClient.api(endpoint).post(data);

  await loadItems(currentFolderId);

  setCreatingFolder(false);
  setNewFolderDialogOpen(false);
};

const onHandleFolderNameChange: InputProps["onChange"] = (event: React.ChangeEvent<HTMLInputElement>, data: InputOnChangeData): void => {
  setFolderName(data?.value);
};
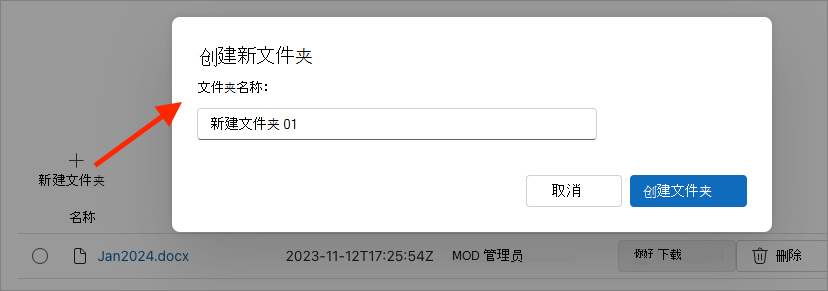
保存更改,刷新浏览器,然后选择容器内容上方的“ 新建文件夹” 按钮:
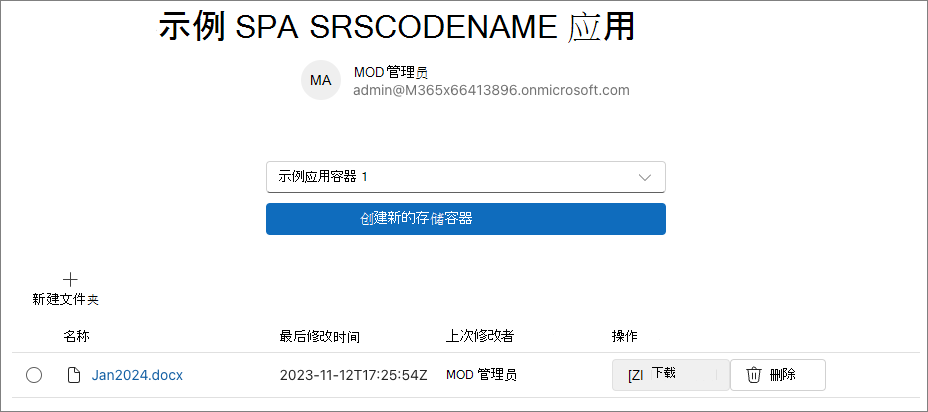
选择“ 新建文件夹” 按钮,输入名称,然后在对话框中选择“ 创建文件夹” 按钮。
创建文件夹后,你将看到它列在内容表中:
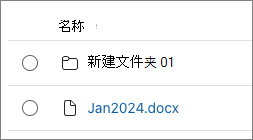
我们需要对组件再进行一次更改。 现在,当你选择文件夹时,它将在新的选项卡中启动 URL,而没有应用。 这不是我们想要的... 我们希望它钻取到 文件夹。
通过查找之前添加的现有 columns 常量并找到 createTableColumn 引用 的 columnId: 'driveItemName'来解决此问题。
renderCell在 属性中,将现有<Link />组件替换为以下代码。 这将根据要呈现的当前项是文件夹还是文件生成两个链接:
{(!driveItem.isFolder)
  ? <Link href={driveItem!.webUrl!} target='_blank'>{driveItem.name}</Link>
  : <Link onClick={() => {
    loadItems(driveItem.id);
    setFolderId(driveItem.id as string)
  }}>{driveItem.name}</Link>
}
现在,选择文件夹时,应用将显示该文件夹的内容。
添加删除文件或文件夹的功能
下一步是添加从容器中删除文件夹或文件的功能。
为此,请先将以下代码添加到注释前// BOOKMARK 1的现有调用列表useState()
const [deleteDialogOpen, setDeleteDialogOpen] = useState(false);
接下来,添加一个对话框,当用户选择“ 删除 ”按钮时充当确认。 在 方法中的return()现有<Dialog>组件后面添加以下代码:
<Dialog open={deleteDialogOpen} modalType='modal' onOpenChange={() => setSelectedRows(new Set<TableRowId>([0]))}>
  <DialogSurface>
    <DialogBody>
      <DialogTitle>Delete Item</DialogTitle>
      <DialogContent>
        <p>Are you sure you want to delete this item?</p>
      </DialogContent>
      <DialogActions>
        <DialogTrigger>
          <Button
            appearance='secondary'
            onClick={() => setDeleteDialogOpen(false)}>Cancel</Button>
        </DialogTrigger>
        <Button
          appearance='primary'
          onClick={onDeleteItemClick}>Delete</Button>
      </DialogActions>
    </DialogBody>
  </DialogSurface>
</Dialog>
更新“ 删除 ”按钮以在选中时执行某些操作。 找到之前添加的现有 columns 常量,并找到 createTableColumn 引用 的 columnId: 'actions'。
renderCell在 属性中,添加将onClick调用 的onDeleteDialogOpen处理程序。 完成后,该按钮应如下所示:
<Button aria-label="Delete"
        icon={<DeleteRegular />}
        onClick={() => setDeleteDialogOpen(true)}>Delete</Button>
最后,紧接在注释前面 // BOOKMARK 2 添加以下代码,以处理当前所选项的删除:
const onDeleteItemClick = async () => {
  const graphClient = Providers.globalProvider.graph.client;
  const endpoint = `/drives/${props.container.id}/items/${selectedRows.entries().next().value[0]}`;
  await graphClient.api(endpoint).delete();
  await loadItems(folderId || 'root');
  setDeleteDialogOpen(false);
}
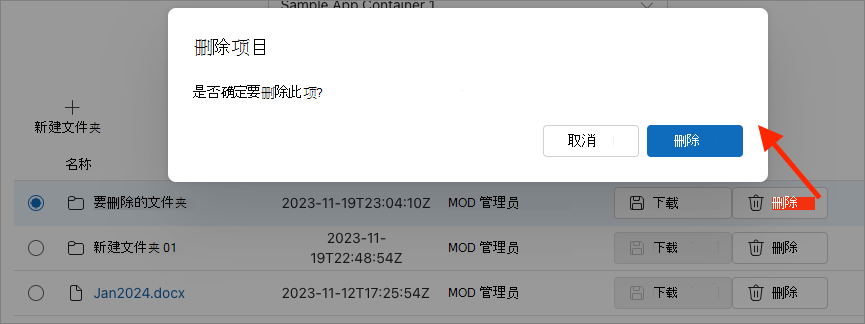
保存更改并刷新浏览器。 在集合中的某个现有文件夹或文件上选择“ 删除 ”按钮。 将出现确认对话框,当在对话框中选择 “删除” 按钮时,容器的内容表将刷新以显示项已被删除:
添加将文件上传到容器的功能
最后一步是添加将文件上传到容器或容器中的文件夹的功能。
首先,在注释前面 // BOOKMARK 1 添加以下代码:
const uploadFileRef = useRef<HTMLInputElement>(null);
接下来,我们将使用隐藏 <Input> 控件重复类似的技术来上传文件。 在组件的 return() 方法中打开 <div> 后立即添加以下代码:
<input ref={uploadFileRef} type="file" onChange={onUploadFileSelected} style={{ display: 'none' }} />
向工具栏添加按钮以触发文件选择对话框。 为此,请紧接在添加新文件夹的现有工具栏按钮后面添加以下代码:
<ToolbarButton vertical icon={<ArrowUploadRegular />} onClick={onUploadFileClick}>Upload File</ToolbarButton>
最后,在注释前面 // BOOKMARK 2 添加以下代码以添加两个事件处理程序。
onUploadFileClick选择“上传文件”工具栏按钮时会触发处理程序,onUploadFileSelected当用户选择文件时,将触发处理程序:
const onUploadFileClick = () => {
  if (uploadFileRef.current) {
    uploadFileRef.current.click();
  }
};

const onUploadFileSelected = async (event: React.ChangeEvent<HTMLInputElement>) => {
  const file = event.target.files![0];
  const fileReader = new FileReader();
  fileReader.readAsArrayBuffer(file);
  fileReader.addEventListener('loadend', async (event: any) => {
    const graphClient = Providers.globalProvider.graph.client;
    const endpoint = `/drives/${props.container.id}/items/${folderId || 'root'}:/${file.name}:/content`;
    graphClient.api(endpoint).putStream(fileReader.result)
      .then(async (response) => {
        await loadItems(folderId || 'root');
      })
      .catch((error) => {
        console.error(`Failed to upload file ${file.name}: ${error.message}`);
      });
  });
  fileReader.addEventListener('error', (event: any) => {
    console.error(`Error on reading file: ${event.message}`);
  });
};
通过保存文件、刷新浏览器并选择“ 上传文件 ”按钮来测试更改:
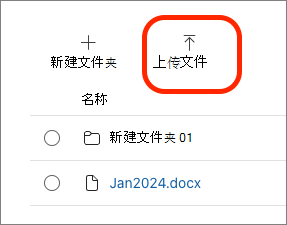
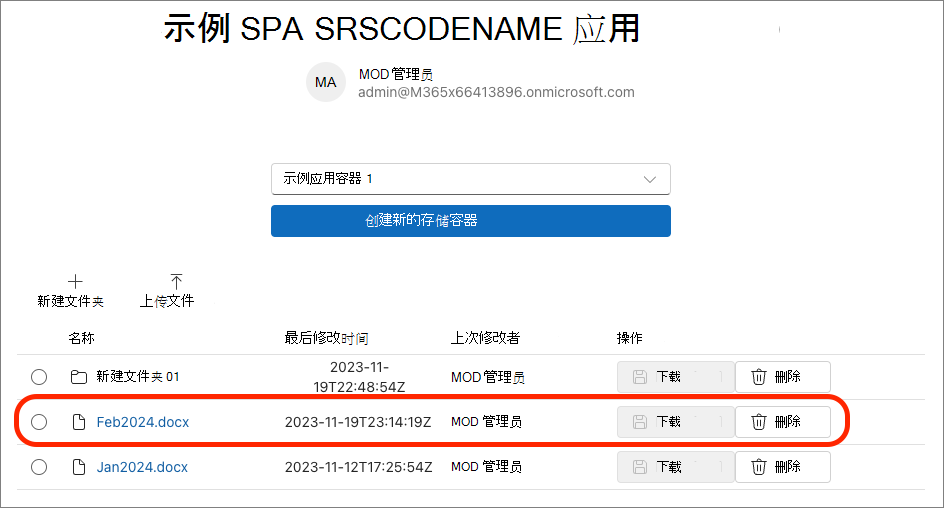
选择文件后,我们的应用将上传该文件并刷新容器的目录:
摘要
在本练习中,你更新了现有项目以在 SharePoint Embedded 容器中存储和管理文件。