使用 .runsettings 文件配置单元测试
.runsettings 文件可用于配置单元测试的运行方式。 例如,可用于更改正在运行测试的 .NET 版本、测试结果的目录,或者在测试运行期间收集的数据。 .runsettings 文件常见的用途是自定义代码覆盖率分析。
可以使用运行设置文件配置测试,这些测试可以从命令行 、IDE 运行,或者在使用 Azure Test Plans 或 Azure DevOps Server(以前称为 Team Foundation Server (TFS))的生成工作流中运行。
Runsettings 文件是可选的。 如果不需要执行任何特殊配置,则无需 .runsettings 文件。
创建一个运行设置文件并对其进行自定义
将运行设置文件添加到解决方案中。 在“解决方案资源管理器”的解决方案快捷菜单上,依次选择“添加”“新建项”和“XML 文件” 。 保存带有类似于 test.runsettings 的名称的文件。
如果看不到所有项模板,请选择“显示所有模板”,然后选择项模板。
提示
只要使用扩展名 .runsettings,文件名就无关紧要。
添加示例 *.runsettings 文件中的内容,然后按需要进行自定义,如以下章节所述。
使用以下某个方法指定要使用的 *.runsettings 文件:
- Visual Studio IDE
- 命令行
- 使用 Azure Test Plans 或 Azure DevOps Server(以前称为 Team Foundation Server (TFS))的生成工作流。
运行单元测试以使用自定义运行设置。
若要禁用和启用 IDE 中的自定义设置,请在“测试”菜单中取消选择或选择文件。
提示
可以在解决方案中创建多个 .runsettings 文件,然后按需选择一个作为活动测试设置文件。
在 IDE 中指定运行设置文件
可用的方法取决于 Visual Studio 的版本。
Visual Studio 2019 版本 16.4 及更高版本
在 Visual Studio 2019 版本 16.4 及更高版本中,指定运行设置文件的方法有三种。
自动检测运行设置文件
注意
这仅适用于名为 .runsettings 的文件。
若要自动检测运行设置文件,请将其放在解决方案的根目录下。
如果启用了自动检测运行设置文件,则此文件中的设置将应用到所有测试运行。 可使用两种方法打开 runsettings 文件自动检测:
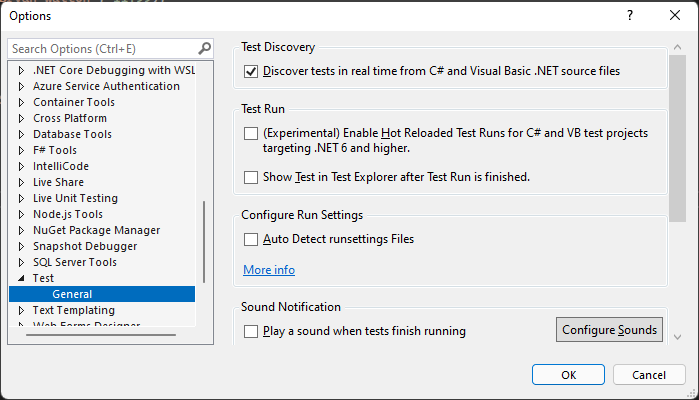
选择“工具”“选项”>“测试”“自动检测 runsettings 文件”

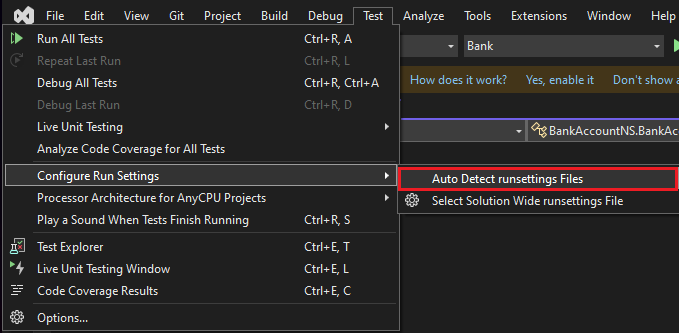
选择“测试”“配置运行设置”>“自动检测 runsettings 文件”

手动选择运行设置文件
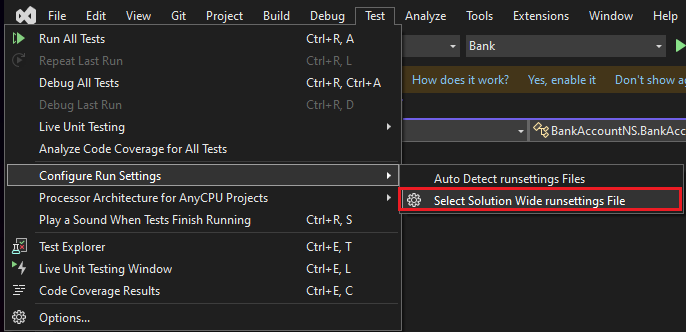
在 IDE 中,选择“测试”“配置运行设置”>“选择解决方案范围的 runsettings 文件”,然后选择 .runsettings 文件。
- 此文件替代解决方案根目录下的 .runsettings 文件(如果存在),并应用于所有测试运行。
- 此文件选择仅在本地保留。

设置生成属性
通过项目文件或 Directory.Build.props 文件将生成属性添加到项目。 项目的运行设置文件由 RunSettingsFilePath 属性指定。
- 当前 C#、VB、C++ 和 F# 项目中支持项目级运行设置。
- 为项目指定的文件将替代解决方案中指定的任何其他运行设置文件。
- 这些 MSBuild 属性 可用于指定 runsettings 文件的路径。
指定项目的 .runsettings 文件示例:
<Project Sdk="Microsoft.NET.Sdk">
  <PropertyGroup>
    <RunSettingsFilePath>$(MSBuildProjectDirectory)\example.runsettings</RunSettingsFilePath>
  </PropertyGroup>
  ...
</Project>
Visual Studio 2019 版本 16.3 及更早版本
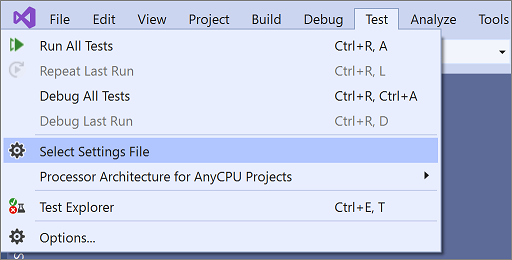
若要在 IDE 中指定运行设置文件,请选择“测试”“选择设置文件”。 浏览到并选择 .runsettings 文件。

该文件将显示在“测试”菜单上,你可以选择或取消选择它。 选择后,每当选择“分析代码覆盖率”时,都会应用运行设置文件。
从命令行指定运行设置文件
若要从命令行运行测试,请使用 vstest.console.exe 并使用 /Settings 参数指定设置文件。
输入类似的命令:
vstest.console.exe MyTestAssembly.dll /EnableCodeCoverage /Settings:CodeCoverage.runsettingsor
vstest.console.exe --settings:test.runsettings test.dll
有关详细信息,请参阅 VSTest.Console.exe 命令行选项。
*.runsettings 文件
*.runsettings 文件是一个 XML 文件,其中的 RunSettings 元素中包含各种配置元素。 以下各节详细介绍了不同元素。 有关完整示例,请参阅示例 *.runsettings 文件。
<?xml version="1.0" encoding="utf-8"?>
<RunSettings>
  <!-- configuration elements -->
</RunSettings>
每个配置元素都是可选的,因为它有默认值。
RunConfiguration 元素
<RunConfiguration>
<MaxCpuCount>1</MaxCpuCount>
<ResultsDirectory>.\TestResults</ResultsDirectory>
<TargetPlatform>x86</TargetPlatform>
<TargetFrameworkVersion>net6.0</TargetFrameworkVersion>
<TestAdaptersPaths>%SystemDrive%\Temp\foo;%SystemDrive%\Temp\bar</TestAdaptersPaths>
<TestCaseFilter>(TestCategory != Integration) & (TestCategory != UnfinishedFeature)</TestCaseFilter>
<TestSessionTimeout>10000</TestSessionTimeout>
<TreatNoTestsAsError>true</TreatNoTestsAsError>
</RunConfiguration>
RunConfiguration 元素可以包含下列元素:
| 节点 | 默认 | 值 |
|---|---|---|
| MaxCpuCount | 1 | 选项名称区分大小写,并且很容易将其错误拼写为 MaxCPUCount。 此设置可控制进程级别的并行度。 使用 0 启用最大进程级并行度。 此设置确定可以并行运行的最大测试 DLL 数或其他测试容器数。 每个 DLL 在其自己的 testhost 进程中运行,且在进程级别与其他测试 DLL 中的测试隔离。 此设置不会强制每个测试 DLL 中的测试并行运行。 控制 DLL 中的并行执行(在线程级别)取决于 MSTest、XUnit 或 NUnit 等测试框架。 默认值为 1,这意味着只有一个 testhost 会同时运行。 特殊值 0 允许 testhost 数与所拥有的逻辑处理器数相同(例如,对于具有 6 个不带多线程的物理核心的计算机,则为 6,对于具有 6 个带多线程的物理核心的计算机,则为 12)。运行中不同 DLL 的数量决定了实际启动的 testhost 数。 |
| ResultsDirectory | 在其中放置测试结果的目录。 该路径相对于包含 .runsettings 文件的目录。 | |
| TargetFrameworkVersion | net40 或 netcoreapp1.0 | 省略整个标记以自动检测。 此设置定义用于运行测试的框架版本或框架系列。 接受的值是任何框架名字对象(例如 net48、net472、net6.0、net5.0、netcoreapp3.1、uap10.0),或任何有效的完整框架名称(例如 .NETFramework,Version=v4.7.2 或 .NETCoreApp,Version=v6.0.0)。 为了向后兼容,接受了 Framework35、Framework40、Framework45、FrameworkCore10、FrameworkUap10(分别为 net35、net40、net45、netcoreapp1.0 和 uap10.0)。 所有值均不区分大小写。提供的值用于确定要使用的测试运行时提供程序。 每个测试运行时提供程序都必须遵循要使用的框架系列,但可能不遵循确切的框架版本: 对于 .NET Framework 4.5.1 - 4.8,将使用通过指定的确切版本生成的 testhost。 对于超出该范围的值,将使用 .NET Framework 4.5.1 testhost。 对于 .NET,测试项目的 <TargetFramework>(或者更准确地说是 runtimeconfig.json)决定了实际版本。对于 UWP,测试项目应用程序本身是一个 testhost,并确定所使用的 UWP 的实际版本。 省略 .runsettings 文件中的 TargetFrameworkVersion 元素,以便从生成的二进制文件自动确定框架版本。自动检测时,所有目标框架都将统一到单个通用框架中。 找到与同一目标框架系列不同的版本时,选择较新的版本(例如 net452、net472、net48 = net48)。 对于 .NET Framework 运行程序(在 Visual Studio 中,或在开发人员命令行中为 vstest.console.exe),通用目标框架设置为 net40。 对于 .NET 运行程序 (dotnet test + DLLs),通用目标框架设置为 netcoreapp1.0。 |
| TargetPlatform | x86 | 省略整个标记以自动检测。 此设置定义用于运行测试的体系结构。 可能的值为 x86、x64、ARM、ARM64、S390x。自动检测时,AnyCPU DLL 的体系结构可能因运行程序而异。 对于 .NET Framework 运行程序(在 Visual Studio 中,或在开发人员命令行中为 vstest.console.exe),默认值为 x86。 对于 .NET 运行程序 (dotnet test),默认值为当前进程体系结构。 |
| TreatTestAdapterErrorsAsWarnings | false | false、true |
| TestAdaptersPaths | TestAdapters 所在目录的一个或多个路径 | |
| TestCaseFilter | 格式为 <property><operator><value>[|&<Expression>] 的筛选表达式。 布尔运算符 和 应由 HTML 实体“amp;”表示。 表达式可以用括号括起来。 有关表达式结构的详细语法,请参阅 vstest/docs/filter.md。 | |
| TestSessionTimeout | 当测试会话超过以毫秒为单位指定的给定时间时,允许用户终止测试会话。 设置超时可确保资源被充分利用,并且测试会话被限制在一个设定时间内。 Visual Studio 2017 版本 15.5 及更高版本中提供了此设置。 | |
| DotnetHostPath | 指定用于运行测试主机的 dotnet 主机的自定义路径。 这在生成自己的 dotnet 时非常有用,例如在生成 dotnet/运行时存储库时。 指定此选项会跳过查找 testhost.exe,并强制使用 testhost.dll。 | |
| TreatNoTestsAsError | false | true 或 false 指定一个布尔值,它定义在未发现测试时的退出代码。 如果该值为 true 并且未发现测试,则返回非零退出代码。 否则返回零。 |
DataCollectors 元素(诊断数据适配器)
DataCollectors 元素指定诊断数据适配器的设置。 诊断数据适配器收集有关测试环境和受测的应用程序的其他信息。 每个适配器都具有默认设置,因此如果不希望使用默认值,只需提供设置。
<DataCollectionRunSettings>
  <DataCollectors>
    <!-- data collectors -->
  </DataCollectors>
</DataCollectionRunSettings>
CodeCoverage 数据收集器
代码覆盖率数据收集器创建应用程序代码的哪些部分已在测试中执行过的日志。 有关自定义代码覆盖率设置的详细信息,请参阅自定义代码覆盖率分析。
<DataCollector friendlyName="Code Coverage" uri="datacollector://Microsoft/CodeCoverage/2.0" assemblyQualifiedName="Microsoft.VisualStudio.Coverage.DynamicCoverageDataCollector, Microsoft.VisualStudio.TraceCollector, Version=11.0.0.0, Culture=neutral, PublicKeyToken=b03f5f7f11d50a3a">
  <Configuration>
    <CodeCoverage>
      <ModulePaths>
        <Exclude>
          <ModulePath>.*CPPUnitTestFramework.*</ModulePath>
        </Exclude>
      </ModulePaths>

      <UseVerifiableInstrumentation>True</UseVerifiableInstrumentation>
      <AllowLowIntegrityProcesses>True</AllowLowIntegrityProcesses>
      <CollectFromChildProcesses>True</CollectFromChildProcesses>
      <CollectAspDotNet>False</CollectAspDotNet>
    </CodeCoverage>
  </Configuration>
</DataCollector>
VideoRecorder 数据收集器
视频数据收集器在运行测试时捕获屏幕录制。 此录制可用于对 UI 测试进行故障排除+。 视频数据收集器在 Visual Studio 2017 版本 15.5 及更高版本中可用。 有关配置此数据收集器的示例,请参阅示例 *.runsettings 文件。
若要自定义任何其他类型的诊断数据适配器,请使用测试设置文件。
意见数据收集器
此选项可帮助你隔离导致测试主机崩溃的有问题的测试。 运行此收集器会在 TestResults 中创建一个输出文件 (Sequence.xml),该文件在主机崩溃之前会捕获执行测试的顺序 。
可以在三种不同的模式下运行意见:
- 序列文件模式:创建一个包含到挂起为止的测试列表的文件
- 故障转储模式:在 testhost 故障时创建转储
- 挂起转储模式:在给定超时之前测试未完成时创建转储
XML 配置应直接放入 <RunSettings> 节点:
<RunSettings>
  <RunConfiguration>
  </RunConfiguration>
  <LoggerRunSettings>
    <Loggers>
      <Logger friendlyName="blame" enabled="True" />
    </Loggers>
  </LoggerRunSettings>
  <DataCollectionRunSettings>
    <DataCollectors>
      <!-- Enables blame -->
      <DataCollector friendlyName="blame" enabled="True">
        <Configuration>
          <!-- Enables crash dump, with dump type "Full" or "Mini".
          Requires ProcDump in PATH for .NET Framework. -->
          <CollectDump DumpType="Full" />
          <!-- Enables hang dump or testhost and its child processes
          when a test hangs for more than 10 minutes.
          Dump type "Full", "Mini" or "None" (just kill the processes). -->
          <CollectDumpOnTestSessionHang TestTimeout="10min" HangDumpType="Full" />
        </Configuration>
      </DataCollector>
    </DataCollectors>
  </DataCollectionRunSettings>
</RunSettings>
TestRunParameters
<TestRunParameters>
    <Parameter name="webAppUrl" value="http://localhost" />
    <Parameter name="docsUrl" value="https://zcusa.951200.xyz" />
</TestRunParameters>
测试运行参数提供了一种可用于运行时测试的定义变量和值的方法。 使用 MSTest TestContext.Properties 属性(或 NUnit TestContext)访问参数:
private string _appUrl;
public TestContext TestContext { get; set; }

[TestMethod] // [Test] for NUnit
public void HomePageTest()
{
    string _appUrl = TestContext.Properties["webAppUrl"];
}
若要使用测试运行参数,请将公共 TestContext 属性添加到测试类。
LoggerRunSettings 元素
LoggerRunSettings 部分定义要用于测试运行的一个或多个记录器。 最常见的记录器为控制台、Visual Studio 测试结果文件 (trx)和 html。
<LoggerRunSettings>
    <Loggers>
      <Logger friendlyName="console" enabled="True">
        <Configuration>
            <Verbosity>quiet</Verbosity>
        </Configuration>
      </Logger>
      <Logger friendlyName="trx" enabled="True">
        <Configuration>
          <LogFileName>foo.trx</LogFileName>
        </Configuration>
      </Logger>
      <Logger friendlyName="html" enabled="True">
        <Configuration>
          <LogFileName>foo.html</LogFileName>
        </Configuration>
      </Logger>
    </Loggers>
  </LoggerRunSettings>
MSTest 元素
这些设置特定于运行具有 TestMethodAttribute 特性的测试方法的测试适配器。
<MSTest>
    <MapInconclusiveToFailed>True</MapInconclusiveToFailed>
    <CaptureTraceOutput>false</CaptureTraceOutput>
    <DeleteDeploymentDirectoryAfterTestRunIsComplete>False</DeleteDeploymentDirectoryAfterTestRunIsComplete>
    <DeploymentEnabled>False</DeploymentEnabled>
    <ConsiderFixturesAsSpecialTests>False</ConsiderFixturesAsSpecialTests>
    <AssemblyResolution>
      <Directory path="D:\myfolder\bin\" includeSubDirectories="false"/>
    </AssemblyResolution>
</MSTest>
| Configuration | 默认 | 值 |
|---|---|---|
| ForcedLegacyMode | false | 较旧版本的 Visual Studio 对 MSTest 适配器进行了优化,使其变得更快且更具伸缩性。 某些行为(如测试的运行顺序)可能不与 Visual Studio 早期版本中的完全一致。 将此值设置为 true 可使用旧测试适配器。 例如,如果为单元测试指定 app.config 文件,可能会用到此设置。 我们建议你考虑重构测试以便可以使用较新的适配器。 |
| SettingsFile | 你可以指定测试设置文件以便与此处的 MSTest 适配器配合使用。 还可以从设置菜单指定测试设置文件。 如果指定此值,则还必须将“ForcedLegacyMode”设置为“true”。 <ForcedLegacyMode>true</ForcedLegacyMode> |
|
| DeploymentEnabled | true | 如果将此值设置为 false,则不会将已在测试方法中指定的部署项目复制到部署目录中。 |
| CaptureTraceOutput | true | 捕获来自将与当前正在运行的测试相关联的 Console.Write*、Trace.Write*、Debug.Write* API 的文本消息。 |
| EnableBaseClassTestMethodsFromOtherAssemblies | true | 一个值,指示是否启用从与继承测试类不同的程序集中的基类发现测试方法。 |
| ClassCleanupLifecycle | EndOfClass | 如果希望在程序集结束时进行类清理,请将此项设置为 EndOfAssembly。 (从 MSTest v4 开始不再支持,因为 EndOfClass 是默认的且唯一的 ClassCleanup 行为) |
| MapNotRunnableToFailed | true | 一个值,指示不可运行的结果是否会映射到失败的测试。 |
| Parallelize | 用于设置并行设置: 辅助角色:用于并行化的线程数/辅助角色数,默认为当前计算机上的处理器数。 范围:并行化的范围。 可以将其设置为 MethodLevel。 默认情况下,它是 ClassLevel。 <Parallelize><Workers>32</Workers><Scope>MethodLevel</Scope></Parallelize> |
|
| TestTimeout | 0 | 获取指定的全局测试用例超时。 |
| TreatDiscoveryWarningsAsErrors | false | 若要将测试发现警告报告为错误,请将此值设置为 true。 |
| TreatClassAndAssemblyCleanupWarningsAsErrors | false | 若要将类清理失败视为错误,请将此值设置为 true。 |
| DeployTestSourceDependencies | true | 一个值,指示是否要部署测试源引用。 |
| DeleteDeploymentDirectoryAfterTestRunIsComplete | true | 若要在测试运行后保留部署目录,请将此值设置为 false。 |
| MapInconclusiveToFailed | false | 如果测试完成返回无结论的状态,则会映射到“测试资源管理器”中的已跳过状态。 如果希望无结论的测试显示为失败,请将此值设为 true。 |
| ConsiderFixturesAsSpecialTests | false | 若要在 Visual Studio 和 Visual Studio Code AssemblyInitialize 和 AssemblyCleanup 日志中将 ClassInitialize、ClassCleanup、Test Explorer、.trx 显示为单独的条目,请将此值设置为 true |
| AssemblyResolution | false | 查找和执行单元测试时,可以指定其他程序集路径。 例如,对与测试程序集位于不同目录中的依赖程序集使用这些路径。 若要指定路径,请使用“Directory Path”元素。 路径可以包括环境变量。<AssemblyResolution> <Directory path="D:\myfolder\bin\" includeSubDirectories="false"/> </AssemblyResolution>请注意,仅当使用 .NET Framework 目标时,才应用此功能。 |
.runsettings 文件示例
以下 XML 显示典型 .runsettings 文件的内容。 复制此代码并对其进行编辑以满足需求。
文件的每个元素都是可选的,因为它有默认值。
<?xml version="1.0" encoding="utf-8"?>
<RunSettings>
<!-- Configurations that affect the Test Framework -->
<RunConfiguration>
<!-- Use 0 for maximum process-level parallelization. This does not force parallelization within the test DLL (on the thread-level). You can also change it from the Test menu; choose "Run tests in parallel". Unchecked = 1 (only 1), checked = 0 (max). -->
<MaxCpuCount>1</MaxCpuCount>
<!-- Path relative to directory that contains .runsettings file-->
<ResultsDirectory>.\TestResults</ResultsDirectory>
<!-- Omit the whole tag for auto-detection. -->
<!-- [x86] or x64, ARM, ARM64, s390x -->
<!-- You can also change it from the Test menu; choose "Processor Architecture for AnyCPU Projects" -->
<TargetPlatform>x86</TargetPlatform>
<!-- Any TargetFramework moniker or omit the whole tag for auto-detection. -->
<!-- net48, [net40], net6.0, net5.0, netcoreapp3.1, uap10.0 etc. -->
<TargetFrameworkVersion>net40</TargetFrameworkVersion>
<!-- Path to Test Adapters -->
<TestAdaptersPaths>%SystemDrive%\Temp\foo;%SystemDrive%\Temp\bar</TestAdaptersPaths>
<!-- TestCaseFilter expression -->
<TestCaseFilter>(TestCategory != Integration) & (TestCategory != UnfinishedFeature)</TestCaseFilter>
<!-- TestSessionTimeout was introduced in Visual Studio 2017 version 15.5 -->
<!-- Specify timeout in milliseconds. A valid value should be greater than 0 -->
<TestSessionTimeout>10000</TestSessionTimeout>
<!-- true or false -->
<!-- Value that specifies the exit code when no tests are discovered -->
<TreatNoTestsAsError>true</TreatNoTestsAsError>
</RunConfiguration>
<!-- Configurations for data collectors -->
<DataCollectionRunSettings>
<DataCollectors>
<DataCollector friendlyName="Code Coverage" uri="datacollector://Microsoft/CodeCoverage/2.0" assemblyQualifiedName="Microsoft.VisualStudio.Coverage.DynamicCoverageDataCollector, Microsoft.VisualStudio.TraceCollector, Version=11.0.0.0, Culture=neutral, PublicKeyToken=b03f5f7f11d50a3a">
<Configuration>
<CodeCoverage>
<ModulePaths>
<Exclude>
<ModulePath>.*CPPUnitTestFramework.*</ModulePath>
</Exclude>
</ModulePaths>
<!-- We recommend you do not change the following values: -->
<UseVerifiableInstrumentation>True</UseVerifiableInstrumentation>
<AllowLowIntegrityProcesses>True</AllowLowIntegrityProcesses>
<CollectFromChildProcesses>True</CollectFromChildProcesses>
<CollectAspDotNet>False</CollectAspDotNet>
</CodeCoverage>
</Configuration>
</DataCollector>
<DataCollector uri="datacollector://microsoft/VideoRecorder/1.0" assemblyQualifiedName="Microsoft.VisualStudio.TestTools.DataCollection.VideoRecorder.VideoRecorderDataCollector, Microsoft.VisualStudio.TestTools.DataCollection.VideoRecorder, Version=15.0.0.0, Culture=neutral, PublicKeyToken=b03f5f7f11d50a3a" friendlyName="Screen and Voice Recorder">
<!--Video data collector was introduced in Visual Studio 2017 version 15.5 -->
<Configuration>
<!-- Set "sendRecordedMediaForPassedTestCase" to "false" to add video attachments to failed tests only -->
<MediaRecorder sendRecordedMediaForPassedTestCase="true" xmlns="">
<ScreenCaptureVideo bitRate="512" frameRate="2" quality="20" />
</MediaRecorder>
</Configuration>
</DataCollector>
<!-- Configuration for blame data collector -->
<DataCollector friendlyName="blame" enabled="True">
</DataCollector>
</DataCollectors>
</DataCollectionRunSettings>
<!-- Parameters used by tests at run time -->
<TestRunParameters>
<Parameter name="webAppUrl" value="http://localhost" />
<Parameter name="webAppUserName" value="Admin" />
<Parameter name="webAppPassword" value="Password" />
</TestRunParameters>
<!-- Configuration for loggers -->
<LoggerRunSettings>
<Loggers>
<Logger friendlyName="console" enabled="True">
<Configuration>
<Verbosity>quiet</Verbosity>
</Configuration>
</Logger>
<Logger friendlyName="trx" enabled="True">
<Configuration>
<LogFileName>foo.trx</LogFileName>
</Configuration>
</Logger>
<Logger friendlyName="html" enabled="True">
<Configuration>
<LogFileName>foo.html</LogFileName>
</Configuration>
</Logger>
<Logger friendlyName="blame" enabled="True" />
</Loggers>
</LoggerRunSettings>
<!-- Adapter Specific sections -->
<!-- MSTest adapter -->
<MSTest>
<MapInconclusiveToFailed>True</MapInconclusiveToFailed>
<CaptureTraceOutput>false</CaptureTraceOutput>
<DeleteDeploymentDirectoryAfterTestRunIsComplete>False</DeleteDeploymentDirectoryAfterTestRunIsComplete>
<DeploymentEnabled>False</DeploymentEnabled>
<AssemblyResolution>
<Directory path="D:\myfolder\bin\" includeSubDirectories="false"/>
</AssemblyResolution>
</MSTest>
</RunSettings>
在 .runsettings 文件中指定环境变量
可以在 .runsettings 文件中设置环境变量,该文件可直接与测试主机交互。 有必要在 .runsettings 文件中指定环境变量,以便支持需要设置环境变量(例如 DOTNET_ROOT)的重要项目 。 这些变量是在生成测试主机进程时设置的,它们在主机中可用。
示例
下面的代码是传递环境变量的示例 .runsettings 文件:
<?xml version="1.0" encoding="utf-8"?>
<!-- File name extension must be .runsettings -->
<RunSettings>
  <RunConfiguration>
    <EnvironmentVariables>
      <!-- List of environment variables we want to set-->
      <DOTNET_ROOT>C:\ProgramFiles\dotnet</DOTNET_ROOT>
      <SDK_PATH>C:\Codebase\Sdk</SDK_PATH>
    </EnvironmentVariables>
  </RunConfiguration>
</RunSettings>
RunConfiguration 节点应包含 EnvironmentVariables 节点 。 可以将环境变量指定为元素名称及其值。
注意
由于应始终在启动测试主机时设置这些环境变量,因此测试应始终在单独的进程中运行。 为此,将在存在环境变量时设置 /InIsolation 标记,以便始终调用测试主机。