VM Server Provisioning Example using Service Manager (SCSM) <> Orchestrator (SCORCH) Integration
This blog talks about the techniques required in order for a user to submit a request (via Service Manager SSP) and then pass the values they enter / select off to Orchestrator for use there. We will not be covering the actual provisioning in this blog, as there are many different ways to do that, and plenty of other examples of that out there. Instead, this post will focus on tips, tricks and techniques for creating the request in Service Manager, and getting the SCSM <> SCORCH integration going. Once these techniques are mastered, you can re-use for any scenario where you need to ask a user a series of questions,take the answers and use them in Orchestrator for automation.
Also see here for a similar example with user onboarding https://aka.ms/stayclassyonboard
SCENARIO / DESIRED OUTCOME:
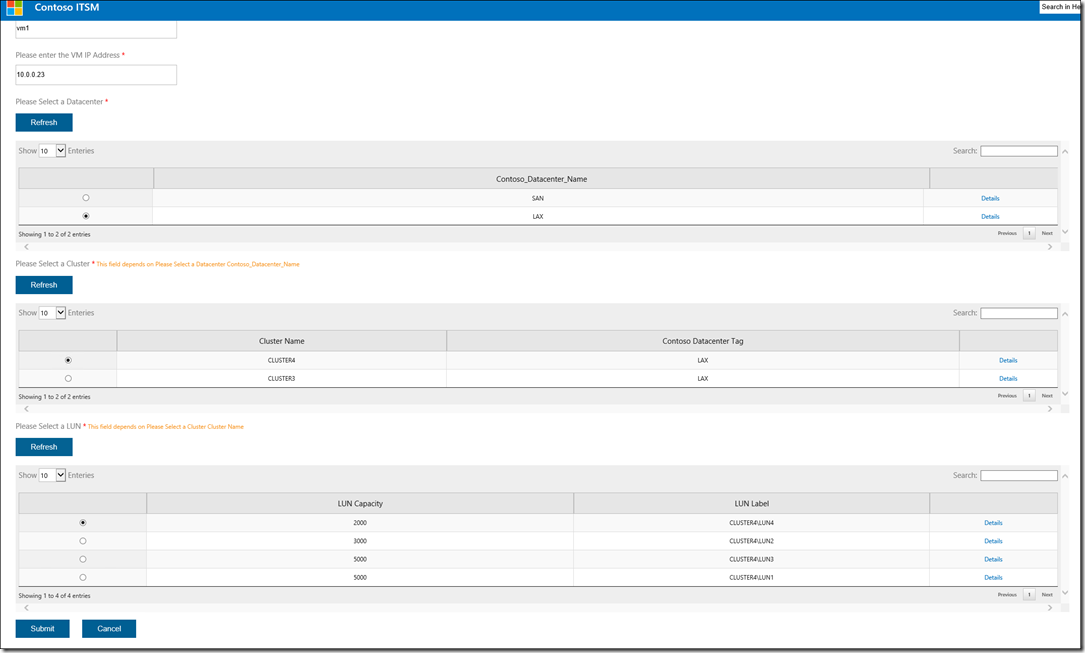
In this example, the desired outcome is to pass 5 values to an Orchestrator runbook - VM NAME, VM IP, datacenter name, cluster name and cluster LUN to a runbook:
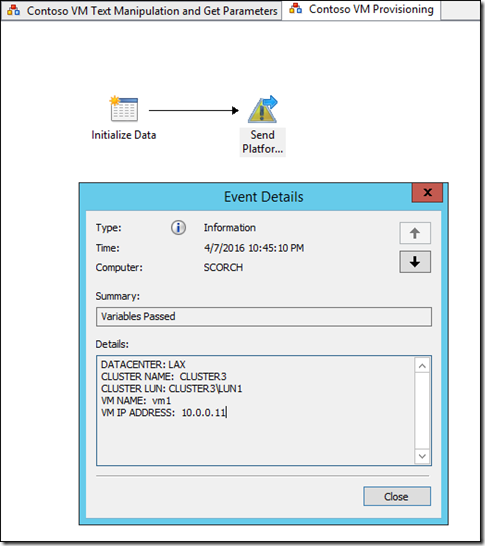
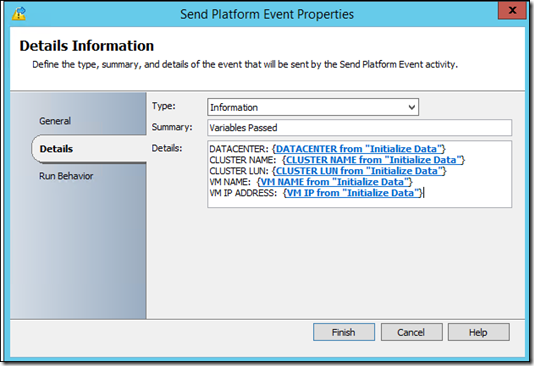
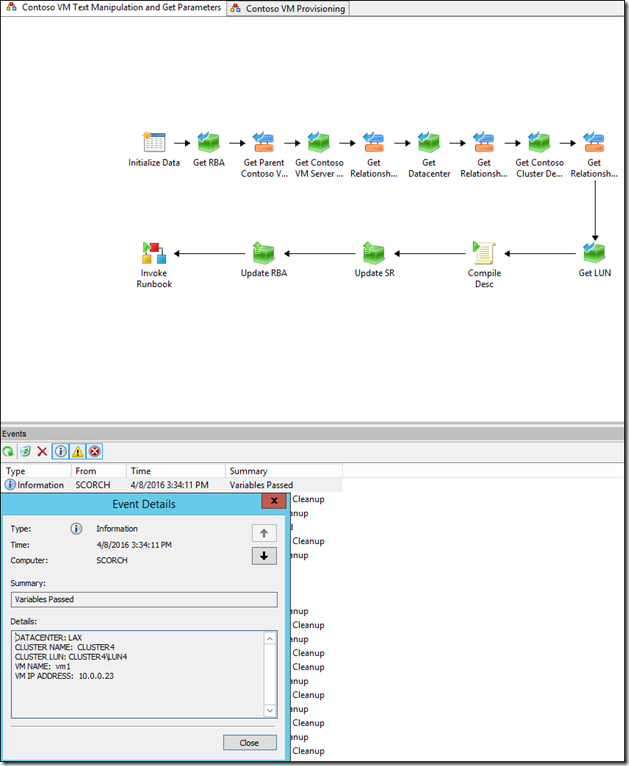
For the purposes of this blogpost, we will take those values and create an event in Orchestrator (platform event) showing those values.
But there is no reason why you cannot take those values and use them in a run.net script (PowerShell) activity, configman task sequence, SCVMM / VMWare activity or indeed any series of activities you may ‘craft’ together in an Orchestrator runbook.
When the submitter submits the request and provides these values, It is also desired to intelligently narrow down available options, based on previous selections. For instance, when selecting a LUN, only LUNS for a previously selected cluster should be shown. When selecting a cluster, only clusters in a previously selected datacenter should be available for selection.
HOW FINAL SOLUTION LOOKS IN PORTAL
First of all you can check out some info on the new HTML portal here: https://blogs.technet.microsoft.com/antoni/2016/04/06/the-new-html5-based-self-service-portal-ssp-in-system-center-2012-r2-service-manager-ur8/
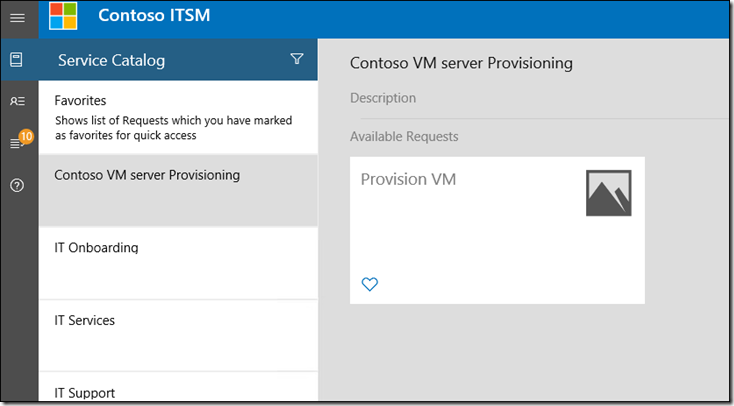
Here is how the example in this blog looks once implemented:
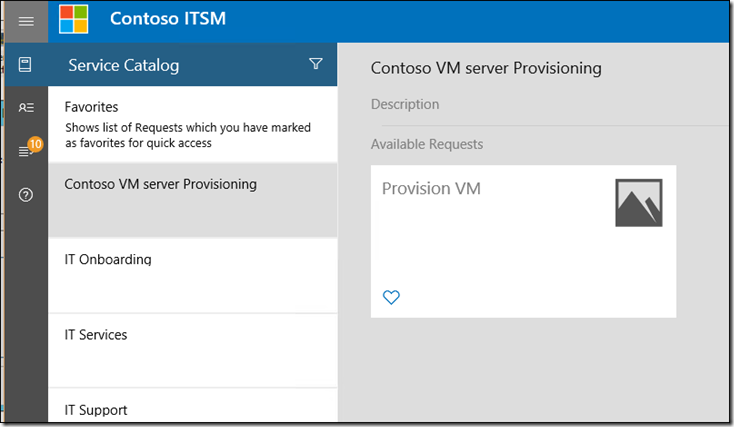
Clicking ‘Provision Vm’ Opens up the Request Offering:
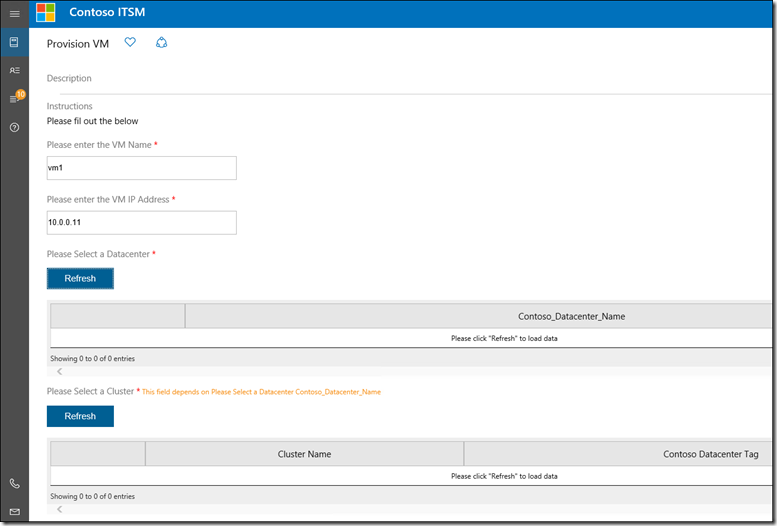
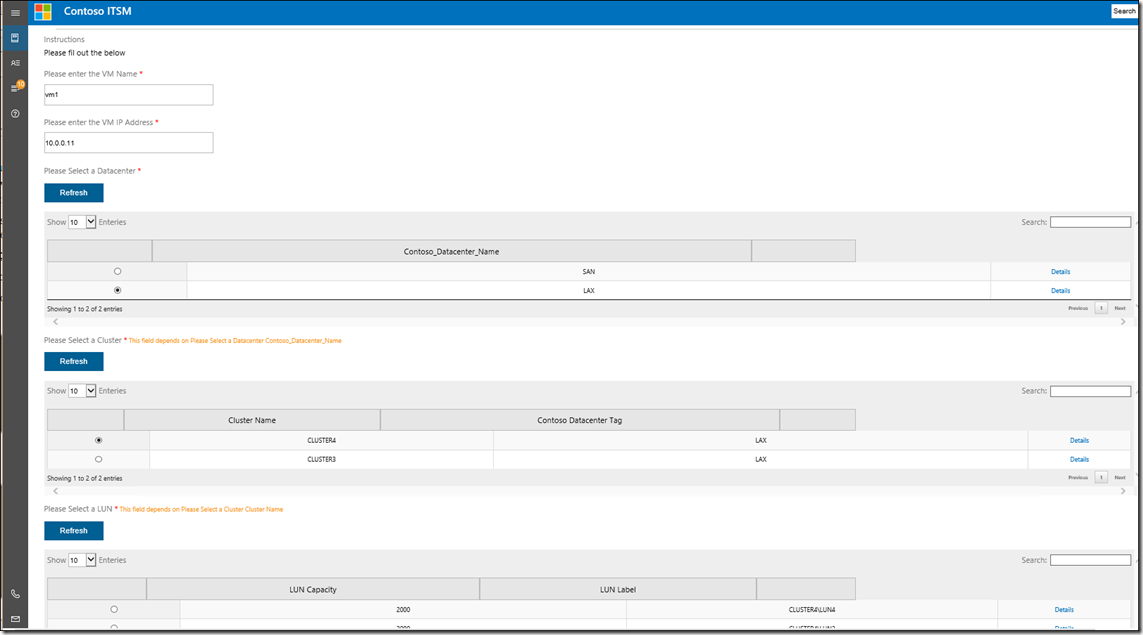
Hitting the blue Refresh button displays the available options for each prompt. In the below example, the LAX datacenter is selected so Cluster3 and Cluster4 in the LAX datacenter are displayed as available Clusters. Following this selection, only LUNS on the selected cluster (CLUSTER4) are shown:
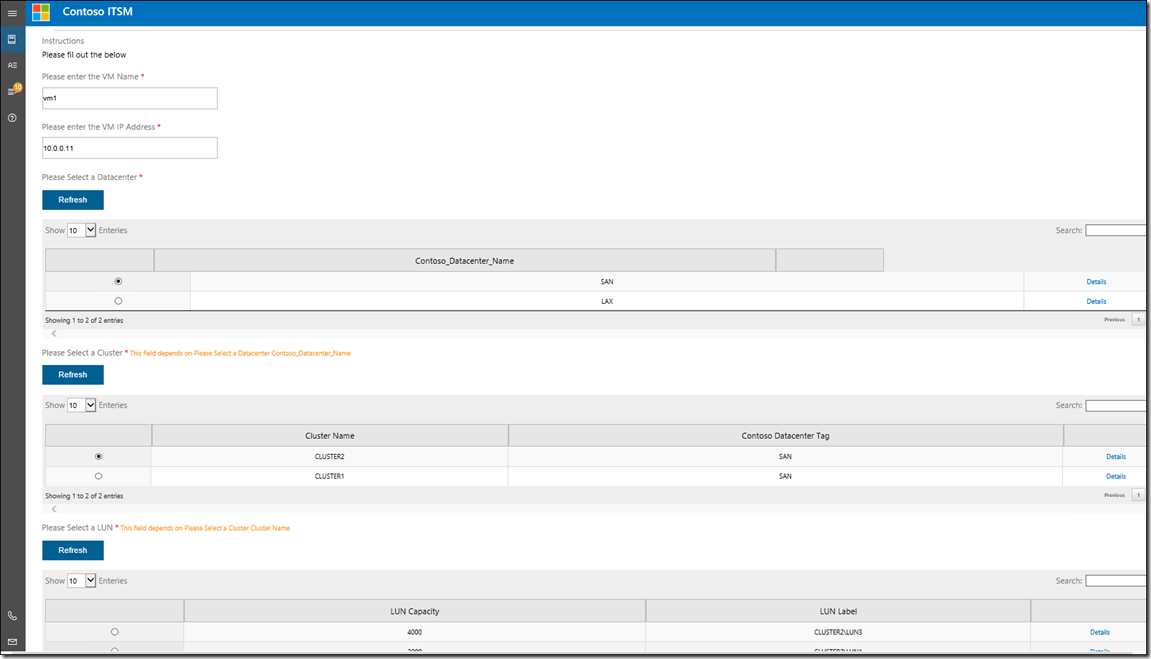
In the below example, the SAN datacenter is selected so Cluster1 and Cluster2 in SAN are displayed as available Clusters and only LUNS on the selected cluster (CLUSTER2) are shown:
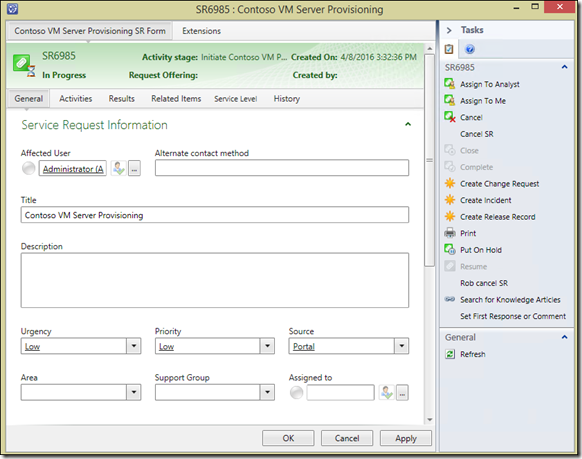
HOW THE SERVICE REQUEST LOOKS IN SCSM:
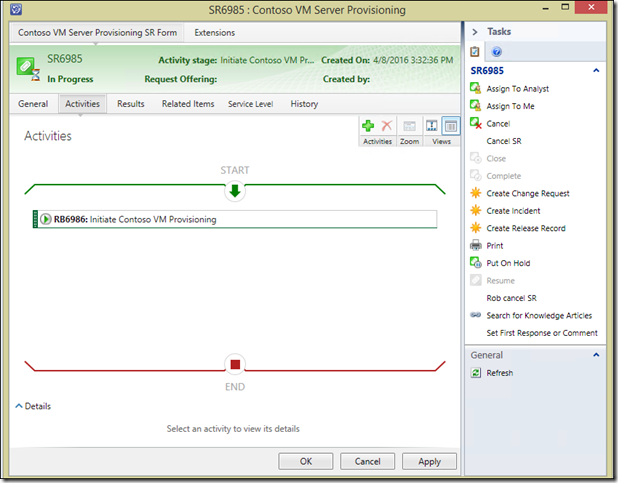
This shows how and where the values would be stored in the Service Request, and how they appear if you’ve viewing the Service Request in the SCSM console:
NOTE: You could also have notifications going out when the service request is created and / or completed.
High-Level Steps for Impletmentation
STEP 1) SCSM Authoring Tool – Create Sealed Custom Management Pack containing VM Server Provisioning SR (extension of SR using ‘Inherit from this class’ option and add the properties that will be entered as strings
STEP 2) - Create Management Pack containing Custom Configuration Item Classes for Datacenter, Cluster, LUN
STEP 3) Import Sealed Management Packs into Service Manager
STEP 4) Create Views in SCSM for each Custom Configuration Item (CI) Class (Datacenter, LUN, Cluster)
STEP 5) Populate Configuration Item (CI) data for instances of each class (Datacenter, Cluster, LUN)
Step 6) Create Orchestrator Runbook (Initiate Contoso VM provisioning)
Step 7) Synchronize Orchestrator and Create Runbook Automation Activity in SCSM referencing ‘Initiate Contoso VM Provisioning Runbook)
Step 8) Create Contoso VM Server Provisioning SR Template in SCSM containing Runbook Activity template created in Step 7
Step 9) Create Service Offering Category and Service Offering in Service Manager
Step 10) Create Request Offering in Service Manager using Template created in Step 9
Detailed Steps
STEP 1) SCSM Authoring Tool – Create Sealed Custom Management Pack containing VM Server Provisioning SR (extension of SR using ‘Inherit from this class’ option and add the properties that will be entered as strings
Because the properties (VM NAME and IP ADDRESS) are not provided out of the box (OOB) as part of the general SCSM Service request class, we know that we will need to customize the service request class to add these properties.
TIP: In some cases you can use the built-in properties that you are not using to store custom properties. For instance, ‘Alternate Contact Method’ is sometimes used for storing a custom value. However,even in a scenario where you only have one or two properties you need to add, it still can be better to customize the class so you have specific properties to store those values in, rather than re-using an OOB property that ultimately you may decide to start using for its original purpose. It is also goof from a simplicity perspective (especially when you need to sue these properties in reporting / Orchestrator etc) to create custom properties rather than use the OOB, of which the names of canot be changed.
As the above properties are specific to this scenario and we don’t want these showing in every service request, (for example it would make no sense to see new hire details in a new VM provisioning SR), we will use the ‘inherit from this class’ option in the authoring tool rather than ‘extend’ option in the authoring tool. If we use the ‘extend’ option, it would extend every single instance of the work item with the custom properties that you create (VM server and VM IP address in this case). Another option you have is to ‘extend’ and add fields such as customstring1, customstring2, customint1, customint2. Don’t go too overboard with that though, as in one environment I saw 50 extended properties (10 string, 10 int etc) and it really hampered performance, causing every instance of that extended work item to take a very long time (almost unusable) to open up and save. The other downside to this is that it can require more overhead and effort in maintaining which of these custom properties is used for what, and also when you want to use them elsewhere (like SCORCH or reports) it is more effort than if you had a specific custom property (created using the inherit from this class option) with a name like VM Name.
SUMMARY: Use Extend if you want the property extension to show up in EVERY service request already created and that will be created going forward. Use the ‘Inherit from this class’ option if you are creating properties specific to a given scenario that you don’t want to see in all service requests, but just those for the particular scenario like VM Server Provisioning or new hire onboarding.
So now the theories out of the way, here’s how to go about doing this:
Perform the following in the SCSM 2012 R2 Authoring Tool which is available for download here if you don’t already have it: https://www.microsoft.com/en-us/download/details.aspx?id=40896
NOTE If you are on a prior version of SCSM like 2012 RTM or 2012 SP1, be sure to grab the respective version – RTM, SP1.
1.1) In the pull down menu choose File>New
1.2) Change the Filename from ManagementPack.GUID (ManagementPack.c8b265d2_f6be_4157_bf2f_62f27131e580) to a name such as ContosoVMServerProvisioningServiceRequestMP.xml (no spaces / special chars – you will be able to set a more friendly display name))
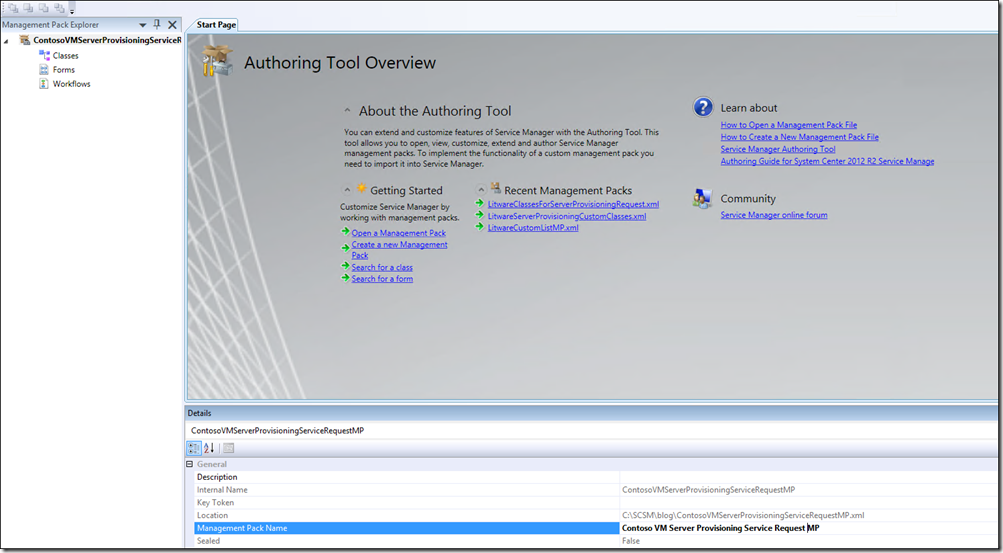
1.3) Click on the Management pack name in the navigation tree on the left and change the display name as desired (I changed mine to Contoso VM Server Provisioning Service Request MP :
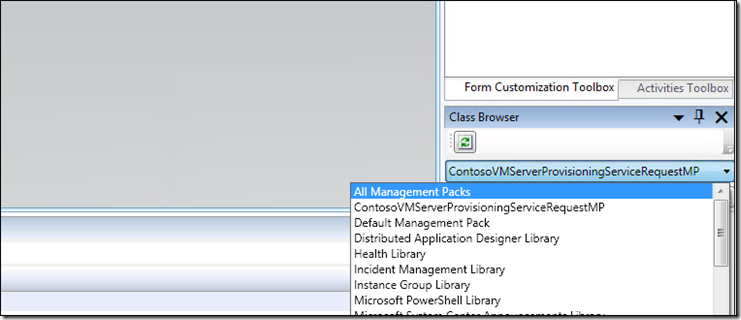
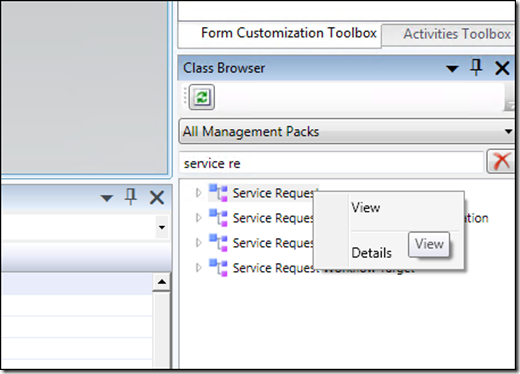
1.4) As we want to extend the service request class, the first thing is to find the Service Request class in the sealed MP it is originally defined in. To do this, on the lower right hand side in the class browser, change the dropdown from the name of your management pack to ‘All Management Packs’ (you may have to scroll up to see this ‘All management packs’ option)
1.5) Once ‘All management packs’ is selected, where it says Search, type Service Request: (yes, keep typing at least all the way to Service R, it is narrowing it down)
1.6) Right-Click Service Request (you may have to right-click twice) and select View:
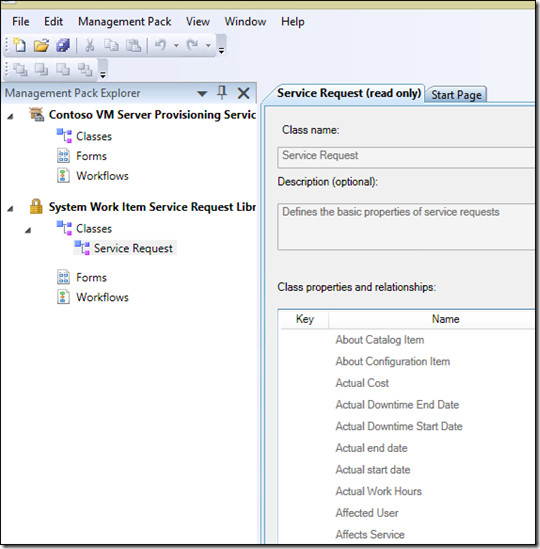
1.7) You will see the class open up from the Sealed MP it is contained in (System Work item Service request Library) on the left hand side:
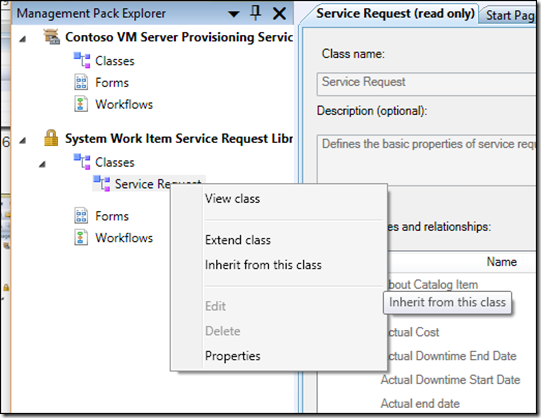
1.8) Right-click Service Request in the management Pack explorer on the left-hand side, and choose ‘Inherit from this Class’:
1.9) In the ‘Target Management Pack’ dialog, Leave the default of the custom unsealed MP selected, and click OK to store the class customization in there.
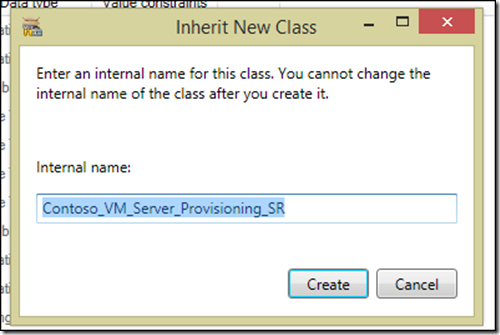
1.10) Change ClassInherit_1 to Contoso_VM_Server_Provisioning_SR (again no spaces here as this is the internal ID – you can create a more friendly display name in the next steps)
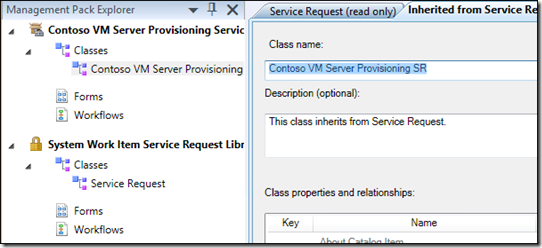
1.11) Under Class and ‘Class Name’, change ‘Inherited from Service Request’ to a more appropriate friendly class name ’Contoso VM Server Provisioning SR’
NOTE: For the next step, you may need to rearrange the windows or in my case pull the details window up to see the class properties and relationships:
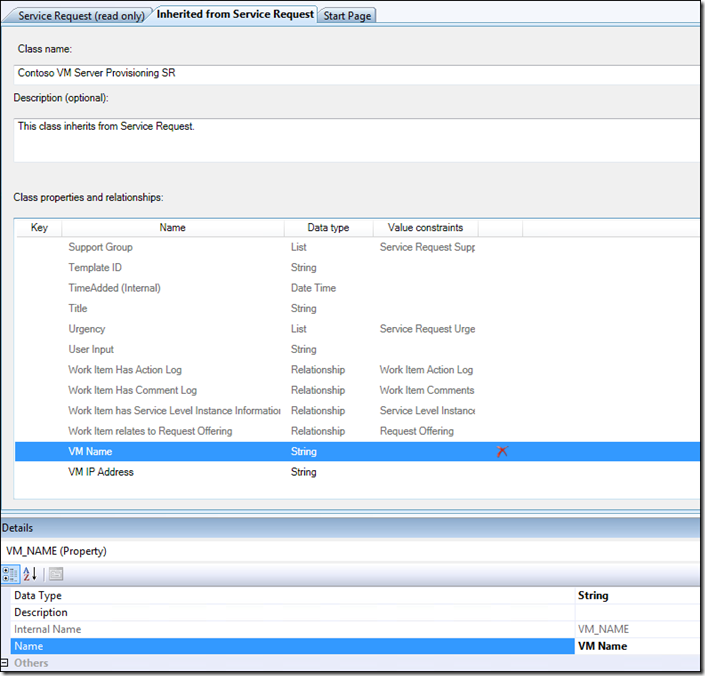
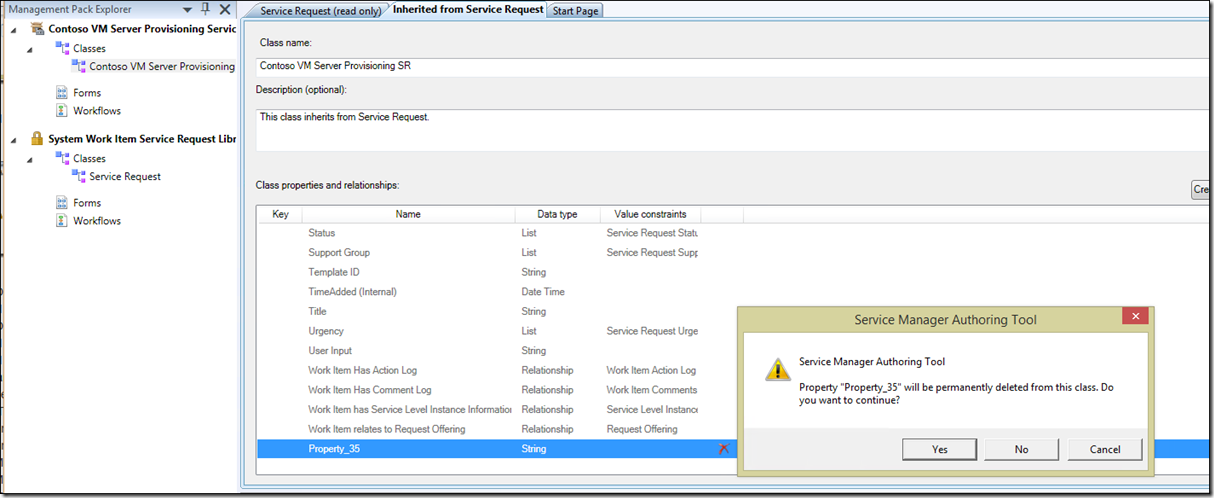
1.12) Scroll all the way to the bottom in the ‘Class Properties and Relationships’ Details pane (should be in the middle), and then you should see a custom property (likely lucky number 35) that the authoring tool kindly created for you (or you can sort by name and scroll to ‘P’):
NOTE: I delete this, as we cannot change the internal name of property_35.
1.13) hit the red X on the right, to delete property 35.
1.14) Create the custom properties that you want. You may vary this (add extra / less properties) and /or use different datatypes for each property depending on your ultimate desired result and how you will use these properties, or how you will need to ultimately manipulate them in service Manager or Orchestrator.
The create property / create relationships buttons can be found just to the lower right of the class description:
Create these 2 properties:
| INTERNAL NAME | DISPLAY NAME | DATA TYPE |
| VM_NAME | VM Name | String |
| VM_IP | VM IP Address | String |
NOTE: The Display Name and Data Type can be modified in the details pane at the bottom of the authoring tool.
NOTE: We are not creating the other things we want to prompt for (DATACENTER, CLUSTER NAME, LUN) as these will be created as Configuration Item classes in the next section, and ultimately these will be stored as ‘Affected Configuration Items (an OOB relationship) and be displayed in the ‘Related Items’ tab of the Service Request:

1.15) Save the MP. It is always best to save at milestones in the Authoring tool
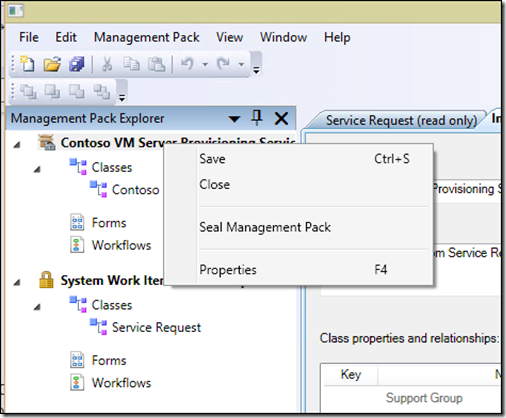
1.16) right-click the Management pack name in the Management pack browser and choose ‘Seal Management Pack'’
1.17) Fill out the fields and click Seal to seal the MP, then close the Seal dialog:
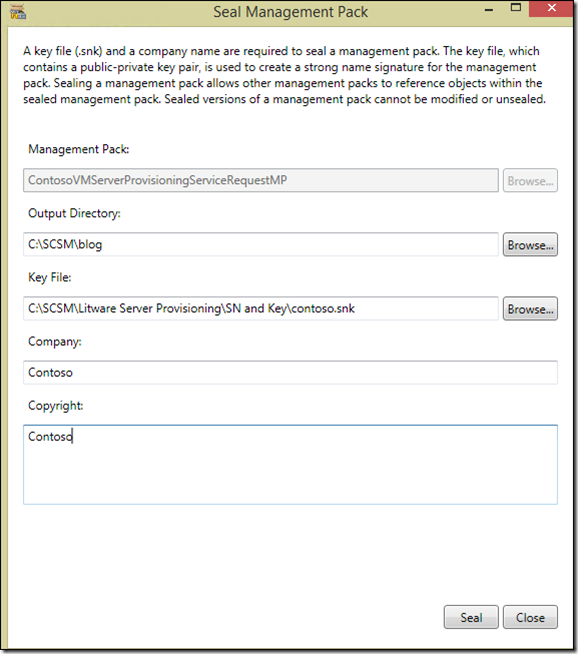
NOTE: Remember to change the Output Directory, as by default it is the user profile’s documents directory)
NOTE: When you click ‘Seal’ , the most recently saved unsealed .xml version of the MP will be preserved, and it will create a sealed version of the MP (.mp file) in the output directory (which you will likely want to change from the default user profile\documents directory) and automatically increment the version number by 1.
STEP 2) Create Management Pack containing Custom Configuration Item Classes for Datacenter, Cluster, LUN
In order that we can narrow down available values based on what is selected in a previous prompt (use tokens for query result filtering), it is necessary to create classes for these values. Simple Lists (populated and maintained within the context of each request offering) can also be used as tokens for query result filtering, but MP enumeration lists (the ones in Library>lists and dropdowns in work items) cannot.
2.1) In the Authoring Tool, in the pull-down menu choose File>New
2.2) Change the Filename from ManagementPack.GUID (ManagementPack.c8b265d2_f6be_4157_bf2f_62f27131e580) to ContosoVMServerProvisioningCustomClasses.xml
2.3) Click on the Management pack name in the navigation tree on the left and change the display name to Litware Server Provisioning Custom Classes
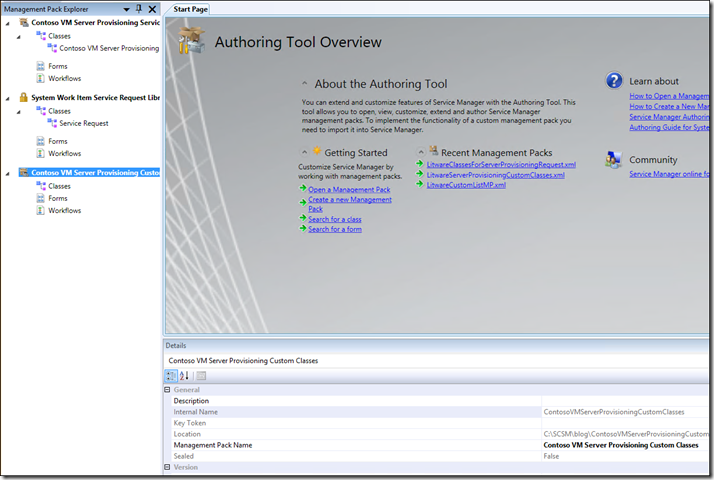
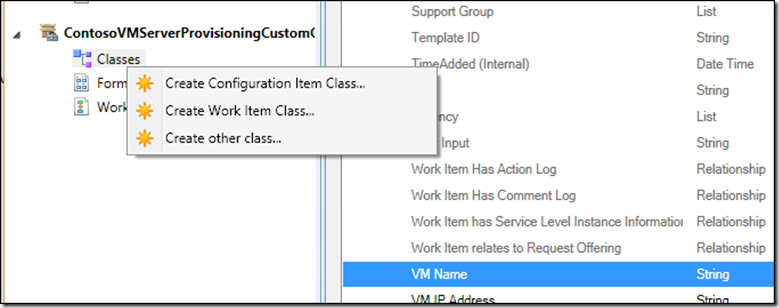
2.4) Under Classes on the left-hand side, right click ‘Create Configuration Item Class…’
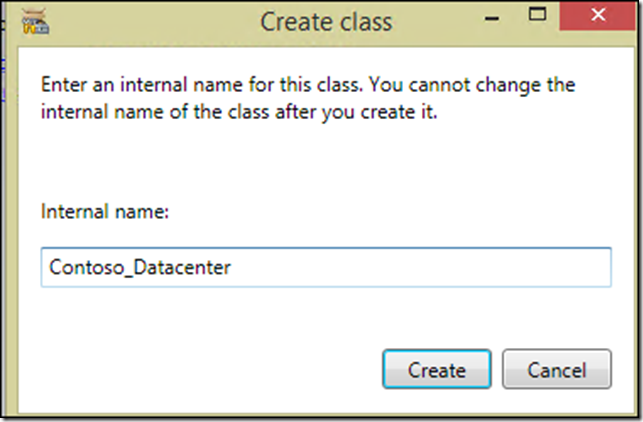
2.5) Change NewClass_1 to Contsoso_Datacenter and Click Create:
NOTE: No spaces / special characters here – you can change the display name next.
2.6) Change Display Name to Contoso Datacenter
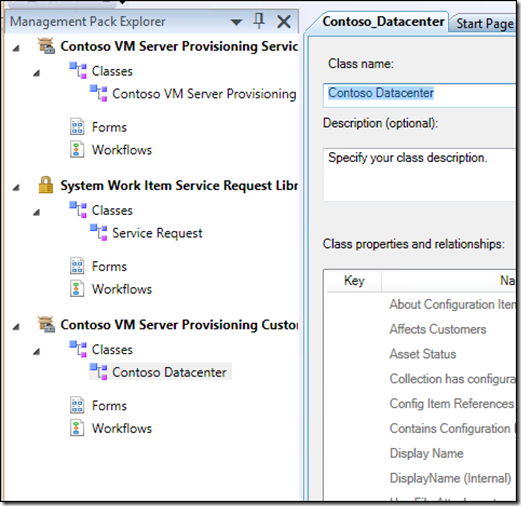
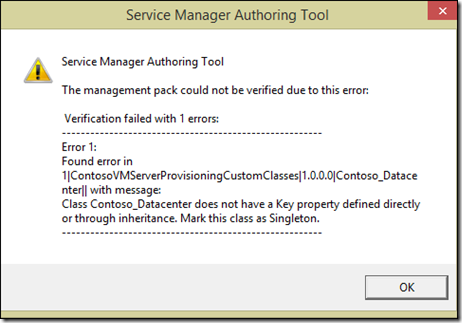
2.7) Delete Property_4 (as we are unable to change the internal name) and click Yes in the dialog:
2.8) Click OK in this dialog:
NOTE: You are receiving this dialog because you deleted the property which was the key for the class. When you specify a new property as the key (in a following step), you will no longer receive this dialog
2.9) Using the “Create Property’ button, Create the following Property:
| INTERNAL NAME | DISPLAY NAME | DATA TYPE | KEY | REQUIRED |
| Contoso_Datacenter_Name | Datacenter Name | String | TRUE | TRUE |
2.10) Under Classes on the left-hand side, right chose ‘Create Configuration item Class…’
2.11) Change NewClass_1 to Contoso_Cluster
2.12) Change Name to Contoso Cluster
2.13) Delete Property_4 (as unable to change internal name)
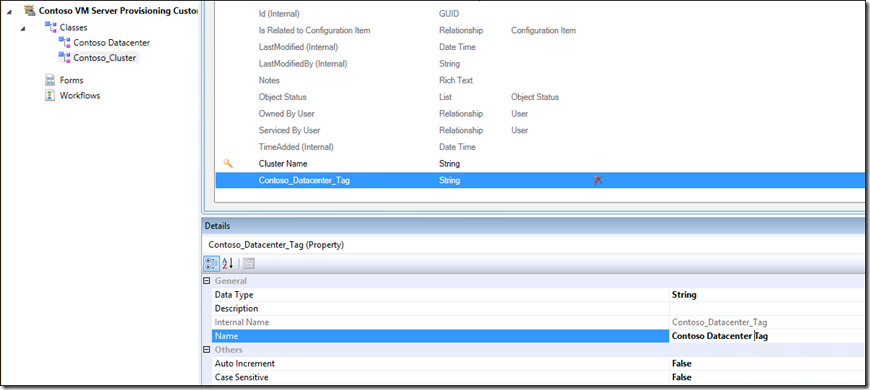
2.14) Create the following Properties using the ‘Create Property’ button for each one:
| INTERNAL NAME | DISPLAY NAME | DATA TYPE | KEY | REQUIRED | |
| Contoso_Cluster_Name | Cluster Name | String | TRUE | TRUE | |
| Contoso_Datacenter_Tag | Datacenter Tag | String | FALSE | FALSE |
2.15) Under Classes on the left-hand side, right click and choose ‘Create Configuration item Class…’
2.16) Change NewClass_1 to Contoso_LUN
2.17) Changed Name to Contoso LUN
2.18) Deleted Property_4 (as unable to change internal name)
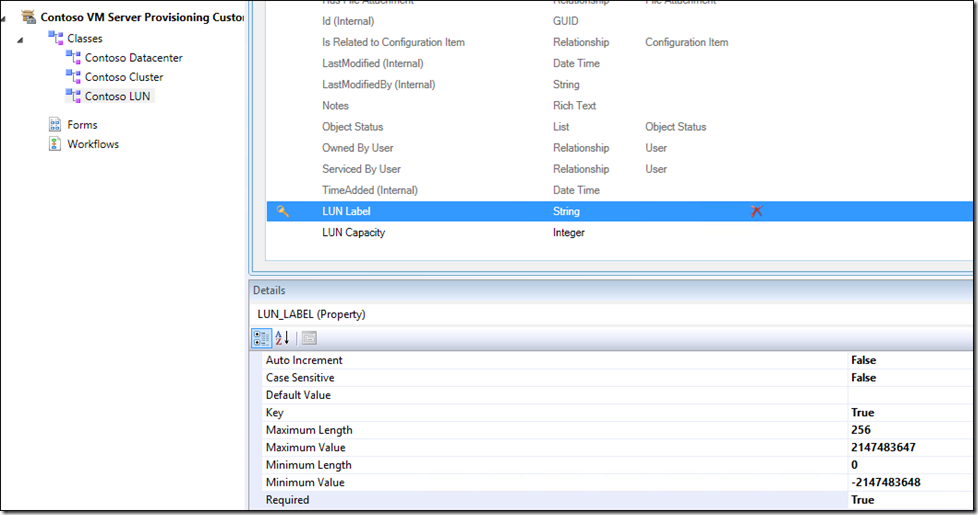
2.19) Created the following Properties using the ‘Create Property’ button for each one:
| INTERNAL NAME | DISPLAY NAME | DATA TYPE | KEY | REQUIRED | |
| LUN_LABEL | LUN Label | String | TRUE | TRUE | |
| LUN_Capacity | LUN Capacity | Integer | FALSE | FALSE |
2.20) Save the MP. It is always best to save at milestones in the Authoring tool
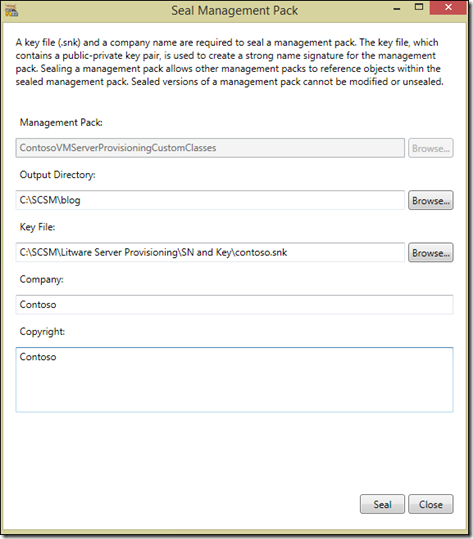
2.21) right-click the Management pack name in the Management pack browser and choose ‘Seal Management Pack'’

2.22) Fill out the fields and click Seal to seal the MP, then close the Seal dialog:
NOTE: remember to change the Output Directory, as by default it is the user profile’s documents directory)
NOTE: When you click ‘Seal’ , the most recently saved unsealed .xml version of the MP will be preserved, and it will create a sealed version of the MP (.mp file) in the output directory (which you will likely want to change from the default user profile\documents directory) and automatically increment the version number by 1.
STEP 3) Import Sealed Management Packs into Service Manager
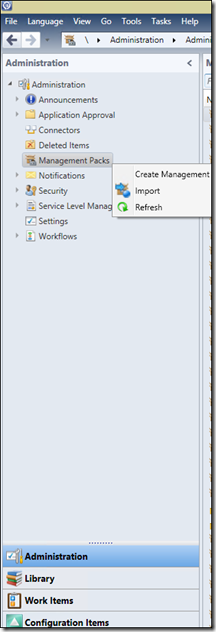
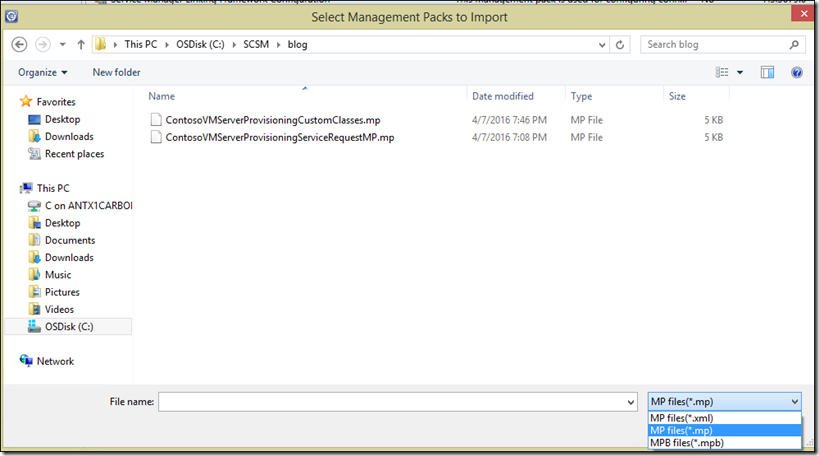
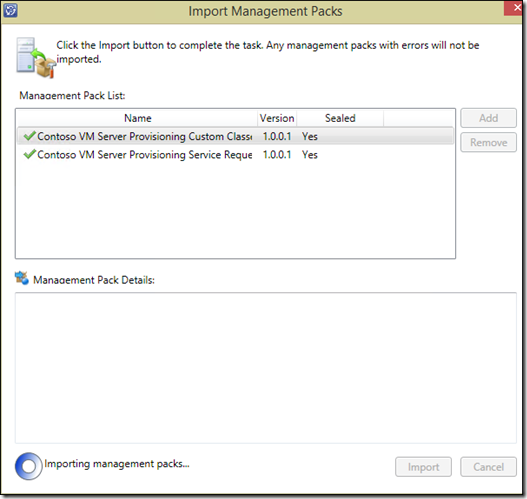
3.1) Navigate to Administration>Management Packs in the Service Manager console, and Import the 2 SEALED (remember to change Management pack type) Management Packs into SCSM (This is required now so that you will be able to select your custom class in the orchestrator runbooks we will create next):
STEP 4) Create Views in SCSM for each Custom Configuration Item (CI) Class (Datacenter, LUN, Cluster)
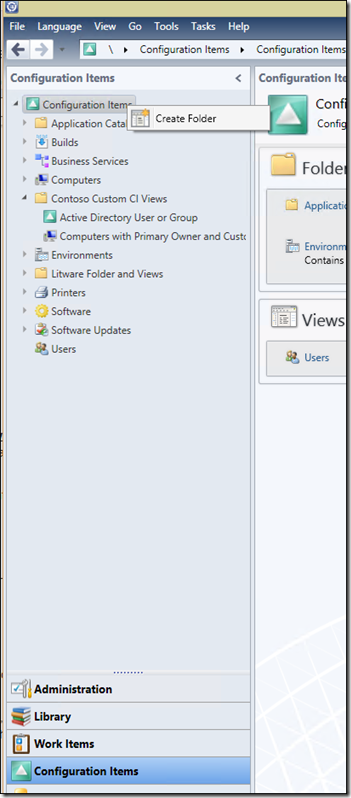
4.1) In the Configuration Items Pane of the console, clicked the top-level ‘Configuration Items’ node and chose ‘Create Folder’
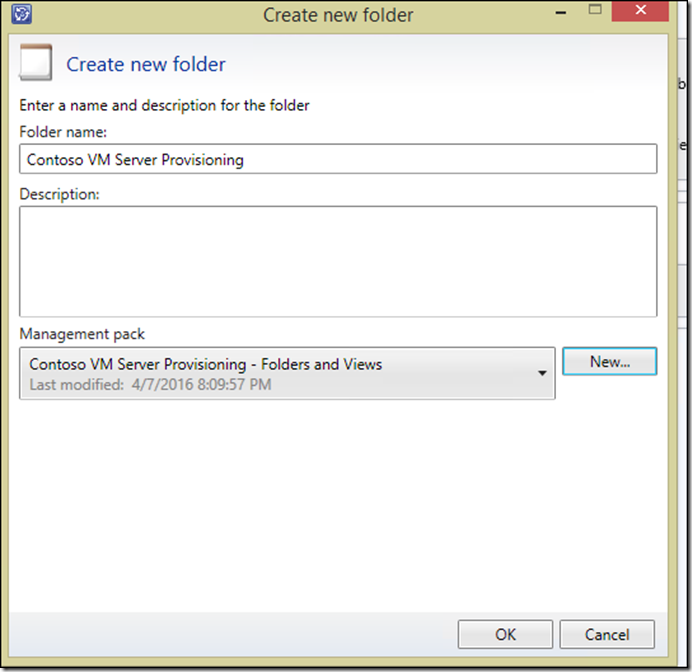
4.2) Create a folder called Contoso VM Server Provisioning in a new Management Pack – Contoso VM– Server Provisioning – Folders and Views
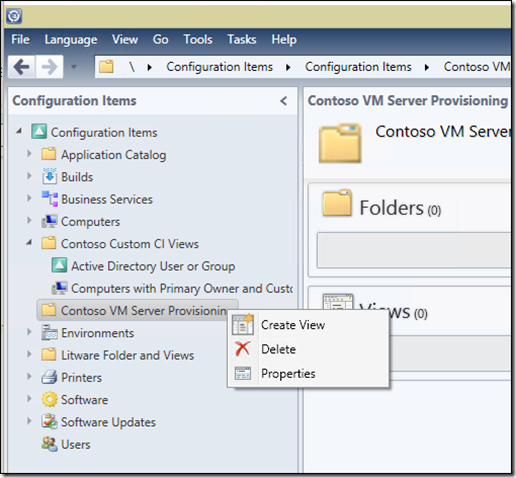
4.2) Right-click the new Contoso VM Server Provisioning folder, chose to create view.
4.3) Give the view a name such as Contoso Datacenter:
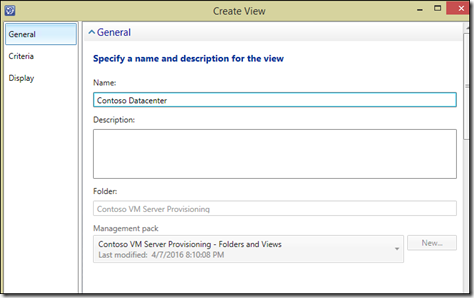
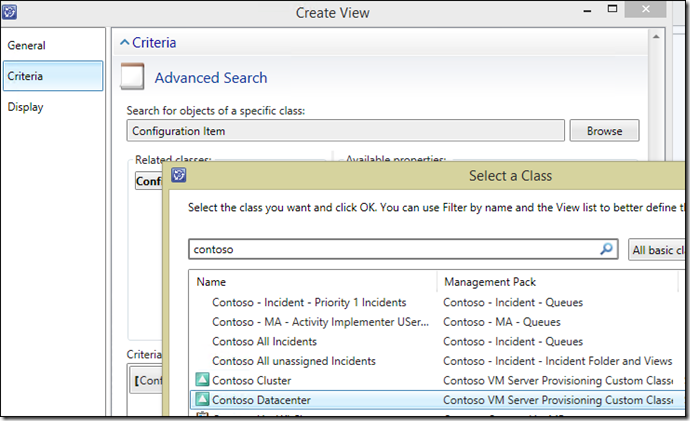
4.4) Next to Configuration Item, click Browse, change Frequently used Basic Classes to All Basic Classes and select Contoso Datacenter:
In the Display page for each view, add the appropriate display fields (our custom ones, time added and last modified):
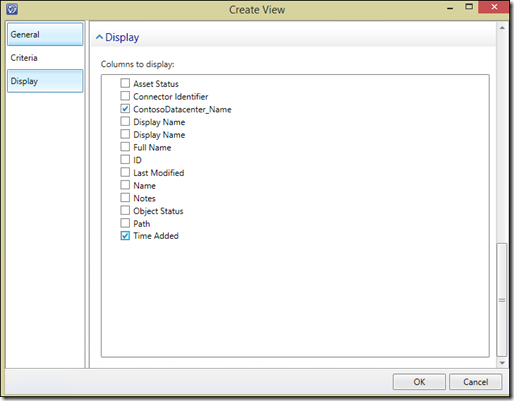
4.3) Repeat the above steps to create views for Contoso Cluster and Cluster LUN
STEP 5) Populate Configuration Item (CI) data for instances of each class (Datacenter, Cluster, LUN)
2 methods for populating your new CI classes with data are as follows (you could also use Orchestrator which we won’t go into here):
- Manually Create Using Forms
- Populate from CSV files
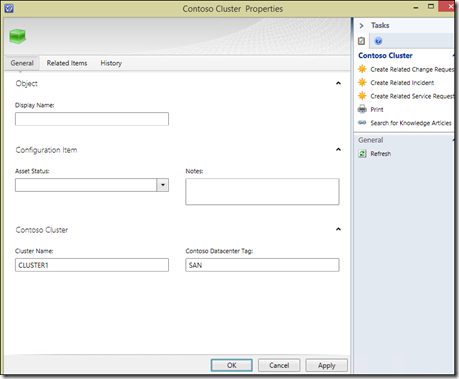
To manually create, you can use the Create task on the right hand side as shown here;
NOTE: This is a big advantage of creating a view for your custom CI ![]()
Fill the form out and click OK
To populate the same values using a CSV file, you will need to create 2 files:
- a) a format file (.xml)
- b) a data file (.csv)
Your Xml file would be set up as shown below with the Internal Class ID and then the properties listed in the same order in which they are listed in your CSV file:
ContosoCluster.xml
<CSVImportFormat>
<Class Type="Contoso_Cluster">
<Property ID="Contoso_Cluster_Name>
<Property ID="Contoso_Datacenter_Tag"/>
</Class>
</CSVImportFormat>
Contoso_Cluster.csv:
CLUSTER1 SAN
CLUSTER2 SAN
CLUSTER3 LAX
CLUSTER4 LAX .
NOTE: The CSV file should not have any headers.
Once you have these 2 files, import from Administration>Connectors>Import from CSV file
NOTE: Unlike the connectors, There is no built-in automated / scheduled process for importing CSVs / managing the data as it is updated etc. One of my customers who implemented a similar scenario to this wipes the data completely and then re-imports on a regular basis. This way we don’t get into any complications of records already existing / merge requirements etc.
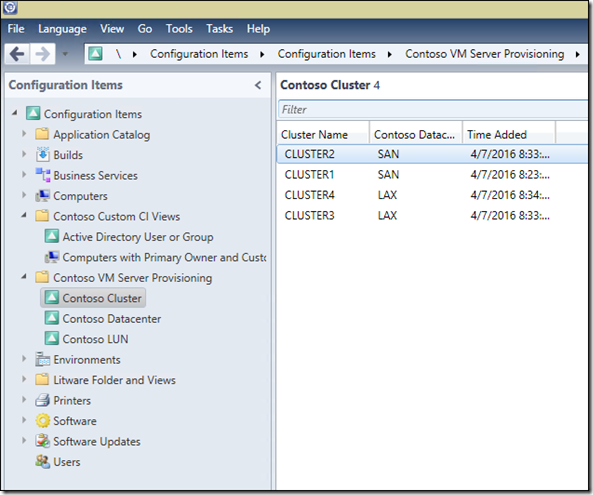
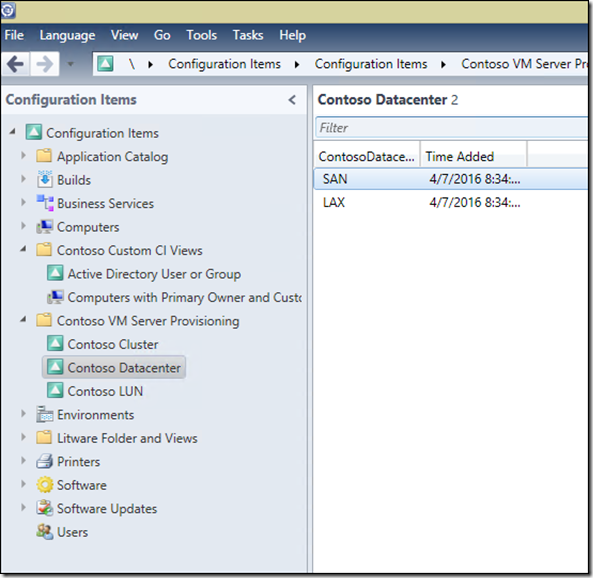
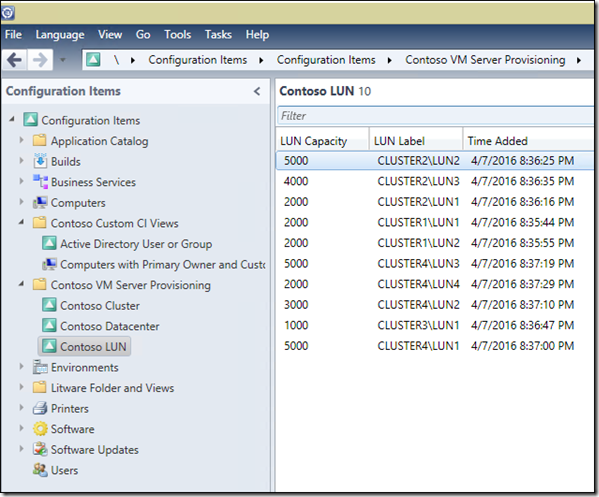
This is how my populated Classes look, once all the data is populated:
Step 6) Create Orchestrator Runbook (Initiate Contoso VM provisioning)
NOTE: This runbook will be triggered from Runbook Activity in SCSM and in turn trigger Contoso VM Text Manipulation and Get Parameters Runbook in Orchestrator
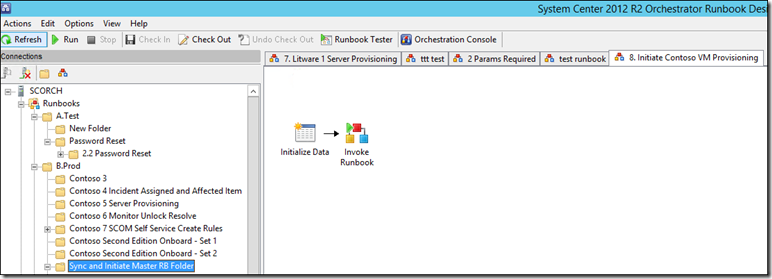
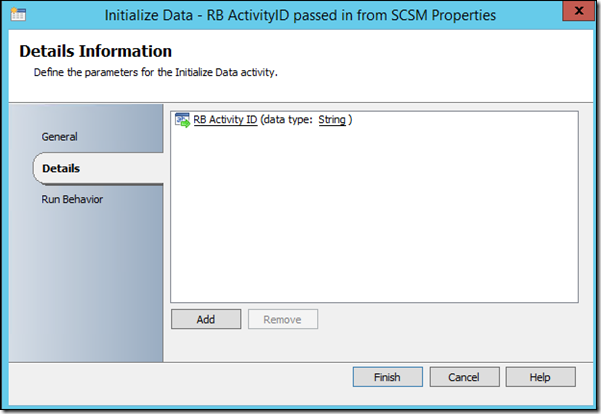
Every runbook automation activity I use in SCSM points to an ‘initiate’ runbook that is always contained in my (sync and initiate runbook Folder. THese Initiate Runbooks just have 2 activities:
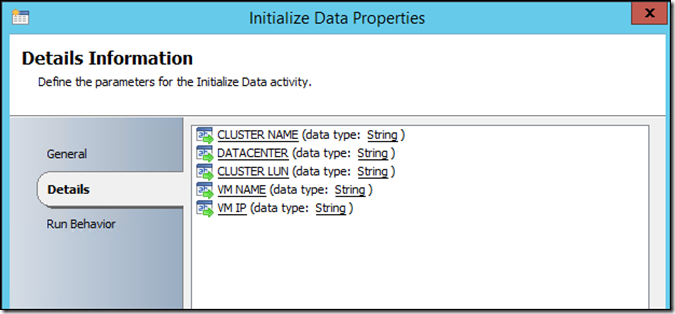
- Initialize Data – Runbook Automation Activity ID
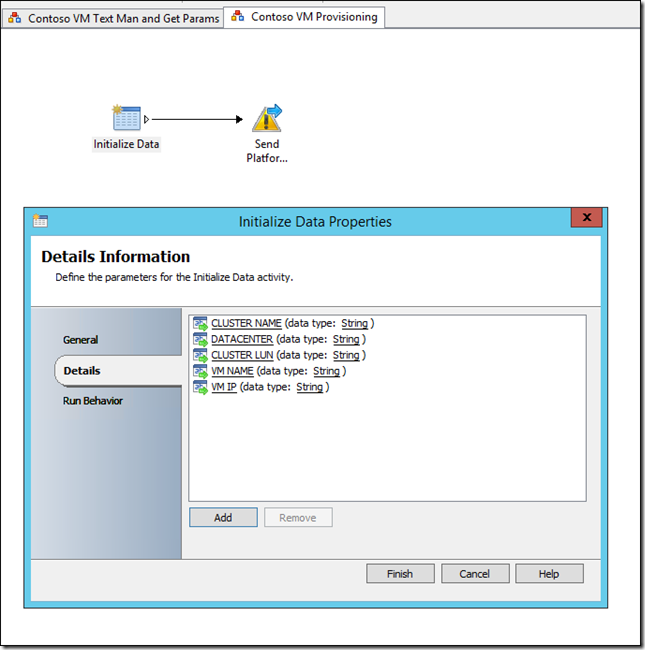
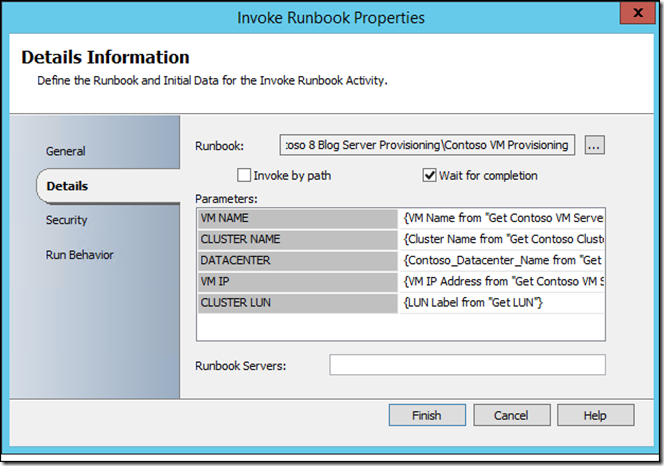
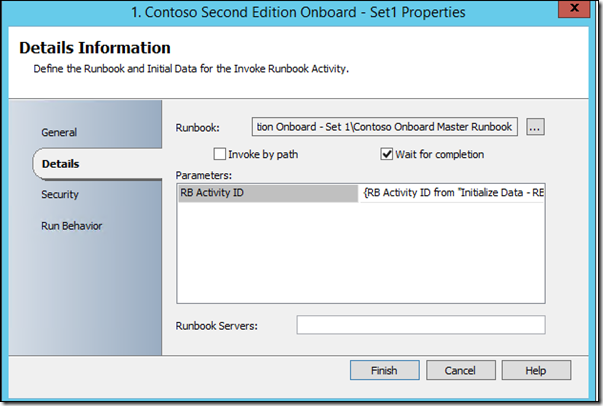
- Invoke Runbook – Invoke a runbook elsewhere in Orchestrator (which may in turn invoke other child runbooks).
NOTE: This approach makes it easier to implement a solution like this in different environments that inevitably will have their runbooks organized in different ways. For more info on this, go to https://aka.ms/stayclassyonboard and search for SEQUEL NOTE: SYNC / INITIATION FOLDER
6.1) Create Runbook Folder called SCSM Sync and Initiate Master RB folder and then a Runbook inside it - Initiate Contoso VM Provisioning.
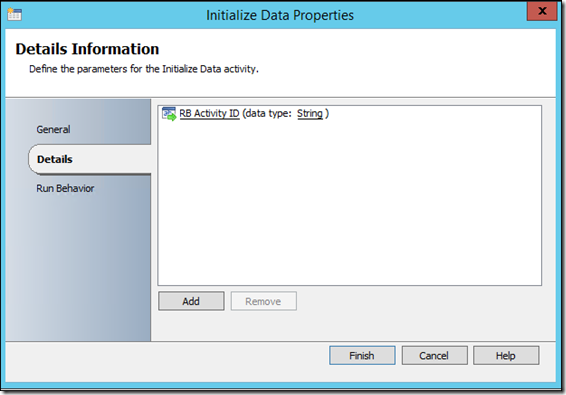
6.2) Add an initialize data and invoke runbook activitiy and join them up as shown below:
NOTE: You will configure these activates after you create the next runbook.
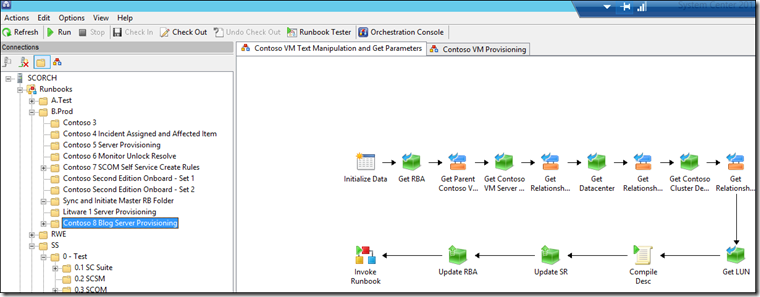
6.3) Create New Folder (Contoso Blog Server Provisioning) and 2 Runbooks inside the folder as shown below
This is what each of this runbooks are for:
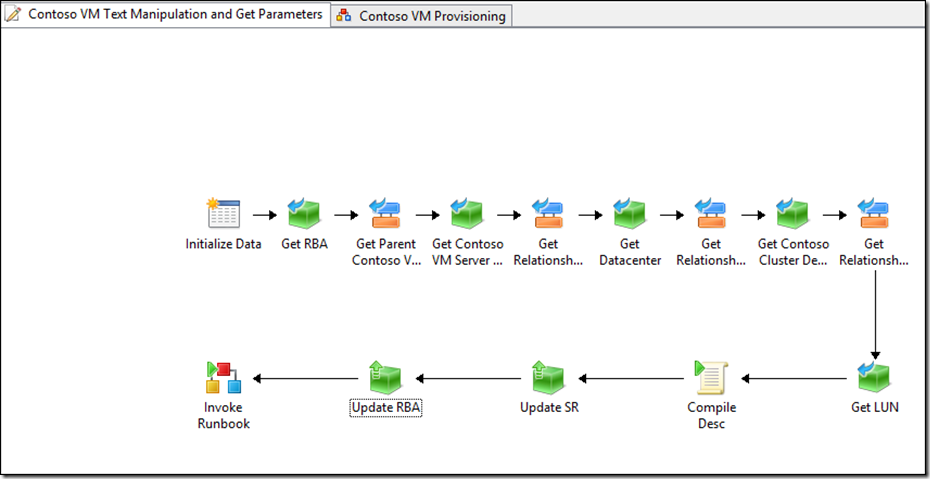
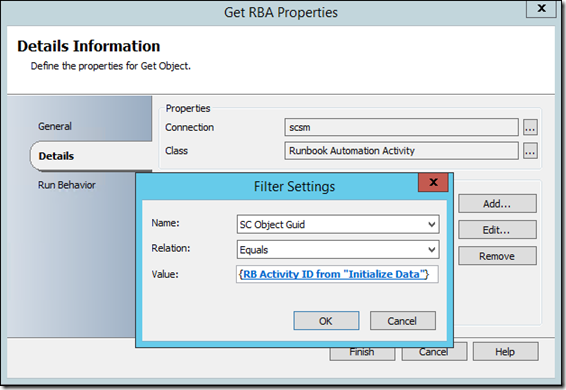
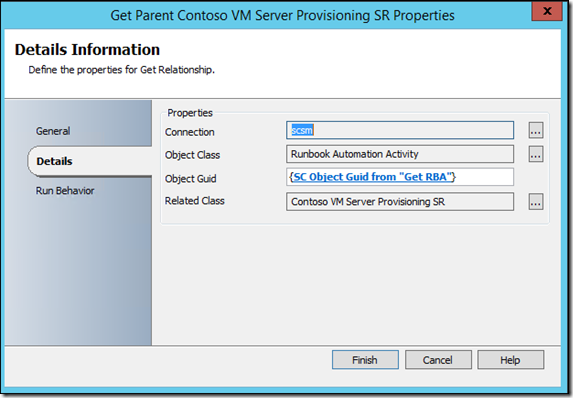
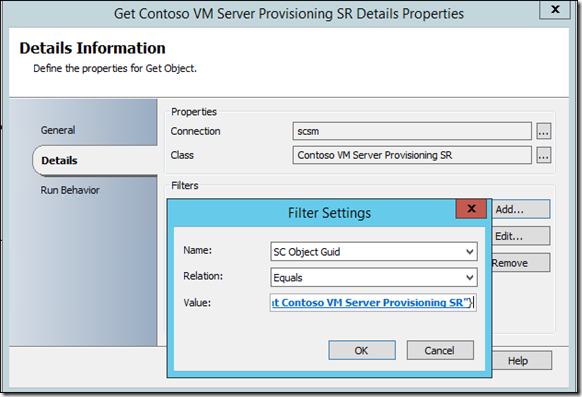
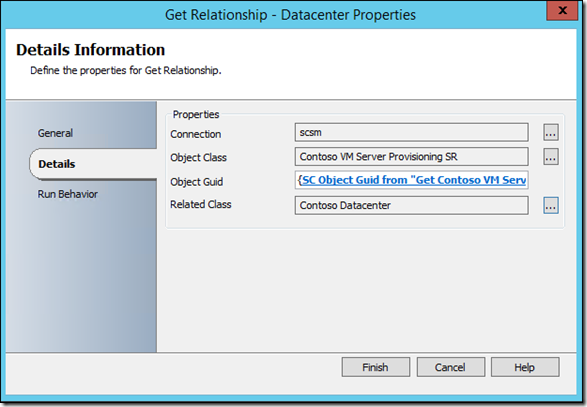
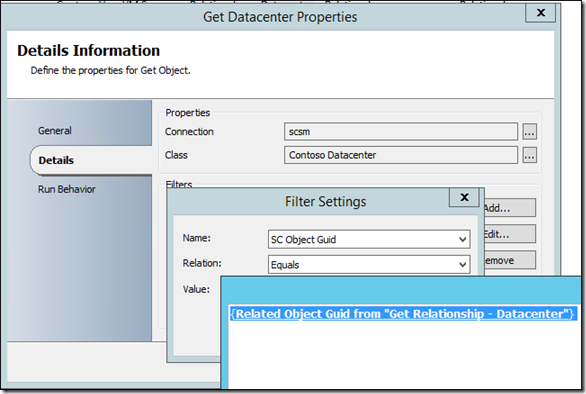
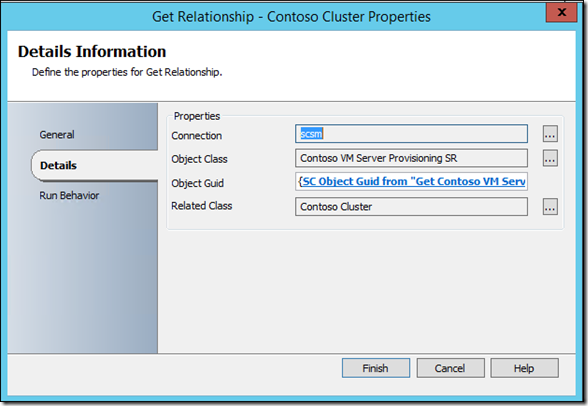
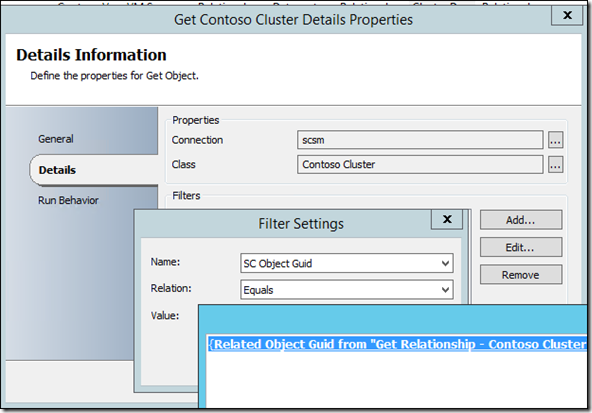
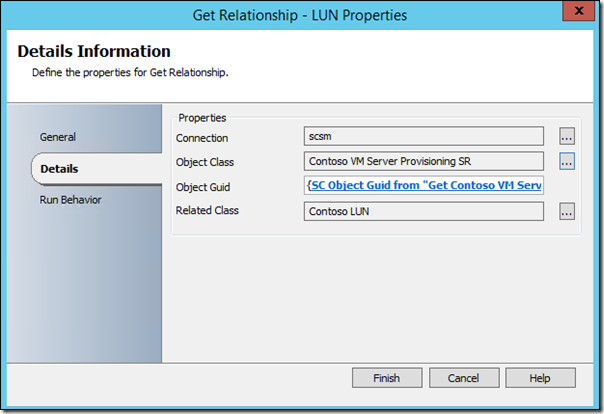
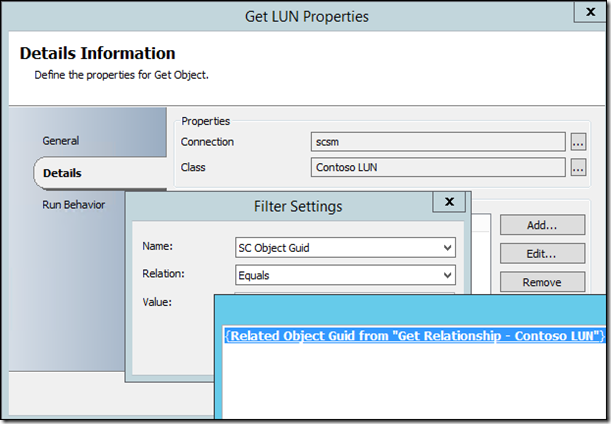
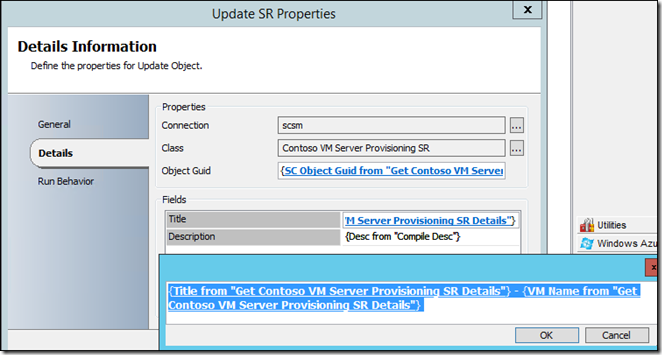
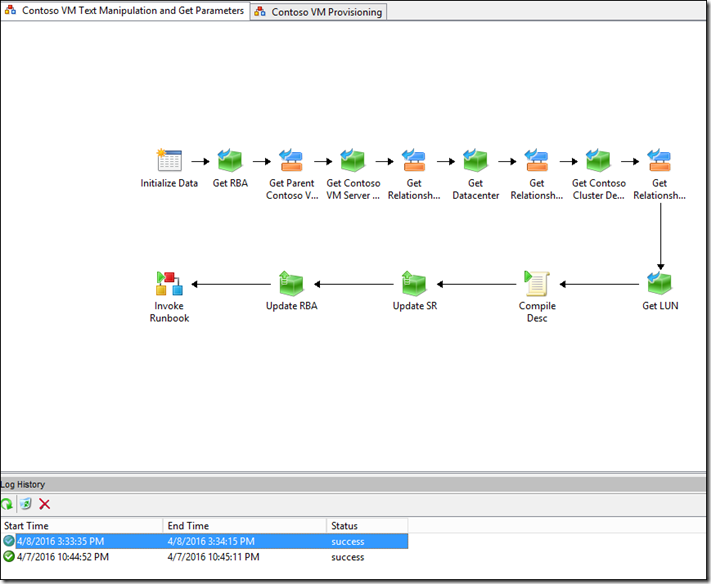
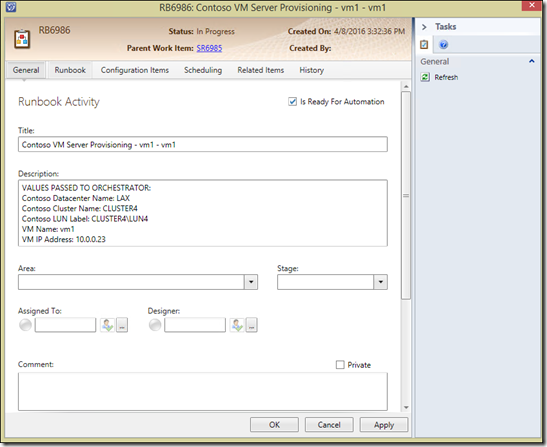
- Contoso VM Text Manipulation and Get Parameters (or you may wish to call this something like Contoso VM Provisioning Master Runbook’): – This runbook will Get the Parent SR and all Related Items (Datacenter, LUN, Cluster), use a run.net script activity (PowerShell script) to bring all the key information together in a block of text and then place this block of text in the description of the SR and child activity. It will also append the VM name to the SR Title. It will then invoke a child runbook (Contoso VM provisioning) passing the required parameters to it.
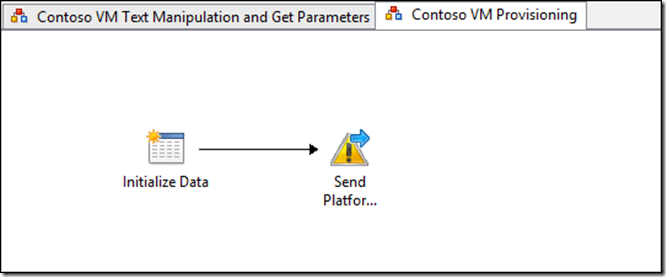
- Contoso VM Provisioning – For the purposes of this runbook, the parameters are displayed in an orchestrator event but this is where you would add provisioning or other capability. The scope of this blog is to show you how to get to that point where the values passed in via the SCSM portal can be consumed in Orchestrator.
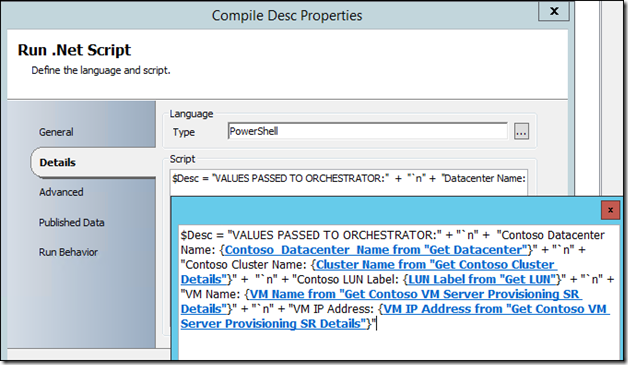
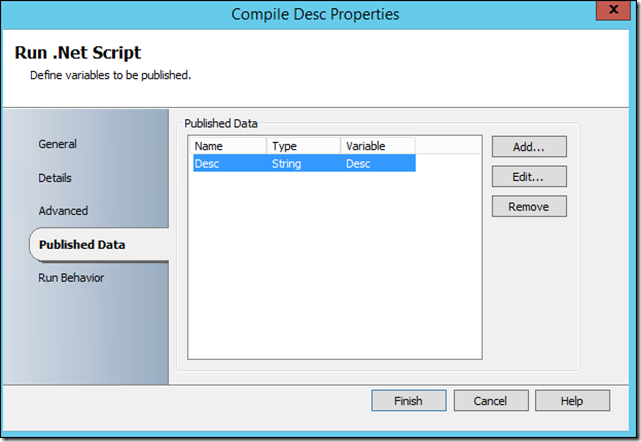
6.4) Configure the Activities in the ‘Contoso VM Text Manipulation and Get Parameters’ Runbook as shown below:
:
the script is:
$Desc = "VALUES PASSED TO ORCHESTRATOR:" + "`n" + "Contoso Datacenter Name: SUBSCRIBE-PUBLISHEDDATA-CONTOSO-DATACENTER-NAME" + "`n" + "Contoso Cluster Name: SUBSCRIBE-PUBLISHEDDATA-CONTOSO-CLUSTER-NAME" + "`n" + "Contoso LUN Label: SUBSCRIBE-PUBLISHEDDATA-CONTOSO-LUN-LABEL" + "`n" + "VM Name: SUBSCRIBE-PUBLISHEDDATA-VM-NAME" + "`n" + "VM IP Address: SUBSCRIBE-PUBLISHEDDATA-VMIPADDRESS"
6.5) Configure the activities in your ‘Contoso VM Provisioning’ Runbook as shown below
NOTE In my scenario, I simply take the outputs and publish them to a platform event but this is where you would implement your automated provisioning.
6.6) Verify all Runbooks are checked in.
6.7) Navigate back to the first runbook you created in the Sync and Initiate Master RB Folder (The ‘Initiate Contoso VM Provisioning Runbook) and configure it as shown here
Now you should have 3 runbooks (one in the Sync and Initiate folder and two in the Contoso VM Server Provisioning folder) and all 3 should be checked in.
Step 7) Synchronize Orchestrator and Create Runbook Automation Activity in SCSM referencing ‘Initiate Contoso VM Provisioning Runbook)
7.1) In the Service manager Console, Navigate to Administration>Connectors.
7.2) Click on SCORCH Connector and then ‘Synchronize Now’ task on right hand side (If you don’t already have a SCORCH connector, create a new one using the steps here - https://technet.microsoft.com/en-us/library/hh519779.aspx ):
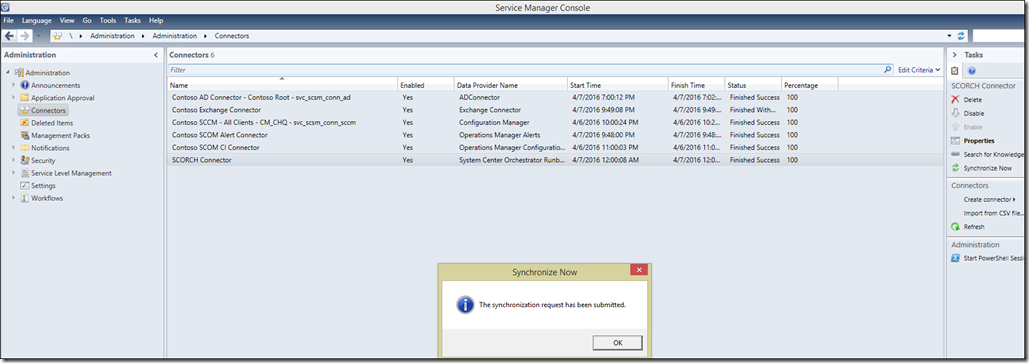
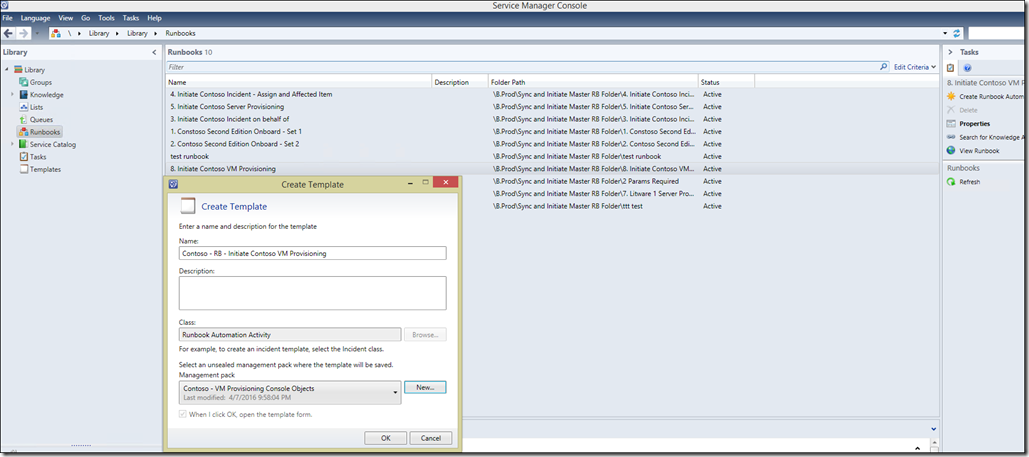
7.3) In Library>runbooks, Click on Initiate Contoso VM Provisioning and click ‘Create Runbook Automation Activity Template’ on right hand side:
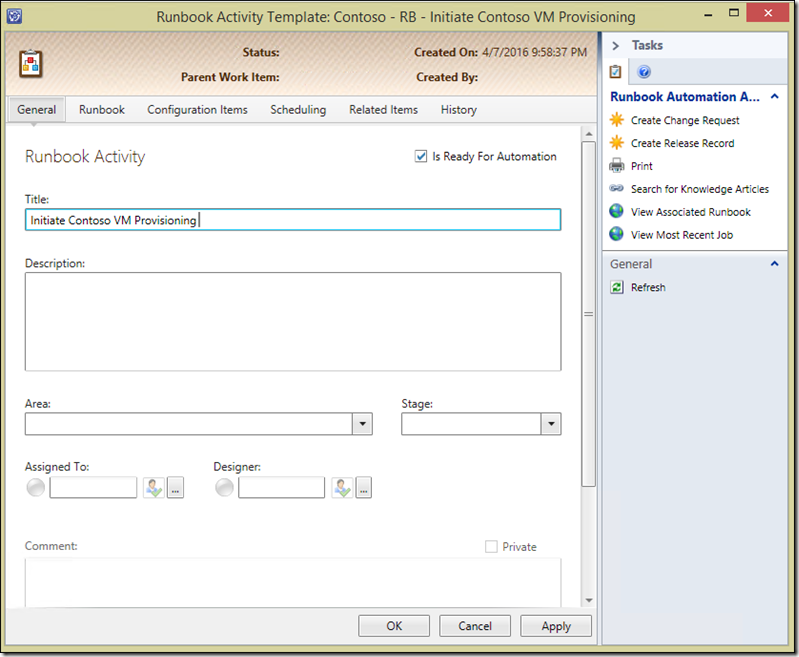
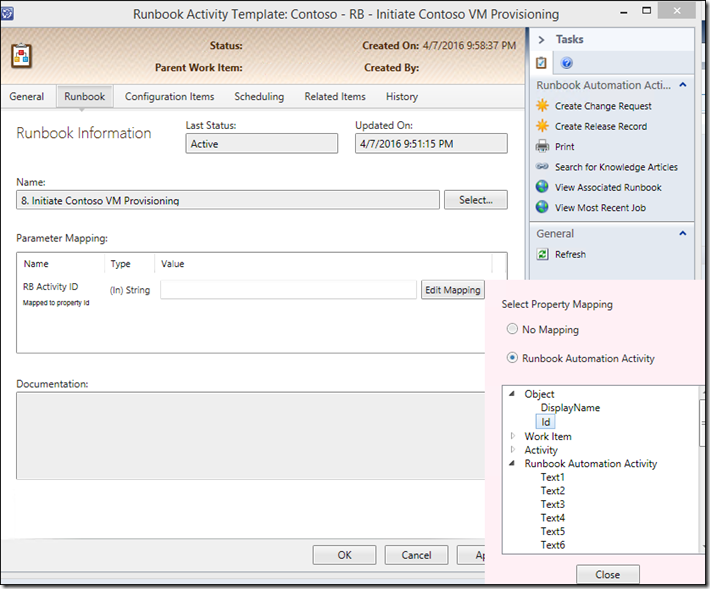
7.4) Create template as follows:
NOTE: I recommend you do not populate Designer – I have come across problems with doing that before.
NOTE: : It is important to check ‘Is ready for Automation’ on the general tab and also choose ObjectName>ID after clicking the Edit Mapping button in the runbook tab..
Step 8) Create Contoso VM Server Provisioning SR Template in SCSM containing Runbook Activity template created in Step 7
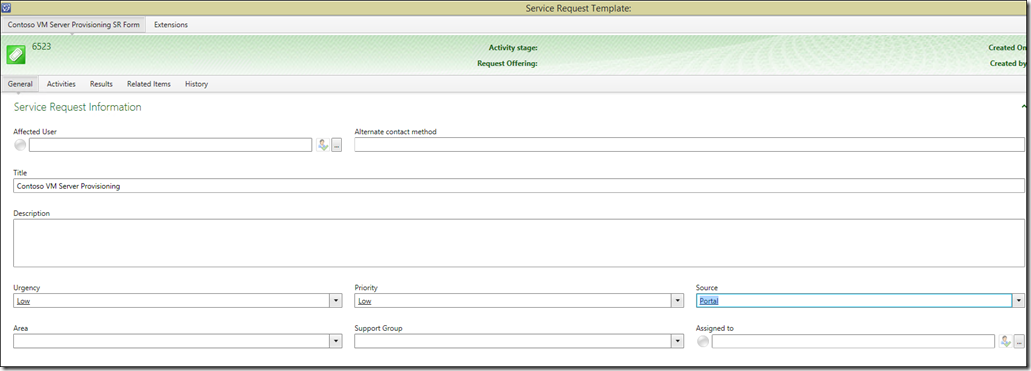
8.1) In Library>templates, Create SR Template as follows:
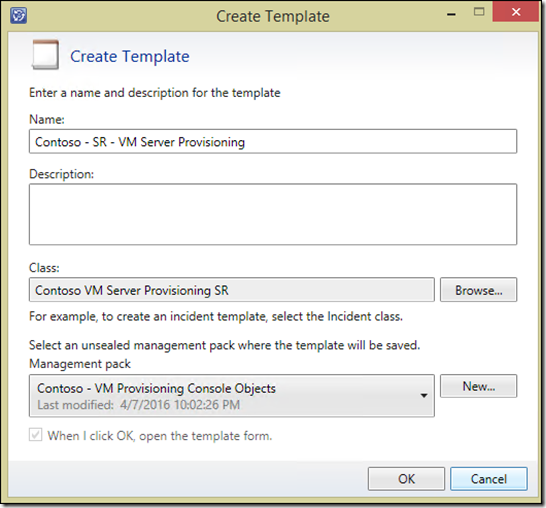
NOTE: Request Offerings based on this template will be stored in the same MP
8.2) Set a title, urgency, Priority and Source:
8.3) In the Activities tab, add the Runbook Automation activity template created in the previous step
8.4) Click OK to save the template
Step 9) Create Service Offering Category and Service Offering in Service Manager
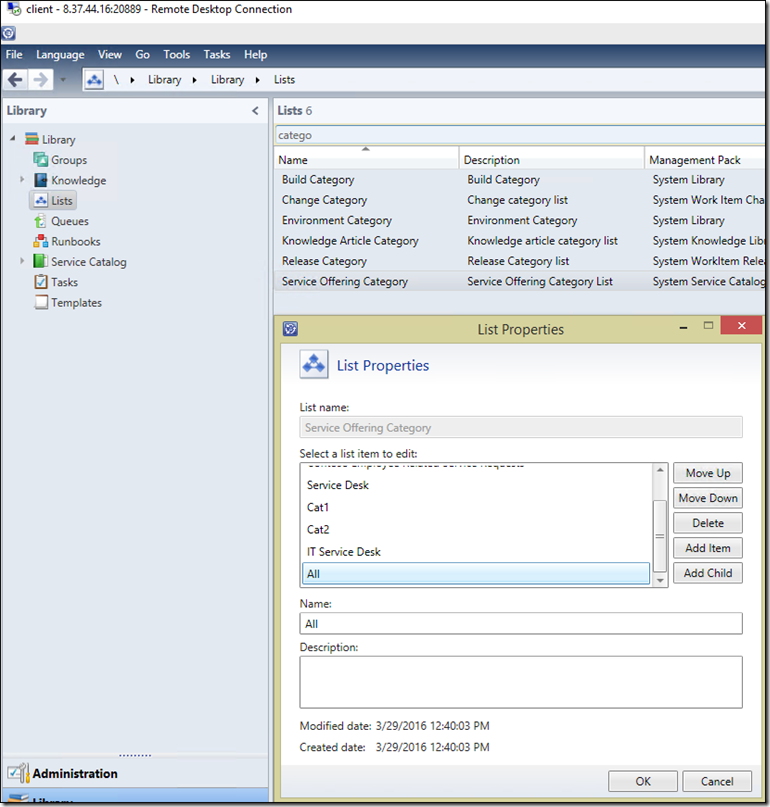
9.1) In Library Lists, Created a Service offering Category (or you can skip this step and just use the OOB General one):
NOTE: If you are prompted to store this in an MP I recommend that you create an MP such as Contoso – List Values – Service Offering Category and store it in there.
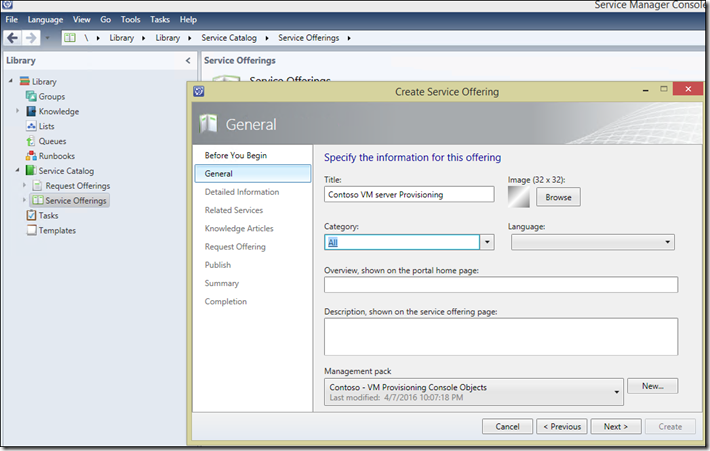
9.2) In Library>Service Catalog>Service Offerings, click Create Service Offering and create a service offering (choosing the category General or the one created in the previous step):
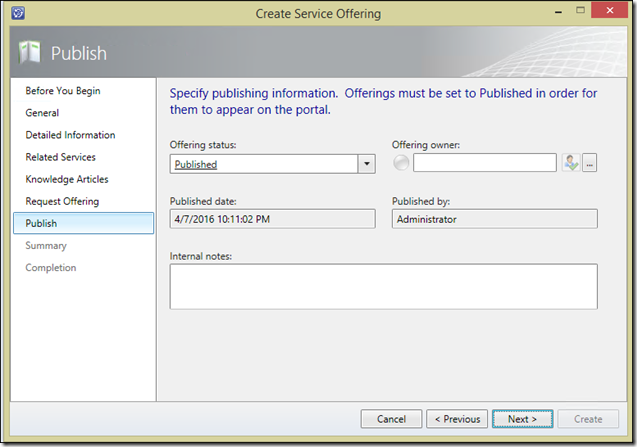
Be sure TO change the Status from Draft to Published:
Step 10) Create Request Offering in Service Manager using Template created in Step 9
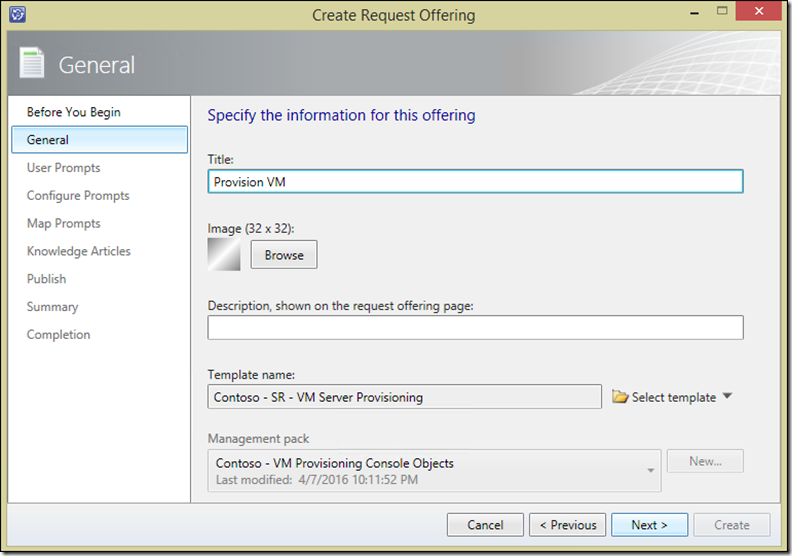
10.1) In Library Service Catalog,>Request Offerings, click the task on the right hand side to create a new request offering.
10.2) Give the Request Offering a name, choose the template created in step 9.
NOTE: this is the display name the user will see on the portal.
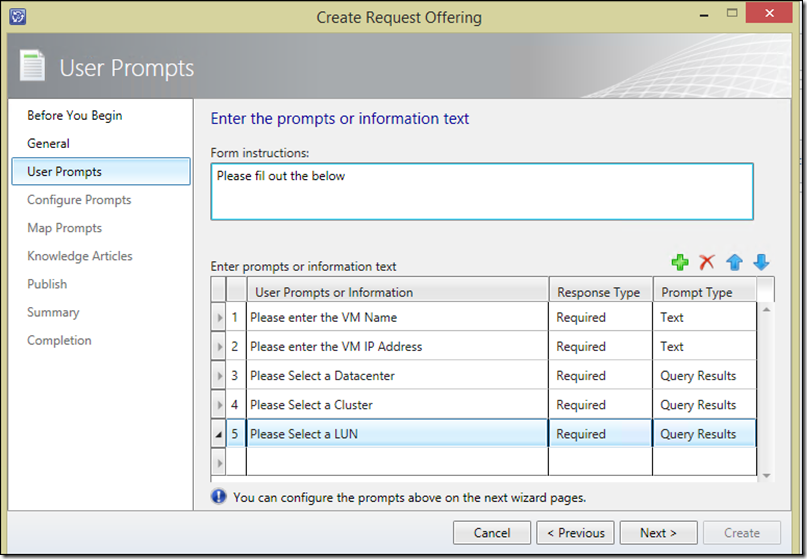
10.3) Fill out your user Prompts:
10.4) Configure your User Prompts
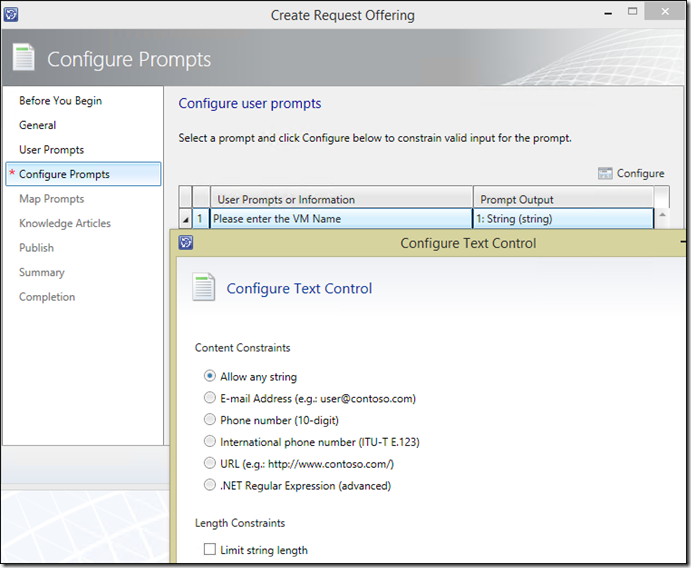
PROMPT 1 – Please Enter the VM Name (Text)
We will leave the defaults:
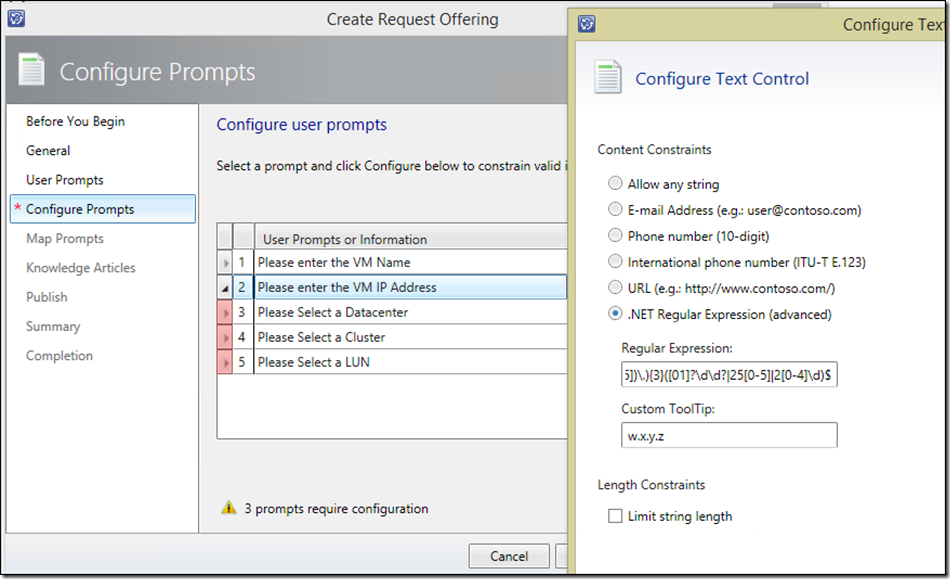
PROMPT 2 – Please enter the VM IP Address (Text)
For IP Address, we will select .NET Regular Expression and use this to ensure an IP Address is entered in the desired format: :
The Expression used above is:
^(([01]?\d\d?|2[0-4]\d|25[0-5])\.){3}([01]?\d\d?|25[0-5]|2[0-4]\d)$
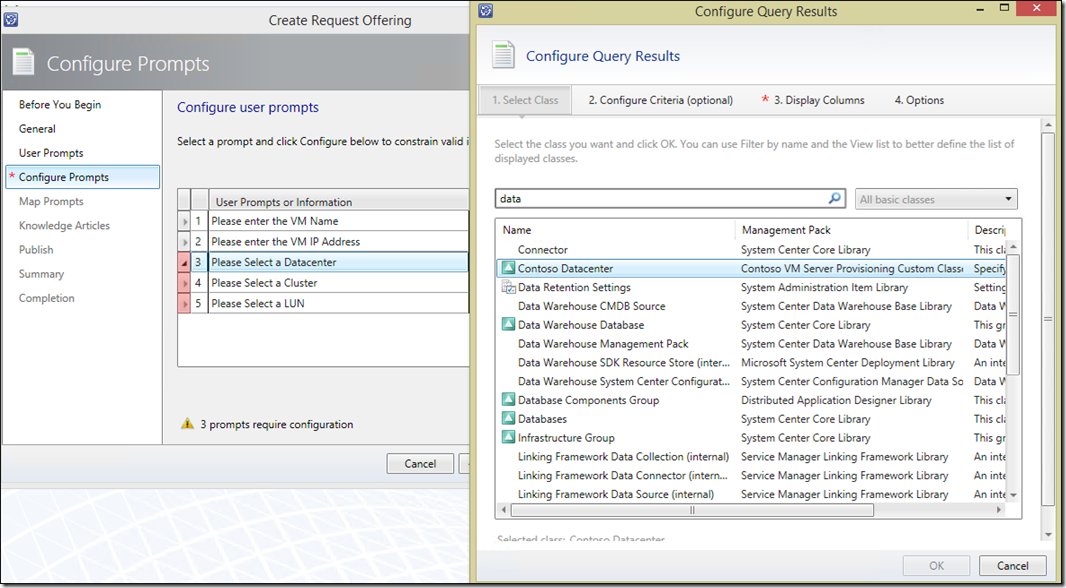
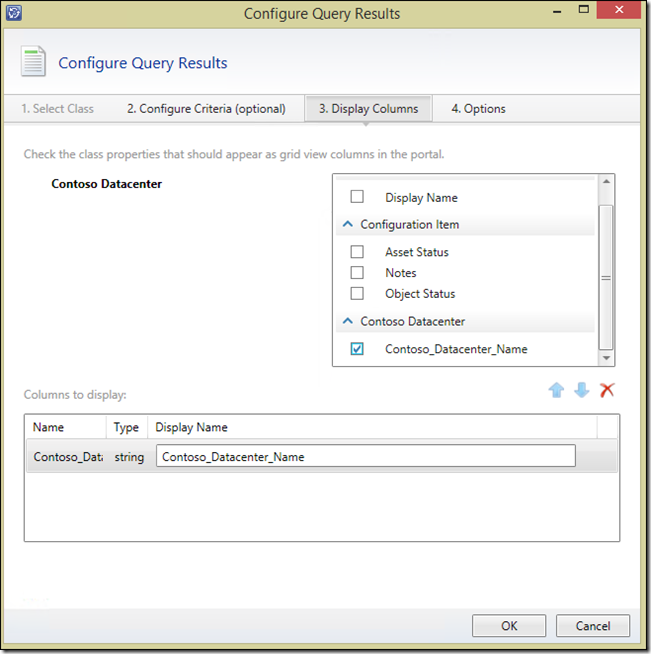
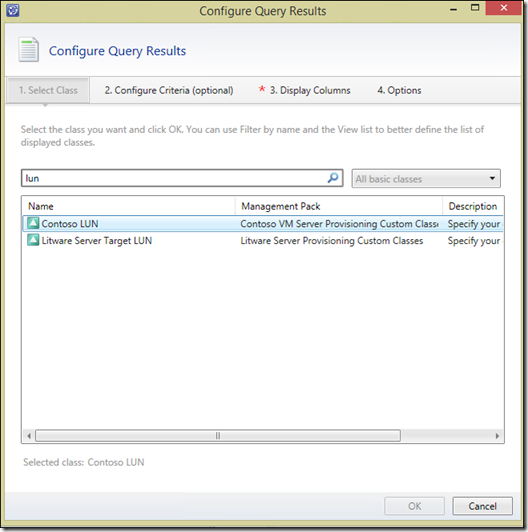
PROMPT 3 - Please select a datacenter: (Query Results)
NOTE: As shown above, change ‘Frequently used classes’ in the right-hand side dropdown to ‘All Basic Classes’ – it may appear to be grayed out, but it is configurable.
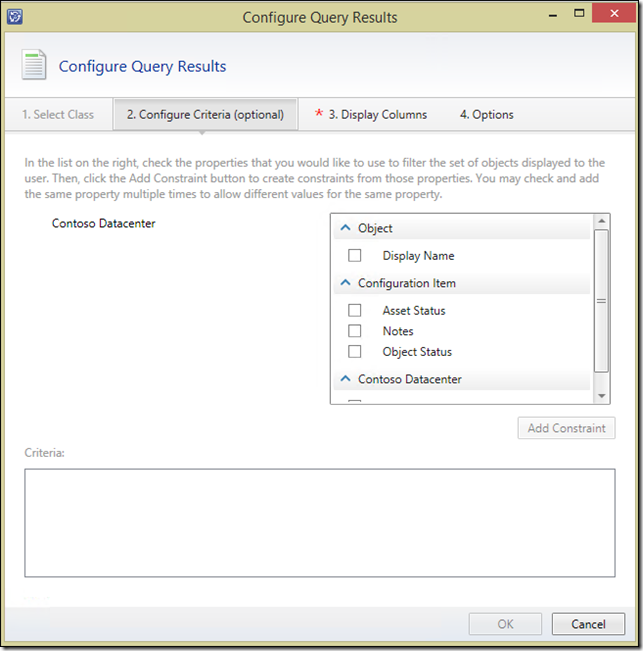
We will leave Configure Criteria blank (defaults) in the case of Datacenter as that is our starting point where we want to show all instances (of datacenters) stored in the CMDB:
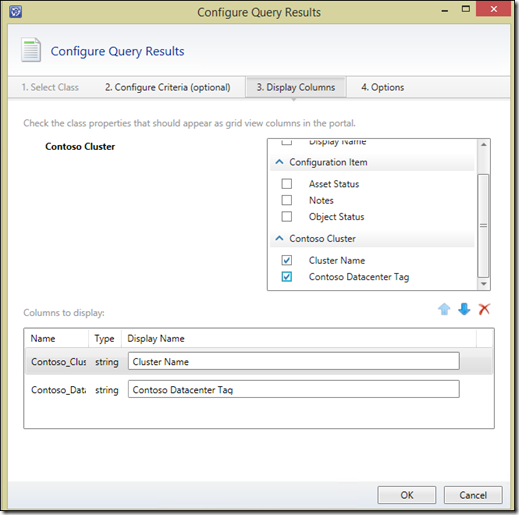
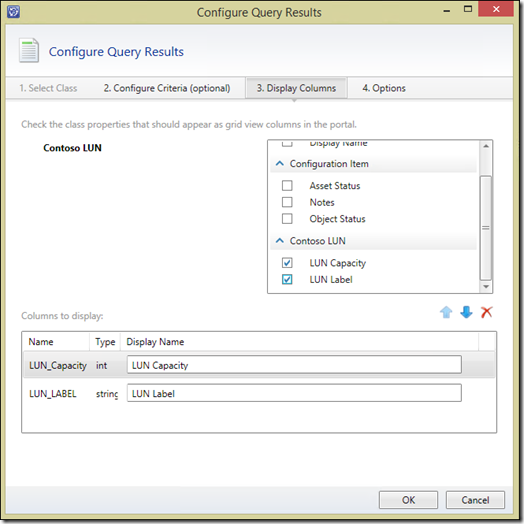
NOTE: The Display column controls what is shown to the user in the portal to aid their selection. However it has another really important function also (which I only discovered recently). The values you select here, are those which can also be used as tokens for query filtering in the following prompts. So for example if my next prompt (cluster) needed to show values where ACTIVE is in the ‘Notes’ field shown below, I would have to add notes here in the display tab to make it available as a token.
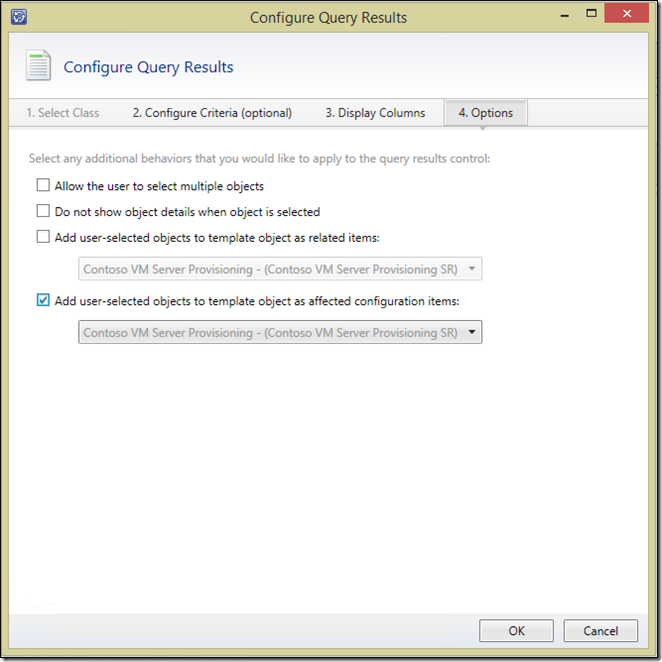
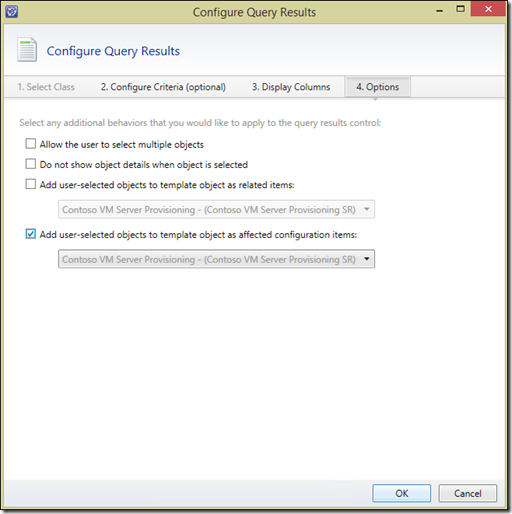
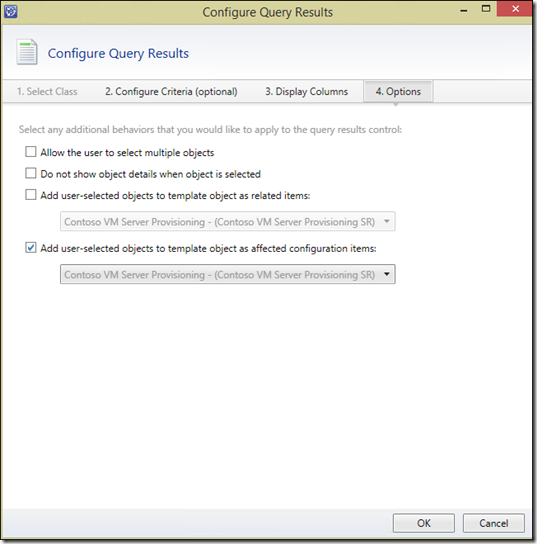
In the ‘Options’ tab, this is where we configure mapping for Query Results prompts. We have spaces (technically, relationships) that we can store query results to as shown below.
NOTE: The dropdown (where is says Contoso VM Server Provisioning – (Contoso VM Server Provisionign SR) above) will let you use the same relationships in child activities which is useful if you need more than 2.
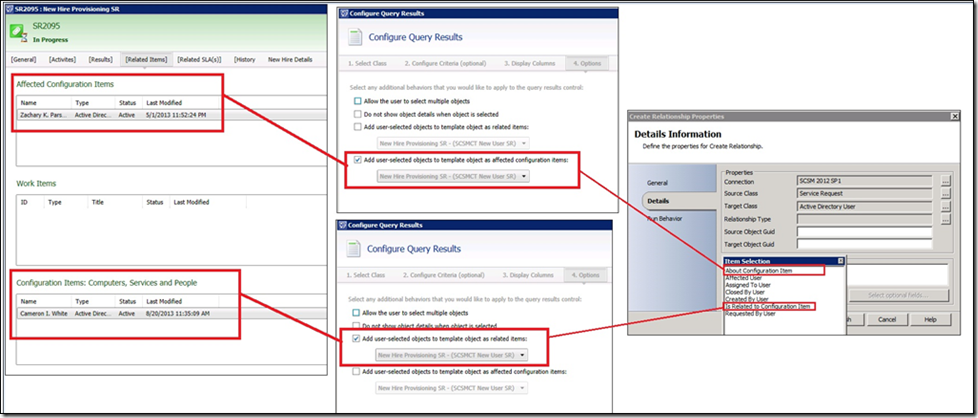
NOTE: The nice bonus in this scenario is that each of the objects we are choosing is a different class (Datacenter, Cluster or LUN). This means that down the line when we need to get data from these classes in Orchestrator, we can query the same relationship field for the specific class’ data that we want. Where this approach would not work is say if we wanted a user to select a VM Owner and then a VM Backup Owner which would be both instances of the Active Directory User class. We have no way in SCORCH to distinguish which is which (in a relationship field that has 2 objects of the same type of class selected), so in this scenario (where you need to be able to pick instances of the same class and distinguish between them), you would need to store the value in different relationship fields, and potentially make use of the relationship fields in child activities, should you need more than 2.
This diagram illustrates how the ‘Options’ dialog box shown above maps to specific relatiosnhips, where these are shown in the SR form and how these relationships are referenced in Orchestrator:
NOTE: This diagram and more details on this can be found in another of my posts - https://blogs.technet.microsoft.com/antoni/2013/08/30/using-built-in-system-center-service-manager-relationships-in-system-center-orchestrator/
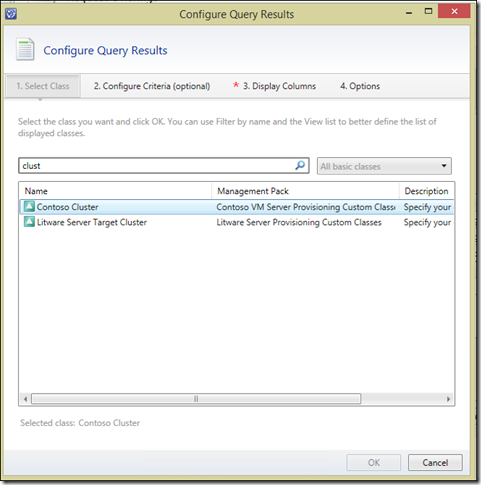
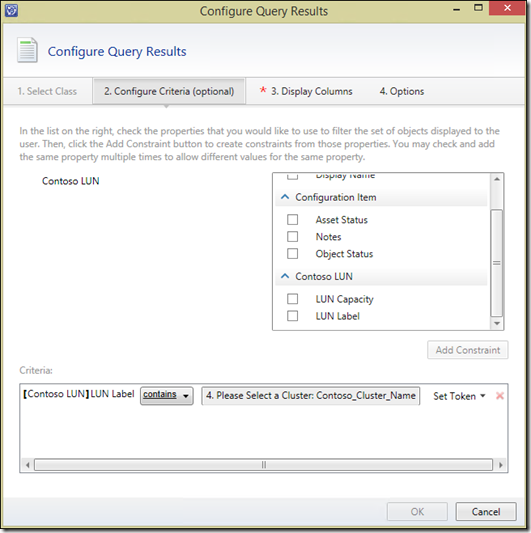
PROMPT 4.- Please Select a Cluster
NOTE: Change Frequently used classes in the right-hand side dropdown to All Basic Classes – it may appear to be grayed out, but it is configurable
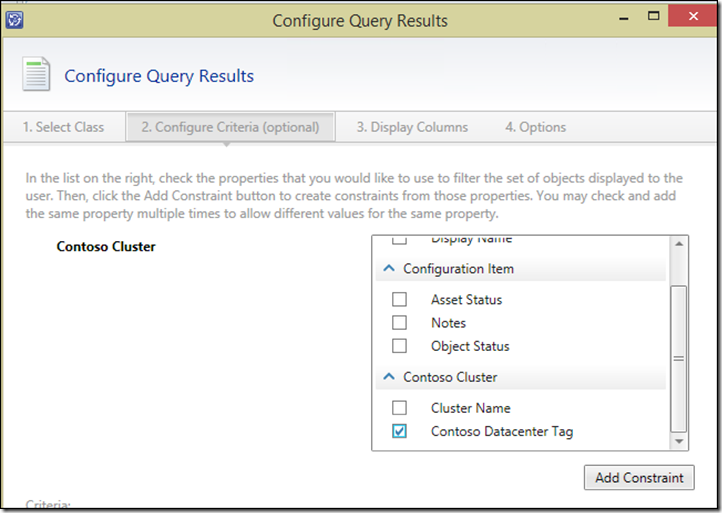
Click Contoso Datacenter Tag then click the ‘Add constraint’ button:
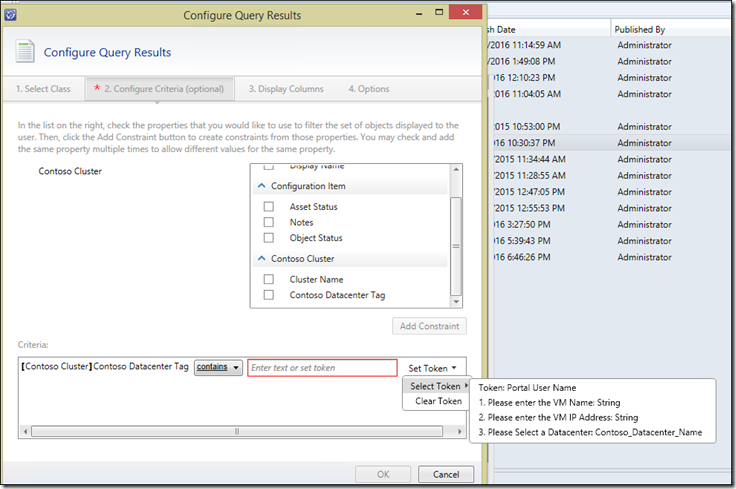
You may need to scroll across to see the down arrow next to ‘Set Token’. Click that and choose ‘3. Please select a Datacenter.
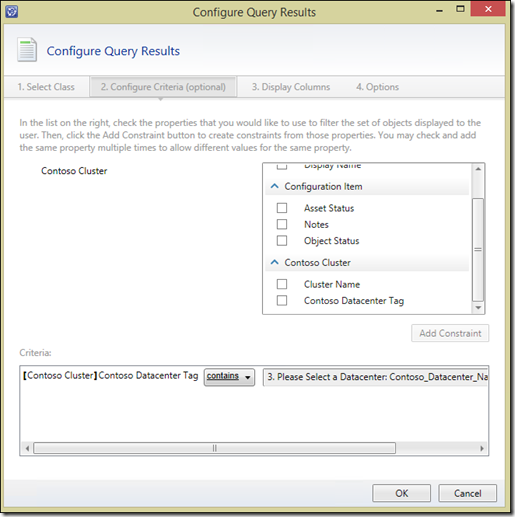
NOTE: This is saying that the Contoso Datacenter Tag property of Contoso Cluster has to contain what was selected in prompt 3 (the matching constoso_datacenter_name) in order to be available for selection in this Contoso Cluster prompt:
PROMPT 5. Please Select a LUN:
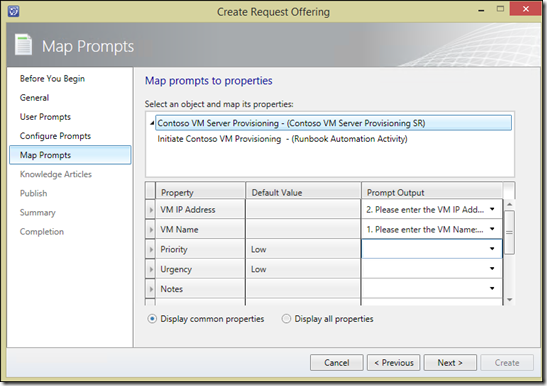
10.5) In the Map Prompts page: map VM name and VM IP Address to the appropriate prompt outputs:
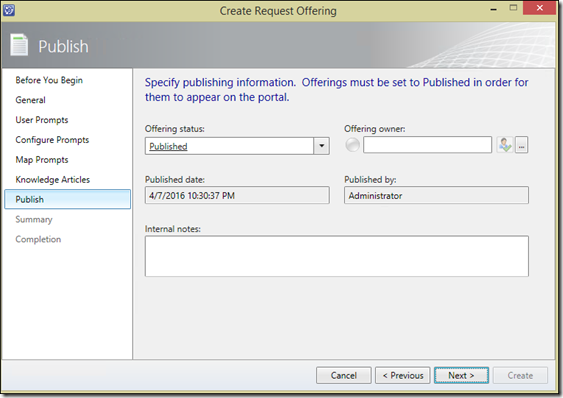
10.6) Click Next in Knowledge Articles and then in the Publish Page, change Draft to Published;
10.7) Click Next, then Create, then Close
10.8) In Library>Service Catlaog>Request Offerings>Published Request Offerings, Select your Request Offering and then click the ‘Add to Service Offering’ Task on the right:
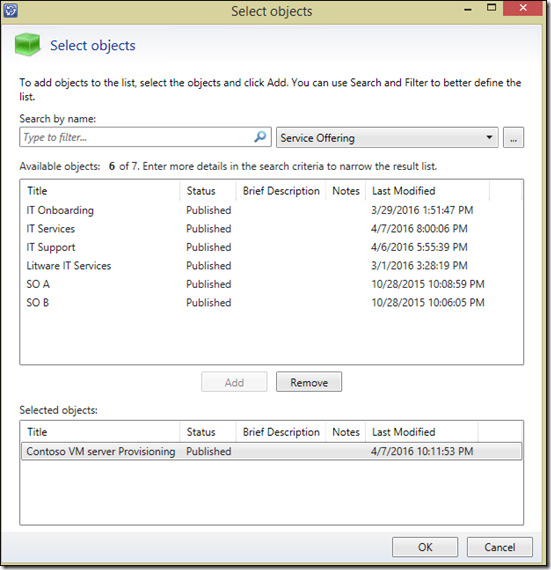
10.9) Choose your Service Offering created in step, choose add, then ok:
DONE!!! Now you are ready to test.
Go to the portal and create an SR using this request offering, filling out the prompts.
When you see the number that gets created, you can take that and search for it from wherever you happen to be in the SCSM console
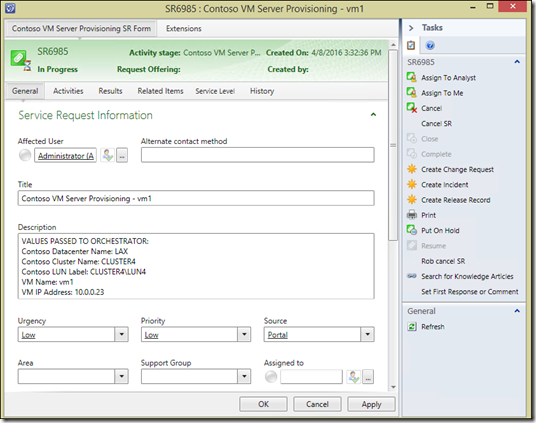
Open up the SR and you should see it in a status of In Progress:
In the extension tabs, you will see your custom properties:
In activities you should see your runbook automation activity is in progress:
In Orchestrator you should see either a green play icon in the runbook tab at the top and a status indicator in the ‘log’ tab at the bottom.
Or if the runbook has already completed, you will see a completion status in the log history tab:
In the events tab, you should see that the event in orchestrator was created with the expected variables:
Back in Service manager, if you close and re-open the same SR, you should see the title and description of the SR and runbook activity have been successfully updated by Orchestrator:
