Basics on how to setup an App Fabric Cache server and API usage
At this year’s SQL PASS summit, I had the opportunity to talk with customers about App Fabric Cache and in preparation for the event, I put a demo to show some of the characteristics of the available APIs. The following is an explanation on how to setup the demo, what to expect when running it (as if you had attended), along with notes based on the most frequently asked questions.
The setup
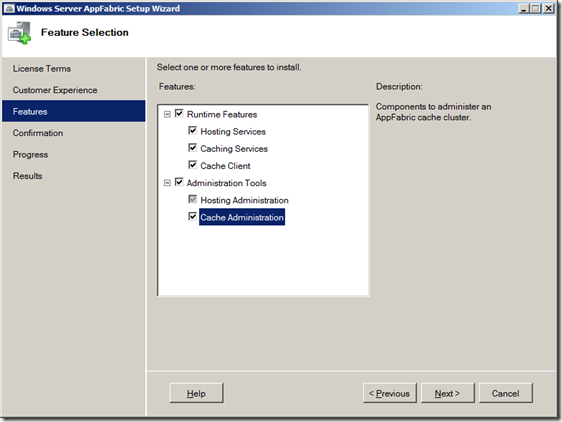
For simplicity, everything will be contained on one machine. Start by downloading the appropriate Windows Server AppFabric bits and installing them and make sure to add the Caching Services, Cache Client and Cache Administrator (I would recommend installing everything so as to play with the host bits as well but nothing of that is included in this blog), see below.
After the bits are installed the configure Hosting Services window will come up, again, for simplicity, take the defaults as shown
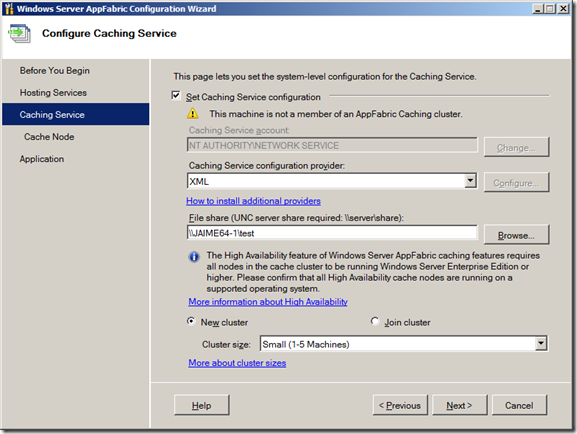
Set the cache host with a XML configuration provider (SQL provider not use only for simplicity, SQL is however the recommended setup) and a small cluster. Make sure the service account has rights to the XML share, as follows. If you have ran the wizard on the same share before you will have to remove the existing ClusterConfig.xml file (or rename it)
Leave all ports as per defaults (see below).
for more installation details see Install Windows Server AppFabric and Configure Windows Server AppFabric.
NOTE: Do not try to setup either a client or server by copying and GACing the App Fabric Cache DLLs, this will lead to errors and is not a supported installation.
Now that the cache host is setup and configured, run the “Caching Administration Windows PowerShell” in elevated rights, as an Administrator. And to start the cache host, run the following command.
>Start-CacheHost
You will be prompted for the hostname and cache port. Give the machine name and port 22233 (since the defaults were taken when running the configuration wizard), you should see the following
HostName : CachePort Service Name Service Status Version Info
-------------------- ------------ -------------- ------------
jaimelap2:22233 AppFabricCachingService UP 1 [1,1][1,1]
Setup your user account to an allowed client user, in my case I had
>Grant-CacheAllowedClientAccount redmond\jaimeab
Create the cache for the demo application and look at the current statistics
>new-cache default
>get-cachestatistics default
You will see the following stats since nothing has yet taken place:
Size : 0
ItemCount : 0
RegionCount : 0
RequestCount : 0
MissCount : 0
Running the demos
Here is the demo project (built in VS2010 ultimate), make sure the two following references are correctly set, otherwise your setup may be incorrect, refer to this blog for troubleshooting hints.
Running the solution will show the following windows form:
Demo #1, Basic Object Addition, Retrieval and Removal
This is the most commonly use APIs, as per the message in the Status text start by adding an object,
- first start by clicking the Add button, this will add a single entry into the cache, the status will show “>>Add-Object Added to Cache [key=LockingDemo]”.
- Clicking the Get button will show the content of the added object which was retrieved by leveraging the Key “lockingDemo”, the status will show “>> Get Object and reference retrieved from cache. [key=LockingDemo, Object=Object stored in cache]”
At this point go back to the “Caching Administration Windows PowerShell” console and type:
>Get-CacheStatistics default
The RequestCount will be 1, this is the new added object had just got added
- Hit the Remove button and then the Get button, you will see the fail status as it indicates that no object was found. The same can be seen if an object is added and retrieved after 15 minutes, which is the default time to keep an item in the cache, this is further explore in the Demo #4 below.
The Add API can be thought as a type of insert statement but it only takes a key value pair. Note that the Get API merely retrieved whatever it found in the object in an optimistic manner, it did not care if it was changed by any other process, as it retrieved the latest version.
Demo #2, Version retrieval, GetIfNewer and Put
If you want to know when an object has changed from the last time it was retrieved then GetIfNewer is a good option. Looking at the code in the solution, when the Get API was executed (in line 134 of form1.cs) a DataCacheItemVersion was also collected, this can be thought of as a type of version for the gotten item. See line 143 in Form1.cs
RetrievedStrFromCache = (string)myDefaultCache.Get(myKey, out myVersionBeforeChange)
For simplicity, say it is retrieved as Version1, if another process comes and does a Put against the same item (by using the same key) then it will change its version to say Version2, in the same way the DataCacheItemVersion will get updated. GetIfNewer can be used to leverage this type of versioning, by using the DataCacheItemVersion retrieved in the Get API in the GetIfNewer API, it will know to return a NULL object if it finds an object with the same DataCacheItemVersion in cache, otherwise it will return the new (updated) object.
Go back to the demo form,
- click on the Add button (if a valid object is still present the Object already exist exception will be raised)
- Then click on the GetIfNewer button and you will get a message saying that a NULL object was retrieved.
- Now click on the Put button (which can be thought as an update statement)
- Go back and click on the GetIfNewer button, now you will get the object that the Put API just updated, the value string changed from “Object stored in cache” to “MOD 1 - Object stored in cache”. Note that clicking on the GetIfNewer button again will return a NULL item since the version has not changed from the last time the API was executed. This also shows that the value of the DataCacheItemVersion also gets updated with each execution of the GetIfNewer API.
Similarly, if GetIfNewer is executed after doing a Remove and an Add, it will also retrieve an object since these two operations (Remove and Add) will have, in effect, modified the object.
Demo #3, Contention, GetAndLock, Unlock and PutAndUnlock
As explained, the Get API does an optimistic retrieval but there are cases when a pessimistic retrieval may be preferred. This scenario will be most adequately use for Resource data (shared reads & writes across multiple users). For those cases, the GetAndLock API will allow locking an object for a given period of time; the demo does it for 5 seconds. Two other things to keep in mind are the key and the DataCacheLockHandle, as these are needed to handle the locking semantics.
Running the demo:
- Click the Add button, if an object already exist an exception will be shown.
- Click on the GetAndLock button, this will collect a DataCacheLockHandle object that will be required to gracefully unlock the object (the Put API may also do this without requiring a DataCacheLockHandle, more on this further below).
- Click the GetAndLock button again, an exception explaining that the object is already lock will be generated.
- Before the 5 seconds for expiration have taken place, hit the Unlock (Bad) button, this will generate an exception due to the fact that even though the correct key is used, the incorrect DataCacheLockHandle is employed.
- If the GetAndLock button is press right after (before the 5 seconds lock is reached) then the exception showing that the object is still lock will be shown, this since the previous unlock called was unsuccessful.
- When the Unlock (ok) button is pressed, the object will be gracefully unlock, as this method uses the correct key and DataCacheLockHandle
- Pressing the GetAndLock button will not show an exception but instead will lock the object again for 5 seconds.
The PutAndUnlock button will also correctly unlock the object but, as stated by its name, it will update the object at the same time.
NOTE: the Put button will override the lock semantics; that is, the object will be unlock and update without requiring a DataCacheLockHandle. This is because the intent with the lock APIs is for all applications to honor it, so in order for the locking to be honored, it is incumbent upon the clients to be using the Lock methods since not using them will override the locking guarantees.
Demo #4, Enable Local cache
This demo goes over the ability to locally cache objects, this will save a round trip to the cache cluster, and in essence, it will eliminate the network delay to and back from the cache server.
To start the demo start the “Caching Administration Windows PowerShell” tool and run the following commands
>restart-cachecluster
>get-cachestatistics default
The purpose here is to clean all the objects currently cache; the statistics results should show all zeros.
Running the demo:
- Click the Add button, as seen in Demo #1, after adding an object the statistics show a RequestCount of 1.
- Choose Enabled from the local cache drop down
- Click on the Get button a few times.
- Go back to the “Caching Administration Windows PowerShell” tool and run the “Get-cacheStatistics default” command again. The requestCount should still stay at 1, this is because the configuration provider did not register the request since it was locally served.
Note that if you do a GetIfNewer instead of a Get, the requestCount will increase; this is because GetIfNewer cannot be locally supplied, as it needs to check with all the other cache hosts (in this case, the XML configuration provider).
To achieved the demonstrated, two DataCacheFactories are leverage - see line 54~59 in form1.cs. The DataCacheFactory named “myCacheFactory” is the one use for non-local cache and the one named “myCacheFactory_LC” is the one setup for local cache, its configuration property is defined in line 57, as follows.
//Create the local cache cacheFactory constructor, kept for 5 min.
configuration.LocalCacheProperties = new DataCacheLocalCacheProperties(1000, new TimeSpan(0, 5, 0), DataCacheLocalCacheInvalidationPolicy.TimeoutBased);
Note that the timeout is setup to 5 minutes, to demo it,
- Go back to the “Caching Administration Windows PowerShell” tool and run the “Get-cacheStatistics default” and make note of the requestCount
- Makes sure the local cache drop down is set to Enabled
- Click the Add button
- Wait for 5 minutes and then hit the Get button
- Go back to the “Caching Administration Windows PowerShell” tool and run the “Get-cacheStatistics default” again. The requestCount will have gone up, as the local cache item would have expired and had to be retrieved from the host cache.
Reviewed by: Christian Martinez and Mark Simms


![clip_image002[6] clip_image002[6]](https://msdntnarchive.z22.web.core.windows.net/media/MSDNBlogsFS/prod.evol.blogs.msdn.com/CommunityServer.Blogs.Components.WeblogFiles/00/00/01/38/83/metablogapi/4762.clip_image002%5B6%5D_thumb.png)
![clip_image003[6] clip_image003[6]](https://msdntnarchive.z22.web.core.windows.net/media/MSDNBlogsFS/prod.evol.blogs.msdn.com/CommunityServer.Blogs.Components.WeblogFiles/00/00/01/38/83/metablogapi/4375.clip_image003%5B6%5D_thumb.png)