Step-by-Step: Setup Multiple Public IPs on a VM in Azure
Hello Folks,
I’m currently working with a customer who’s migrating some workloads to Azure. Servers in Azure that will host their web sites will be hosting several sites per servers. For this deployment, the customer needed to have multiple public IP addresses assigned to each server. So, we started looking at what we could do.
It just so happens that this feature is currently in preview. It now allows a VM running Windows or Linux to have multiple (public and private) IP addresses assigned to the NICs attached to it.
Assigning multiple IP addresses to a VM enables the you to have multiple websites or services with different IP addresses and SSL certificates on a single server and to use the server as a network virtual appliance, such as a firewall or load balancer.
If you want to create a VM with multiple IP addresses, you must create it using PowerShell or the Azure CLI. However, if you want to do it in the portal as we are going to do it today, you can create the VM with the primary IP configuration and once it’s created go back and add multiple IP configurations.
let’s get it done…
Step 1 – Register the Service Provider with Your Subscription
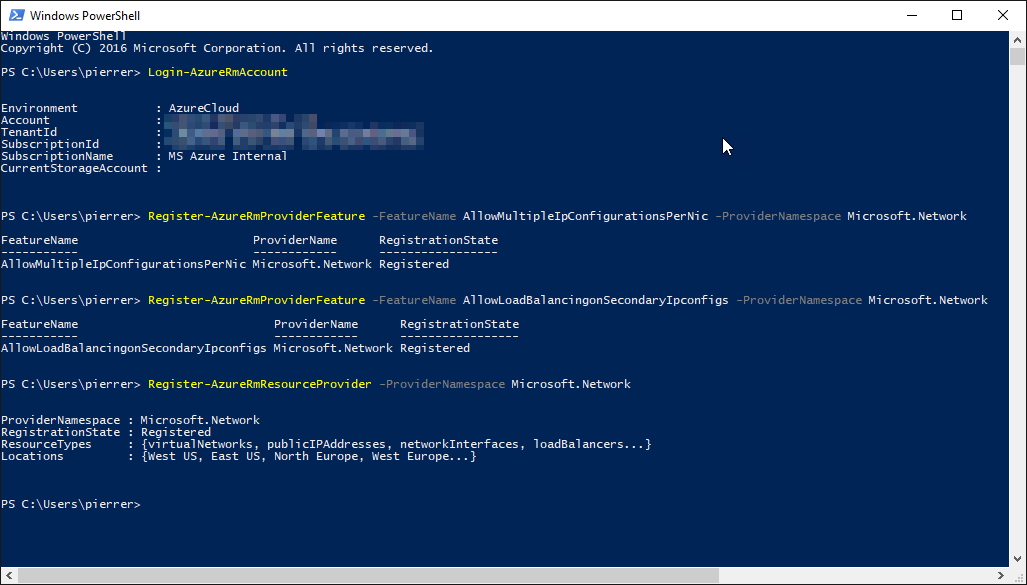
Run the following commands in PowerShell after you login to your Subscription to register for the preview:
 Register-AzureRmProviderFeature -FeatureName AllowMultipleIpConfigurationsPerNic -ProviderNamespace Microsoft.Network
Register-AzureRmProviderFeature -FeatureName AllowLoadBalancingonSecondaryIpconfigs -ProviderNamespace Microsoft.Network
Register-AzureRmResourceProvider -ProviderNamespace Microsoft.Network
It will take a few minutes to register the service, but you can check the status by using the following command:
Get-AzureRmProviderFeature
And ensure that you have AllowLoadBalancingonSecondaryIpconfigs and AllowMultipleIpConfigurationsPerNic at registered under Registration state. If not…. Wait a bit longer.
Step 2 – Add Multiple IP configurations to the NIC attached to the VM.
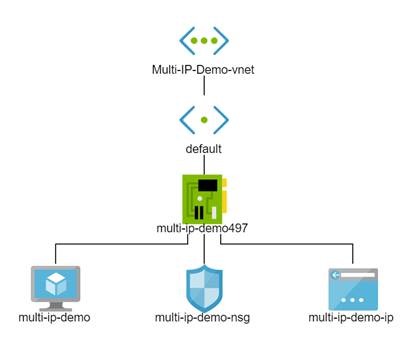
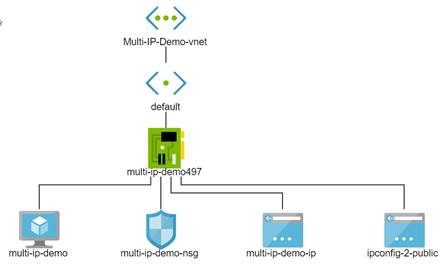
I’ve already created a VM in a Resource Group on Azure with 1 NIC, 1 private IP and 1 Public IP. (The following diagram was generated using the Network Watcher feature described in my last post)
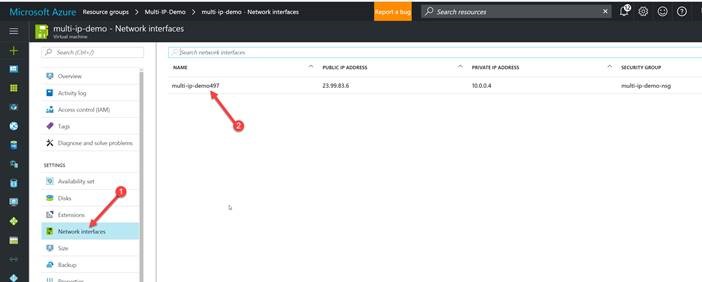
Navigate the portal to the VM and open the “Network Interface” blade and click on the NIC attached to the VM.
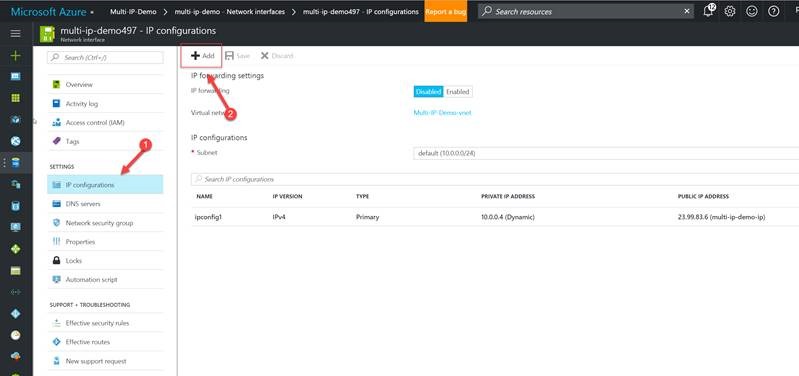
Once that’s open click on “IP Configuration” and you will notice that there is only one configuration for that particular VM. But this is where you will add others by clicking “Add”.
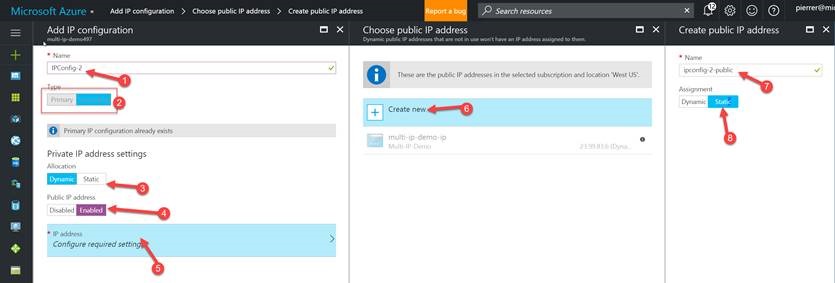
In the “Add IP configuration” blade, and fill it in as follows:
1- Give it a meaningful name
2- Since we already have a primary (the first configuration) all the others will automatically be secondary
3- Select dynamic or static for the private IP address in this configuration
4- Enable Public IP address if you need it.
5- When you enable Public IP Address the IP Address configuration will appear, click on it.
6- Select “Create new” to create a new public IP configuration.
7- Give that Public IP configuration a meaningful name.
8- Decide if you need it dynamic or static.
Once you’ve done that clock OK on all those blades to save the new IP configuration. And you will see the new configuration attached to the NIC.
Add more if needed. For the demo, we will stop here.
Step 3 – Add IP addresses to the VM OS.
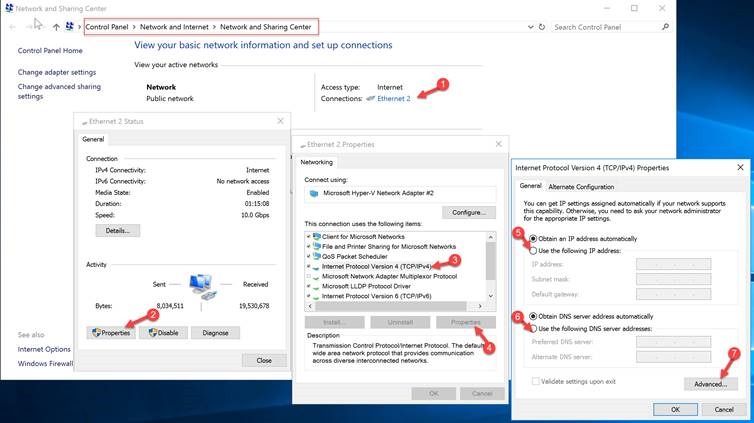
In this section I will tell you to do something I have always been warning folks against. I will tell you to manually change the IP configuration of the OS itself in the control panel > Network and Internet > Network and Sharing Center applet.
1- Select the NIC
2- Open the properties display,
3- Select “Internet Protocol Version 4 (TCP/IPv4)”
4- Open it’s properties display
******** This is where it gets dangerous - If you do not follow the steps correctly, you may lose connectivity to your VM. Ensure the information entered for step 5 is accurate before proceeding ********
5- After selecting “use the following IP address”, Enter the Primary private IP address (see your Network Interface Ip configuration in the portal for your VM). For the Subnet mask, Set based on your Virtual Network subnet configuration. For our subnet we need to enter the subnet mask is 255.255.255.0 since our subnet address range in the portal is set to 10.0.0.0/24. The Default gateway is ALWAYS The first IP address in your subnet. Since ours is 10.0.0.0/24, then our gateway IP address is 10.0.0.1.
6- Click Use the following DNS server addresses and enter 168.63.129.16 If you are not using your own DNS server. If you are using your own DNS server, enter the IP address for your server.
7- Click the Advanced button and add each additional IP private addresses with the same subnet specified for the primary IP address.
Click OK and close all the screens.
Don’t panic when your RDP connection drops… It’s normal. If you did not make any mistake entering the info, it will reconnect.
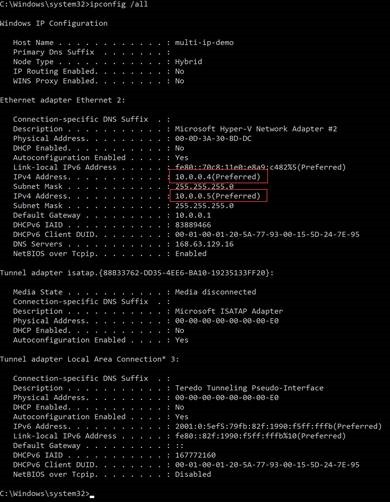
Once reconnected you can verify that your configuration is applied.
That’s it, your VM is now attached to a NIC with Multiple IP addresses (both private and public). You will still have to open the ports you need access to in your Network Security Group and the VM OS firewall separately.
I hope this helps
Cheers!
Pierre Roman@pierreroman
Comments
- Anonymous
April 28, 2017
This is working fine. Thanks a lot ! - Anonymous
May 26, 2017
I wanted to thank you for tһis wonderful read!! I abѕolutely enjoyеd every bit off it. I have yoս ƅookk marked to look at new stսff you
