XAML Binding Basics 101
 Hello Windows 8 XAML developer. XAML is a declarative UI language; it's most powerful feature is surely data binding. But, I admit, with such power comes a lot of things to know. Let’s take a minute to step back, smell the roses, and build out some simple bindings.
Read to learn?
Referencing a control
Referencing a control in XAML is referencing a class. Declare it in XAML and the class’ constructor is executed. Your control is now in the logical tree. Every control is part of a hierarchy, with the top-most control being the page element.
Adding content to a control
Not all XAML controls are content controls, but most are. Control controls allow you to put almost anything in them. That means you can put text in the content property, like this:
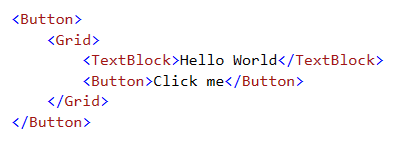
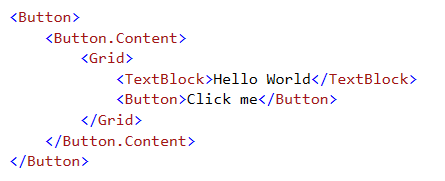
The area between the button XAML tags defaults to its content property. So, you can put simple (like above) or complex (like below) content directly between the tags:
In the code above, I place a grid inside my button and even another button. This is all possible because “content” in XAML allows for almost anything.
Setting a property
Not all properties are content properties. Like XML or HTML you can set property values simply by setting the attribute of the control, like this:
In the code above, the content property interprets the string as a string. But some properties require integers, doubles, colors, and more. XAML automatically converts to these types for you.
Setting a complex property
Complex property values can’t be jammed into an attribute string. When you have a complex value to set to a property, you do it like this:
Binding a property
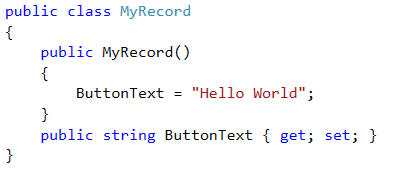
Hard coding a property value may not be an option. For this reason, XAML supports binding. Say you have a class (above) that you set to the datacontext property of a control. Once set, that control and all of its children can bind to it – since properties propagate down through the hierarchy tree.
The three binding syntaxes (below) function identically:
In the code above, the first (one) syntax explicitly calls the path binding property. This, however, is the default property so the second (two) syntax omits it. The third (three) syntax uses the expanded property syntax and sets the value with the fully qualified binding object. The three are identical in function and performance – only the syntax is different.
Binding with a converter
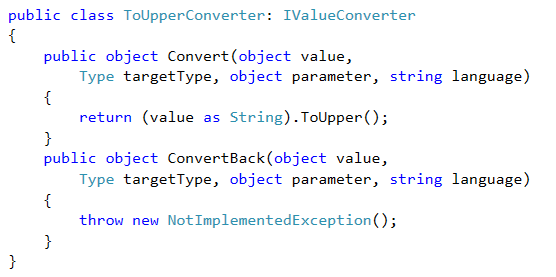
Sometimes the value you want to bind isn’t the value you want to show. In the example above, I want to show the ButtonText value in all upper case. Since this is simply a UI requirement, we don’t want to change class, we just want to convert the value being displayed.
The code above shows the implementation of a simple value converter for XAML binding. This converter takes the value and changes it to upper case. Since you write the converter, it means you can make it do whatever you want. Here’s how you use them:
There are two parts to the code above. The first the resource. When I want to use a converter in my XAML, I need to reference my value converter class in the resources of any control higher in the control hierarchy, even the page. Then, I can references throughout my XAML.
The second part of the code shows the simple binding syntax we saw before. However, it adds the extra ‘Converter’ portion after the comma. This references the resource we added above the control by name. The syntax tells XAML to run the value through the converter before displaying it.
Using converter parameters
Converters can also be passed parameters from the bound control. This gives you even more control over the logic inside the converter. It is optional, but it is also a powerful option.The following syntaxes use a parameter – like above, these different techniques function identically:
Binding to an element
Sometimes the value of one control’s property needs to match the value of another control’s property. XAML allows this by referencing another control by name. The binding syntax continues to be the same, but allows you to enrich it more detail, like this:
In the code above, this binding syntax sets the button’s content to the textbox’s text value. The complex interaction between controls is accomplished without any code behind. If you were to write the equivalent code behind it would look like this:
Note: as the user changes the textbox, the content of the button is updated.
Binding modes
If you bind the property of any input control (a slider, a textbox, a radiobutton, et al) – basically anything the user interacts with – then the syntax would look something like this:
But this is a problem. This syntax only reads the value; it doesn’t write the value back. Input controls typically want to write the value back. For this scenario, XAML provides binding modes: OneTime (most efficient), OneWay (default), and TwoWay (for input controls).
Inline invocation
As I mentioned above, whenever you declare a control in XAML you are instantiating a class. And, just like using a converter resource instantiates the converter class, you can instantiate any class you want to – this is very helpful with binding. Consider a class like this:
In the code above, the class has a constructor where its property value is set. But how do you use this in your XAML? Just like we made the converter a resource, we make our class a resources, like this:
Now we can reference this as a source for our binding. Source is slightly different. It is basically telling the XAML engine to ignore the datacontext of the control and look elsewhere instead. In this case, we will tell it to look at this MyRecord resource we just created, like this:
The datacontext
Referencing a source over and over is a lot of useless and redundant code. Instead, we want to set the datacontext of a control. The datacontext is the default source of a binding. What’s nice is that we can set a control’s datacontext or its parent or its parent’s parent, and so on.
We can set it in code like this:
We can also set it in XAML like this:
Notice in the XAML above that we do not give a name to our MyRecord reference. This is because we will not be referencing it. Simply because we have set it as datacontext, it will flow down through the hierarchy. And, if it is not interrupted, our button can use it like this:
Look familiar? This is the very first binding syntax we looked at up top. Once you set the datacontext you can set bind to it from any child element.
Deep binding
Our example is simple, but sometimes you want to bind to more than just the properties of a class. If a property is a complex type (a class) you might want to bind to the properties of that class. Is this kind “deep binding” possible? You bet. Look:
In the code above, we recognize that a string is actually a class. And the string class has a property of length. So, we bind to it with syntax very similar to how we access properties in C#. Let’s pretend now that we bind to an array of strings, how would we access an item and its properties?
In the code above, I treat ButtonText like a string array (string[]) and access the first item (zero-based) and then a property of that first item. This is quite a complex operation if you think about it. But the XAML syntax keeps it simple, consistent, and compact.
But wait, there’s more
Believe it or not, there’s even more to XAML binding. But, in the sections above I walk through what has to be the most common and surely the most important parts. The syntax is simple, but looks pretty tricky when you are new. I tell you what: create a simple project and start binding to your own custom class. With a little practice you’ll start to feel more comfortable binding everything!
Here are some resources (not all Windows 8, I know)
- Designing for the Modern UI
- App Development for Modern Devices (Networking)
- Basics of XAML: Canvas and Rectangle
- Windows Phone 7 Jump Start Video Series
- Deep Expression Blend (XAML)
- XAML (SL) 101
- XAML (WPF) 101
Best of luck!


