How to Deploy SSTP and L2TP VPN in Windows Azure (Windows Server 2012)
Now, Windows Azure is more and more popular in our business. In the meantime, we all know we can deploy Virtual Network in Windows Azure. However, deploying Windows Azure Virtual Network is a quite annoying thing. So we can use Windows Server 2012 RRAS roles to provide VPN. Following the steps to implement it.
Prerequisite
Create SSL Certificate.
As SSTP is a VPN based on HTTPS, so we need to create a SSL certificate. If you would like to buy a SSL certificate from SSL authority, it would be better. If not, we can create a self-certificate by ourselves.
Firstly, open IIS manager, choose the Server (RoccosVPN) – Server Certificates. If there is a certificate showing in the windows Issued to your VM FQDN name, please export it with private key. Or you will follow the steps to make a self-certificate.

Figure 1 - Server Certificate

Figure 2 - Export Certificate
Make self-certificate
- Open an elevated CMD prompt
- Use SelfSSL (IIS6 Resource Kit) to generate an SSL certificate for the SSTP:
selfssl.exe /N:cn=RoccosVPN.cloudapp.net /V:3650
(3650 == 10 years, "RoccosVPN.cloudapp.net" represents the fully-qualified domain name, FQDN) - Confirm prompt with "y", ignore metabase error (if it appears)
- Run mmc.exe, add snap-in for Certificates -> Computer account
- Click on Personal -> Certificates
- Right-click on the RoccosVPN.cloudapp.net certificate, then on All Tasks -> Export, include private keys and protect with password
Step 1, Create Windows Azure VM
Click left bottom button NEW, choose COMPUTE – VIRTUAL MACHINE – QUICK CREATE, filling DNS NAME, USER NAME and NEW PASSWORD in the text box.

Figure 3 - Create VM
Step 2, Configure Windows Azure
For deploying SSTP VPN, first of all, we should enable TCP 443 port for our VM.

Figure 4 - Azure Endpoint
And then, connect to this VM using RDP.
Step 3, Add Server Role
Click Server Manager – Add roles and features. then it pops out a window. In this window, we will add
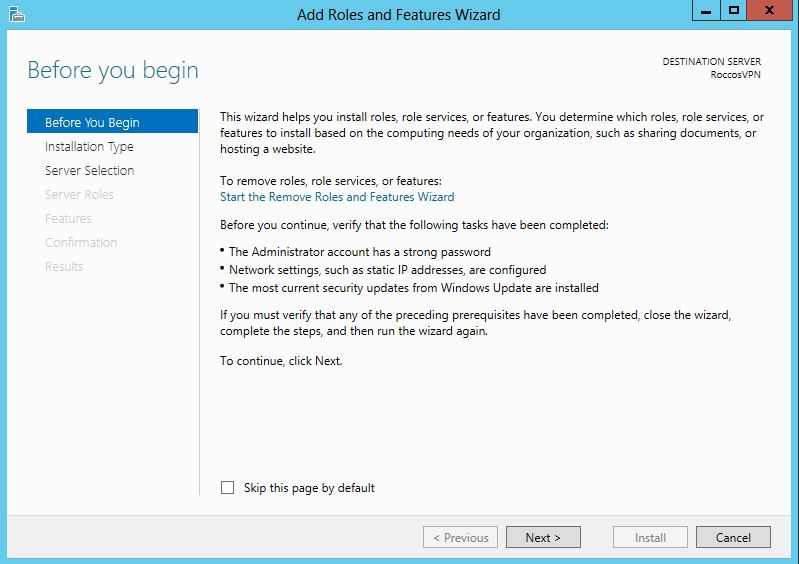
Figure 5 - Add Roles
It pops out a window. In this window, we will add Remote Access role, DirectAccess and VPN (RAS) and Routing role services.

After installing the role and role services, it may need to restart.
Step 4, Configure Routing and Remote Access
After restarting, open Server Manager - Notification – Open the Getting Started Wizard, select Deploy VPN only.
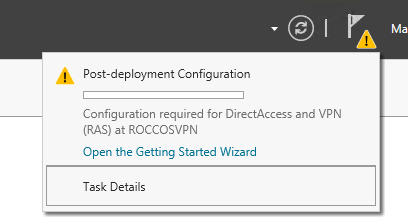
Figure 6 - Getting Started Wizard
Now, it opens Routing and Remote Access window. Right click server name, click Configure and Enable Routing and Remote Access.
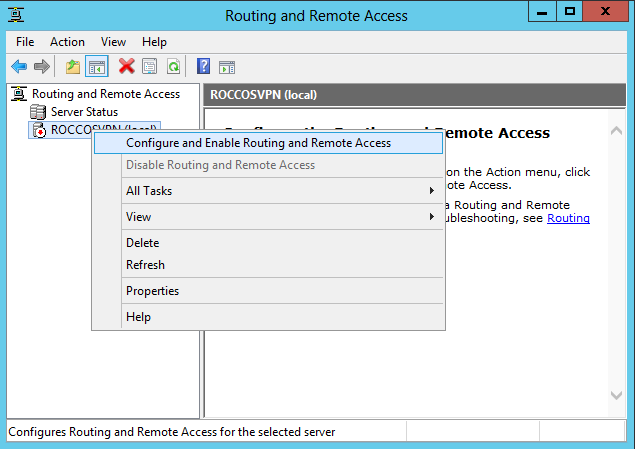
Figure 7 - Routing and Remote Access Configure
Then, Routing and Remote Access Server Setup Wizard will be open.

Figure 8 - Setup Wizard
Choose Custom configuration after click Next button. Select VPN access and NAT in Custom Configuration.
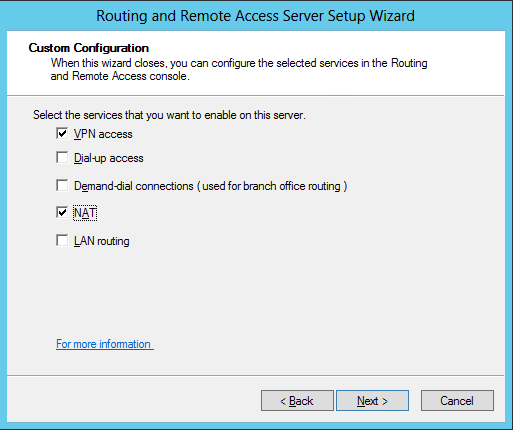
Figure 9 - Customer Configuration
After click Finish, it will start Routing and Remote Access service.
Right click on the server and then click on Properties and choose Security tab. In the tab, select roccosvpn.cloudapp.net certificate.
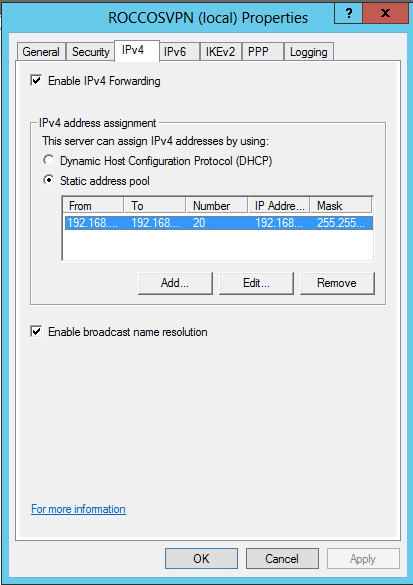
Then, click on IPV4 tab, check a "Static address pool" for client acquiring ipv4 address and OK as follow:
Click IPv4 node and expand it. Right click NAT and choose New Interface…
In the dialog, select an external interface. And in the Network Address Translation Properties dialog, choose Public interface connected to the Internet and check Enable NAT on this interface. Click OK to save configurations.
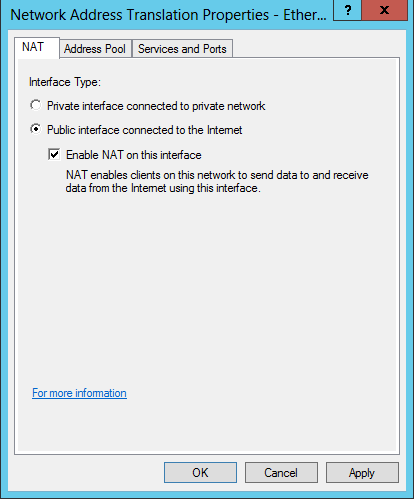
Figure 10 - NAT Properties
Step 5, Add VPN Users
Use Local Users and Groups management tools to add a new user.
Open Run dialog and enter lusrmgr.msc and then click OK to open Local Users and Group management.
Then click Users folder, in the middle panel, right click on the blank and select New User. Type Users Name, Full Name and Password. Uncheck User must change password at next logon.
After that, double click the user, switch to Dial-in tab. Choose Allow access in Network Access Permission.
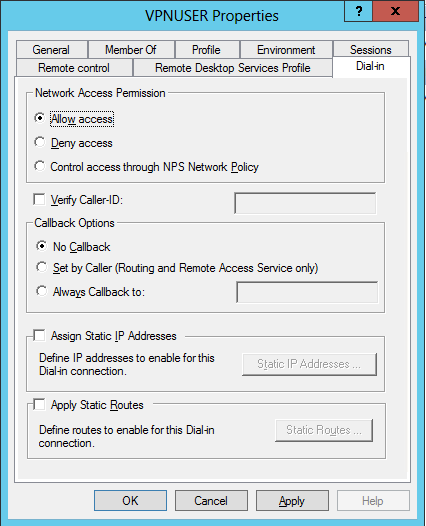
Figure 11 - User Properties
Step 6, Client Configuration
Install the exported certificate from Server into Trusted Root Certificate Authorities.
Go to Network and Sharing Center, click on Setup a new connection or network, then select Connect to a workplace then Use my Internet Connection (VPN).
Type RoccosVPN.cloudapp.net in the Internet Address and enter your Destination Name and Create.
Click on the network tray icon, right click on the VPN connection then Properties.
Switch to Security tab. Change the VPN type to Secure Socket Tunneling Protocol (SSTP) .

In the last, check Microsoft CHAP Version 2 (MS-CHAP v2) and click OK now.
Now, connect this VPN, type your VPN user credential. Have fun with your Windows Azure VPN. Enjoy!
Step 7, L2TP VPN Deployment
While deployment L2TP VPN, we should enable some UDP ports as first in Windows Azure.
L2TP port: UDP 1701
IPsec port: UDP 500
IKEv2 port: UDP 4500
And, in addition, add exceptions in Windows Server firewall.
Then, open RRAS management tools, and right click the server, select Properties and Security tab.
Check "Allow custom IPsec policy for L2TP/IKEv2 connection" and enter a preshared key

References
How to Setup Windows Azure (Server 2012) as an SSTP and L2TP VPN Provider
By Rocco Ren
Comments
Anonymous
August 02, 2013
how about the L2TP vpn?Anonymous
November 18, 2013
Rocco, how about a site to site azure VPN? AaronAnonymous
November 18, 2013
@Aaron, do you mean Windows Azure Virtual Network S2S VPN?Anonymous
March 09, 2014
中文版: diaosbook.com/.../setup-sstp-windows-azureAnonymous
March 11, 2014
Hi, SSTP is possible without a problem, while L2TP is NOT possible in Windows Azure currently. Cheers, MatthiasAnonymous
March 24, 2014
The comment has been removedAnonymous
April 12, 2014
points to add: if you are going to make a self-signed cert, the easiest way is to let the IIS get thing done (IIS > Your Server > Server certificates. Second, when deploy the .cer to your client machine, please choose Local Machine - “Trusted Root Certificate Authorities” store, otherwise '0x800B0109' err might be common. Btw, SSTP is the most convenient choose for PC scenario.Anonymous
August 30, 2014
l2tp works fine on pc, but not working on wp, with error 809. possibly since cert can't be imported to wp?Anonymous
March 31, 2015
It seems that the certificate generated by SelfSSL only have 1024 bits RSA public key which is vulenrable and will causing VPN disconnected (check the server system event, will see errors like "An TLS 1.0 connection request was received from a remote client application, but none of the cipher suites supported by the client application are supported by the server. ". To address this, I just tried generate the certificate by makecert specify -len 2048 (seems SelfSSL can also speicfy key length). So far it works well.Anonymous
September 28, 2015
Another useless document. Will get stuck in one of the steps- Anonymous
November 17, 2016
How?
- Anonymous
Anonymous
November 19, 2015
Hi Guys, Can't be the only one having this issue, every time there is any maintenance on my ras server, it stops working and I need to disable RAS and set it up again. Think it's because the network cards GUID keeps changing?