Creating Transactional Web Tests for Visual Studio with Fiddler / neXpert
One of the best features of Fiddler when performance testing is it’s ability to save a capture as a Visual Studio Web Test. You can then use this web test to functional test or stick it in a load test to stress test your site.
The latest version of Fiddler (2.2.2.0) has an updated “Save As Visual Studio Web Test” which will now use any steps you created with neXpert to automatically create transactions in the generated web test.
NOTE: You may experience a bug with the think time not correctly being set on the resulting web test. You can easily change the think time between requests through the Visual Studio GUI. This will be fixed in a future version of Fiddler. (This note will be updated with the version it is fixed in)
If you have never checked out the original feature, please see the following resources:
- Sean Lumley’s (VSTS Developer and creator of the feature) Tutorial On Creating a Web Test with Fiddler
https://blogs.msdn.com/slumley/pages/enhanced-web-test-support-in-fiddler.aspx - Visual Studio Web Test Feature Page
https://www.fiddlertool.com/Fiddler/help/WebTest.asp
This post will first go over the value of transactions and then provide a walkthrough of creating transactional web tests with Fiddler/neXpert
What is a Transaction?
“A transaction in a Web test is like a timer. You can encapsulate a set of actions in a transaction. You can think of a typical transaction as starting a timer, requesting a page, requesting another page, and then ending the timer. This series of actions, from start to end, constitutes a transaction.
When using Web tests in a load test, transaction response times are displayed in the transaction table of the Load Test Analyzer.” MSDN
So what does that mean exactly? Transactions let you:
- Name steps in a scenario
- Associate requests together
All so you can get an accurate response time for each step of a common scenario.
Transactions in a Web Test
Lets look at some quick examples. Say we want to script a web test of the neXpert blog. Lets do the classic scenario of:
- Navigate to the blog
- Click on a post
- Click on the email link
- Click on the Known Issues page
Doing this using the VSTS recorder or Fiddler we get the following web test:
Running the test produces the following:
As you can see, each page is given it’s own timer. This is fine for a simple site like the blog, but what about a more involved site like Facebook?
Lets look at the following simple Facebook scenario:
- Navigate to login page
- Log in
- Click profile
Even though there are only 3 steps, there are 10 steps recorded by VSTS to complete the scenario
Running the web test also shows the time and statistics for all 10 (Not aggregates of the 3 steps we are interested in):
Here is where the power of transactions comes in. Wrapping the appropriate steps in transactions now produces the following web test:
And running the web test produces the following chart:
Much better!
Transactions in a Load Test
Not only does this help with a single web test, it also helps with load testing. Now you can view results by transaction after a load test is finished. Facebook was “load tested” with 1 user for 30 sec.
The following is a snippet from the Load Test Summary provided at the end of a load test run.
Creating Transactional Web Tests with Fiddler/neXpert
Now that I have convinced you to use transactions, lets walk through how to use Fiddler/neXpert to create transactional web tests.
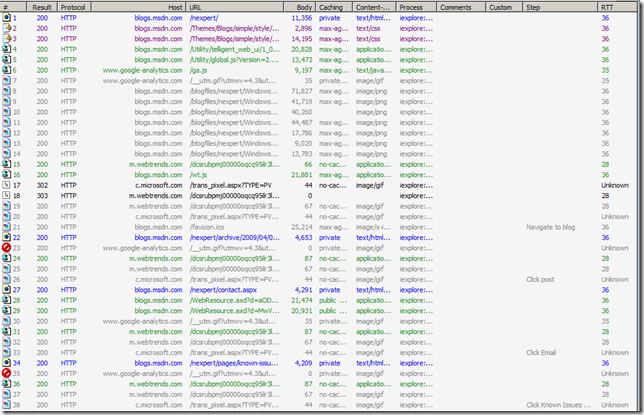
Step 1: Capture with Fiddler adding neXpert step markers along the way
Here is a screenshot of running through a typical scenario of someone visiting the neXpert blog. Notice the step names marked in the “Step" column.
Step 2: Save as Visual Studio Web Test
Highlight all the session you wish to create a web test from, then select Save… Selected Sessions… as Visual Studio Web Test from the File menu.
Step 3: Create a new Test Project
In Visual Studio, create a new Test Project which will hold the web test.
Step 4: Add web test to project
Right click on the project name and choose Add … Existing Item.
Navigate to your saved web test. Be sure to change the filter to the right of the File name box to “Web Test Files”
You should now see your web test in the project in the Solution Explorer.
Step 5: Run the test
Double clicking on the web test in the Solution Explorer will allow you to configure the web test. As you can see, the step names in neXpert were used to create the name of each transaction.
Comments
Anonymous
May 04, 2009
PingBack from http://microsoft-sharepoint.simplynetdev.com/creating-transactional-web-tests-for-visual-studio-with-fiddler-nexpert/Anonymous
May 05, 2009
Check out this blog post from Eric Mattingly about extenstions he added to fiddler for creating VSTSAnonymous
May 05, 2009
Thank you for submitting this cool story - Trackback from DotNetShoutoutAnonymous
February 01, 2012
Does anyone know if there is a way to copy the step marker from the old session entry, to the new session entry during a Fiddler replay?Anonymous
September 01, 2015
What benefit does this kind of grouping do from the response time calculation? Is it correct to say that the transaction response time will be same as the summation of individual request's response time, as included in the transaction?


