啟用通話的推播通知
推播通知會將應用程式的信息傳送至使用者的裝置。 您可以使用推播通知來顯示對話框、播放音效,或顯示應用程式 UI 層的來電。
在本文中,您將瞭解如何啟用 Azure 通訊服務 通話的推播通知。 通訊服務提供與 Azure 事件方格 與 Azure 通知中樞的整合,可讓您將推播通知新增至您的應用程式。
TTL 令牌概觀
存留時間 (TTL) 令牌是一項設定,可決定通知令牌在變成無效之前保持有效的時間長度。 此設定對於業務開發不需要日常互動但在較長時間內仍然至關重要的應用程式非常實用。
TTL 設定允許管理推播通知的生命週期。 這可減少頻繁更新令牌的需求,同時協助確保應用程式與其使用者之間的通道在延長期間保持開放且可靠。
目前,TTL 的最大值為180天(15,552,000秒),最小值為5分鐘(300秒)。 您可以輸入此值並加以調整,以符合您的需求。 如果不提供值,則預設值為 [24 小時 (86,400 秒)]。
呼叫註冊推播通知 API 之後,裝置令牌資訊會儲存在註冊機構中。 TTL 持續時間結束后,裝置端點資訊會被刪除。 如果這些裝置未再次呼叫註冊推播通知 API,則這些裝置上的任何連入呼叫都無法傳遞至裝置。
如果您想要撤銷身分識別,請遵循 此程式。 撤銷身分識別之後,應該刪除註冊機構專案。
注意
對於Microsoft Teams 使用者,最大 TTL 值為 24 小時(86,400 秒)。 沒有可新增此值的方法。 您應該每隔 24 小時在背景喚醒應用程式,並註冊裝置令牌。
必要條件
具有有效訂用帳戶的 Azure 帳戶。 免費建立帳戶。
已部署通訊服務資源。 建立通訊服務資源。
用來啟用呼叫用戶端的使用者存取權杖。 如需詳細資訊,請參閱建立和管理存取權杖。
選擇性:完成快速入門以將語音通話新增至您的應用程式。
遵循快速入門
透過 Azure 通訊服務 Web 通話 SDK 的 Web 推播通知處於預覽狀態,並可在 1.12.0-beta.2+ 版中取得。
重要
此 Azure 通訊服務功能目前處於預覽狀態。
提供的預覽 API 和 SDK 並無服務等級協定。 建議您不要將其用於生產工作負載。 部分功能可能不受支援,或是在功能上有所限制。
如需詳細資訊,請參閱 Microsoft Azure 預覽版增補使用規定。
如需逐步指示,請參閱 GitHub 上的快速入門。
已啟用 Firebase 雲端通訊 (FCM) 的 Firebase 帳戶,並使用您的 FCM 服務連線到 Azure 通知中樞實例。 如需詳細資訊,請參閱通訊服務通知。
Android Studio 3.6 版或更新版本可建置您的應用程式。
一組許可權,可讓Android應用程式接收來自 FCM 的通知訊息。 在您的
AndroidManifest.xml檔案中,於標籤後面<manifest ...>或下方</application>新增下列許可權:<uses-permission android:name="android.permission.INTERNET"/> <uses-permission android:name="android.permission.GET_ACCOUNTS"/> <uses-permission android:name="com.google.android.c2dm.permission.RECEIVE" />
重要
2023 年 6 月 20 日,Google 宣佈已 淘汰使用 FCM 舊版 API 來傳送訊息,並將於 2024 年 6 月開始從服務中移除舊版 FCM。 Google 建議 [從舊版 FCM API 移轉至 FCM HTTP v1]。
如果您的通訊服務資源仍在使用 FCM 舊版 API,請遵循 此移轉指南。
行動推播通知的考慮
行動推播通知是出現在行動裝置上的快顯通知。 針對通話,本文著重於 voice over Internet Protocol (VoIP) 推播通知。
注意
當應用程式註冊推播通知並處理 Teams 使用者的傳入推播通知時,API 會相同。 本文描述的 API 也可以在 或 TeamsCallAgent 類別上CommonCallAgent叫用。
安裝 SDK
找出您的項目層級build.gradle檔案,並將 新增mavenCentral()至 和allprojects下的buildscript存放庫清單:
buildscript {
    repositories {
    ...
        mavenCentral()
    ...
    }
}
allprojects {
    repositories {
    ...
        mavenCentral()
    ...
    }
}
然後,在您的模組層級 build.gradle 檔案中,將下列幾行新增至 dependencies 區段:
dependencies {
    ...
    implementation 'com.azure.android:azure-communication-calling:1.0.0'
    ...
}
初始化必要的物件
若要建立 CallAgent 執行個體,您必須在 CallClient 執行個體上呼叫 createCallAgent 方法。 此呼叫會以非同步方式傳回 CallAgent 執行個體物件。
createCallAgent 方法會採用 CommunicationUserCredential 作為引數,用來封裝存取權杖。
若要存取 DeviceManager,您必須先建立 callAgent 執行個體。 然後,您可以使用 CallClient.getDeviceManager 方法取得 DeviceManager。
String userToken = '<user token>';
CallClient callClient = new CallClient();
CommunicationTokenCredential tokenCredential = new CommunicationTokenCredential(userToken);
android.content.Context appContext = this.getApplicationContext(); // From within an activity, for instance
CallAgent callAgent = callClient.createCallAgent(appContext, tokenCredential).get();
DeviceManager deviceManager = callClient.getDeviceManager(appContext).get();
若要設定來電者的顯示名稱,請使用下列替代方法:
String userToken = '<user token>';
CallClient callClient = new CallClient();
CommunicationTokenCredential tokenCredential = new CommunicationTokenCredential(userToken);
android.content.Context appContext = this.getApplicationContext(); // From within an activity, for instance
CallAgentOptions callAgentOptions = new CallAgentOptions();
callAgentOptions.setDisplayName("Alice Bob");
DeviceManager deviceManager = callClient.getDeviceManager(appContext).get();
CallAgent callAgent = callClient.createCallAgent(appContext, tokenCredential, callAgentOptions).get();
註冊推播通知
若要註冊推播通知,應用程式必須使用裝置註冊令牌在實例上CallAgent呼叫 registerPushNotification() 。
若要取得裝置註冊令牌,請在 區段中新增下列幾行,將 Firebase SDK 新增至應用程式模組的 build.gradle 檔案(如果這些行 dependencies 還不存在):
// Add the SDK for Firebase Cloud Messaging
implementation 'com.google.firebase:firebase-core:16.0.8'
implementation 'com.google.firebase:firebase-messaging:20.2.4'
在專案層級的 build.gradle 檔案中 dependencies ,如果區段尚未存在,請在 區段中新增下列這一行:
classpath 'com.google.gms:google-services:4.3.3'
如果檔案尚未存在,請將下列外掛程式新增至檔案的開頭:
apply plugin: 'com.google.gms.google-services'
在工具列上,選取 [ 立即同步處理]。 新增下列代碼段,以取得 Firebase 雲端傳訊 SDK 針對用戶端應用程式實例產生的裝置註冊令牌。 請務必將下列匯入新增至 實例主要活動的標頭,以擷取令牌。
import com.google.android.gms.tasks.OnCompleteListener;
import com.google.android.gms.tasks.Task;
import com.google.firebase.iid.FirebaseInstanceId;
import com.google.firebase.iid.InstanceIdResult;
新增此程式碼片段以擷取權杖:
FirebaseInstanceId.getInstance().getInstanceId()
    .addOnCompleteListener(new OnCompleteListener<InstanceIdResult>() {
        @Override
        public void onComplete(@NonNull Task<InstanceIdResult> task) {
            if (!task.isSuccessful()) {
                Log.w("PushNotification", "getInstanceId failed", task.getException());
                return;
            }

            // Get the new instance ID token
            String deviceToken = task.getResult().getToken();
            // Log
            Log.d("PushNotification", "Device Registration token retrieved successfully");
        }
    });
向通話服務 SDK 註冊裝置註冊權杖,以取得連入通話的推播通知:
String deviceRegistrationToken = "<Device Token from previous section>";
try {
    callAgent.registerPushNotification(deviceRegistrationToken).get();
}
catch(Exception e) {
    System.out.println("Something went wrong while registering for Incoming Calls Push Notifications.")
}
處理推播通知
若要接收來電推播通知,請在具有承載的實例上CallAgent呼叫 handlePushNotification() 。
若要從 Firebase 雲端傳訊取得承載,請從建立擴充 FirebaseMessagingService Firebase SDK 類別並覆寫 onMessageReceived 方法的新服務 (選取 [檔案>新>服務>服務] 開始。 此方法是 Firebase 雲端傳訊將推播通知傳遞至應用程式時所呼叫的事件處理程式。
public class MyFirebaseMessagingService extends FirebaseMessagingService {
    private java.util.Map<String, String> pushNotificationMessageDataFromFCM;

    @Override
    public void onMessageReceived(RemoteMessage remoteMessage) {
        // Check if the message contains a notification payload.
        if (remoteMessage.getNotification() != null) {
            Log.d("PushNotification", "Message Notification Body: " + remoteMessage.getNotification().getBody());
        }
        else {
            pushNotificationMessageDataFromFCM = remoteMessage.getData();
        }
    }
}
將下列服務定義新增至 AndroidManifest.xml 檔案的 <application> 標籤內:
<service
    android:name=".MyFirebaseMessagingService"
    android:exported="false">
    <intent-filter>
        <action android:name="com.google.firebase.MESSAGING_EVENT" />
    </intent-filter>
</service>
擷取承載之後,您可以將它傳遞給通訊服務 SDK,以剖析為內部 IncomingCallInformation 物件。 這個物件會處理在 實例上CallAgent呼叫 handlePushNotification 方法。 您可以在 類別上CallClient呼叫 createCallAgent(...) 方法,以建立 CallAgent 實例。
try {
    IncomingCallInformation notification = IncomingCallInformation.fromMap(pushNotificationMessageDataFromFCM);
    Future handlePushNotificationFuture = callAgent.handlePushNotification(notification).get();
}
catch(Exception e) {
    System.out.println("Something went wrong while handling the Incoming Calls Push Notifications.");
}
當推播通知訊息的處理成功,且所有事件處理程式都已正確註冊時,應用程式會響鈴。
取消註冊推播通知
應用程式可以隨時取消註冊推播通知。 若要取消註冊,請在 上callAgent呼叫 unregisterPushNotification() 方法:
try {
    callAgent.unregisterPushNotification().get();
}
catch(Exception e) {
    System.out.println("Something went wrong while un-registering for all Incoming Calls Push Notifications.")
}
停用內送通話的內部推播通知
傳入呼叫的推播承載可以透過兩種方式傳遞給被呼叫者:
- 使用 FCM,並使用先前所述的 API 註冊裝置令牌,
registerPushNotificationCallAgent或TeamsCallAgent - 在建立
CallAgent或TeamsCallAgent以取得傳遞的推送承載時,向內部服務註冊 SDK
藉由在 或 TeamsCallAgentOptions中使用 CallAgentOptions 屬性setDisableInternalPushForIncomingCall,可以指示 SDK 停用透過內部推送服務傳遞推送承載:
CallAgentOptions callAgentOptions = new CallAgentOptions();
callAgentOptions.setDisableInternalPushForIncomingCall(true);
行動推播通知的考慮
行動推播通知是出現在行動裝置上的快顯通知。 針對通話,本文著重於 voice over Internet Protocol (VoIP) 推播通知。 如需 iOS 應用程式中 CallKit 整合的指南,請參閱 與 CallKit 整合。
注意
當應用程式註冊推播通知並處理 Teams 使用者的傳入推播通知時,API 會相同。 本文描述的 API 也可以在 或 TeamsCallAgent 類別上CommonCallAgent叫用。
設定系統
請遵循下列步驟來設定系統。
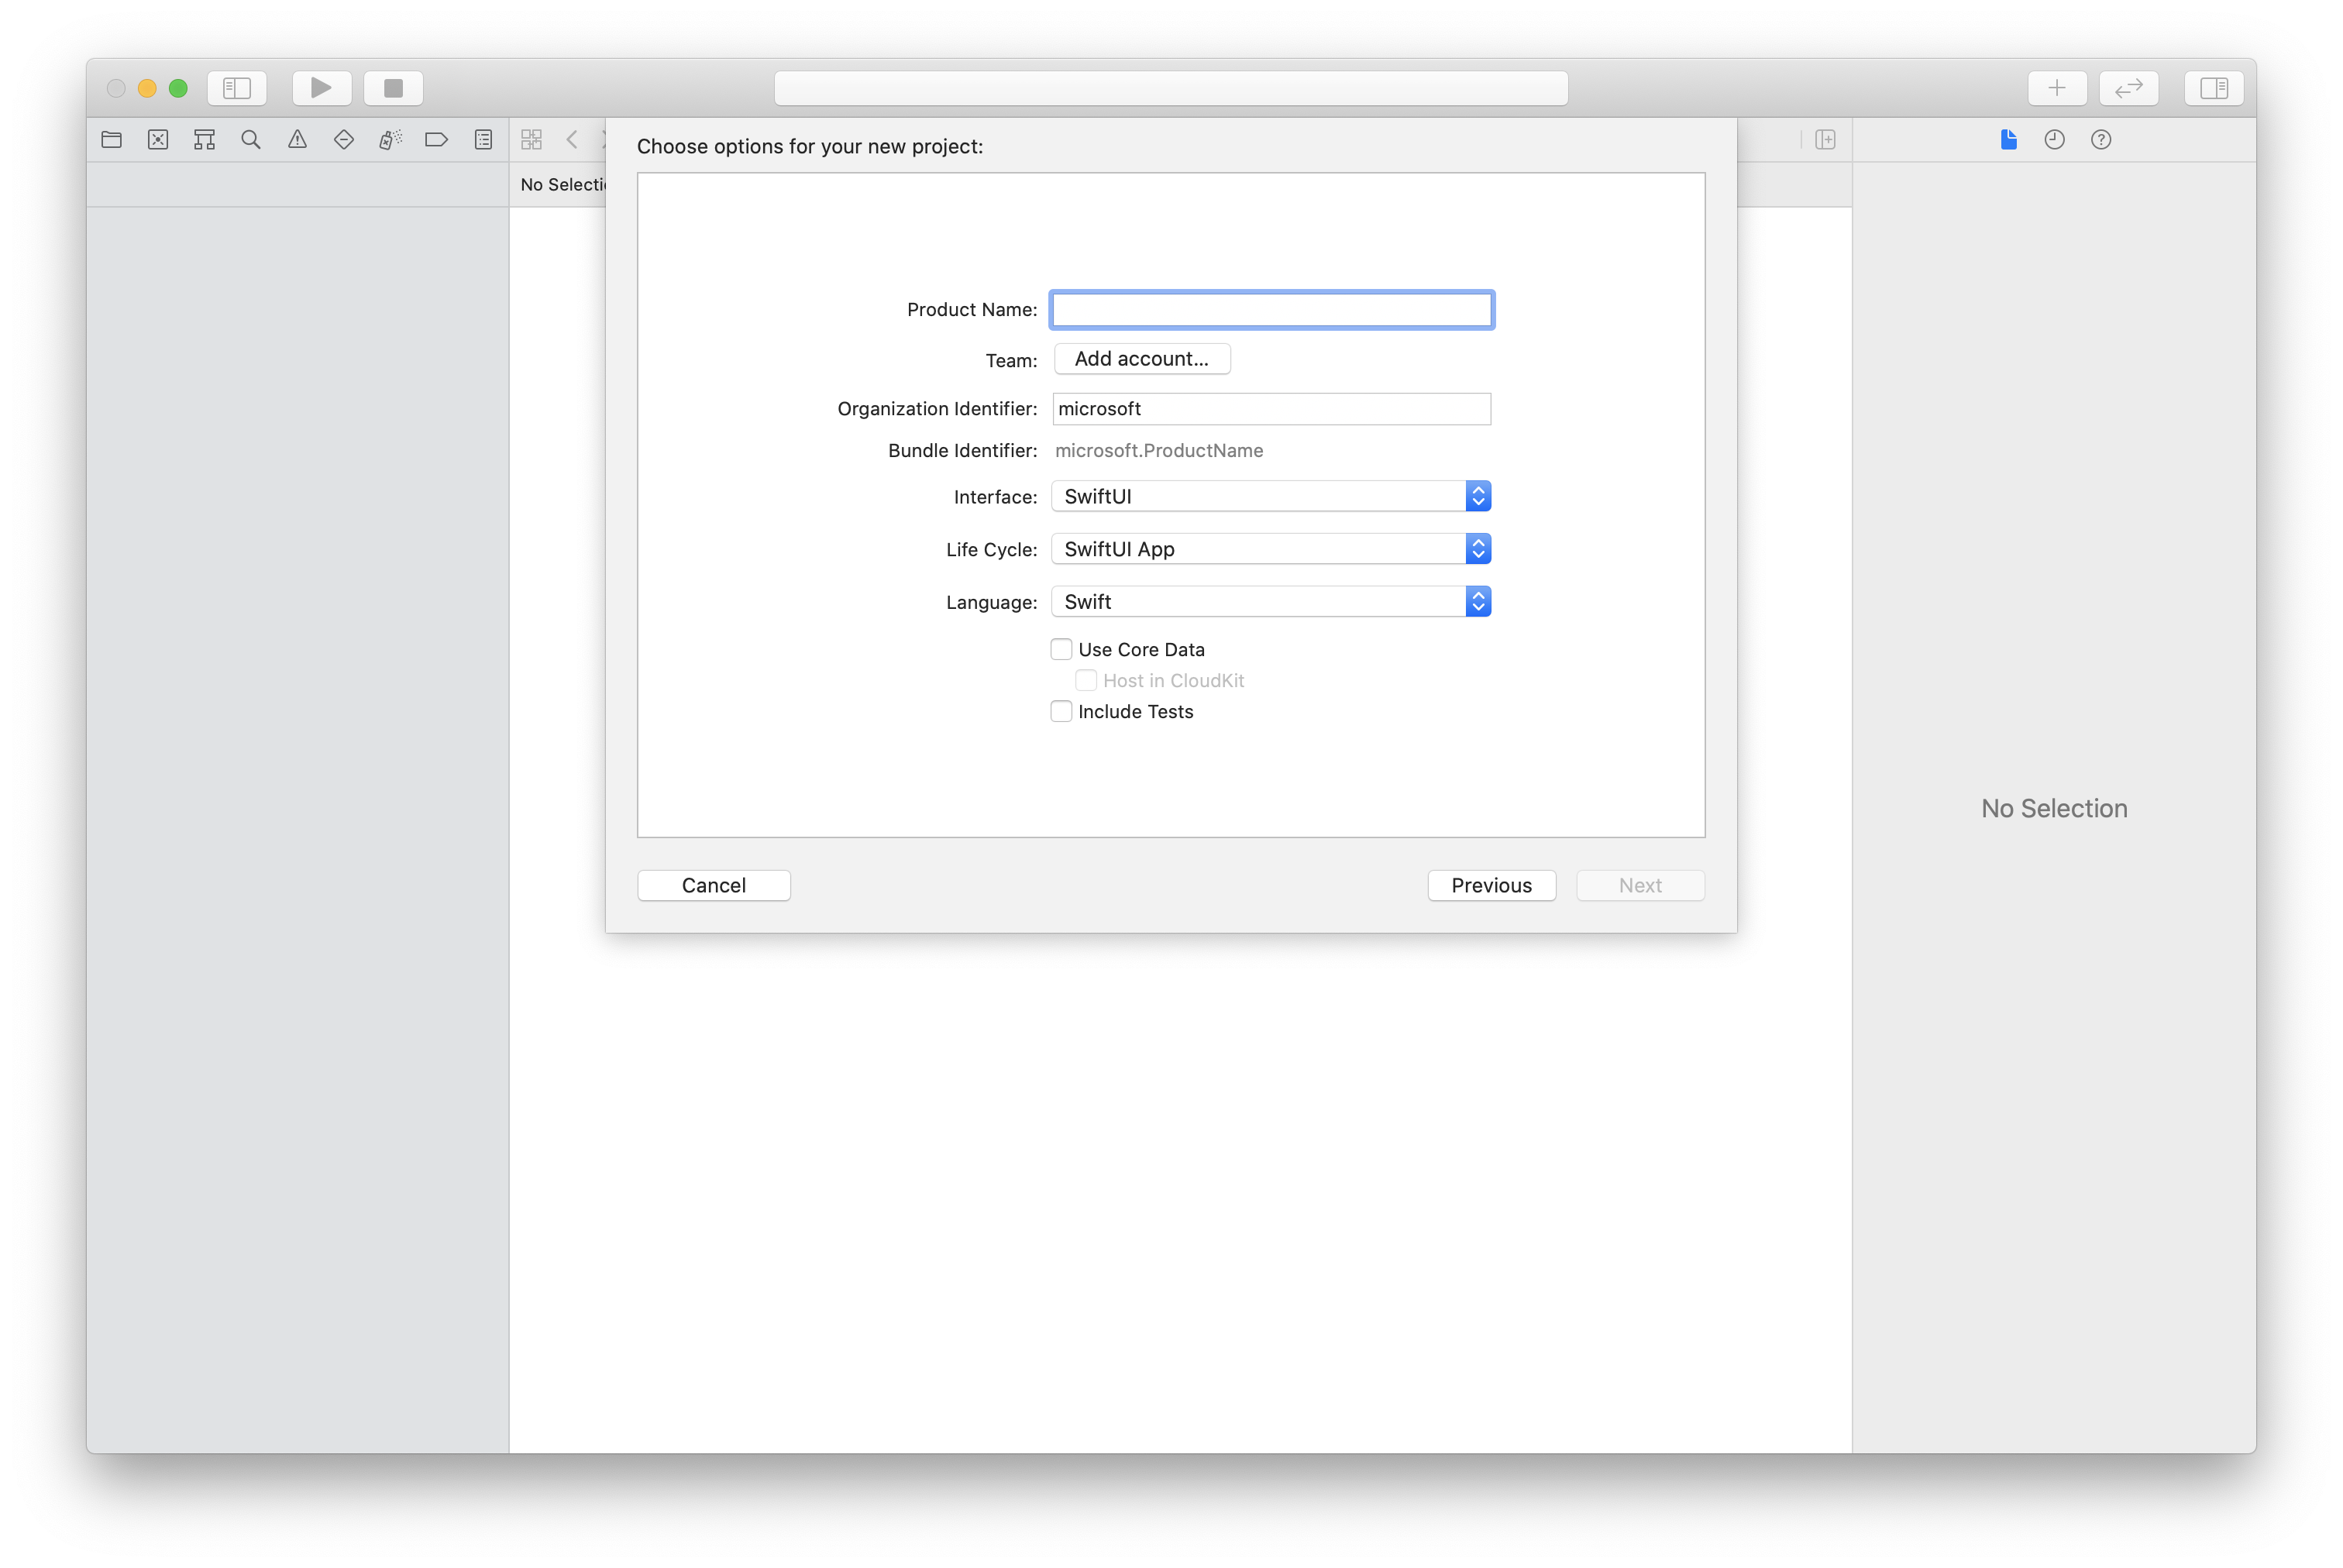
建立 Xcode 專案
在 Xcode 中建立新的 iOS 專案,並選取 [單一檢視應用程式] 範本。 本文使用 SwiftUI 架構,因此您應該將 Language 設定為 Swift,並將 Interface 設定為 SwiftUI。
您不會在本文中建立測試。 您可以隨意清除 [包含測試] 核取方塊。
使用 CocoaPods 安裝套件和相依性
為您的應用程式建立 Podfile,如以下範例所示:
platform :ios, '13.0'
use_frameworks!
target 'AzureCommunicationCallingSample' do
    pod 'AzureCommunicationCalling', '~> 1.0.0'
end
執行
pod install。使用 Xcode 開啟
.xcworkspace。
要求存取麥克風
若要存取裝置的麥克風,您必須使用 NSMicrophoneUsageDescription 更新應用程式的資訊屬性清單。 將相關聯的值設定為對話框中所包含的字串,系統用來要求使用者存取權。
以滑鼠右鍵按一下專案樹狀結構的 Info.plist 項目,接著選取 [開啟為]>[原始程式碼]。 將以下幾行新增至最上層 <dict> 區段中,然後儲存檔案。
<key>NSMicrophoneUsageDescription</key>
<string>Need microphone access for VOIP calling.</string>
設定應用程式架構
開啟項目的 ContentView.swift 檔案。 將 import 宣告新增至檔案頂端,以匯入 AzureCommunicationCalling 程式庫。 此外,匯入 AVFoundation。 您需要它才能在程式代碼中要求音訊許可權。
import AzureCommunicationCalling
import AVFoundation
初始化 CallAgent
若要從 CallClient 建立 CallAgent 執行個體,您必須使用 callClient.createCallAgent 方法,在 CallAgent 物件初始化後以非同步方式傳回該物件。
若要建立通話用戶端,請傳遞 CommunicationTokenCredential 物件:
import AzureCommunication

let tokenString = "token_string"
var userCredential: CommunicationTokenCredential?
do {
    let options = CommunicationTokenRefreshOptions(initialToken: token, refreshProactively: true, tokenRefresher: self.fetchTokenSync)
    userCredential = try CommunicationTokenCredential(withOptions: options)
} catch {
    updates("Couldn't created Credential object", false)
    initializationDispatchGroup!.leave()
    return
}

// tokenProvider needs to be implemented by Contoso, which fetches a new token
public func fetchTokenSync(then onCompletion: TokenRefreshOnCompletion) {
    let newToken = self.tokenProvider!.fetchNewToken()
    onCompletion(newToken, nil)
}
將您建立的 CommunicationTokenCredential 物件傳遞至 CallClient,並設定顯示名稱:
self.callClient = CallClient()
let callAgentOptions = CallAgentOptions()
options.displayName = " iOS Azure Communication Services User"

self.callClient!.createCallAgent(userCredential: userCredential!,
    options: callAgentOptions) { (callAgent, error) in
        if error == nil {
            print("Create agent succeeded")
            self.callAgent = callAgent
        } else {
            print("Create agent failed")
        }
})
設定推播通知
開始註冊、處理和取消註冊推播通知的工作之前,請先完成此設定工作:
- 在 Xcode 中,移至 [簽署與功能]。 選取 [+ 功能],然後選取 [推播通知],以新增功能。
- 選取 [+ 功能],然後選取 [背景模式],以新增另一個功能。
- 在 [背景模式] 底下,選取 [透過 IP 的語音] 和 [遠端通知] 核取方塊。

註冊推播通知
若要註冊推播通知,請使用裝置註冊令牌在 實體上CallAgent呼叫 registerPushNotification() 。
成功初始化之後,必須註冊推播通知。 callAgent當對象終結時,logout會呼叫 ,以自動取消註冊推播通知。
let deviceToken: Data = pushRegistry?.pushToken(for: PKPushType.voIP)
callAgent.registerPushNotifications(deviceToken: deviceToken!) { (error) in
    if(error == nil) {
        print("Successfully registered to push notification.")
    } else {
        print("Failed to register push notification.")
    }
}
處理推播通知
若要接收來電的推播通知,請在具有字典承載的實例上CallAgent呼叫handlePushNotification():
let callNotification = PushNotificationInfo.fromDictionary(pushPayload.dictionaryPayload)

callAgent.handlePush(notification: callNotification) { (error) in
    if (error == nil) {
        print("Handling of push notification was successful")
    } else {
        print("Handling of push notification failed")
    }
}
取消註冊推播通知
應用程式可以隨時取消註冊推播通知。 若要取消註冊,請在 上CallAgent呼叫 unregisterPushNotification 方法。
注意
應用程式不會在登出時自動從推播通知取消註冊。
callAgent.unregisterPushNotification { (error) in
    if (error == nil) {
        print("Unregister of push notification was successful")
    } else {
       print("Unregister of push notification failed, please try again")
    }
}
停用內送通話的內部推播通知
傳入呼叫的推播承載可以透過兩種方式傳遞給被呼叫者:
- 使用 Apple 推播通知服務 (APNS) 並使用先前所述的 API 註冊裝置令牌,
registerPushNotificationCallAgent或TeamsCallAgent - 在建立
CallAgent或TeamsCallAgent以取得傳遞的推送承載時,向內部服務註冊 SDK
藉由在 或 TeamsCallAgentOptions中使用 CallAgentOptions 屬性disableInternalPushForIncomingCall,可以指示 SDK 停用透過內部推送服務傳遞推送承載:
let options = CallAgentOptions()
options.disableInternalPushForIncomingCall = true
Windows 推播通知的考慮
行動推播通知是出現在行動裝置上的快顯通知。 針對通話,本文著重於 voice over Internet Protocol (VoIP) 推播通知。
Windows 平臺上的推播通知會透過 Windows 推播通知服務 (WNS) 傳遞。
注意
當應用程式註冊推播通知並處理自定義 Teams 端點 (CTE) 的推播通知時,API 會相同。 本文描述的 API 也可以在 CTE 的 CommonCallAgent 或 TeamsCallAgent 類別上叫用。
設定系統
請遵循下列步驟來設定系統。
建立 Visual Studio 專案
針對 通用 Windows 平台 應用程式,請在 Visual Studio 2022 中建立新的空白應用程式 (通用 Windows) 專案。 在輸入專案名稱之後,隨意選擇高於 10.0.17763.0 的任何 Windows SDK。
針對 WinUI 3 應用程式,使用空白應用程式、封裝 (桌面中的 WinUI 3) 範本建立新專案,以設定單頁 WinUI 3 應用程式。 需要 Windows App SDK 1.3 版或更新版本。
使用 NuGet 套件管理員來安裝套件和相依性
通話 SDK API 和程式庫可透過 NuGet 套件公開取得。
若要尋找、下載並安裝呼叫 SDK NuGet 套件:
- 藉由選取 [工具]>[NuGet 套件管理員]>[管理解決方案的 NuGet 套件],開啟 NuGet 套件管理員。
- 選取 [ 瀏覽],然後在搜尋方塊中輸入 Azure.Communication.Calling.WindowsClient 。
- 請確定 已選取 [包含發行前版本 ] 複選框。
- 選取 Azure.Communication.Calling.WindowsClient 套件,然後選取 [Azure.Communication.Calling.WindowsClient 1.4.0-beta.1] 或更新版本。
- 選取對應至右窗格中 Azure 通訊服務 項目的複選框。
- 選取 [安裝]。
設定推播通知
開始註冊、處理及顯示 Windows 通知以接聽或拒絕來電的工作之前,請先完成此設定工作:
遵循 [教學課程:使用 Azure 通知中樞向通用 Windows 平台應用程式傳送通知]。 遵循本教學課程之後,您有:
- 具有
WindowsAzure.Messaging.Managed和Microsoft.Toolkit.Uwp.Notifications套件的應用程式。 - 參考為
<AZURE_PNH_HUB_NAME>的 Azure 通知中樞名稱和本文中所參考的<AZURE_PNH_HUB_CONNECTION_STRING>Azure 通知中樞 連接字串。
- 具有
若要在每個應用程式初始化上註冊 WNS 通道,請務必在檔案
App.xaml.cs中新增初始化程式代碼:// App.xaml.cs protected override async void OnLaunched(LaunchActivatedEventArgs e) { await InitNotificationsAsync(); ... } private async Task InitNotificationsAsync() { if (AZURE_PNH_HUB_NAME != "<AZURE_PNH_HUB_NAME>" && AZURE_PNH_HUB_CONNECTION_STRING != "<AZURE_PNH_HUB_CONNECTION_STRING>") { var channel = await PushNotificationChannelManager.CreatePushNotificationChannelForApplicationAsync(); channel.PushNotificationReceived += Channel_PushNotificationReceived; var hub = new NotificationHub(AZURE_PNH_HUB_NAME, AZURE_PNH_HUB_CONNECTION_STRING); var result = await hub.RegisterNativeAsync(channel.Uri); if (result.ChannelUri != null) { PNHChannelUri = new Uri(result.ChannelUri); } else { Debug.WriteLine("Cannot register WNS channel"); } } }註冊新的推播通知訊息送達時所啟動的
App.xaml.cs事件處理程式:// App.xaml.cs private void Channel_PushNotificationReceived(PushNotificationChannel sender, PushNotificationReceivedEventArgs args) { switch (args.NotificationType) { case PushNotificationType.Toast: case PushNotificationType.Tile: case PushNotificationType.TileFlyout: case PushNotificationType.Badge: break; case PushNotificationType.Raw: var frame = (Frame)Window.Current.Content; if (frame.Content is MainPage) { var mainPage = frame.Content as MainPage; await mainPage.HandlePushNotificationIncomingCallAsync(args.RawNotification.Content); } break; } }
註冊推播通知
若要註冊推播通知,請使用在應用程式初始化上取得的 WNS 註冊通道,在實體上CallAgent呼叫 RegisterForPushNotificationAsync() 。
成功初始化之後,必須註冊推播通知。
// MainPage.xaml.cs

this.callAgent = await this.callClient.CreateCallAgentAsync(tokenCredential, callAgentOptions);

if ((Application.Current as App).PNHChannelUri != null)
{
    await this.callAgent.RegisterForPushNotificationAsync((Application.Current as App).PNHChannelUri.ToString());
}

this.callAgent.CallsUpdated += OnCallsUpdatedAsync;
this.callAgent.IncomingCallReceived += OnIncomingCallAsync;
處理推播通知
若要接收來電的推播通知,請在具有字典承載的實例上CallAgent呼叫handlePushNotification():
// MainPage.xaml.cs

public async Task HandlePushNotificationIncomingCallAsync(string notificationContent)
{
    if (this.callAgent != null)
    {
        PushNotificationDetails pnDetails = PushNotificationDetails.Parse(notificationContent);
        await callAgent.HandlePushNotificationAsync(pnDetails);
    }
}
此呼叫會觸發 上 CallAgent 顯示來電通知的來電事件:
// MainPage.xaml.cs

private async void OnIncomingCallAsync(object sender, IncomingCallReceivedEventArgs args)
{
    incomingCall = args.IncomingCall;
    (Application.Current as App).ShowIncomingCallNotification(incomingCall);
}
// App.xaml.cs

public void ShowIncomingCallNotification(IncomingCall incomingCall)
{
    string incomingCallType = incomingCall.IsVideoEnabled ? "Video" : "Audio";
    string caller = incomingCall.CallerDetails.DisplayName != "" ? incomingCall.CallerDetails.DisplayName : incomingCall.CallerDetails.Identifier.RawId;
    new ToastContentBuilder()
    .SetToastScenario(ToastScenario.IncomingCall)
    .AddText(caller + " is calling you.")
    .AddText("New Incoming " + incomingCallType + " Call")
      .AddButton(new ToastButton()
          .SetContent("Decline")
          .AddArgument("action", "decline"))
      .AddButton(new ToastButton()
          .SetContent("Accept")
          .AddArgument("action", "accept"))
      .Show();
}
新增程式代碼以處理 方法中 OnActivated 通知的按鈕按下:
// App.xaml.cs

protected override async void OnActivated(IActivatedEventArgs e)
{
    // Handle notification activation
    if (e is ToastNotificationActivatedEventArgs toastActivationArgs)
    {
      ToastArguments args = ToastArguments.Parse(toastActivationArgs.Argument);
      string action = args?.Get("action");

      if (!string.IsNullOrEmpty(action))
      {
          var frame = Window.Current.Content as Frame;
          if (frame.Content is MainPage)
          {
              var mainPage = frame.Content as MainPage;
              await mainPage.AnswerIncomingCall(action);
          }
      }
    }
}
// MainPage.xaml.cs

public async Task AnswerIncomingCall(string action)
{
    if (action == "accept")
    {
      var acceptCallOptions = new AcceptCallOptions()
      {
          IncomingVideoOptions = new IncomingVideoOptions()
          {
              StreamKind = VideoStreamKind.RemoteIncoming
          }
      };

      call = await incomingCall?.AcceptAsync(acceptCallOptions);
      call.StateChanged += OnStateChangedAsync;
      call.RemoteParticipantsUpdated += OnRemoteParticipantsUpdatedAsync;
    }
    else if (action == "decline")
    {
      await incomingCall?.RejectAsync();
    }
}