如何將受控識別與 Azure 服務搭配使用,以連線到適用於 NoSQL 的 Azure Cosmos DB
適用於:NoSQL
部署指南順序的圖表,包括這些位置,順序如下:概觀、概念、準備、角色型訪問控制、網路和參考。 「準備」位置目前已醒目提示。
本文會檢閱建立受控識別,以搭配使用連線至 Azure Cosmos DB for NoSQL 的已部署應用程式所需的步驟。
受控識別是 Microsoft Entra ID 中的其中一種身分識別類型,以供應用程式在連線至支援 Microsoft Entra 驗證的資源時使用。 受控識別可用來取代傳統資源擁有的認證 (例如金鑰)。 在 Azure 中,受控識別可讓應用程式取得 Microsoft Entra 權杖以向 Azure 服務進行驗證,而無需撰寫大量的驗證碼。
您可以使用 Microsoft Entra 向 Azure 服務進行驗證,包括但不限於:
- Azure SQL
- Azure AI
- Azure Cosmos DB
- Azure 儲存體
- Azure 事件中樞
- Azure Container Registry
您可以使用受控識別來代表從其他 Azure 服務向 Azure 服務進行驗證的主體,包括但不限於:
- Azure Kubernetes Service
- Azure 容器應用程式
- Azure 虛擬機器
- Azure Functions
- Azure App Service
- Azure Spring Apps
- Azure Service Fabric
受控識別會啟用多個安全案例,其中各種 Azure 服務可以彼此連線。 這些範例包含:
- 為 Azure Spring 應用程式中的應用程式建立系統指派的受控識別,以連線和查詢 Azure SQL 帳戶
- 搭配 Azure Kubernetes Service 和 Azure Functions 使用單一使用者指派的受控識別,以向 Azure AI 帳戶發出要求
- 使用 Azure Cosmos DB 帳戶的受控識別,以將金鑰儲存在 Azure Key Vault 中
如需詳細資訊,請參閱 Azure 資源的受控識別。
必要條件
- 具有有效訂用帳戶的 Azure 帳戶。 免費建立帳戶。
在 Azure Cloud Shell 中使用 Bash 環境。 如需詳細資訊,請參閱 Azure Cloud Shell 中的 Bash 快速入門。
若要在本地執行 CLI 參考命令,請安裝 Azure CLI。 若您在 Windows 或 macOS 上執行,請考慮在 Docker 容器中執行 Azure CLI。 如需詳細資訊,請參閱〈如何在 Docker 容器中執行 Azure CLI〉。
如果您使用的是本機安裝,請使用 az login 命令,透過 Azure CLI 來登入。 請遵循您終端機上顯示的步驟,完成驗證程序。 如需其他登入選項,請參閱使用 Azure CLI 登入。
出現提示時,請在第一次使用時安裝 Azure CLI 延伸模組。 如需擴充功能詳細資訊,請參閱使用 Azure CLI 擴充功能。
執行 az version 以尋找已安裝的版本和相依程式庫。 若要升級至最新版本,請執行 az upgrade。
- 如果您選擇在本機使用 Azure PowerShell:
- 安裝最新版的 Az PowerShell 模組。
- 使用 Connect-AzAccount Cmdlet 連線至 Azure 帳戶。
- 如果您選擇使用 Azure Cloud Shell:
- 請參閱 Azure Cloud Shell 概觀 以取得詳細資訊。
使用系統指派的受控識別建立 Azure 服務
使用系統指派的受控識別建立新的 Azure 服務。 本節會建立 Azure 容器執行個體資源。
使用
az container create來建立新的容器執行個體。 使用assign-identity參數,將帳戶設定為使用系統指派的受控識別。az container create \ --resource-group "<name-of-existing-resource-group>" \ --name "<name-of-new-container>" \ --image mcr.microsoft.com/dotnet/samples:aspnetapp-chiseled \ --cpu 1 \ --memory 2 \ --assign-identity使用
az container show和 JMESPath 查詢,取得系統指派的受控識別的詳細資料。az container show \ --resource-group "<name-of-existing-resource-group>" \ --name "<name-of-existing-container>" \ --query "identity"檢閱命令的輸出。 它應該包含身分識別和租用戶的唯一識別碼。
{
  "principalId": "aaaaaaaa-bbbb-cccc-1111-222222222222",
  "tenantId": "aaaabbbb-0000-cccc-1111-dddd2222eeee",
  "type": "SystemAssigned",
  "userAssignedIdentities": null
}
建立新的 Bicep 檔案來定義新的容器執行個體。 將檔案命名為 container-instance.bicep。 設定容器執行個體的以下屬性:
值 name使用名為 instanceName的參數location設定為資源群組的位置 identity.typeSystemAssignedproperties.osTypeLinuxproperties.containers[0].nameaspnet-sampleproperties.containers[0].properties.imagemcr.microsoft.com/dotnet/samples:aspnetapp-chiseledproperties.containers[0].properties.resources.requests.cpu1properties.containers[0].properties.resources.requests.memoryInGB2metadata description = 'Create Azure Container Instance resource with system-assigned managed identity.' @description('Name of the Azure Container Instances resource.') param instanceName string resource instance 'Microsoft.ContainerInstance/containerGroups@2023-05-01' = { name: instanceName location: resourceGroup().location identity: { type: 'SystemAssigned' } properties: { osType: 'Linux' containers: [ { name: 'aspnet-sample' properties: { image: 'mcr.microsoft.com/dotnet/samples:aspnetapp-chiseled' resources: { requests: { cpu: 1 memoryInGB: 2 } } } } ] } } output systemAssignedIdentity object = instance.identity建立名為 container-instance.
bicepparam的新 Bicep 參數檔案。 在此參數檔案中,使用instanceName參數為您的容器執行個體建立唯一名稱。using './container-instance.bicep' param instanceName = '<name-of-new-container-instance>'使用
az deployment group create部署 Bicep 範本。 指定 Bicep 範本、參數檔案和 Azure 資源群組的名稱。az deployment group create \ --resource-group "<name-of-existing-resource-group>" \ --parameters "container-instance.bicepparam" \ --template-file "container-instance.bicep"檢閱部署的輸出。 輸出包含
properties.outputs.systemAssignedIdentity.value屬性中容器執行個體的識別物件。{ "principalId": "aaaaaaaa-bbbb-cccc-1111-222222222222", "tenantId": "aaaabbbb-0000-cccc-1111-dddd2222eeee", "type": "SystemAssigned" }
登入 Azure 入口網站 (https://portal.azure.com)。
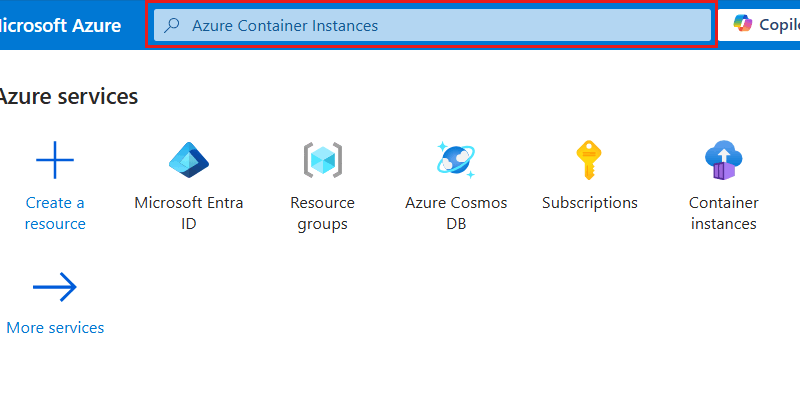
在全域搜尋列中輸入 Azure 容器執行個體。
在 [服務] 中,選取 [容器執行個體]。
![在搜尋功能表中選取的 [容器執行個體] 選項的螢幕擷取畫面。](../../includes/media/managed-identities/search-results-container-instances.png)
在 [容器執行個體] 窗格中,選取 [建立]。
![Azure 容器執行個體窗格內 [建立] 選項的螢幕擷取畫面。](../../includes/media/managed-identities/create-container-instance.png)
在 [基本] 窗格中,設定下列選項,然後選取 [檢閱 + 建立]:
值 訂用帳戶 選取您的 Azure 訂用帳戶 資源群組 建立新的資源群組,或選取現有的資源群組 容器名稱 提供全域唯一名稱 區域 為您的訂用帳戶選取支援的 Azure 區域 ![Azure 容器執行個體資源建立 [基本] 窗格的螢幕擷取畫面。](../../includes/media/managed-identities/basics-pane-container-instance.png)
提示
您可以將任何未指定的選項保留為預設值。
在 [檢閱 + 建立] 窗格中,等候您的帳戶驗證順利完成,然後選取 [建立]。
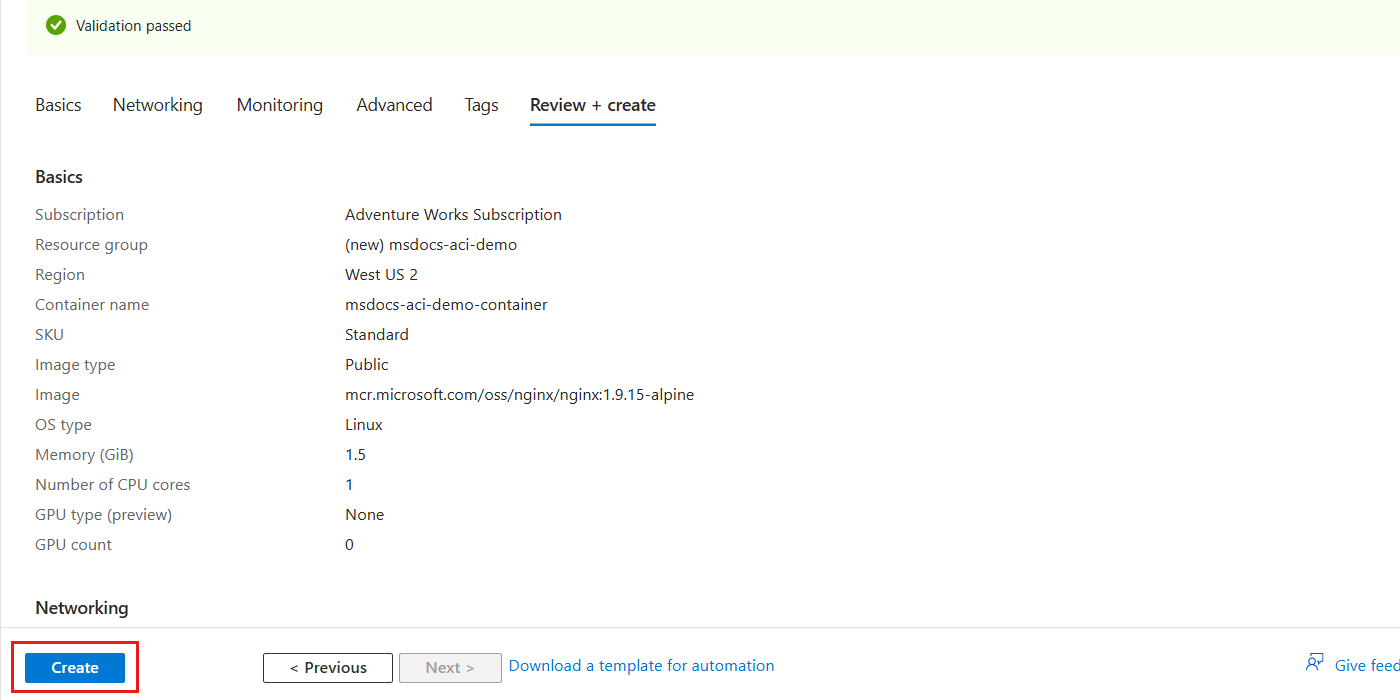
入口網站會自動流覽至 [部署] 窗格。 等待部署完成。
部署完成後,選取 [移至資源] 以瀏覽至新的 Azure 容器執行個體資源。
![已完整部署 Azure 容器執行個體資源的螢幕擷取畫面,其中已醒目提示 [移至資源] 選項。](../../includes/media/managed-identities/deployment-finalized-container-instance.png)
在新容器執行個體的窗格內,選取服務功能表 [設定] 區段內的 [身分識別]。
![容器執行個體服務功能表中 [身分識別] 選項的螢幕擷取畫面。](../../includes/media/managed-identities/settings-identity-option-container-instance.png)
在 [身分識別] 窗格中,將 [狀態] 選項設定為 [開啟],以啟用系統指派的受控識別。 然後,選取 [儲存] 並解決任何認可變更的提示。
![將系統指派的受控識別的狀態設定為 [開啟] 的螢幕擷取畫面。](../../includes/media/managed-identities/enable-system-assigned-managed-identity.png)
系統指派的受控識別準備就緒後,檢閱 [物件 (主體) ID] 屬性。 該屬性值是身分識別的唯一識別碼。
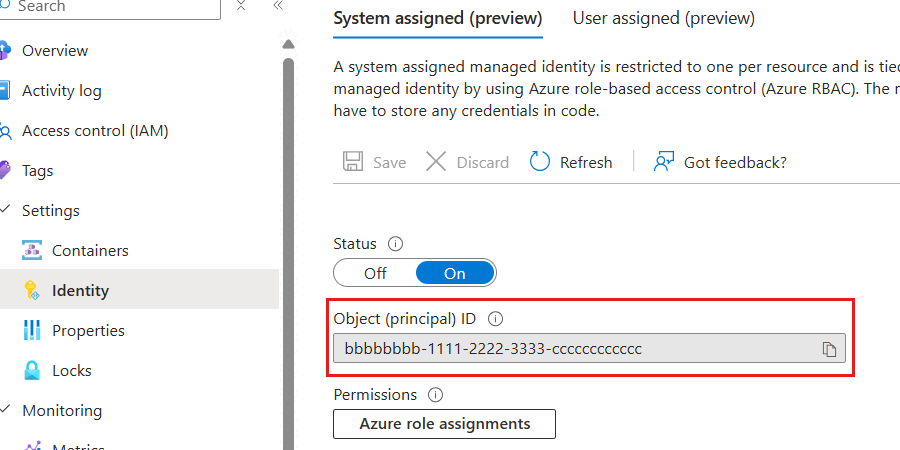
提示
在這裡範例螢幕擷取畫面中,系統指派的受控識別的唯一識別碼是
bbbbbbbb-1111-2222-3333-cccccccccccc。
使用
New-AzContainerInstanceObject建立代表容器的物件,並將其儲存在名為$container的變數中。 然後,使用該容器物件建立具有New-AzContainerGroup的新容器執行個體。 將IdentityType參數設定為SystemAssigned,進而將帳戶設定為使用系統指派的受控識別。$parameters = @{ Name = "aspnet-sample" Image = "mcr.microsoft.com/dotnet/samples:aspnetapp-chiseled" RequestCpu = 1 RequestMemoryInGb = 2 } $container = New-AzContainerInstanceObject @parameters $parameters = @{ ResourceGroupName = "<name-of-existing-resource-group>" Name = "<name-of-new-container>" Container = $container OsType = "Linux" Location = "<azure-region>" IdentityType = "SystemAssigned" } New-AzContainerGroup @parameters使用
Get-AzContainerGroup和Format-List並僅選取Identity屬性,以取得系統指派的受控識別的詳細資料。$parameters = @{ ResourceGroupName = "<name-of-existing-resource-group>" Name = "<name-of-existing-container>" } Get-AzContainerGroup @parameters | Format-List Identity檢閱命令的輸出。 它應該包含身分識別和租用戶的唯一識別碼。
Identity : {
             "principalId": "aaaaaaaa-bbbb-cccc-1111-222222222222",
             "tenantId": "aaaabbbb-0000-cccc-1111-dddd2222eeee",
             "type": "SystemAssigned"
           }
建立使用者指派的受控識別
建立使用者指派的受控識別,以可攜式方式與一或多個 Azure 服務搭配使用。
使用
az identity create,以在 Azure 資源群組中建立新的使用者指派的受控識別。az identity create \ --resource-group "<name-of-existing-resource-group>" \ --name "<name-of-new-managed-identity>"使用
az identity list取得資源群組中使用者指派的受控識別清單az identity list \ --resource-group "<name-of-existing-resource-group>"檢閱命令的輸出。 記錄
id欄位的值,因為此完整資源識別碼會用來將使用者指派的受控識別指派給您的 Azure 資源。{ "clientId": "11112222-bbbb-3333-cccc-4444dddd5555", "id": "/subscriptions/aaaa0a0a-bb1b-cc2c-dd3d-eeeeee4e4e4e/resourcegroups/msdocs-identity-example/providers/Microsoft.ManagedIdentity/userAssignedIdentities/msdocs-identity-example-user-assigned", "location": "<azure-location>", "name": "msdocs-identity-example-user-assigned", "principalId": "cccccccc-dddd-eeee-3333-444444444444", "resourceGroup": "msdocs-identity-example", "systemData": null, "tags": {}, "tenantId": "aaaabbbb-0000-cccc-1111-dddd2222eeee", "type": "Microsoft.ManagedIdentity/userAssignedIdentities" }注意
在此範例中,
id值會是/subscriptions/aaaa0a0a-bb1b-cc2c-dd3d-eeeeee4e4e4e/resourcegroups/msdocs-identity-example/providers/Microsoft.ManagedIdentity/userAssignedIdentities/msdocs-identity-example-user-assigned。 此範例會使用虛構的數據,而且您的標識符會與這個範例不同。
建立 Bicep 檔案來定義使用者指派的受控識別,並將檔案命名為 user-assigned-managed-identity.bicep。 設定以下最小屬性:
值 name使用名為 identityName的選擇性參數,並產生唯一預設值location設定為資源群組的位置 metadata description = 'Create a user-assigned managed identity.' param identityName string = uniqueString(subscription().id, resourceGroup().id) resource identity 'Microsoft.ManagedIdentity/userAssignedIdentities@2023-01-31' = { name: identityName location: resourceGroup().location } output id string = identity.id output name string = identity.name使用
az deployment group create部署 Bicep 範本。 指定 Bicep 範本和 Azure 資源群組的名稱。az deployment group create \ --resource-group "<name-of-existing-resource-group>" \ --template-file "user-assigned-managed-identity.bicep"檢閱部署的輸出。 輸出包含
properties.outputs.name.value屬性中受控識別的唯一識別碼。 請記錄此值,因為本指南稍後建立新的 Azure 資源時需要使用。{ "type": "String", "value": "msdocs-identity-example-user-assigned" }注意
在此範例中,
name.value會是msdocs-identity-example-user-assigned。 此範例會使用虛構的數據,而且您的標識符會與這個範例不同。
在全域搜尋列中,輸入 [受控識別]。
在 [服務] 中,選取 [受控識別]。
![在搜尋功能表中選取的 [受控識別] 選項的螢幕擷取畫面。](../../includes/media/managed-identities/search-results-managed-identities.png)
在 [容器執行個體] 窗格中,選取 [建立]。
![受控識別窗格內 [建立] 選項的螢幕擷取畫面。](../../includes/media/managed-identities/create-managed-identity.png)
在 [基本] 窗格中,設定下列選項,然後選取 [檢閱 + 建立]:
值 訂用帳戶 選取您的 Azure 訂用帳戶 資源群組 建立新的資源群組,或選取現有的資源群組 區域 為您的訂用帳戶選取支援的 Azure 區域 名稱 提供全域唯一名稱 ![受控識別資源建立 [基本] 窗格的螢幕擷取畫面。](../../includes/media/managed-identities/basics-pane-managed-identity.png)
在 [檢閱 + 建立] 窗格中,等候您的帳戶驗證順利完成,然後選取 [建立]。
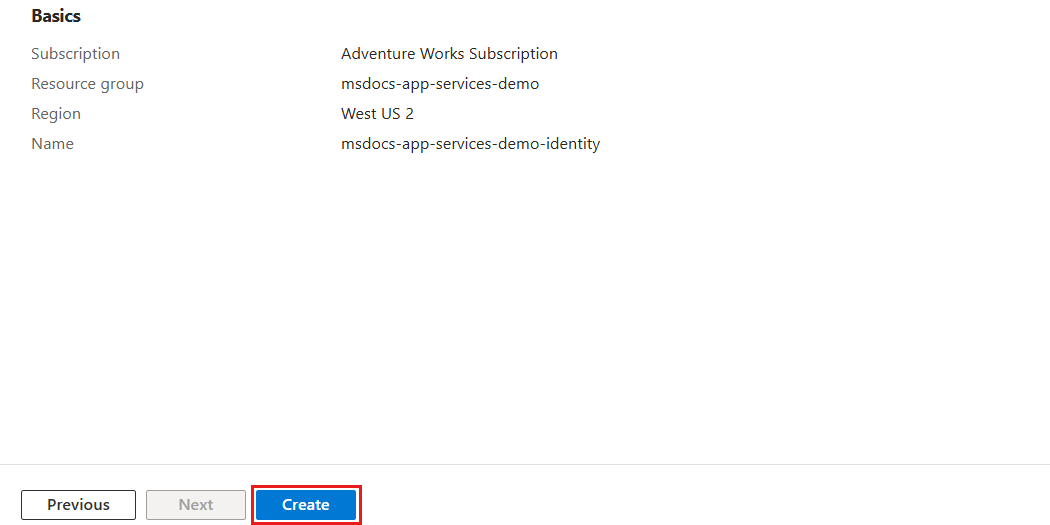
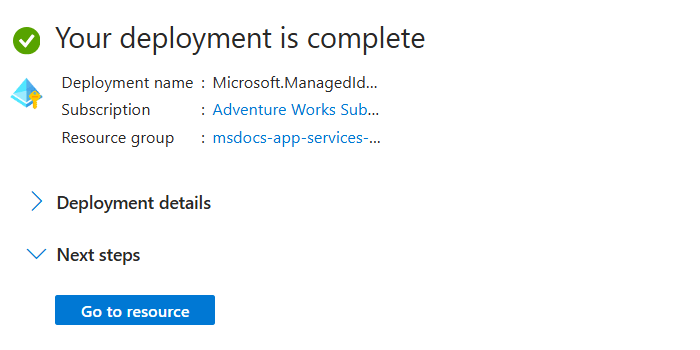
入口網站會自動流覽至 [部署] 窗格。 等待部署完成。
等待受控識別的部署完成。
使用 Azure 資源群組中的
New-AzUserAssignedIdentity,建立新的使用者指派的受控識別。$parameters = @{ ResourceGroupName = "<name-of-existing-resource-group>" Name = "<name-of-new-managed-identity>" Location = "<azure-region>" } New-AzUserAssignedIdentity @parameters使用
Get-AzUserAssignedIdentity,以取得資源群組中使用者指派的受控識別清單。$parameters = @{ ResourceGroupName = "<name-of-existing-resource-group>" } Get-AzUserAssignedIdentity @parameters | Format-List Name, Id檢閱命令的輸出。 記錄
Id欄位的值,因為此完整資源識別碼會用來將使用者指派的受控識別指派給您的 Azure 資源。Name : msdocs-identity-example-user-assigned Id : /subscriptions/aaaa0a0a-bb1b-cc2c-dd3d-eeeeee4e4e4e/resourcegroups/msdocs-identity-example/providers/Microsoft.ManagedIdentity/userAssignedIdentities/msdocs-identity-example-user-assigned注意
在此範例中,
Id值會是/subscriptions/aaaa0a0a-bb1b-cc2c-dd3d-eeeeee4e4e4e/resourcegroups/msdocs-identity-example/providers/Microsoft.ManagedIdentity/userAssignedIdentities/msdocs-identity-example-user-assigned。 此範例會使用虛構的數據,而且您的標識符會與這個範例不同。
以使用者指派的受控識別建立 Azure 服務
將先前建立的使用者指派的受控識別指派至新的 Azure 託管服務。 本節會建立 Azure App Service Web 應用程式資源。
使用
az appservice plan create建立新的 App Service 方案。az appservice plan create \ --resource-group "<name-of-existing-resource-group>" \ --name "<name-of-new-plan>"使用
az webapp create將使用者指派的受控識別指派至新的 Web 應用程式。 使用本指南稍早記錄的id欄位作為ssign-identity參數的值。az webapp create \ --resource-group "<name-of-existing-resource-group>" \ --name "<name-of-existing-web-app>" \ --plan "<name-of-existing-plan>" \ --assign-identity "<resource-id-recorded-earlier>"使用
az webapp show和 JMESPath 查詢,取得指派至此帳戶的所有身分識別詳細資料。az webapp show \ --resource-group "<name-of-existing-resource-group>" \ --name "<name-of-existing-account>" \ --query "identity"檢閱命令的輸出。 其應包含使用者指派的受控識別。
{
  "principalId": null,
  "tenantId": null,
  "type": "UserAssigned",
  "userAssignedIdentities": {
    "/subscriptions/aaaa0a0a-bb1b-cc2c-dd3d-eeeeee4e4e4e/resourcegroups/msdocs-identity-example/providers/Microsoft.ManagedIdentity/userAssignedIdentities/msdocs-identity-example-user-assigned": {
      "clientId": "11112222-bbbb-3333-cccc-4444dddd5555",
      "principalId": "cccccccc-dddd-eeee-3333-444444444444"
    }
  }
}
建立另一個名為 app-service-web-app.bicep 的 Bicep 檔案,並定義 Azure App Service 方案和 Web 應用程式。 設定這些資源的以下屬性:
資源 值 name現有的受控識別 使用名為 identityName的參數nameApp Service 方案 使用名為 planName的參數locationApp Service 方案 設定為資源群組的位置 nameWeb 應用程式 使用名為 webAppName的參數locationWeb 應用程式 設定為資源群組的位置 identity.typeUserAssignedidentity.userAssignedIdentities.{identity.id}{}properties.serverFarmIdplan.idmetadata description = 'Creates an Azure App Service plan and web app with a user-assigned managed identity.' @description('The name of the app service plan.') param planName string @description('The name of the web app.') param webAppName string @description('The name of the user-assigned managed identity.') param identityName string resource identity 'Microsoft.ManagedIdentity/userAssignedIdentities@2023-01-31' existing = { name: identityName } resource plan 'Microsoft.Web/serverfarms@2023-12-01' = { name: planName location: resourceGroup().location } resource webApp 'Microsoft.Web/sites@2023-12-01' = { name: webAppName location: resourceGroup().location identity: { type: 'UserAssigned' userAssignedIdentities: { '${identity.id}': {} } } properties: { serverFarmId: plan.id } } output userAssignedIdentity object = webApp.identity建立名為 app-service-web-app.
bicepparam的 Bicep 參數檔案。 在此參數檔案中,分別使用planName和webAppName參數,為您的 Web 應用程式和方案建立唯一名稱。 然後,提供使用者指派的受控識別名稱做為identityName參數的值。using './app-service-web-app.bicep' param planName = '<name-of-new-app-service-plan>' param webAppName = '<name-of-new-web-app>' param identityName = '<name-of-existing-managed-identity>'使用
az deployment group create部署 Bicep 範本。 指定 Bicep 範本、參數檔案和 Azure 資源群組的名稱。az deployment group create \ --resource-group "<name-of-existing-resource-group>" \ --parameters "app-service-web-app.bicepparam" \ --template-file "app-service-web-app.bicep"檢閱部署的輸出。 輸出包含
properties.outputs.userAssignedIdentity.value屬性中容器執行個體的識別物件。{ "type": "UserAssigned", "userAssignedIdentities": { "/subscriptions/aaaa0a0a-bb1b-cc2c-dd3d-eeeeee4e4e4e/resourcegroups/msdocs-identity-example/providers/Microsoft.ManagedIdentity/userAssignedIdentities/msdocs-identity-example-user-assigned": { "clientId": "11112222-bbbb-3333-cccc-4444dddd5555", "principalId": "cccccccc-dddd-eeee-3333-444444444444" } } }
在全域搜尋列中輸入 [Web 應用程式]。
在 [服務] 中,選取 [應用程式服務]。
![在搜尋功能表中選取的 [應用程式服務] 選項的螢幕擷取畫面。](../../includes/media/managed-identities/search-results-app-services.png)
在 [應用程式服務] 窗格中,選取 [建立],然後選取 [Web 應用程式]。
![Azure App Service 窗格內 [建立] 和 [Web 應用程式] 選項的螢幕擷取畫面。](../../includes/media/managed-identities/create-app-service-web-app.png)
在 [基本] 窗格中,設定下列選項,然後選取 [檢閱 + 建立]:
值 訂用帳戶 選取您的 Azure 訂用帳戶 資源群組 建立新的資源群組,或選取現有的資源群組 名稱 提供全域唯一名稱 計劃 建立新的方案,或選取現有方案 ![Web 應用程式資源建立 [基本] 窗格的螢幕擷取畫面。](../../includes/media/managed-identities/basics-pane-web-app.png)
在 [檢閱 + 建立] 窗格中,等候您的帳戶驗證順利完成,然後選取 [建立]。
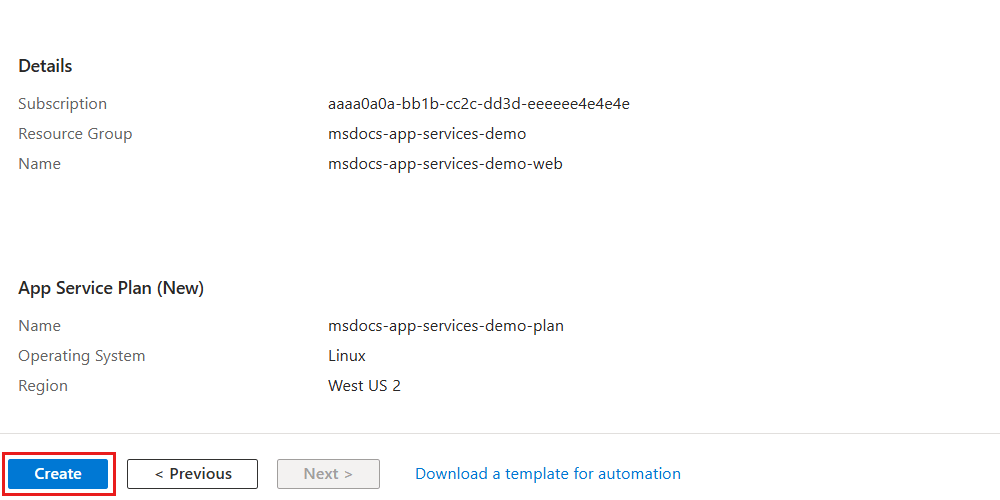
入口網站會自動流覽至 [部署] 窗格。 等待部署完成。
部署完成後,選取 [移至資源] 以瀏覽至新的 Azure 容器執行個體資源。
![已完整部署 Azure App Service Web 應用程式資源的螢幕擷取畫面,其中已醒目提示 [移至資源] 選項。](../../includes/media/managed-identities/deployment-finalized-web-app.png)
在新容器執行個體的窗格內,選取服務功能表 [設定] 區段內的 [身分識別]。
![Web 應用程式服務功能表中 [身分識別] 選項的螢幕擷取畫面。](../../includes/media/managed-identities/settings-identity-option-web-app.png)
在 [身分識別] 窗格上,選取 [使用者指派] 選項。
![Web 應用程式的 [身分識別] 窗格中 [使用者指派] 選項的螢幕擷取畫面。](../../includes/media/managed-identities/user-assigned-managed-identity-option.png)
選取 [新增] 開啟對話方塊,以指派現有的使用者指派的受控識別。 在對話方塊中,選取您現有的使用者指派的受控識別,然後選取 [新增]。
![Web 應用程式的 [身分識別] 窗格中 [新增] 選項和 [新增使用者指派的受控識別] 對話方塊的螢幕擷取畫面。](../../includes/media/managed-identities/existing-user-assigned-managed-identity.png)
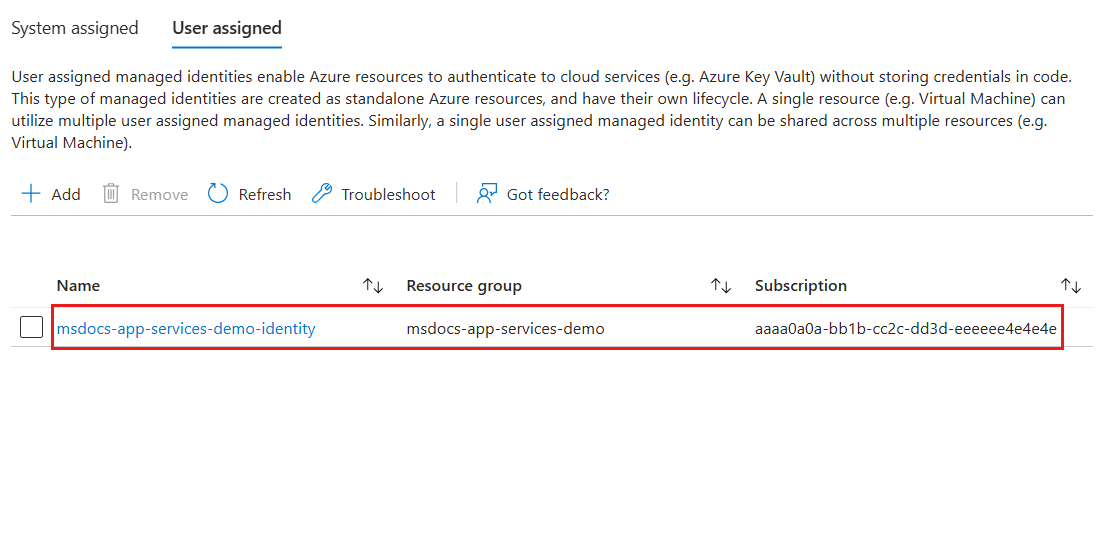
最後,檢閱與 Web 應用程式關聯的使用者指派的受控識別的清單。 其應包含身分識別的名稱、資源群組名稱和訂用帳戶識別碼。
使用
New-AzWebApp建立新的 Azure App Service Web 應用程式。$parameters = @{ ResourceGroupName = "<name-of-existing-resource-group>" Name = "<name-of-new-web-app>" Location = "<azure-region>" } New-AzWebApp @parameters修補新建立的 Web 應用程式,將
identity.type屬性設定為UserAssigned,並將現有的使用者指派的受控識別新增至identity.userAssignedIdentities屬性。 若要完成這項工作,請先提供本指南稍早記錄的做為identityId命令介面變數的值的id欄位。 然後,建構酬載物件,並將其轉換為 JSON。 最後,搭配使用Invoke-AzRestMethod和PATCHHTTP 指令動詞來更新現有的 Web 應用程式。$identityId = "<resource-id-recorded-earlier>" $payload = @{ identity = @{ type = "UserAssigned" userAssignedIdentities = @{ "$identityId" = @{} } } } | ConvertTo-Json -Depth 3 $parameters = @{ ResourceGroupName = "<name-of-existing-resource-group>" Name = "<name-of-existing-web-app>" ResourceProviderName = 'Microsoft.Web' ResourceType = 'sites' ApiVersion = '2023-12-01' Method = 'PATCH' Payload = $payload } Invoke-AzRestMethod @parameters使用
Get-AzWebApp、Select-Object和ConvertTo-Json並僅選取Identity屬性,以取得指派至 Web 應用程式的所有身分識別的詳細資料。$parameters = @{ ResourceGroupName = "<name-of-existing-resource-group>" Name = "<name-of-existing-web-app>" } Get-AzWebApp @parameters | Select-Object Identity | ConvertTo-Json -Depth 3檢閱命令的輸出。 它應該包含身分識別和租用戶的唯一識別碼。
{
  "Identity": {
    "Type": "UserAssigned",
    "TenantId": null,
    "PrincipalId": null,
    "UserAssignedIdentities": {
      "/subscriptions/aaaa0a0a-bb1b-cc2c-dd3d-eeeeee4e4e4e/resourcegroups/msdocs-identity-example/providers/Microsoft.ManagedIdentity/userAssignedIdentities/msdocs-identity-example-user-assigned": {
        "PrincipalId": "cccccccc-dddd-eeee-3333-444444444444",
        "ClientId": "11112222-bbbb-3333-cccc-4444dddd5555"
      }
    }
  }
}

