如何在管線中執行超參數微調
適用於: Azure CLI ml 延伸模組 v2 (目前)
 Python SDK azure-ai-ml v2 (目前)
在本文中,您將了解如何使用 Azure Machine Learning CLI v2 或適用於 Python v2 的 Azure Machine Learning SDK,將 Azure Machine Learning 管線中的超參數微調自動化。
超參數是可調整的參數,可讓您控制模型定型流程。 超參數微調是尋找能產生最佳效能之超參數設定的程序。 Azure Machine Learning 可讓您將超參數微調自動化,並平行執行實驗,以有效率地最佳化超參數。
必要條件
- 擁有 Azure Machine Learning 帳戶和工作區。
- 了解 Azure Machine Learning 管線和超參數微調模型。
建立和執行超參數微調管線
下列範例來自在 Azure Machine Learning 範例存放庫中使用管線中的整理 (hyperdrive) 執行管線作業。 如需使用元件建立管線的詳細資訊,請參閱使用元件搭配 Azure Machine Learning CLI 建立和執行機器學習管線。
使用超參數輸入建立命令元件
Azure Machine Learning 管線必須具有使用超參數輸入的命令元件。 下列範例專案中的 train.yml 檔案會定義具有 c_value、kernel 和 coef 超參數輸入的 trial 元件,並執行位於 ./train-src 資料夾中的原始程式碼。
$schema: https://azuremlschemas.azureedge.net/latest/commandComponent.schema.json
type: command

name: train_model
display_name: train_model
version: 1

inputs:
  data:
    type: uri_folder
  c_value:
    type: number
    default: 1.0
  kernel:
    type: string
    default: rbf
  degree:
    type: integer
    default: 3
  gamma:
    type: string
    default: scale
  coef0:
    type: number
    default: 0
  shrinking:
    type: boolean
    default: false
  probability:
    type: boolean
    default: false
  tol:
    type: number
    default: 1e-3
  cache_size:
    type: number
    default: 1024
  verbose:
    type: boolean
    default: false
  max_iter:
    type: integer
    default: -1
  decision_function_shape:
    type: string
    default: ovr
  break_ties:
    type: boolean
    default: false
  random_state:
    type: integer
    default: 42

outputs:
  model_output:
    type: mlflow_model
  test_data:
    type: uri_folder

code: ./train-src

environment: azureml://registries/azureml/environments/sklearn-1.5/labels/latest

command: >-
  python train.py
  --data ${{inputs.data}}
  --C ${{inputs.c_value}}
  --kernel ${{inputs.kernel}}
  --degree ${{inputs.degree}}
  --gamma ${{inputs.gamma}}
  --coef0 ${{inputs.coef0}}
  --shrinking ${{inputs.shrinking}}
  --probability ${{inputs.probability}}
  --tol ${{inputs.tol}}
  --cache_size ${{inputs.cache_size}}
  --verbose ${{inputs.verbose}}
  --max_iter ${{inputs.max_iter}}
  --decision_function_shape ${{inputs.decision_function_shape}}
  --break_ties ${{inputs.break_ties}}
  --random_state ${{inputs.random_state}}
  --model_output ${{outputs.model_output}}
  --test_data ${{outputs.test_data}}
建立試用元件原始程式碼
此範例的原始程式碼是單一 train.py 檔案。 此程式碼會在整理作業的每個試用版中執行。
# imports
import os
import mlflow
import argparse

import pandas as pd
from pathlib import Path

from sklearn.svm import SVC
from sklearn.model_selection import train_test_split

# define functions
def main(args):
    # enable auto logging
    mlflow.autolog()

    # setup parameters
    params = {
        "C": args.C,
        "kernel": args.kernel,
        "degree": args.degree,
        "gamma": args.gamma,
        "coef0": args.coef0,
        "shrinking": args.shrinking,
        "probability": args.probability,
        "tol": args.tol,
        "cache_size": args.cache_size,
        "class_weight": args.class_weight,
        "verbose": args.verbose,
        "max_iter": args.max_iter,
        "decision_function_shape": args.decision_function_shape,
        "break_ties": args.break_ties,
        "random_state": args.random_state,
    }

    # read in data
    df = pd.read_csv(args.data)

    # process data
    X_train, X_test, y_train, y_test = process_data(df, args.random_state)

    # train model
    model = train_model(params, X_train, X_test, y_train, y_test)
    # Output the model and test data
    # write to local folder first, then copy to output folder

    mlflow.sklearn.save_model(model, "model")

    from distutils.dir_util import copy_tree

    # copy subdirectory example
    from_directory = "model"
    to_directory = args.model_output

    copy_tree(from_directory, to_directory)

    X_test.to_csv(Path(args.test_data) / "X_test.csv", index=False)
    y_test.to_csv(Path(args.test_data) / "y_test.csv", index=False)


def process_data(df, random_state):
    # split dataframe into X and y
    X = df.drop(["species"], axis=1)
    y = df["species"]

    # train/test split
    X_train, X_test, y_train, y_test = train_test_split(
        X, y, test_size=0.2, random_state=random_state
    )

    # return split data
    return X_train, X_test, y_train, y_test


def train_model(params, X_train, X_test, y_train, y_test):
    # train model
    model = SVC(**params)
    model = model.fit(X_train, y_train)

    # return model
    return model


def parse_args():
    # setup arg parser
    parser = argparse.ArgumentParser()

    # add arguments
    parser.add_argument("--data", type=str)
    parser.add_argument("--C", type=float, default=1.0)
    parser.add_argument("--kernel", type=str, default="rbf")
    parser.add_argument("--degree", type=int, default=3)
    parser.add_argument("--gamma", type=str, default="scale")
    parser.add_argument("--coef0", type=float, default=0)
    parser.add_argument("--shrinking", type=bool, default=False)
    parser.add_argument("--probability", type=bool, default=False)
    parser.add_argument("--tol", type=float, default=1e-3)
    parser.add_argument("--cache_size", type=float, default=1024)
    parser.add_argument("--class_weight", type=dict, default=None)
    parser.add_argument("--verbose", type=bool, default=False)
    parser.add_argument("--max_iter", type=int, default=-1)
    parser.add_argument("--decision_function_shape", type=str, default="ovr")
    parser.add_argument("--break_ties", type=bool, default=False)
    parser.add_argument("--random_state", type=int, default=42)
    parser.add_argument("--model_output", type=str, help="Path of output model")
    parser.add_argument("--test_data", type=str, help="Path of output model")

    # parse args
    args = parser.parse_args()

    # return args
    return args


# run script
if __name__ == "__main__":
    # parse args
    args = parse_args()

    # run main function
    main(args)
注意
請確定在試用元件原始程式碼中記錄計量,其名稱與管線檔案中的 primary_metric 值完全相同。 此範例使用 mlflow.autolog(),這是追蹤機器學習實驗的建議方式。 如需 MLflow 的詳細資訊,請參閱使用 MLflow 追蹤 ML 實驗和模型。
使用超參數整理步驟建立管線
假設在 train.yml 中定義的命令元件,下列程式碼會建立雙步驟 train 和 predict 管線定義檔案。 在 sweep_step 中,必要的步驟類型為 sweep,而 trial 元件的 c_value、kernel 和 coef 超參數輸入會新增至 search_space。
下列範例會醒目提示超參數微調 sweep_step。
$schema: https://azuremlschemas.azureedge.net/latest/pipelineJob.schema.json
type: pipeline
display_name: pipeline_with_hyperparameter_sweep
description: Tune hyperparameters using TF component
settings:
    default_compute: azureml:cpu-cluster
jobs:
  sweep_step:
    type: sweep
    inputs:
      data:
        type: uri_file
        path: wasbs://datasets@azuremlexamples.blob.core.windows.net/iris.csv
      degree: 3
      gamma: "scale"
      shrinking: False
      probability: False
      tol: 0.001
      cache_size: 1024
      verbose: False
      max_iter: -1
      decision_function_shape: "ovr"
      break_ties: False
      random_state: 42
    outputs:
      model_output:
      test_data:
    sampling_algorithm: random
    trial: ./train.yml
    search_space:
      c_value:
        type: uniform
        min_value: 0.5
        max_value: 0.9
      kernel:
        type: choice
        values: ["rbf", "linear", "poly"]
      coef0:
        type: uniform
        min_value: 0.1
        max_value: 1
    objective:
      goal: minimize
      primary_metric: training_f1_score
    limits:
      max_total_trials: 5
      max_concurrent_trials: 3
      timeout: 7200

  predict_step:
    type: command
    inputs:
      model: ${{parent.jobs.sweep_step.outputs.model_output}}
      test_data: ${{parent.jobs.sweep_step.outputs.test_data}}
    outputs:
      predict_result:
    component: ./predict.yml
如需完整整理作業結構描述,請參閱 CLI (v2) 整理作業 YAML 結構描述。
提交超參數微調管線作業
提交此管線作業之後,Azure Machine Learning 會多次執行 trial 元件,根據您在 sweep_step 中定義的搜尋空間和限制來整理超參數。
在工作室中檢視超參數微調結果
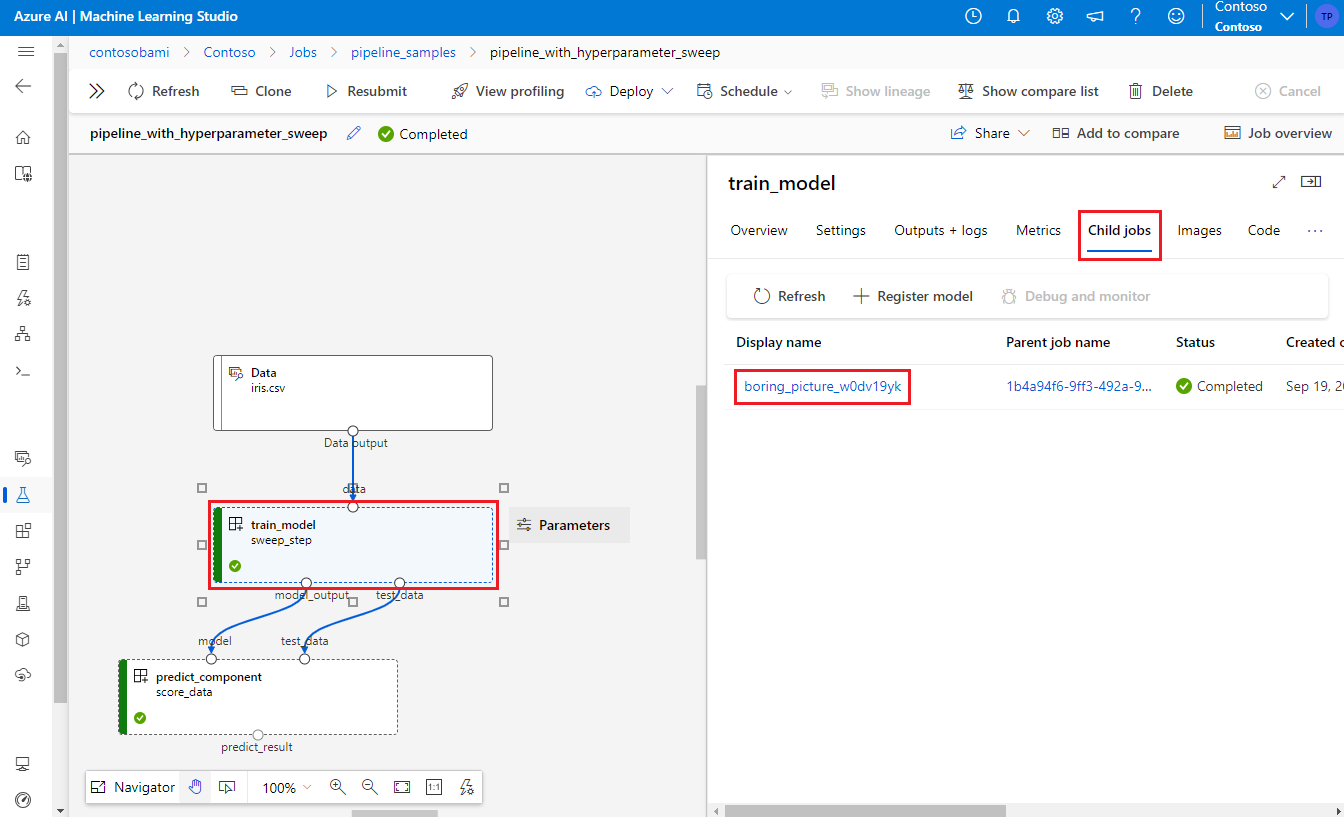
提交管線作業之後,SDK 或 CLI Widget 會提供 Azure Machine Learning 工作室 UI 中管線圖形的 Web URL 連結。
若要檢視超參數微調結果,請按兩下管線圖形中的整理步驟、在詳細資料面板中選取 [子作業] 索引標籤,然後選取子作業。
在子作業頁面上,選取 [試用版] 索引標籤,以查看並比較所有子執行的計量。 選取任何子執行,以查看該執行的詳細資料。
如果子執行失敗,您可以選取子執行頁面上的 [輸出 + 記錄] 索引標籤,以查看實用的偵錯資訊。

![子作業頁面的螢幕擷取畫面,其中包含 [試用版] 索引標籤。](media/how-to-use-sweep-in-pipeline/sweep-job.png?view=azureml-api-2)
![子執行 [輸出和記錄] 索引標籤的螢幕擷取畫面。](media/how-to-use-sweep-in-pipeline/child-run.png?view=azureml-api-2)