Ask for user input in Composer
APPLIES TO: Composer v1.x and v2.x
Bot Framework Composer makes it easy to collect and validate many data types, and handle instances when users input is invalid or unrecognized data.
Prerequisites
- Familiarity with dialogs, triggers and language generation.
- Install Composer.
Run the sample bot
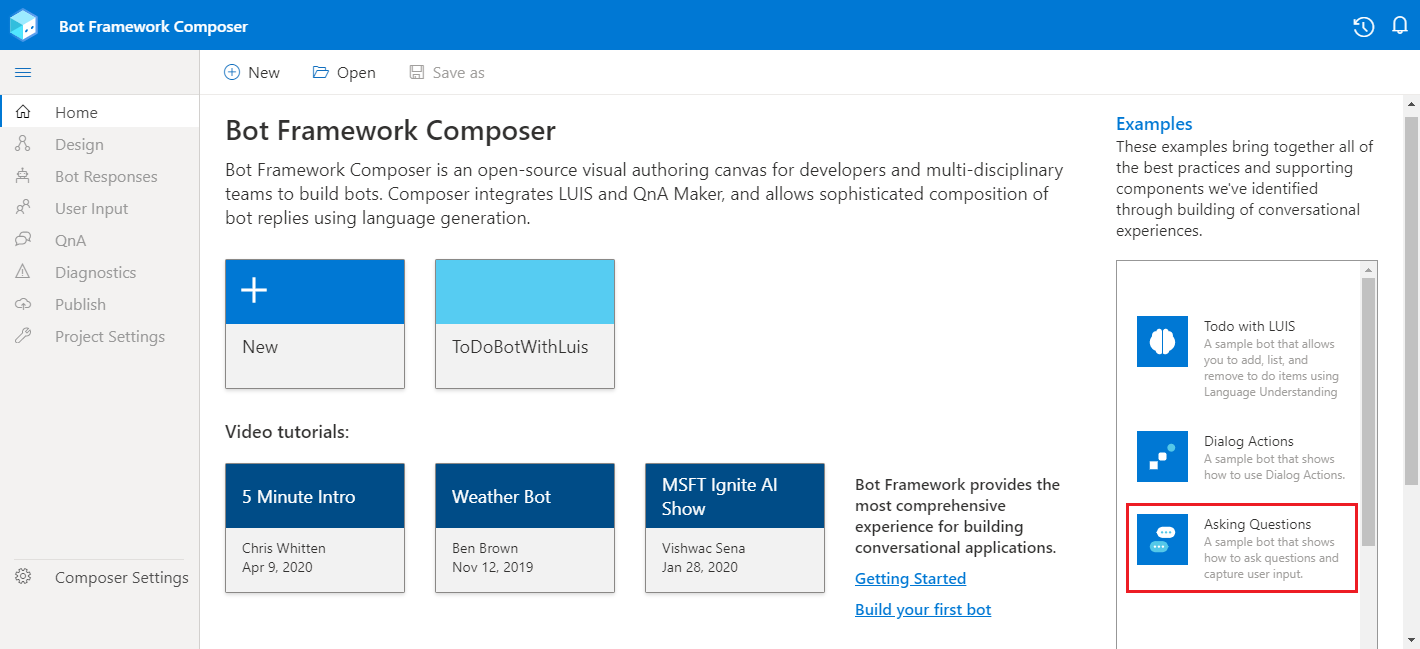
This section introduces the Asking Questions example (sample bot) that's used in this article to explain how to incorporate prompts for user input into your bot using Composer.
Do the following to get the Asking Questions example running in Composer:
- Clone the BotBuilder-Samples GitHub repository onto your machine.
- Within the
composer-samplesfolder, you'll find C# and JavaScript projects, choose a language and navigate into theprojectssubfolder. - In this folder, you'll find an
AskingQuestionsSampleproject that you can open in Composer. Open the project to load it. - After you load it in Composer, select Start Bot then Open in Web Chat to explore the sample interactively.
Now let's take a look to see how it works:
Select Create from the navigation pane.
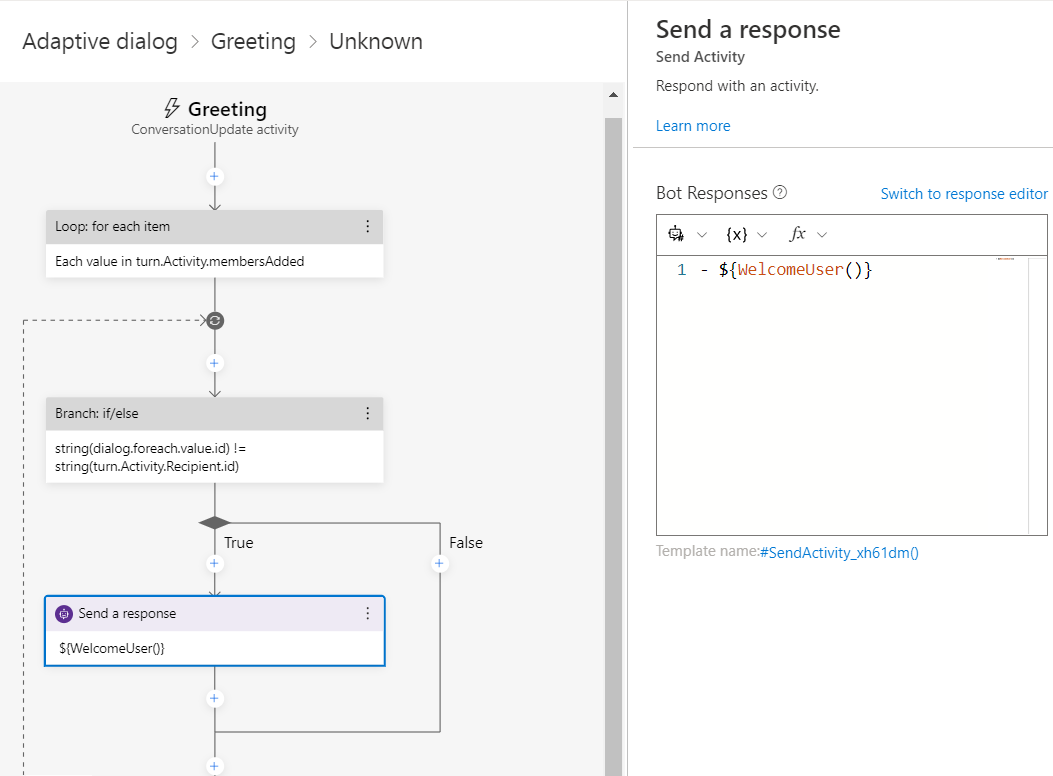
Select the Greeting trigger in the main dialog to get an idea of how this sample works.
In this sample, the Greeting trigger always runs first when the bot starts. This trigger executes the Send a response action. The Send a response action calls the WelcomeUser template:
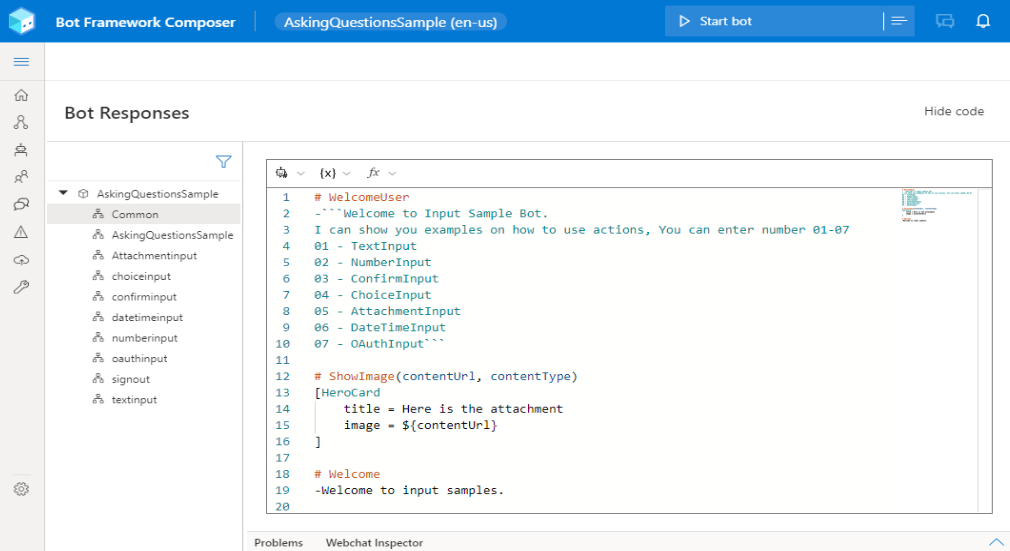
${WelcomeUser()}.To see what the WelcomeUser template does, select Bot Responses from the navigation pane and search for
#WelcomeUserin the Name column.When the user responds by typing in the name or number of the item they wish to select, the bot searches the user input for known patterns. When a pattern is found, the bot sends an event with the corresponding intent. That intent is captured by the Intent recognized trigger that was created to handle it.
For example, if the user enters "01" or "TextInput", the TextInput trigger handles that event and calls the TextInput dialog. The remaining steps in this section will walk you through this process.
Select the main dialog and look at the properties pane. By default, the Recognizer Type is set to Regular expression.
Navigate to the Common dialog under Bot Responses to see the template used to create a menu of options. Because the Regular expression recognizer is selected, users can respond with either the name of the input type or the number to test the associated example.
For example, if a user responds with "05" or "AttachmentInput", the bot will start the attachment input example.
In each of the following sections, you'll learn how to create each of these user input types, using the corresponding dialog as an example.
Prompt user for text input
The Text input prompts users for their name and then responds with a greeting using the name provided. This is demonstrated in the TextInput dialog.
You create a text input prompt by selecting the + icon in the authoring canvas and then selecting Text input from the Ask a question menu. Optionally, the next section details how to create an entire text input dialog.
Create a text input action
To create a text input action:
- Select the + icon and then select Text from the Ask a question menu.
- Enter
Hello, I'm Zoidberg. What is your name? (This can't be interrupted)into the Prompt for text field in the Properties pane. - Select the User input tab, then enter
user.nameinto the Property field. - Create a new action by selecting the + icon in the authoring canvas. Then select Send a response from the list of actions.
- Enter
Hello ${user.name}, nice to talk to you!into the response editor in the Properties pane.
Prompt user for number input
The NumberInput example prompts the user for their age and other numerical values using the Number input action.
As seen in the NumberInput dialog the user is prompted for two numbers: their age stored as user.age and the result of 2*2.2stored as a user.result. When using number prompts, you can set the Output format to either float or integer.
Create a number input action
To create a number input action:
Select the + icon in the authoring canvas. When the list of actions appear, select Number from the Ask a question menu.
- In the Bot Asks tab of the Properties pane, enter
What is your age? - Select the User Input tab, then enter
user.ageinto the Property field. - In the Output format field, enter
int(this.value). The default isfloat(this.value). - Select the Other tab, select Validation. Enter
Please input a number.into the Invalid Prompt field.
- In the Bot Asks tab of the Properties pane, enter
Create another action by selecting the + icon in the authoring canvas and selecting Send a response and enter
Hello, your age is ${user.age}!into the prompt field. This will cause the bot to respond back to the user with their age.Next, follow step 1 in this section to create another Number Input action.
- In the Bot Asks tab of the Properties pane, enter
2 * 2.2 equals? - Select the User Input tab then enter
user.resultinto the Property field. - Select the Other tab and select Validation. Enter
Please input a number.into the Invalid Prompt field.
- In the Bot Asks tab of the Properties pane, enter
Create a Branch: If/else action by selecting the + icon in the authoring canvas and selecting Branch: If/else from the Create a condition menu. In the properties panel, specify the condition and follow the Adaptive expressions syntax. The if-else action creates two branches. If the expression evaluates to
true, the actions on the True branch are processed; otherwise, the actions on the False branch are processed. After the appropriate branch completes, processing continues with the next action after the Branch: If/else action.Select the + icon in the True branch and select Send a response.
Enter
2 * 2.2 equals ${user.result}, that's right!into the prompt field. The will cause the bot to respond back to the user with "2 * 2.2 equals 4.4, that's right!".Create a conditional action by selecting the + icon in the False branch. This will execute when the user enters an invalid answer.
Create another action by selecting the + icon in the authoring canvas and selecting Send a response.
Enter
2 * 2.2 equals ${user.result}, that's wrong!into the prompt field.
Prompt user for confirmation input
Confirmation prompts are useful after you've asked the user a question and want to confirm their answer. Unlike the Multiple choice action that enables your bot to present the user with a list to choose from, confirmation prompts ask the user to make a binary (yes/no) decision.
Create a confirmation action
To create a confirmation action:
Select the + icon then select Confirmation from the Ask a question menu.
Enter
Would you like ice cream?in the Prompt field of the Properties pane.Switch to the User input tab.
Tip
You can also switch to the User input tab by selecting the User answers action in the authoring canvas.
Enter
user.confirmedin the Property field.Select the + icon in the authoring canvas and select Send a response.
Enter
confirmation: ${user.confirmed}into the prompt field.
Prompt user for multiple-choice input
Multiple choice enables you to present your users with a list of options to choose from.
Create a multiple-choice action
To create a prompt with a list of options that the user can choose from:
Select the + icon then select Multi-choice from the Ask a question menu.
Select Bot Asks tab and enter
Please select a value from below:in the Prompt with multi-choice field.Switch to the User input tab.
- Enter
user.stylein the Property field. - Scroll down to the Array of choices section and select one of the three options (simple choices, structured choices, expression) to add your choices.
- Enter
To define simple multi-choices, select simple choices, you can add the choices one at a time in the Array of choices field. Every time you add a choice option, make sure you press Enter. For example:
- Test1
- Test2
- Test3
To add additional data or value to the choice, select structured choices, then select Add and add the choices one at a time with the following properties.
Property Description Example Choice name The name of the choice and the value to return when this choice is selected. Test01Synonym (Optional) A list of synonyms to recognize in addition to the Choice namevalue.test1, test01Action Card action to define for this choice. See the example below. Read more in the botframework-schema CardAction reference doc. The following is an example of how to define an Action in JSON format:
{
    "type": "messageBack",
    "title": "Title",
    "image": "https://sec.ch9.ms/ch9/7ff5/e07cfef0-aa3b-40bb-9baa-7c9ef8ff7ff5/buildreactionbotframework_960.jpg",
    "displayText": "display text",
    "text": "Text"
}
If you want to configure a dynamic multiple-choice action with an array or a variable, select =Write an expression and enter the property name of the initialized array like
=user.name. This means any value from theuser.nameproperty will be returned dynamically.
Additional information: The User Input tab
The Output format field is set to
valueby default. This means the value, not the index will be returned; for this example that means any one of these three values will be returned: 'test1', 'test2', 'test3'.By default the locale is set to
en-us. The locale sets the language the recognizer should expect from the user (US English in this sample).By default the List style is set to
Auto. The List style sets the style for how the choice options are displayed. The table below describes the differences in appearance for the three choices:List style Description None No options are displayed. Auto Composer decides which style to use, usually suggested action buttons. Inline Separates options using the characters in the Inline separator field. List Displays options as list—as a numbered list if Include numbers is selected. SuggestedAction Displays options as suggested action buttons. HeroCard Displays a hero card with options as buttons within the card. There are three boxes related to inline separation, or how your bot separates the text of your choices:
- Inline separator - character used to separate individual choices when there are more than two choices, usually
,. - Inline or - separator used when there are only two choices, usually
or. - Inline or more - separator between last two choices when there are more than two options, usually
, or.
- Inline separator - character used to separate individual choices when there are more than two choices, usually
The Include numbers option allows you to use plain or numbered lists when the List Style is set to List.
File or attachment input
The Attachment Input example demonstrates how to enable users to upload images, videos, and other media. When running this example bot in the Emulator, and once this option is selected from the main menu, you'll be prompted to "Please send an image." Select the paperclip icon next to the text input area, and select an image file.
Create an attachment input action
To implement an Attachment Input action:
Select the + icon then select File or attachment from the Ask a question menu.
Enter
Please send an image.in the Prompt field of the Properties pane.Switch to the User Input tab ()
Enter
dialog.attachmentsin the Property field.Enter
allin the Output format field.Tip
You can set the Output format to
first(only the first attachment will be output even is multiple were selected) orall(all attachments will be output when multiple were selected).
Select the + icon in the authoring canvas and select Send a response.
Enter
-${ShowImage(dialog.attachments[0].contentUrl, dialog.attachments[0].contentType)}into the prompt field.
Date or time input
The DateTimeInput sample demonstrates how to get date and time information from your users using Date or time prompt.
Create a date time input action
To prompt a user for a date:
- Select the + icon then select Date or time from the Ask a question menu.
- Enter
Please enter a date.in the Prompt field of the Properties pane. - Switch to the User input tab and enter
user.datein the Property field. - Switch to the Other tab and enter
Please enter a date.in the Invalid Prompt field. - Select the + icon in the authoring canvas and select Send a response.
- Enter
You entered: ${user.date[0].value}.
Adjust prompt settings and validation
In the Properties pane under the Other tab, you can set user input validation rules using adaptive expressions and respond independently to user input to accommodate an unrecognized, invalid and Default value responses.
Important
The value to be validated is present in the this.value property. this is a memory scope that pertains to the active action's properties. Read more in the memory concept article.
Recognizers
Expand Recognizers to view and edit Unrecognized Prompt.
Unrecognized Prompt is the message that is sent to a user if the response entered wasn't recognized. It's a good practice to add some guidance along with the prompt. For example, when a user input is the name of a city but a five-digit ZIP Code is expected, the unrecognized prompt can be the following:
Sorry, I don't understand '${this.value}'. Please enter a ZIP Code in the form of 12345.
Validation
Expand Validation to define Validation rules and Invalid prompts.
Validation rules are defined in adaptive expressions to validate the user's response. The input is considered valid only if the expression evaluates to
true. An example validation rule specifying that the user input be 5 characters long can look like the following:length(string(this.value)) == 5Invalid prompt is the message that is sent to a user if the response entered is invalid according to the validation rules. It's a good practice to specify in the message that it's not valid and what is expected. For example:
Sorry, '${this.value}' isn't valid. I'm looking for a 5 digit number as ZIP Code. Please specify a ZIP Code in the form 12345.
Prompt Configurations
Expand Prompt Configurations to view and edit the following properties:
Default value response: The value that is returned after the Max turn count has been hit. This will be sent to the user after the last failed attempt. If this isn't specified, the prompt ends and moves on, without telling the user that it chose a default value. In order for the default value response to be used, you must specify both the Default value and the Default value response.
Max turn count: The maximum number of reprompt attempts before the default value is selected. When the max turn count is reached, the property will end up being set to
nullunless a default value is specified.Important
If your dialog isn't designed to handle a null value, it may crash the bot.
Default value: The value returned when no value is supplied. When a default value is specified, you should also specify the Default value response.
Allow interruptions (true/false): This determines whether the parent should be able to interrupt the child dialog. Consider using this property to either handle a global interruption or a local interruption within the context of the dialog.
Always prompt (true/false): Collect information even if specified property isn't empty.
Next
- Learn how to manage conversation flow using conditionals and dialogs.
- Best practices for building bots using Composer.


