如何:針對自動配置使用格線
此範例說明如何使用自動版面配置方法中的格線,以建立當地語系化的應用程式。
使用者介面 (UI) 的當地語系化作業可能是非常耗時的程序。 當地語系化人員除了翻譯文字以外,通常還需要重新調整項目的大小並重新定位。 以往,每種語言都必須配接 UI 才能進行必要的調整。 現在,您可以使用 Windows Presentation Foundation (WPF) 的功能,設計出不用過多調整的項目。 auto layout 是一種可以更輕鬆調整大小和重新定位的應用程式撰寫方法。
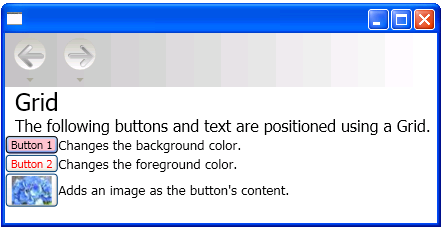
下列 Extensible Application Markup Language (XAML) 示範如何使用方格來定位部分按鈕和文字。 請注意,儲存格的寬度與高度設為 Auto;因此系統會將包含按鈕的儲存格調整為符合影像大小。 由於 Grid 項目可以依據本身的內容進行調整,因此,若您採用自動版面配置方法來設計可當地語系化的應用程式,此項目就非常實用。
範例
下列範例示範如何使用格線。
<Grid Name="grid" ShowGridLines ="false">
<Grid.ColumnDefinitions>
<ColumnDefinition Width="Auto"/>
<ColumnDefinition Width="*"/>
</Grid.ColumnDefinitions>
<Grid.RowDefinitions>
<RowDefinition Height="Auto"/>
<RowDefinition Height="Auto"/>
<RowDefinition Height="Auto"/>
<RowDefinition Height="Auto"/>
<RowDefinition Height="Auto"/>
</Grid.RowDefinitions>

<TextBlock Margin="10, 10, 5, 5" Grid.Column="0" Grid.Row="0" FontSize="24">Grid
</TextBlock>
<TextBlock Margin="10, 10, 5, 5" Grid.Column="0" Grid.Row="1" FontSize="12"
    Grid.ColumnSpan="2">The following buttons and text are positioned using a Grid.
</TextBlock>
<Button Margin="10, 10, 5, 5" Grid.Column="0" Grid.Row="2" Background="Pink"
    BorderBrush="Black" BorderThickness="10">Button 1
</Button>
<TextBlock Margin="10, 10, 5, 5" Grid.Column="1" Grid.Row="2" FontSize="12"
   VerticalAlignment="Center" TextWrapping="WrapWithOverflow">Sets the background
   color.
</TextBlock>
<Button Margin="10, 10, 5, 5" Grid.Column="0" Grid.Row="3" Foreground="Red">
   Button 2
</Button>
<TextBlock Margin="10, 10, 5, 5" Grid.Column="1" Grid.Row="3" FontSize="12"
   VerticalAlignment="Center" TextWrapping="WrapWithOverflow">Sets the foreground
   color.
</TextBlock>
<Button Margin="10, 10, 5, 5" Grid.Column="0" Grid.Row="4">
   <Image Source="data\flower.jpg"></Image>
</Button>
<TextBlock Margin="10, 10, 5, 5" Grid.Column="1" Grid.Row="4" FontSize="12"
   VerticalAlignment="Center" TextWrapping="WrapWithOverflow">Adds an image as
   the button's content.
</TextBlock>
</Grid>
下圖顯示程式碼範例的輸出。

方格
