操作說明:設定 TileBrush 的水平和垂直對齊
本範例示範如何控制並排顯示中內容的水平和垂直對齊。 若要控制 TileBrush 的水平和垂直對齊,請使用 AlignmentX 和 AlignmentY 屬性。
當下列任一條件成立時,便會使用 TileBrush 的 AlignmentX 和 AlignmentY 屬性:
Stretch 屬性是 Uniform 或 UniformToFill,而 Viewbox 和 Viewport 具有不同的外觀比例。
將 TileBrush 對齊左上角
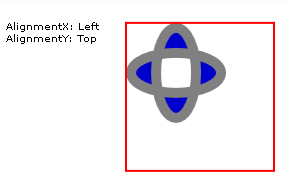
下列範例會將 DrawingBrush (類型為 TileBrush) 的內容對齊其圖格的左上角。 為了對齊內容,此範例會將 DrawingBrush 的 AlignmentX 屬性設定為 Left,並將 AlignmentY 屬性設定為 Top。 此範例會產生下列輸出。
 對齊左上方的 TileBrushgraphicsmm_TileBrushAlignmentExampleTopLeft
內容對齊左上角的 TileBrush
//
// Create a TileBrush and align its
// content to the top-left of its tile.
//
DrawingBrush topLeftAlignedTileBrush = new DrawingBrush();
topLeftAlignedTileBrush.AlignmentX = AlignmentX.Left;
topLeftAlignedTileBrush.AlignmentY = AlignmentY.Top;

// Set Stretch to None so that the brush's
// content doesn't automatically expand to
// fill the entire tile.
topLeftAlignedTileBrush.Stretch = Stretch.None;

// Define the brush's content.
GeometryGroup ellipses = new GeometryGroup();
ellipses.Children.Add(new EllipseGeometry(new Point(50, 50), 20, 45));
ellipses.Children.Add(new EllipseGeometry(new Point(50, 50), 45, 20));
Pen drawingPen = new Pen(Brushes.Gray, 10);
GeometryDrawing ellipseDrawing = new GeometryDrawing(Brushes.Blue, drawingPen, ellipses);
topLeftAlignedTileBrush.Drawing = ellipseDrawing;

// Use the brush to paint a rectangle.
Rectangle rectangle1 = new Rectangle();
rectangle1.Width = 150;
rectangle1.Height = 150;
rectangle1.Stroke = Brushes.Red;
rectangle1.StrokeThickness = 2;
rectangle1.Margin = new Thickness(20);
rectangle1.Fill = topLeftAlignedTileBrush;
'
' Create a TileBrush and align its
' content to the top-left of its tile.
'
Dim topLeftAlignedTileBrush As New DrawingBrush()
topLeftAlignedTileBrush.AlignmentX = AlignmentX.Left
topLeftAlignedTileBrush.AlignmentY = AlignmentY.Top

' Set Stretch to None so that the brush's
' content doesn't automatically expand to
' fill the entire tile.
topLeftAlignedTileBrush.Stretch = Stretch.None

' Define the brush's content.
Dim ellipses As New GeometryGroup()
ellipses.Children.Add(New EllipseGeometry(New Point(50, 50), 20, 45))
ellipses.Children.Add(New EllipseGeometry(New Point(50, 50), 45, 20))
Dim drawingPen As New Pen(Brushes.Gray, 10)
Dim ellipseDrawing As New GeometryDrawing(Brushes.Blue, drawingPen, ellipses)
topLeftAlignedTileBrush.Drawing = ellipseDrawing

' Use the brush to paint a rectangle.
Dim rectangle1 As New Rectangle()
With rectangle1
    .Width = 150
    .Height = 150
    .Stroke = Brushes.Red
    .StrokeThickness = 2
    .Margin = New Thickness(20)
    .Fill = topLeftAlignedTileBrush
End With
<Rectangle
  Width="150" Height="150"
  Stroke="Red" StrokeThickness="2"
  Margin="20">
  <Rectangle.Fill>

    <!-- This brush's content is aligned to the top-left
         of its tile. -->
    <DrawingBrush
      Stretch="None"
      AlignmentX="Left"
      AlignmentY="Top">
      <DrawingBrush.Drawing>
        <GeometryDrawing Brush="MediumBlue">
          <GeometryDrawing.Geometry>
            <GeometryGroup>
              <EllipseGeometry RadiusX="20" RadiusY="45" Center="50,50" />
              <EllipseGeometry RadiusX="45" RadiusY="20" Center="50,50" />
            </GeometryGroup>
          </GeometryDrawing.Geometry>
          <GeometryDrawing.Pen>
            <Pen Brush="Gray" Thickness="10" />
          </GeometryDrawing.Pen>
        </GeometryDrawing>
      </DrawingBrush.Drawing>
    </DrawingBrush>
  </Rectangle.Fill>
</Rectangle>
將 DrawingBrush 對齊右下角
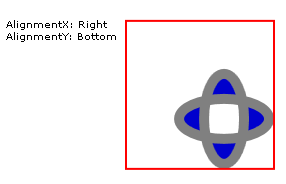
下一個範例會藉由將 AlignmentX 屬性設定為 Right,並將 AlignmentY 屬性設定為 Bottom,將 DrawingBrush 的內容對齊其圖格的右下角。 這個範例會產生下列輸出。
 對齊右下角的 TileBrushgraphicsmm_TileBrushAlignmentExampleBottomRight
內容對齊右下角的 TileBrush
//
// Create a TileBrush and align its
// content to the bottom-right of its tile.
//
DrawingBrush bottomRightAlignedTileBrush = new DrawingBrush();
bottomRightAlignedTileBrush.AlignmentX = AlignmentX.Right;
bottomRightAlignedTileBrush.AlignmentY = AlignmentY.Bottom;
bottomRightAlignedTileBrush.Stretch = Stretch.None;

// Define the brush's content.
bottomRightAlignedTileBrush.Drawing = ellipseDrawing;

// Use the brush to paint a rectangle.
Rectangle rectangle2 = new Rectangle();
rectangle2.Width = 150;
rectangle2.Height = 150;
rectangle2.Stroke = Brushes.Red;
rectangle2.StrokeThickness = 2;
rectangle2.Margin = new Thickness(20);
rectangle2.Fill = bottomRightAlignedTileBrush;
'
' Create a TileBrush and align its
' content to the bottom-right of its tile.
'
Dim bottomRightAlignedTileBrush As New DrawingBrush()
With bottomRightAlignedTileBrush
    .AlignmentX = AlignmentX.Right
    .AlignmentY = AlignmentY.Bottom
    .Stretch = Stretch.None

    ' Define the brush's content.
    .Drawing = ellipseDrawing
End With

' Use the brush to paint a rectangle.
Dim rectangle2 As New Rectangle()
With rectangle2
    .Width = 150
    .Height = 150
    .Stroke = Brushes.Red
    .StrokeThickness = 2
    .Margin = New Thickness(20)
    .Fill = bottomRightAlignedTileBrush
End With
<Rectangle
  Width="150" Height="150"
  Stroke="Red" StrokeThickness="2"
  Margin="20">
  <Rectangle.Fill>

    <!-- This brush's content is aligned to the bottom right
         of its tile. -->
    <DrawingBrush
      Stretch="None"
      AlignmentX="Right"
      AlignmentY="Bottom">
      <DrawingBrush.Drawing>
        <GeometryDrawing Brush="MediumBlue">
          <GeometryDrawing.Geometry>
            <GeometryGroup>
              <EllipseGeometry RadiusX="20" RadiusY="45" Center="50,50" />
              <EllipseGeometry RadiusX="45" RadiusY="20" Center="50,50" />
            </GeometryGroup>
          </GeometryDrawing.Geometry>
          <GeometryDrawing.Pen>
            <Pen Brush="Gray" Thickness="10" />
          </GeometryDrawing.Pen>
        </GeometryDrawing>
      </DrawingBrush.Drawing>
    </DrawingBrush>
  </Rectangle.Fill>
</Rectangle>
將 DrawingBrush 對齊左上角
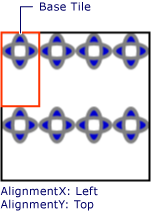
下一個範例會藉由將 AlignmentX 屬性設定為 Left,並將 AlignmentY 屬性設定為 Top,將 DrawingBrush 的內容對齊其圖格的左上角。 該範例也會設定 DrawingBrush 的 Viewport 和 TileMode,以產生圖格模式。 這個範例會產生下列輸出。
 對齊左上角且以圖格顯示的 TileBrushgraphicsmm_TileBrushAlignmentExampleTopLeftTiled
內容對齊基底並排中左上角的並排顯示模式
上圖將其中一個基底並排醒目提示,讓您能了解其內容的對齊方式。 請注意,AlignmentX 設定沒有作用,因為 DrawingBrush 的內容會以水平方式填滿基底圖格。
//
// Create a TileBrush that generates a
// tiled pattern and align its
// content to the top-left of its tile.
//
DrawingBrush tiledTopLeftAlignedTileBrush = new DrawingBrush();
tiledTopLeftAlignedTileBrush.AlignmentX = AlignmentX.Left;
tiledTopLeftAlignedTileBrush.AlignmentY = AlignmentY.Top;
tiledTopLeftAlignedTileBrush.Stretch = Stretch.Uniform;

// Set the brush's Viewport and TileMode to produce a
// tiled pattern.
tiledTopLeftAlignedTileBrush.Viewport = new Rect(0, 0, 0.25, 0.5);
tiledTopLeftAlignedTileBrush.TileMode = TileMode.Tile;

// Define the brush's content.
tiledTopLeftAlignedTileBrush.Drawing = ellipseDrawing;

// Use the brush to paint a rectangle.
Rectangle rectangle3 = new Rectangle();
rectangle3.Width = 150;
rectangle3.Height = 150;
rectangle3.Stroke = Brushes.Black;
rectangle3.StrokeThickness = 2;
rectangle3.Margin = new Thickness(20);
rectangle3.Fill = tiledTopLeftAlignedTileBrush;
'
' Create a TileBrush that generates a
' tiled pattern and align its
' content to the top-left of its tile.
'
Dim tiledTopLeftAlignedTileBrush As New DrawingBrush()
With tiledTopLeftAlignedTileBrush
    .AlignmentX = AlignmentX.Left
    .AlignmentY = AlignmentY.Top
    .Stretch = Stretch.Uniform

    ' Set the brush's Viewport and TileMode to produce a
    ' tiled pattern.
    .Viewport = New Rect(0, 0, 0.25, 0.5)
    .TileMode = TileMode.Tile

    ' Define the brush's content.
    .Drawing = ellipseDrawing
End With

' Use the brush to paint a rectangle.
Dim rectangle3 As New Rectangle()
With rectangle3
    .Width = 150
    .Height = 150
    .Stroke = Brushes.Black
    .StrokeThickness = 2
    .Margin = New Thickness(20)
    .Fill = tiledTopLeftAlignedTileBrush
End With
<Rectangle
 Width="150" Height="150"
 Stroke="Black" StrokeThickness="2"
 Margin="20">
  <Rectangle.Fill>

    <!-- This brush's content is aligned to the top left
         of its tile.  -->
    <DrawingBrush
      Stretch="Uniform"
      Viewport="0,0,0.25,0.5"
      TileMode="Tile"
      AlignmentX="Left"
      AlignmentY="Top">
      <DrawingBrush.Drawing>
        <GeometryDrawing Brush="MediumBlue">
          <GeometryDrawing.Geometry>
            <GeometryGroup>
              <EllipseGeometry RadiusX="20" RadiusY="45" Center="50,50" />
              <EllipseGeometry RadiusX="45" RadiusY="20" Center="50,50" />
            </GeometryGroup>
          </GeometryDrawing.Geometry>
          <GeometryDrawing.Pen>
            <Pen Brush="Gray" Thickness="10" />
          </GeometryDrawing.Pen>
        </GeometryDrawing>
      </DrawingBrush.Drawing>
    </DrawingBrush>
  </Rectangle.Fill>
</Rectangle>
將以圖格顯示的 DrawingBrush 對齊右下角
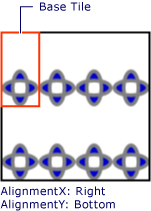
最後一個範例會藉由將 AlignmentX 屬性設定為 Right,並將 AlignmentY 屬性設定為 Bottom,將以圖格顯示的 DrawingBrush 內容對齊其基底圖格的右下方。 這個範例會產生下列輸出。
 對齊右下角並以圖格顯示的 TileBrushgraphicsmm_TileBrushAlignmentExampleBottomRightTiled
內容對齊基底並排中右下角的並排顯示模式
同樣地,AlignmentX 設定沒有作用,因為 DrawingBrush 的內容會以水平方式填滿基底圖格。
//
// Create a TileBrush and align its
// content to the bottom-right of its tile.
//
DrawingBrush bottomRightAlignedTileBrush = new DrawingBrush();
bottomRightAlignedTileBrush.AlignmentX = AlignmentX.Right;
bottomRightAlignedTileBrush.AlignmentY = AlignmentY.Bottom;
bottomRightAlignedTileBrush.Stretch = Stretch.None;

// Define the brush's content.
bottomRightAlignedTileBrush.Drawing = ellipseDrawing;

// Use the brush to paint a rectangle.
Rectangle rectangle2 = new Rectangle();
rectangle2.Width = 150;
rectangle2.Height = 150;
rectangle2.Stroke = Brushes.Red;
rectangle2.StrokeThickness = 2;
rectangle2.Margin = new Thickness(20);
rectangle2.Fill = bottomRightAlignedTileBrush;
'
' Create a TileBrush and align its
' content to the bottom-right of its tile.
'
Dim bottomRightAlignedTileBrush As New DrawingBrush()
With bottomRightAlignedTileBrush
    .AlignmentX = AlignmentX.Right
    .AlignmentY = AlignmentY.Bottom
    .Stretch = Stretch.None

    ' Define the brush's content.
    .Drawing = ellipseDrawing
End With

' Use the brush to paint a rectangle.
Dim rectangle2 As New Rectangle()
With rectangle2
    .Width = 150
    .Height = 150
    .Stroke = Brushes.Red
    .StrokeThickness = 2
    .Margin = New Thickness(20)
    .Fill = bottomRightAlignedTileBrush
End With
<Rectangle
  Width="150" Height="150"
  Stroke="Red" StrokeThickness="2"
  Margin="20">
  <Rectangle.Fill>

    <!-- This brush's content is aligned to the bottom right
         of its tile. -->
    <DrawingBrush
      Stretch="None"
      AlignmentX="Right"
      AlignmentY="Bottom">
      <DrawingBrush.Drawing>
        <GeometryDrawing Brush="MediumBlue">
          <GeometryDrawing.Geometry>
            <GeometryGroup>
              <EllipseGeometry RadiusX="20" RadiusY="45" Center="50,50" />
              <EllipseGeometry RadiusX="45" RadiusY="20" Center="50,50" />
            </GeometryGroup>
          </GeometryDrawing.Geometry>
          <GeometryDrawing.Pen>
            <Pen Brush="Gray" Thickness="10" />
          </GeometryDrawing.Pen>
        </GeometryDrawing>
      </DrawingBrush.Drawing>
    </DrawingBrush>
  </Rectangle.Fill>
</Rectangle>
這些範例會使用 DrawingBrush 物件來示範 AlignmentX 和 AlignmentY 屬性的使用方式。 這些屬性對於所有圖格筆刷的行為都相同:DrawingBrush、ImageBrush 和 VisualBrush。 如需拼貼筆刷的詳細資訊,請參閱使用影像、繪圖和視覺效果繪製。
