WPF 中圖案和基本繪圖概觀
本主題提供如何使用 Shape 物件 (部分機器翻譯) 來繪圖的概觀。 Shape (部分機器翻譯) 是一種 UIElement 類型 (部分機器翻譯),可讓您將圖形繪製到螢幕。 因為它們是 UI 元素,所以 Shape 物件 (部分機器翻譯) 可以在 Panel 元素 (部分機器翻譯) 和大多數控制項內使用。
Windows Presentation Foundation (WPF) 提供對圖形和轉譯服務的數個存取層。 位於最上層的 Shape 物件 (部分機器翻譯) 很容易使用並提供許多有用的功能,例如版面配置和參與 Windows Presentation Foundation (WPF) 事件系統。
與圖形相關的類別位於 Windows.Shapes 命名空間中。 與幾何相關的類別位於 System.Windows.Media 命名空間中。
Shape 物件
WPF 提供數個可立即供您使用的 Shape 物件 (部分機器翻譯)。 所有圖形物件都是繼承自 Shape 類別 (部分機器翻譯)。 可用的圖形物件包括 Ellipse (部分機器翻譯)、Line (部分機器翻譯)、Path (部分機器翻譯)、Polygon (部分機器翻譯)、Polyline (部分機器翻譯) 和 Rectangle (部分機器翻譯)。 Shape 物件 (部分機器翻譯) 共用下列通用屬性。
Stroke (英文):描述圖形外框的繪製方式。
StrokeThickness (部分機器翻譯):描述圖形外框的粗細。
Fill (英文):描述圖形內部的繪製方式。
用來指定座標和頂點的資料屬性,以裝置獨立像素為單位。
因為它們衍生自 UIElement (部分機器翻譯),圖形物件可以用在面板和大部分的控制項。 Canvas 面板 (部分機器翻譯) 特別適合用來建立複雜的繪圖,因為它支援其子物件的絕對位置。
Line 類別 (部分機器翻譯) 可讓您在兩點之間繪製線段。 下列範例示範用來指定線段座標和筆觸屬性的數種方法。
<Canvas Height="300" Width="300">

  <!-- Draws a diagonal line from (10,10) to (50,50). -->
  <Line
    X1="10" Y1="10"
    X2="50" Y2="50"
    Stroke="Black"
    StrokeThickness="4" />

  <!-- Draws a diagonal line from (10,10) to (50,50)
       and moves it 100 pixels to the right. -->
  <Line
    X1="10" Y1="10"
    X2="50" Y2="50"
    StrokeThickness="4"
    Canvas.Left="100">
    <Line.Stroke>
      <RadialGradientBrush GradientOrigin="0.5,0.5" Center="0.5,0.5" RadiusX="0.5" RadiusY="0.5">
        <RadialGradientBrush.GradientStops>
          <GradientStop Color="Red" Offset="0" />
          <GradientStop Color="Blue" Offset="0.25" />
        </RadialGradientBrush.GradientStops>
      </RadialGradientBrush>
    </Line.Stroke>
  </Line>

  <!-- Draws a horizontal line from (10,60) to (150,60). -->
  <Line
     X1="10" Y1="60"
     X2="150" Y2="60"
     Stroke="Black"
     StrokeThickness="4"/>

</Canvas>
// Add a Line Element
myLine = gcnew Line();
myLine->Stroke = Brushes::LightSteelBlue;
myLine->X1 = 1;
myLine->X2 = 50;
myLine->Y1 = 1;
myLine->Y2 = 50;
myLine->HorizontalAlignment = HorizontalAlignment::Left;
myLine->VerticalAlignment = VerticalAlignment::Center;
myLine->StrokeThickness = 2;
myGrid->Children->Add(myLine);
// Add a Line Element
myLine = new Line();
myLine.Stroke = System.Windows.Media.Brushes.LightSteelBlue;
myLine.X1 = 1;
myLine.X2 = 50;
myLine.Y1 = 1;
myLine.Y2 = 50;
myLine.HorizontalAlignment = HorizontalAlignment.Left;
myLine.VerticalAlignment = VerticalAlignment.Center;
myLine.StrokeThickness = 2;
myGrid.Children.Add(myLine);
' Add a Line Element
Dim myLine As New Line()
myLine.Stroke = Brushes.LightSteelBlue
myLine.X1 = 1
myLine.X2 = 50
myLine.Y1 = 1
myLine.Y2 = 50
myLine.HorizontalAlignment = HorizontalAlignment.Left
myLine.VerticalAlignment = VerticalAlignment.Center
myLine.StrokeThickness = 2
myGrid.Children.Add(myLine)
下列影像顯示轉譯的 Line (部分機器翻譯)。
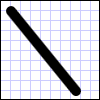
雖然 Line 類別 (部分機器翻譯) 確實提供 Fill 屬性 (英文),但是設定它沒有任何作用,因為 Line (部分機器翻譯) 沒有區域。
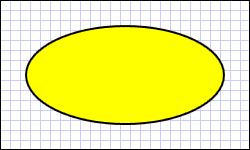
另一個常見的圖形是 Ellipse (部分機器翻譯)。 藉由定義圖形的 Ellipse (部分機器翻譯) 和 Width 屬性 (部分機器翻譯) 來建立 Height (部分機器翻譯)。 若要繪製圓形,請指定 Ellipse (部分機器翻譯) 和 Width 值 (部分機器翻譯) 相等的 Height (部分機器翻譯)。
<Ellipse
Fill="Yellow"
Height="100"
Width="200"
StrokeThickness="2"
Stroke="Black"/>
using System;
using System.Windows;
using System.Windows.Controls;
using System.Windows.Media;
using System.Windows.Shapes;

namespace SDKSample
{
    public partial class SetBackgroundColorOfShapeExample : Page
    {
        public SetBackgroundColorOfShapeExample()
        {
            // Create a StackPanel to contain the shape.
            StackPanel myStackPanel = new StackPanel();

            // Create a red Ellipse.
            Ellipse myEllipse = new Ellipse();

            // Create a SolidColorBrush with a red color to fill the
            // Ellipse with.
            SolidColorBrush mySolidColorBrush = new SolidColorBrush();

            // Describes the brush's color using RGB values.
            // Each value has a range of 0-255.
            mySolidColorBrush.Color = Color.FromArgb(255, 255, 255, 0);
            myEllipse.Fill = mySolidColorBrush;
            myEllipse.StrokeThickness = 2;
            myEllipse.Stroke = Brushes.Black;

            // Set the width and height of the Ellipse.
            myEllipse.Width = 200;
            myEllipse.Height = 100;

            // Add the Ellipse to the StackPanel.
            myStackPanel.Children.Add(myEllipse);

            this.Content = myStackPanel;
        }
    }
}
Imports System.Windows
Imports System.Windows.Controls
Imports System.Windows.Media
Imports System.Windows.Shapes

Namespace SDKSample
    Partial Public Class SetBackgroundColorOfShapeExample
        Inherits Page
        Public Sub New()
            ' Create a StackPanel to contain the shape.
            Dim myStackPanel As New StackPanel()

            ' Create a red Ellipse.
            Dim myEllipse As New Ellipse()

            ' Create a SolidColorBrush with a red color to fill the
            ' Ellipse with.
            Dim mySolidColorBrush As New SolidColorBrush()

            ' Describes the brush's color using RGB values.
            ' Each value has a range of 0-255.
            mySolidColorBrush.Color = Color.FromArgb(255, 255, 255, 0)
            myEllipse.Fill = mySolidColorBrush
            myEllipse.StrokeThickness = 2
            myEllipse.Stroke = Brushes.Black

            ' Set the width and height of the Ellipse.
            myEllipse.Width = 200
            myEllipse.Height = 100

            ' Add the Ellipse to the StackPanel.
            myStackPanel.Children.Add(myEllipse)

            Me.Content = myStackPanel
        End Sub

    End Class
End Namespace
下列影像顯示已轉譯的 Ellipse (部分機器翻譯) 範例。
使用路徑和幾何
Path 類別 (部分機器翻譯) 可讓您繪製曲線和複雜的圖形。 這些曲線和圖形會使用 Geometry 物件 (部分機器翻譯) 來描述。 若要使用 Path (部分機器翻譯),您可以建立 Geometry (部分機器翻譯),並用它來設定 Path 物件 (部分機器翻譯) 的 Data 屬性 (英文)。
有各種不同的 Geometry 物件 (部分機器翻譯) 可供選擇。 LineGeometry (部分機器翻譯)、RectangleGeometry (部分機器翻譯) 和 EllipseGeometry 類別 (部分機器翻譯) 描述相對簡單的圖形。 若要建立更複雜的圖形或建立曲線,請使用 PathGeometry (部分機器翻譯)。
PathGeometry 和 PathSegments
PathGeometry 物件 (部分機器翻譯) 是由一或多個 PathFigure 物件 (部分機器翻譯) 所組成;每個 PathFigure (部分機器翻譯) 都代表不同的「外形」或圖形。 每個 PathFigure (部分機器翻譯) 本身都是由一或多個 PathSegment 物件 (部分機器翻譯) 所組成,每個物件都代表外型或圖形的連接部分。 線段類型包括下列各項:LineSegment (部分機器翻譯)、BezierSegment (部分機器翻譯) 和 ArcSegment (部分機器翻譯)。
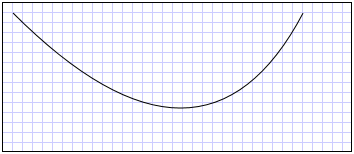
在下列範例中,Path (部分機器翻譯) 是用來繪製二次方貝茲曲線。
<Path Stroke="Black" StrokeThickness="1">
  <Path.Data>
    <PathGeometry>
      <PathGeometry.Figures>
        <PathFigureCollection>
          <PathFigure StartPoint="10,100">
            <PathFigure.Segments>
              <PathSegmentCollection>
                <QuadraticBezierSegment Point1="200,200" Point2="300,100" />
              </PathSegmentCollection>
            </PathFigure.Segments>
          </PathFigure>
        </PathFigureCollection>
      </PathGeometry.Figures>
    </PathGeometry>
  </Path.Data>
</Path>
下列影像顯示轉譯的圖形。
如需有關 PathGeometry (部分機器翻譯) 和其他 Geometry 類別 (部分機器翻譯) 的詳細資訊,請參閱幾何概觀 (部分機器翻譯)。
XAML 縮寫語法
在 Extensible Application Markup Language (XAML) 中,您也可以使用特殊的縮寫語法來描述 Path (部分機器翻譯)。 在下列範例中,縮寫語法是用來繪製複雜的圖形。
      <Path Stroke="DarkGoldenRod" StrokeThickness="3"
Data="M 100,200 C 100,25 400,350 400,175 H 280" />
下列影像顯示轉譯的 Path (部分機器翻譯)。
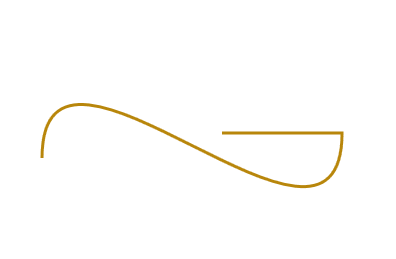
Data 屬性字串 (英文) 的開頭為 "moveto" 命令 (以 M 指示),這會在 Canvas (部分機器翻譯) 的座標系統中建立路徑的起點。 Path 資料參數 (部分機器翻譯) 會區分大小寫。 大寫 M 表示新的目前點的絕對位置。 小寫 m 則表示相對座標。 第一個線段是三次方貝茲曲線,開始於 (100,200) 並結束於 (400,175),使用 (100,25) 和 (400,350) 這兩個控制點繪製。 此線段是由 Data 屬性字串 (英文) 中的 C 命令表示。 同樣地,大寫 C 表示絕對路徑;小寫 c 表示相對路徑。
第二個線段的開頭為絕對水平 "lineto" 命令 H,它會指定從前面的子路徑的端點 (400,175) 到新端點 (280,175) 繪製的線段。 因為它是水平 "lineto" 命令,指定的值是 x 座標。
如需完整的路徑語法,請參閱 Data 參考資料 (英文) 以及使用 PathGeometry 建立圖形 (部分機器翻譯)。
繪製圖形
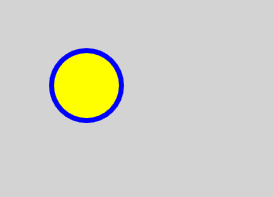
Brush 物件 (部分機器翻譯) 可用來繪製圖形的 Stroke (英文) 和 Fill (英文)。 在下列範例中,已指定 Ellipse (部分機器翻譯) 的筆觸和填滿。 請注意,筆刷屬性的有效輸入可以是關鍵字或十六進位色彩值。 如需可用色彩關鍵字的詳細資訊,請參閱 Colors 命名空間 (部分機器翻譯) 中 System.Windows.Media 類別 (部分機器翻譯) 的屬性。
<Canvas Background="LightGray">
   <Ellipse
      Canvas.Top="50"
      Canvas.Left="50"
      Fill="#FFFFFF00"
      Height="75"
      Width="75"
      StrokeThickness="5"
      Stroke="#FF0000FF"/>
</Canvas>
下列影像顯示轉譯的 Ellipse (部分機器翻譯)。
或者,您可以使用屬性元素語法明確地建立 SolidColorBrush 物件 (部分機器翻譯),以使用純色繪製圖形。
<!-- This polygon shape uses pre-defined color values for its Stroke and
     Fill properties.
     The SolidColorBrush's Opacity property affects the fill color in
     this case by making it slightly transparent (opacity of 0.4) so
     that it blends with any underlying color. -->

<Polygon
    Points="300,200 400,125 400,275 300,200"
    Stroke="Purple"
    StrokeThickness="2">
    <Polygon.Fill>
       <SolidColorBrush Color="Blue" Opacity="0.4"/>
    </Polygon.Fill>
</Polygon>
下圖顯示轉譯的圖形。

您也可以使用漸層、影像、圖樣等等繪製圖形的筆觸或填滿。 如需詳細資訊,請參閱使用純色和漸層繪製的概觀。
可縮放的圖形
Line (部分機器翻譯)、Path (部分機器翻譯)、Polygon (部分機器翻譯)、Polyline (部分機器翻譯) 和 Rectangle 類別 (部分機器翻譯) 都有 Stretch 屬性 (英文)。 這個屬性會決定如何延展 Shape 物件 (部分機器翻譯) 的內容 (要繪製的圖形),以填滿 Shape 物件 (部分機器翻譯) 的版面配置空間。 Shape 物件 (部分機器翻譯) 的版面配置空間是配置系統配置 Shape (部分機器翻譯) 的空間量 (因為明確的 Width (部分機器翻譯) 和 Height 設定 (部分機器翻譯),或因為其 HorizontalAlignment (英文) 和 VerticalAlignment 設定 (部分機器翻譯))。 如需 Windows Presentation Foundation 中版面配置的詳細資訊,請參閱版面配置概觀。
Stretch 屬性可接受下列其中一個值:
Fill (部分機器翻譯):會延展 Shape 物件 (部分機器翻譯) 的內容以填滿其版面配置空間。 不會維持外觀比例。
Uniform (部分機器翻譯):會盡可能地延展 Shape 物件 (部分機器翻譯) 的內容,以填滿其版面配置空間,同時維持其原始外觀比例。
UniformToFill (部分機器翻譯):會延展 Shape 物件 (部分機器翻譯) 的內容,以完全填滿其版面配置空間,同時維持其原始外觀比例。
請注意,當 Shape 物件 (部分機器翻譯) 的內容延展時,Shape 物件 (部分機器翻譯) 的外框會在延展之後繪製。
在下列範例中,Polygon (部分機器翻譯) 會用來繪製從 (0,0) 到 (0,1) 到 (1,1) 的非常小的三角形。 Polygon 物件 (部分機器翻譯) 的 Width (部分機器翻譯) 和 Height (部分機器翻譯) 會設定為 100,而其延展屬性則設定為 [填滿]。 因此,Polygon 物件 (部分機器翻譯) 的內容 (該三角形) 會延展以填滿較大的空間。
<Polygon
  Points="0,0 0,1 1,1"
  Fill="Blue"
  Width="100"
  Height="100"
  Stretch="Fill"
  Stroke="Black"
  StrokeThickness="2" />
PointCollection myPointCollection = new PointCollection();
myPointCollection.Add(new Point(0,0));
myPointCollection.Add(new Point(0,1));
myPointCollection.Add(new Point(1,1));

Polygon myPolygon = new Polygon();
myPolygon.Points = myPointCollection;
myPolygon.Fill = Brushes.Blue;
myPolygon.Width = 100;
myPolygon.Height = 100;
myPolygon.Stretch = Stretch.Fill;
myPolygon.Stroke = Brushes.Black;
myPolygon.StrokeThickness = 2;
轉換圖形
Transform 類別 (部分機器翻譯) 提供方法來轉換二維平面中的圖形。 轉換包含旋轉 (RotateTransform)、縮放 (ScaleTransform)、扭曲 (SkewTransform) 和平移 (TranslateTransform) 等不同轉換類型。
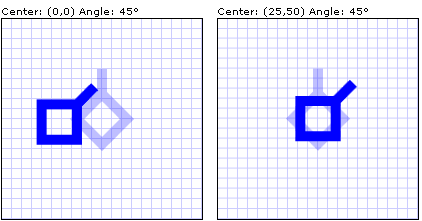
套用至圖形的一種常用轉換就是旋轉。 若要旋轉圖形,請建立 RotateTransform (部分機器翻譯) 並指定其 Angle (部分機器翻譯)。 45 的 Angle (部分機器翻譯) 會將元素順時針旋轉 45 度;90 的角度則會將元素順時針旋轉 90 度,依此類推。 如果您想要控制元素的旋轉點,請設定 CenterX (英文) 和 CenterY 屬性 (部分機器翻譯)。 這些屬性值會以轉換之元素的座標空間表示。 CenterX (英文) 和 CenterY (部分機器翻譯) 具有零的預設值。 最後,將 RotateTransform (部分機器翻譯) 套用至元素。 如果您不想讓轉換影響版面配置,請設定圖形的 RenderTransform 屬性 (部分機器翻譯)。
在下列範例中,RotateTransform 是用來讓圖形繞著圖形左上角 (0,0) 旋轉 45 度。
<!-- Rotates the Polyline 45 degrees about the point (0,0). -->
<Polyline Points="25,25 0,50 25,75 50,50 25,25 25,0"
  Stroke="Blue" StrokeThickness="10"
  Canvas.Left="75" Canvas.Top="50">
  <Polyline.RenderTransform>
    <RotateTransform CenterX="0" CenterY="0" Angle="45" />
  </Polyline.RenderTransform>
</Polyline>
在下一個範例中,另一個圖形也旋轉 45 度,但這次是從點 (25,50) 旋轉。
<!-- Rotates the Polyline 45 degrees about its center. -->
<Polyline
  Points="25,25 0,50 25,75 50,50 25,25 25,0"
  Stroke="Blue" StrokeThickness="10"
  Canvas.Left="75" Canvas.Top="50"
  RenderTransformOrigin="0.5,0.5">
  <Polyline.RenderTransform>
    <RotateTransform Angle="45" />
  </Polyline.RenderTransform>
</Polyline>
下圖顯示套用兩種轉換的結果。
在上一個範例中,已將單一轉換套用至每個圖形物件。 若要將多個轉換套用至圖形 (或任何其他 UI 元素),請使用 TransformGroup (部分機器翻譯)。
