Power Automate 授權的自動宣告原則
身為管理員,您通常會手動將授權指派給使用者。 自動宣告 Power Automate 授權可讓管理員在 Microsoft 365 系統管理中心輕鬆設定原則,類似於其他 Microsoft 產品和服務。 設定原則後,組織中任何需要個人 Power Automate 使用者授權的使用者都會自動獲指派授權。
您可以在 Microsoft 365 系統管理中心建立和管理這些自動宣告原則。
自動宣告原則範圍
目前 Power Automate 授權自動宣告原則的範圍適用於以下授權:
- Power Automate Premium 方案
- Power Automate 每個使用者計畫 (舊版)
設定自動宣告原則後,在以下情境當使用者缺少所需的權利時,會自動向使用者指派授權。
Power Automate 每個使用者計畫
在 Power Automate 入口網站中:
- 使用者觸發/儲存/打開進階雲端流程 (或受控環境的標準流程)
- 使用者要求 Power Automate 每個使用者授權
Power Automate Premium
除了 Power Automate 每個使用者計畫列出的情境外,使用者還可執行以下工作。
在 Power Automate 入口網站中:
- 使用者使用有人參與的 RPA (機器人程序自動化) 觸發/儲存/打開進階雲端流程
- 使用者要求 Power Automate 進階授權
在電腦版 Power Automate 應用程式 (安裝程式版本 2.43 或更新版本) 中:
- 使用者選擇前往進階版
- 使用者擁有自助進階試用版,並且正在積極使用 RPA 功能
建立 Power Automate 授權的自動宣告原則
使用此處所述的資訊為 Power Automate 設定自動宣告原則。
如需深入了解如何管理 Microsoft 365 系統管理中心的自動宣告原則,請前往管理 Microsoft 365 系統管理中心的自動宣告原則。
誰可以建立和管理自動宣告原則?
您必須具備 Microsoft 365 全域管理員權限,才能建立和管理自動宣告原則。 如需詳細資訊,請前往 Microsoft 365 系統管理中心的管理員角色。
打開自動宣告原則功能
您必須先在 Microsoft 365 系統管理中心啟用自動宣告原則功能,才能建立自動宣告原則。
- 登入 Microsoft 365 系統管理中心。
- 在導覽功能表中,選取計費>授權。
- 選取自動宣告原則索引標籤。
- 選取打開設定。
打開此功能之後,您可以建立自動宣告原則。
建立 Power Automate 的自動宣告原則
自動宣告原則索引標籤會顯示您所建立的原則。 您可以查看原則名稱、關聯的應用程式、已指派的產品、可用的授權,以及原則的狀態。
若要建立新原則,請完成下列步驟:
在 Microsoft 365 系統管理中心,選取計費>權限。
選擇自動宣告原則索引標籤,然後選擇新增原則。
在命名此自動宣告原則頁面上,輸入原則的名稱,然後選取下一步。
在設定自動宣告應用程式和產品頁面上,根據您的授權類型選擇下拉式清單中顯示的以下計畫:
授權類型 自動宣告應用程式 已指派的產品 Power Automate 每個使用者計畫 Power Automate 每個使用者計畫 Power Automate 每個使用者計畫 Power Automate Premium Power Automate RPA 有人參與 Power Automate Premium 在選取應用程式頁面上,選取或清除要隨授權包含或排除之應用程式的核取方塊,然後選取下一步。
在檢閱並完成頁面上,確認新的原則資訊、進行任何必要的變更,然後選取建立原則。
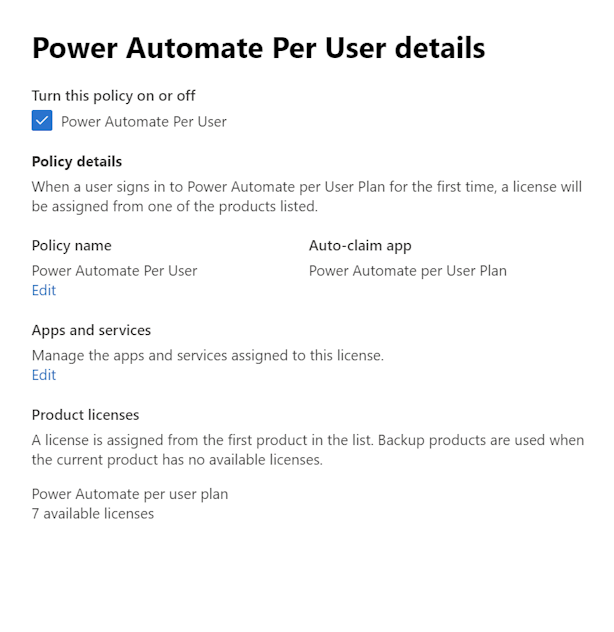
原則詳細資料隨即顯示。

在自動宣告原則報表中查看授權指派
自動宣告原則報告顯示過去 90 天內自動宣告原則中的所有授權指派。
若要檢視自動宣告原則報表:
- 在 Microsoft 365 系統管理中心中,選擇計費>授權,然後選擇自動宣告原則索引標籤。
- 選取檢視報表。 自動宣告原則報表頁面會列出過去幾天從每個原則指派的所有授權。 預設情況下,該頁面顯示過去 90 天的內容。
若要變更顯示的時間段,請選取過去 30 天下拉式清單。 您可以查看過去 1 天、7 天、30 天和 90 天的報表。
預設會啟用自動宣告原則
為了簡化管理員的授權管理,在以下場景中預設啟用自動宣告原則:
擁有新 Power Automate 進階授權的租用戶:從 2024 年 2 月開始,擁有新 Power Automate 進階授權的租用戶 Power Automate 的在 Microsoft 365 系統管理中心擁有新的自動宣告授權原則。 此原則可確保需要 Power Automate 進階版授權的使用者自動收到該授權 (如果您的租用戶中提供該授權)。 預設情況下,此原則適用於所有環境。
具有受控環境的租用戶:從 2024 年 4 月開始,使用受控環境的租用戶在 Microsoft 365 系統管理中心中針對 Power Automate 擁有新的自動宣告授權原則。 此原則可確保需要 Power Automate 進階版或依使用者方案 (舊版) 授權的使用者自動收到該授權 (如果您的租用戶中提供該授權)。 預設情況下,此原則會套用至受控環境中的使用者。 但是,管理員也可以選擇擴展此原則,以套用於 Power Platform 系統管理中心的標準環境。
管理員可以更新原則嗎?
可以,管理員可以管理 Microsoft 365 系統管理中心的原則,就像其他自動宣告原則一樣。 管理員可以停用原則,將其刪除,也可以查看已指派授權的使用者報告。
在 Power Platform 系統管理中心中,管理員可以決定該原則是只套用於受控環境,還是套用於所有環境。
- 登入 Power Platform 系統管理中心。
- 選擇設定>自動宣告原則。
- 在自動宣告原則窗格中,選取原則是否套用於所有環境,或只套用於受控環境。
支援群組式授權指派
自動宣告原則支援個別授權指派,這表示授權可指派給個別使用者。 如果您的組織已有授權指派流程,管理員仍可使用自動宣告原則,同時維持目前的工作流程。
管理員可以在 Microsoft 365 系統管理中心查看透過自動宣告原則指派授權的使用者清單。 然後,他們可以根據需要進行變更,例如取消指派自動宣告指派的授權,並將使用者移至指定群組以使用 Microsoft Entra 群組式授權。 如需群組式授權的詳細資訊,請前往群組式授權案例。
以下是一些可協助取消指派授權,並將使用者新增至所需 Microsoft Entra 群組的命令。
##
#Install and import AzureAD PowerShell module prior to running these commands
##
##You might be able to get a list of users, that have been auto-assigned a
##license directly, via Microsoft Admin Center. Follow instructions at
##https://learn.microsoft.com/en-us/microsoft-365/commerce/licenses/manage-auto-claim-policies?view=o365-worldwide#view-an-auto-claim-policy-report
##
##Once you have a list of users, you can use the following commands to remove
##the direct license assignment and add the user to a licensed group, or
##you might tweak the script to iterate through a list of users and
##perform this in bulk
##
##Please note that adding a user to a licensed group might not result in an
##immediate license assignment. Refer to https://learn.microsoft.com/en-us/entra/identity/users/licensing-group-advanced for more information
#############################################>

$Credential = Get-Credential

# Connect to Azure AD
Connect-AzureAD -Credential $Credential

#The user that will get a group based license
$LicensedUser = Get-AzureADUser -SearchString "<UPN, display name or object ID of the user for which you want to assign a license>"

#The group that has the license assigned
$LicensedGroup = Get-AzureADGroup -SearchString "<Object ID or name of the group that has a relevant license assigned>"

#SKU part number of the sku that needs to be unassigned
# Power Automate premium = "POWER_AUTOMATE_ATTENDED_RPA"
# Power Automate per user (legacy) = "FLOW_PER_USER"
$SkuPartName = "POWER_AUTOMATE_ATTENDED_RPA"

#Get the SkuID of the license that needs to be unassigned from the user
$LicenseSku = Get-AzureADSubscribedSku | Where-Object {$_.SkuPartNumber -eq $SkuPartName}

#Create the AssignedLicenses Object, used for removing direct license assignment from the user
$LicensesToRemove = New-Object -TypeName Microsoft.Open.AzureAD.Model.AssignedLicenses
$LicensesToRemove.RemoveLicenses = $LicenseSku.SkuId

#Remove directly assigned license from the user
#Note that this command will result in an error if the user does not have the relevant license assigned directly
Set-AzureADUserLicense -ObjectId $LicensedUser.ObjectId -AssignedLicenses $LicensesToRemove

#Add user to a licensed group
Add-AzureADGroupMember -ObjectId $LicensedGroup.ObjectId -RefObjectId $LicensedUser.ObjectId
限制
本節介紹 Power Automate 自動宣告原則的所有限制。
自動宣告原則在建立後最多可能需要兩個小時才能啟動
建立 Power Automate 授權自動宣告原則後,最多可能需要兩個小時才能啟動設定的原則,並在相關 Microsoft 服務之間傳播。
成功的授權自動宣告不會立即反映在 Power Automate 入口網站中
自動宣告 Power Automate 使用者授權後,在 Power Automate 入口網站更新授權狀態之前可能會稍微延遲。 在此期間,入口網站可能會指示使用者沒有自動宣告的授權。 但是,儘管入口網站已顯示,但使用者仍可以存取進階功能。