Xamarin.Forms Visual State Manager
使用 Visual State Manager 根據程式代碼所設定的視覺狀態,對 XAML 元素進行變更。
Visual State Manager (VSM) 提供結構化的方式,從程式代碼對使用者介面進行視覺變更。 在大部分情況下,應用程式的使用者介面是在 XAML 中定義,而這個 XAML 包含標記,描述 Visual State Manager 如何影響使用者介面的視覺效果。
VSM 引進視覺狀態的概念。 Xamarin.Forms例如的Button檢視可能會根據其基礎狀態而有數個不同的視覺外觀,無論是已停用或按下,還是具有輸入焦點。 這些是按鈕的狀態。
視覺狀態會收集於視覺狀態群組中。 視覺狀態群組中的所有視覺狀態都是互斥的。 視覺狀態和視覺狀態群組都是透過簡單的文字字串來識別。
Xamarin.Forms Visual State Manager 會定義一個名為 “CommonStates” 的視覺狀態群組,並具有下列視覺狀態:
- "Normal"
- “Disabled”
- “Focused”
- “Selected”
衍生自 VisualElement的所有類別都支援這個視覺狀態群組,這是 和Page的基類View。
您也可以定義自己的視覺狀態群組和視覺狀態,如本文將示範。
注意
Xamarin.Forms 熟悉 觸發程式的 開發人員知道觸發程式也可以根據檢視屬性的變更或引發事件,對使用者介面中的視覺效果進行變更。 不過,使用觸發程式來處理這些變更的各種組合可能會變得相當令人困惑。 在過去,Visual State Manager 是在以 Windows XAML 為基礎的環境中引進的,以減輕視覺狀態組合所造成的混淆。 使用 VSM 時,視覺狀態群組內的視覺狀態一律互斥。 在任何時候,每個群組中只有一個狀態是目前的狀態。
常見狀態
Visual State Manager 可讓您在 XAML 檔案中包含標記,以在檢視正常或停用或具有輸入焦點時變更檢視的視覺外觀。 這些稱為 常見狀態。
例如,假設您在頁面上有檢視 Entry ,而且您想要以下列方式變更 的 Entry 視覺效果外觀:
Entry停用 時Entry,應該會有粉紅色的背景。Entry通常應該有石灰背景。- 當
Entry其具有輸入焦點時,應該會展開至其正常高度的兩倍。
您可以將 VSM 標記附加至個別檢視,或者如果 VSM 標記套用至多個檢視,則可以在樣式中定義它。 接下來的兩節將說明這些方法。
檢視上的 VSM 標記
若要將 VSM 標記附加至 Entry 檢視,請先將 分隔 Entry 成開始和結束標記:
<Entry FontSize="18">

</Entry>
它會提供明確的字型大小,因為其中一個狀態會使用 FontSize 屬性來將 中的 Entry文字大小加倍。
接下來,在這些標記之間插入 VisualStateManager.VisualStateGroups 標籤:
<Entry FontSize="18">
    <VisualStateManager.VisualStateGroups>

    </VisualStateManager.VisualStateGroups>
</Entry>
VisualStateGroups 是類別所 VisualStateManager 定義的附加可系結屬性。 (如需附加可系結屬性的詳細資訊,請參閱文章附加屬性。)這是屬性附加至 Entry 物件的方式VisualStateGroups。
屬性 VisualStateGroups 的類型為 VisualStateGroupList,這是物件的集合 VisualStateGroup 。 在標記內 VisualStateManager.VisualStateGroups ,針對您想要包含的每個視覺狀態群組插入一組 VisualStateGroup 標記:
<Entry FontSize="18">
    <VisualStateManager.VisualStateGroups>
        <VisualStateGroup x:Name="CommonStates">

        </VisualStateGroup>
    </VisualStateManager.VisualStateGroups>
</Entry>
請注意,標籤 VisualStateGroup 具有 x:Name 屬性,指出群組的名稱。 類別 VisualStateGroup 會 Name 定義您可以改用的屬性:
<VisualStateGroup Name="CommonStates">
您可以在相同的專案中使用 x:Name 或 Name ,但不能同時使用兩者。
類別 VisualStateGroup 會定義名為 States的屬性,這是物件的集合 VisualState 。 States是的內容屬性VisualStateGroups,因此您可以直接在標記之間VisualStateGroup包含VisualState標記。 (內容屬性會在文章 中討論基本 XAML 語法。)
下一個步驟是針對該群組中的每個視覺狀態包含一組標記。 您也可以使用 x:Name 或 Name識別這些屬性:
<Entry FontSize="18">
    <VisualStateManager.VisualStateGroups>
        <VisualStateGroup x:Name="CommonStates">
            <VisualState x:Name="Normal">

            </VisualState>

            <VisualState x:Name="Focused">

            </VisualState>

            <VisualState x:Name="Disabled">

            </VisualState>
        </VisualStateGroup>
    </VisualStateManager.VisualStateGroups>
</Entry>
VisualState 會定義名為 Setters的屬性,這是物件的集合 Setter 。 這些是您在物件中使用的Style相同Setter物件。
Setters不是 的內容屬性VisualState,因此必須包含 屬性的屬性項目標記Setters:
<Entry FontSize="18">
    <VisualStateManager.VisualStateGroups>
        <VisualStateGroup x:Name="CommonStates">
            <VisualState x:Name="Normal">
                <VisualState.Setters>

                </VisualState.Setters>
            </VisualState>

            <VisualState x:Name="Focused">
                <VisualState.Setters>

                </VisualState.Setters>
            </VisualState>

            <VisualState x:Name="Disabled">
                <VisualState.Setters>

                </VisualState.Setters>
            </VisualState>
        </VisualStateGroup>
    </VisualStateManager.VisualStateGroups>
</Entry>
您現在可以在每個標記組Setters之間插入一或多個Setter物件。 這些物件會 Setter 定義稍早所述的視覺狀態:
<Entry FontSize="18">
    <VisualStateManager.VisualStateGroups>
        <VisualStateGroup x:Name="CommonStates">
            <VisualState x:Name="Normal">
                <VisualState.Setters>
                    <Setter Property="BackgroundColor" Value="Lime" />
                </VisualState.Setters>
            </VisualState>

            <VisualState x:Name="Focused">
                <VisualState.Setters>
                    <Setter Property="FontSize" Value="36" />
                </VisualState.Setters>
            </VisualState>

            <VisualState x:Name="Disabled">
                <VisualState.Setters>
                    <Setter Property="BackgroundColor" Value="Pink" />
                </VisualState.Setters>
            </VisualState>
        </VisualStateGroup>
    </VisualStateManager.VisualStateGroups>
</Entry>
當該狀態為目前時,每個 Setter 標記都會指出特定屬性的值。 對象所參考 Setter 的任何屬性都必須由可繫結屬性支援。
類似於這個的 標記是範例程式中檢視 頁面上 VSM 的基礎。 頁面包含三 Entry 個檢視,但只有第二個檢視已附加 VSM 標記:
<ContentPage xmlns="http://xamarin.com/schemas/2014/forms"
             xmlns:x="http://schemas.microsoft.com/winfx/2009/xaml"
             xmlns:local="clr-namespace:VsmDemos"
             x:Class="VsmDemos.MainPage"
             Title="VSM Demos">

    <StackLayout>
        <StackLayout.Resources>
            <Style TargetType="Entry">
                <Setter Property="Margin" Value="20, 0" />
                <Setter Property="FontSize" Value="18" />
            </Style>

            <Style TargetType="Label">
                <Setter Property="Margin" Value="20, 30, 20, 0" />
                <Setter Property="FontSize" Value="Large" />
            </Style>
        </StackLayout.Resources>

        <Label Text="Normal Entry:" />
        <Entry />
        <Label Text="Entry with VSM: " />
        <Entry>
            <VisualStateManager.VisualStateGroups>
                <VisualStateGroup x:Name="CommonStates">
                    <VisualState x:Name="Normal">
                        <VisualState.Setters>
                            <Setter Property="BackgroundColor" Value="Lime" />
                        </VisualState.Setters>
                    </VisualState>
                    <VisualState x:Name="Focused">
                        <VisualState.Setters>
                            <Setter Property="FontSize" Value="36" />
                        </VisualState.Setters>
                    </VisualState>
                    <VisualState x:Name="Disabled">
                        <VisualState.Setters>
                            <Setter Property="BackgroundColor" Value="Pink" />
                        </VisualState.Setters>
                    </VisualState>
                </VisualStateGroup>
            </VisualStateManager.VisualStateGroups>

            <Entry.Triggers>
                <DataTrigger TargetType="Entry"
                             Binding="{Binding Source={x:Reference entry3},
                                               Path=Text.Length}"
                             Value="0">
                    <Setter Property="IsEnabled" Value="False" />
                </DataTrigger>
            </Entry.Triggers>
        </Entry>
        <Label Text="Entry to enable 2nd Entry:" />
        <Entry x:Name="entry3"
               Text=""
               Placeholder="Type something to enable 2nd Entry" />
    </StackLayout>
</ContentPage>
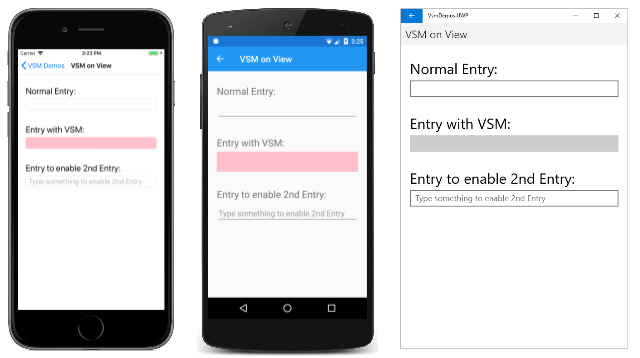
請注意,第二Entry個 也在其集合中Trigger具有 DataTrigger 。 這會導致 Entry 停用,直到某個項目輸入到第三 Entry個 。 以下是在iOS、Android和 通用 Windows 平台上執行的啟動時的頁面(UWP):
目前的視覺狀態為「已停用」,因此第二個 Entry 畫面的背景為粉紅色的iOS和Android畫面。 的UWP實 Entry 作不允許在停用 時 Entry 設定背景色彩。
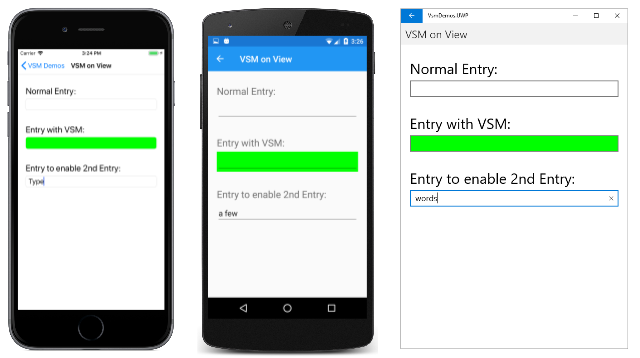
當您將一些文字輸入第三 Entry個時,第二個 Entry 文字會切換成「一般」狀態,而背景現在是石灰:
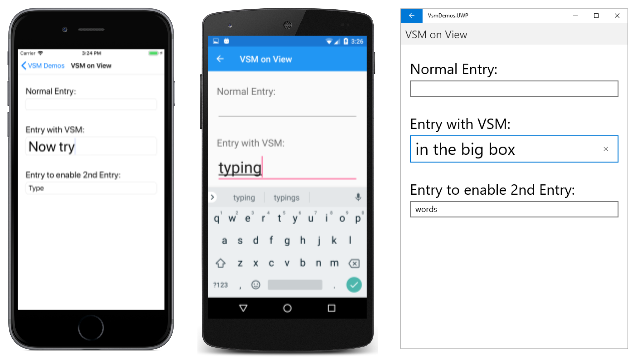
當您觸碰第二個 Entry時,它會取得輸入焦點。 它會切換至「焦點」狀態,並擴充為其高度的兩倍:
請注意, Entry 取得輸入焦點時,不會保留石灰背景。 當 Visual State Manager 在視覺狀態之間切換時,先前狀態所設定的屬性會取消設定。 請記住,視覺狀態互斥。 「一般」狀態不只 Entry 表示 已啟用 。 這表示 Entry 已啟用 且沒有輸入焦點。
如果您想要 Entry 在「焦點」狀態中具有石灰背景,請將另一個 Setter 新增至該視覺狀態:
<VisualState x:Name="Focused">
    <VisualState.Setters>
        <Setter Property="FontSize" Value="36" />
        <Setter Property="BackgroundColor" Value="Lime" />
    </VisualState.Setters>
</VisualState>
為了讓這些 Setter 物件正常運作, VisualStateGroup 必須包含 VisualState 該群組中所有狀態的物件。 如果有沒有任何 Setter 對象的視覺狀態,請將其納入空白標籤:
<VisualState x:Name="Normal" />
樣式中的Visual State Manager 標記
通常必須在兩個或多個檢視之間共用相同的Visual State Manager標記。 在此情況下,您會想要將標記放在定義中 Style 。
以下是 VSM On View 頁面上元素的現有隱含:Style Entry
<Style TargetType="Entry">
    <Setter Property="Margin" Value="20, 0" />
    <Setter Property="FontSize" Value="18" />
</Style>
新增 Setter 附加可系結屬性的 VisualStateManager.VisualStateGroups 標籤:
<Style TargetType="Entry">
    <Setter Property="Margin" Value="20, 0" />
    <Setter Property="FontSize" Value="18" />
    <Setter Property="VisualStateManager.VisualStateGroups">

    </Setter>
</Style>
的內容屬性 Setter 為 Value,因此可以直接在這些標記內指定 屬性的值 Value 。 該屬性的類型為 VisualStateGroupList:
<Style TargetType="Entry">
    <Setter Property="Margin" Value="20, 0" />
    <Setter Property="FontSize" Value="18" />
    <Setter Property="VisualStateManager.VisualStateGroups">
        <VisualStateGroupList>

        </VisualStateGroupList>
    </Setter>
</Style>
在這些標籤中,您可以包含其中 VisualStateGroup 一個物件:
<Style TargetType="Entry">
    <Setter Property="Margin" Value="20, 0" />
    <Setter Property="FontSize" Value="18" />
    <Setter Property="VisualStateManager.VisualStateGroups">
        <VisualStateGroupList>
            <VisualStateGroup x:Name="CommonStates">

            </VisualStateGroup>
        </VisualStateGroupList>
    </Setter>
</Style>
VSM 標記的其餘部分與之前相同。
以下是 [樣式 ] 頁面中的 VSM,其中顯示完整的 VSM 標記:
<ContentPage xmlns="http://xamarin.com/schemas/2014/forms"
             xmlns:x="http://schemas.microsoft.com/winfx/2009/xaml"
             x:Class="VsmDemos.VsmInStylePage"
             Title="VSM in Style">
    <StackLayout>
        <StackLayout.Resources>
            <Style TargetType="Entry">
                <Setter Property="Margin" Value="20, 0" />
                <Setter Property="FontSize" Value="18" />
                <Setter Property="VisualStateManager.VisualStateGroups">
                    <VisualStateGroupList>
                        <VisualStateGroup x:Name="CommonStates">
                            <VisualState x:Name="Normal">
                                <VisualState.Setters>
                                    <Setter Property="BackgroundColor" Value="Lime" />
                                </VisualState.Setters>
                            </VisualState>
                            <VisualState x:Name="Focused">
                                <VisualState.Setters>
                                    <Setter Property="FontSize" Value="36" />
                                    <Setter Property="BackgroundColor" Value="Lime" />
                                </VisualState.Setters>
                            </VisualState>
                            <VisualState x:Name="Disabled">
                                <VisualState.Setters>
                                    <Setter Property="BackgroundColor" Value="Pink" />
                                </VisualState.Setters>
                            </VisualState>
                        </VisualStateGroup>
                    </VisualStateGroupList>
                </Setter>
            </Style>

            <Style TargetType="Label">
                <Setter Property="Margin" Value="20, 30, 20, 0" />
                <Setter Property="FontSize" Value="Large" />
            </Style>
        </StackLayout.Resources>

        <Label Text="Normal Entry:" />
        <Entry />
        <Label Text="Entry with VSM: " />
        <Entry>
            <Entry.Triggers>
                <DataTrigger TargetType="Entry"
                             Binding="{Binding Source={x:Reference entry3},
                                               Path=Text.Length}"
                             Value="0">
                    <Setter Property="IsEnabled" Value="False" />
                </DataTrigger>
            </Entry.Triggers>
        </Entry>
        <Label Text="Entry to enable 2nd Entry:" />
        <Entry x:Name="entry3"
               Text=""
               Placeholder="Type something to enable 2nd Entry" />
    </StackLayout>
</ContentPage>
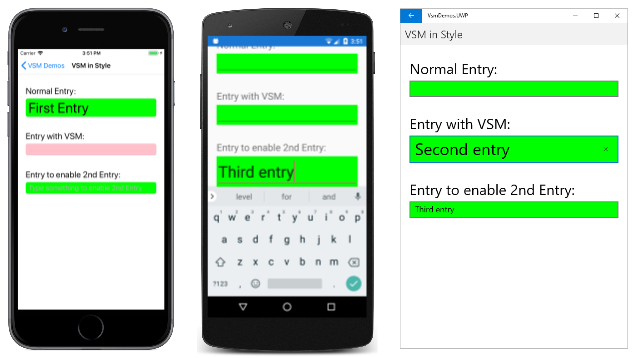
現在此頁面上的所有 Entry 檢視都會以相同的方式回應其視覺狀態。 另請注意,「焦點」狀態現在包含第二 Setter 個狀態,在具有輸入焦點時,也會提供每個 Entry 石灰背景:
中的視覺狀態 Xamarin.Forms
下表列出 中 Xamarin.Forms定義的視覺狀態:
| 類別 | 狀態 | 相關資訊 |
|---|---|---|
Button |
Pressed |
按鈕視覺狀態 |
CheckBox |
IsChecked |
CheckBox 視覺效果狀態 |
CarouselView |
DefaultItem、 、 CurrentItem、 PreviousItemNextItem |
CarouselView 視覺效果狀態 |
ImageButton |
Pressed |
ImageButton 視覺狀態 |
RadioButton |
Checked, Unchecked |
RadioButton 視覺狀態 |
Switch |
On, Off |
切換視覺狀態 |
VisualElement |
Normal、 、 Disabled、 FocusedSelected |
常見狀態 |
每個狀態都可以透過名為 CommonStates的視覺狀態群組來存取。
此外,會 CollectionView 實作 Selected 狀態。 如需詳細資訊,請參閱 變更選取的專案色彩。
在多個元素上設定狀態
在先前的範例中,視覺狀態已附加至單一元素並操作。 不過,您也可以建立附加至單一元素的視覺狀態,但在相同範圍內設定其他元素的屬性。 這可避免在狀態運作的每個元素上重複視覺狀態。
此 Setter 類型具有 TargetName 類型的 string屬性,代表視覺狀態將操作的目標專案 Setter 。 TargetName定義 屬性時,會將 Setter 中TargetName定義的 元素的 設定Property為 Value:
<Setter TargetName="label"
        Property="Label.TextColor"
        Value="Red" />
在這裡範例中, Label 具名 label 的 屬性 TextColor 會設定為 Red。 設定 屬性時, TargetName 您必須在 中 Property指定 屬性的完整路徑。 因此,若要在 上LabelProperty設定 TextColor 屬性,會指定為 Label.TextColor。
注意
對象所參考 Setter 的任何屬性都必須由可繫結屬性支援。
範例中的 VSM 與 Setter TargetName 頁面會示範如何從單一視覺狀態群組設定多個元素的狀態。 XAML 檔案包含 StackLayout 包含 Label 項目、 Entry、 與 Button:
<ContentPage xmlns="http://xamarin.com/schemas/2014/forms"
             xmlns:x="http://schemas.microsoft.com/winfx/2009/xaml"
             x:Class="VsmDemos.VsmSetterTargetNamePage"
             Title="VSM with Setter TargetName">
    <StackLayout Margin="10">
        <Label Text="What is the capital of France?" />
        <Entry x:Name="entry"
               Placeholder="Enter answer" />
        <Button Text="Reveal answer">
            <VisualStateManager.VisualStateGroups>
                <VisualStateGroup x:Name="CommonStates">
                    <VisualState x:Name="Normal" />
                    <VisualState x:Name="Pressed">
                        <VisualState.Setters>
                            <Setter Property="Scale"
                                    Value="0.8" />
                            <Setter TargetName="entry"
                                    Property="Entry.Text"
                                    Value="Paris" />
                        </VisualState.Setters>
                    </VisualState>
                </VisualStateGroup>
            </VisualStateManager.VisualStateGroups>
        </Button>
    </StackLayout>
</ContentPage>
VSM 標籤會附加至 StackLayout。 有兩個互斥狀態,名為 「Normal」 和 「Pressed」,每個狀態都包含 VisualState 標記。
未按下 時 Button ,「一般」狀態為作用中,而且可以輸入對問題的回應:
按下 時 Button ,「已按下」狀態會變成作用中:
“Pressed” VisualState 指定按下 時 Button ,其 Scale 屬性會從預設值 1 變更為 0.8。 此外, Entry 該名 entry 將將其 Text 屬性設定為巴黎。 因此,結果是按下 Button 時會重新調整為稍微小一點,而且 Entry 顯示巴黎。 然後,發行 時 Button ,它會重新調整為預設值 1,並 Entry 顯示任何先前輸入的文字。
重要
指定屬性的 元素TargetName目前不支援Setter屬性路徑。
定義您自己的視覺狀態
衍生自 VisualElement 的每個類別都支援通用狀態 「Normal」、“Focused” 和 “Disabled”。 此外,類別 CollectionView 支援「已選取」狀態。 在內部,類別 VisualElement 會在啟用或停用或焦點或未對焦時偵測,並呼叫靜態 VisualStateManager.GoToState 方法:
VisualStateManager.GoToState(this, "Focused");
這是您在 類別中找到 VisualElement 的唯一 Visual State Manager 程式代碼。 因為 GoToState 會根據衍生自 VisualElement的每個類別呼叫每個物件,因此您可以使用 Visual State Manager 搭配任何 VisualElement 對象來回應這些變更。
有趣的是,不會在 中 VisualElement明確參考視覺狀態群組 「CommonStates」 的名稱。 組名不是 Visual State Manager API 的一部分。 在到目前為止顯示的兩個範例程式之一內,您可以將群組的名稱從 “CommonStates” 變更為任何其他專案,而且程式仍然可以運作。 組名只是該群組中狀態的一般描述。 隱含地瞭解,任何群組中的視覺狀態都是互斥的:一種狀態,而且隨時只有一個狀態。
如果您想要實作自己的視覺狀態,您必須從程式代碼呼叫 VisualStateManager.GoToState 。 您通常會從頁面類別的程式代碼後置檔案進行此呼叫。
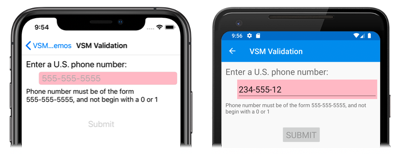
範例中的 VSM 驗證頁面示範如何搭配輸入驗證使用 Visual State Manager。 XAML 檔案包含 StackLayout 包含兩 Label 個專案的 Entry, 與 Button:
<ContentPage xmlns="http://xamarin.com/schemas/2014/forms"
             xmlns:x="http://schemas.microsoft.com/winfx/2009/xaml"
             x:Class="VsmDemos.VsmValidationPage"
             Title="VSM Validation">
    <StackLayout x:Name="stackLayout"
                 Padding="10, 10">
            <VisualStateManager.VisualStateGroups>
                <VisualStateGroup Name="ValidityStates">
                    <VisualState Name="Valid">
                        <VisualState.Setters>
                            <Setter TargetName="helpLabel"
                                    Property="Label.TextColor"
                                    Value="Transparent" />
                            <Setter TargetName="entry"
                                    Property="Entry.BackgroundColor"
                                    Value="Lime" />
                        </VisualState.Setters>
                    </VisualState>
                    <VisualState Name="Invalid">
                        <VisualState.Setters>
                            <Setter TargetName="entry"
                                    Property="Entry.BackgroundColor"
                                    Value="Pink" />
                            <Setter TargetName="submitButton"
                                    Property="Button.IsEnabled"
                                    Value="False" />
                        </VisualState.Setters>
                    </VisualState>
                </VisualStateGroup>
            </VisualStateManager.VisualStateGroups>
        <Label Text="Enter a U.S. phone number:"
               FontSize="Large" />
        <Entry x:Name="entry"
               Placeholder="555-555-5555"
               FontSize="Large"
               Margin="30, 0, 0, 0"
               TextChanged="OnTextChanged" />
        <Label x:Name="helpLabel"
               Text="Phone number must be of the form 555-555-5555, and not begin with a 0 or 1" />
        <Button x:Name="submitButton"
                Text="Submit"
                FontSize="Large"
                Margin="0, 20"
                VerticalOptions="Center"
                HorizontalOptions="Center" />
    </StackLayout>
</ContentPage>
VSM 標記會附加至 StackLayout (具名 stackLayout)。 有兩個互斥狀態,名為“Valid” 和 “Invalid”,每個狀態都包含 VisualState 標記。
Entry如果 不包含有效的電話號碼,則目前的狀態為 「無效」,因此 Entry 具有粉紅色背景,第二Label個是可見的,且 Button 已停用:
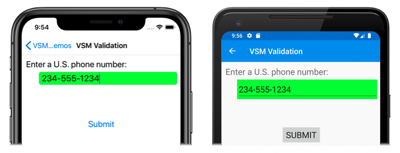
輸入有效的電話號碼時,目前的狀態會變成「有效」。 會 Entry 取得石灰背景,第二個 Label 消失,而 Button 現在已啟用:
程序代碼後置檔案負責處理 TextChanged 中的 Entry事件。 處理程式會使用正則表示式來判斷輸入字串是否有效。 名為 GoToState 的程式代碼後置檔案中的 方法會呼叫 的stackLayout靜態VisualStateManager.GoToState方法:
public partial class VsmValidationPage : ContentPage
{
    public VsmValidationPage()
    {
        InitializeComponent();

        GoToState(false);
    }

    void OnTextChanged(object sender, TextChangedEventArgs args)
    {
        bool isValid = Regex.IsMatch(args.NewTextValue, @"^[2-9]\d{2}-\d{3}-\d{4}$");
        GoToState(isValid);
    }

    void GoToState(bool isValid)
    {
        string visualState = isValid ? "Valid" : "Invalid";
        VisualStateManager.GoToState(stackLayout, visualState);
    }
}
另請注意,從 GoToState 建構函式呼叫 方法以初始化狀態。 一律應該有目前的狀態。 但是程式代碼中沒有任何參考視覺狀態群組的名稱,儘管 XAML 中會將其參考為 「ValidationStates」,但為了清楚起見,
請注意,程式代碼後置檔案只需要考慮頁面上定義視覺狀態的物件,並呼叫 VisualStateManager.GoToState 此物件。 這是因為這兩個視覺狀態都以頁面上的多個對象為目標。
您可能想知道:如果程式代碼後置檔案必須參考定義視覺狀態之頁面上的對象,為什麼程式代碼後置檔案無法直接存取這個和其他物件? 這當然可以。 不過,使用 VSM 的優點是您可以控制視覺元素在 XAML 中完全回應不同狀態的方式,這會將所有 UI 設計保留在一個位置。 這可避免直接從程式代碼後置存取視覺項目來設定視覺外觀。
視覺狀態觸發程式
視覺狀態支持狀態觸發程式,這是一組特殊的觸發程式,可定義應套用 的條件 VisualState 。
狀態觸發程序會新增至 VisualState 的 StateTriggers 集合。 此集合可以包含單一狀態觸發程序或多個狀態觸發程序。 當集合中的任何狀態觸發程序為作用中時,將會套用 VisualState。
使用狀態觸發程式來控制視覺狀態時, Xamarin.Forms 會使用下列優先順序規則來判斷哪一個觸發程式 (以及對應的 VisualState) 為作用中:
- 衍生自
StateTriggerBase的任何觸發程序。 - 因為符合
MinWindowWidth條件,所以已啟用AdaptiveTrigger。 - 因為符合
MinWindowHeight條件,所以已啟用AdaptiveTrigger。
如果多個觸發程序同時處於作用中狀態 (例如,兩個自訂觸發程序),則會優先使用標記中宣告的第一個觸發程序。
如需狀態觸發程式的詳細資訊,請參閱 狀態觸發程式。
使用 Visual State Manager 進行調適型配置
Xamarin.Forms在手機上執行的應用程式通常可以以直向或橫向外觀比例來檢視,而Xamarin.Forms桌面上執行的程式可以重設大小,以假設許多不同的大小和外觀比例。 設計良好的應用程式可能會針對這些不同的頁面或視窗尺寸,以不同的方式顯示其內容。
這項技術有時稱為 調適型配置。 因為調適型配置只牽涉到程式的視覺效果,所以它是 Visual State Manager 的理想應用程式。
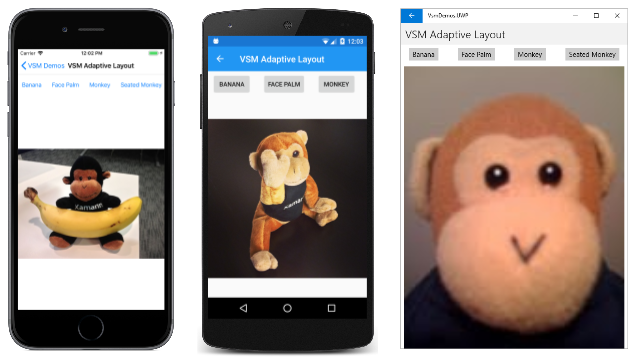
簡單的範例是一個應用程式,其會顯示影響應用程式內容的小型按鈕集合。 在直向模式中,這些按鈕可能會顯示在頁面頂端的水準列中:
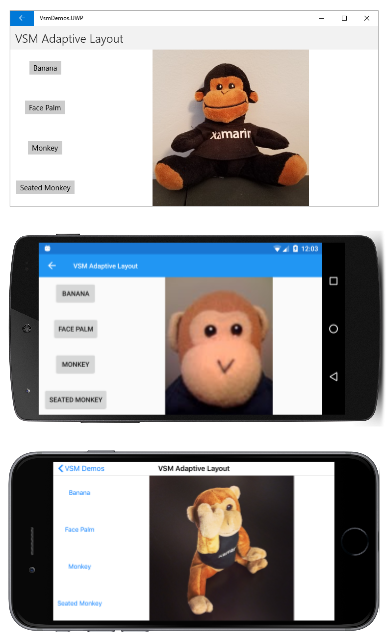
在橫向模式中,按鈕陣列可能會移至一側,並顯示在數據行中:
程式會從上到下在 通用 Windows 平台、Android 和iOS上執行。
範例中的 VSM 調 適型版 面配置頁面會定義名為 「OrientationStates」 的群組,其中包含兩個名為 「Portrait」 和 「Landscape」 的視覺狀態。 (更複雜的方法可能以數個不同的頁面或窗口寬度為基礎。
VSM 標記會在 XAML 檔案的四個位置發生。 StackLayout具名mainStack同時包含功能表和內容,也就是 Image 元素。 這 StackLayout 在直向模式中應有垂直方向,橫向模式應為水準方向:
<ContentPage xmlns="http://xamarin.com/schemas/2014/forms"
             xmlns:x="http://schemas.microsoft.com/winfx/2009/xaml"
             x:Class="VsmDemos.VsmAdaptiveLayoutPage"
             Title="VSM Adaptive Layout">

    <StackLayout x:Name="mainStack">
        <VisualStateManager.VisualStateGroups>
            <VisualStateGroup Name="OrientationStates">
                <VisualState Name="Portrait">
                    <VisualState.Setters>
                        <Setter Property="Orientation" Value="Vertical" />
                    </VisualState.Setters>
                </VisualState>
                <VisualState Name="Landscape">
                    <VisualState.Setters>
                        <Setter Property="Orientation" Value="Horizontal" />
                    </VisualState.Setters>
                </VisualState>
            </VisualStateGroup>
        </VisualStateManager.VisualStateGroups>

        <ScrollView x:Name="menuScroll">
            <VisualStateManager.VisualStateGroups>
                <VisualStateGroup Name="OrientationStates">
                    <VisualState Name="Portrait">
                        <VisualState.Setters>
                            <Setter Property="Orientation" Value="Horizontal" />
                        </VisualState.Setters>
                    </VisualState>
                    <VisualState Name="Landscape">
                        <VisualState.Setters>
                            <Setter Property="Orientation" Value="Vertical" />
                        </VisualState.Setters>
                    </VisualState>
                </VisualStateGroup>
            </VisualStateManager.VisualStateGroups>

            <StackLayout x:Name="menuStack">
                <VisualStateManager.VisualStateGroups>
                    <VisualStateGroup Name="OrientationStates">
                        <VisualState Name="Portrait">
                            <VisualState.Setters>
                                <Setter Property="Orientation" Value="Horizontal" />
                            </VisualState.Setters>
                        </VisualState>
                        <VisualState Name="Landscape">
                            <VisualState.Setters>
                                <Setter Property="Orientation" Value="Vertical" />
                            </VisualState.Setters>
                        </VisualState>
                    </VisualStateGroup>
                </VisualStateManager.VisualStateGroups>

                <StackLayout.Resources>
                    <Style TargetType="Button">
                        <Setter Property="VisualStateManager.VisualStateGroups">
                            <VisualStateGroupList>
                                <VisualStateGroup Name="OrientationStates">
                                    <VisualState Name="Portrait">
                                        <VisualState.Setters>
                                            <Setter Property="HorizontalOptions" Value="CenterAndExpand" />
                                            <Setter Property="Margin" Value="10, 5" />
                                        </VisualState.Setters>
                                    </VisualState>
                                    <VisualState Name="Landscape">
                                        <VisualState.Setters>
                                            <Setter Property="VerticalOptions" Value="CenterAndExpand" />
                                            <Setter Property="HorizontalOptions" Value="Center" />
                                            <Setter Property="Margin" Value="10" />
                                        </VisualState.Setters>
                                    </VisualState>
                                </VisualStateGroup>
                            </VisualStateGroupList>
                        </Setter>
                    </Style>
                </StackLayout.Resources>

                <Button Text="Banana"
                        Command="{Binding SelectedCommand}"
                        CommandParameter="Banana.jpg" />
                <Button Text="Face Palm"
                        Command="{Binding SelectedCommand}"
                        CommandParameter="FacePalm.jpg" />
                <Button Text="Monkey"
                        Command="{Binding SelectedCommand}"
                        CommandParameter="monkey.png" />
                <Button Text="Seated Monkey"
                        Command="{Binding SelectedCommand}"
                        CommandParameter="SeatedMonkey.jpg" />
            </StackLayout>
        </ScrollView>

        <Image x:Name="image"
               VerticalOptions="FillAndExpand"
               HorizontalOptions="FillAndExpand" />
    </StackLayout>
</ContentPage>
名為的內部ScrollViewmenuScroll和StackLayout具名menuStack會實作按鈕功能表。 這些版面配置的方向與相反 mainStack。 功能表在直向模式中應該是水平,橫向模式則為垂直。
VSM 標記的第四個區段是按鈕本身的隱含樣式。 此標記會設定 VerticalOptions直向和橫向特定的、 HorizontalOptions和 Margin 屬性。
程式代碼後置檔案會 BindingContext 設定 的屬性 menuStack 以實 Button 作命令,並且也會將處理程式附加至 SizeChanged 頁面的事件:
public partial class VsmAdaptiveLayoutPage : ContentPage
{
    public VsmAdaptiveLayoutPage ()
    {
        InitializeComponent ();

        SizeChanged += (sender, args) =>
        {
            string visualState = Width > Height ? "Landscape" : "Portrait";
            VisualStateManager.GoToState(mainStack, visualState);
            VisualStateManager.GoToState(menuScroll, visualState);
            VisualStateManager.GoToState(menuStack, visualState);

            foreach (View child in menuStack.Children)
            {
                VisualStateManager.GoToState(child, visualState);
            }
        };

        SelectedCommand = new Command<string>((filename) =>
        {
            image.Source = ImageSource.FromResource("VsmDemos.Images." + filename);
        });

        menuStack.BindingContext = this;
    }

    public ICommand SelectedCommand { private set; get; }
}
處理程式 SizeChanged 會呼叫 VisualStateManager.GoToState 這兩 StackLayout 個 和 ScrollView 元素,然後循環執行 的 menuStack 子系來呼叫 VisualStateManager.GoToState Button 元素。
程序代碼後置檔案似乎可以更直接地處理方向變更,方法是在 XAML 檔案中設定元素的屬性,但 Visual State Manager 絕對是一個更結構化的方法。 所有視覺效果都會保留在 XAML 檔案中,讓視覺效果更容易檢查、維護和修改。
Xamarin.University 的 Visual State Manager
Xamarin.Forms 3.0 Visual State Manager 影片
