Create custom actions to deploy with SharePoint Add-ins
Important
The SharePoint Add-In model in SharePoint Online has been deprecated as of November 27th 2023, checkout the full retirement announcement to learn more.
Deprecation means that the feature will not get any new investments, but it's still supported. SharePoint add-in model is retired fully on April 2nd, 2026 and is no longer available after that time. Primary replacement technology for the SharePoint add-in model is SharePoint Framework (SPFx) which continues to be supported also in future.
When you are creating a SharePoint Add-in, custom actions let you interact with the lists and the ribbon in the host web. A custom action deploys to the host web when end users install your add-in. Custom actions can open a remote webpage and pass information through the query string.
Two types of custom actions are available for add-ins: Ribbon and Menu Item.
Prerequisites for using the examples in this article
You need a development environment as explained in Get started creating provider-hosted SharePoint Add-ins.
Core concepts to help you understand custom actions
The following table lists useful articles that can help you understand the concepts and steps that are involved in a custom action scenario.
Table 1. Core concepts for custom actions
| Article | Description |
|---|---|
| SharePoint Add-ins | Learn about the new add-in model in SharePoint that enables you to create add-ins, which are small, easy-to-use solutions for end users. |
| UX design for SharePoint Add-ins | Learn about the user experience (UX) options that you have when you are building SharePoint Add-ins. |
| Host webs, add-in webs, and SharePoint components in SharePoint | Learn about the difference between host webs and add-in webs. Find out which SharePoint components can be included in a SharePoint Add-in, which components are deployed to the host web, which components are deployed to the add-in web, and how the add-in web is deployed in an isolated domain. |
Code example: Create a custom action in the host web document libraries
Following are the steps to create a custom action in the host web document libraries:
Create the SharePoint Add-in and remote web projects.
Add an add-in webpage for the custom actions.
Add a Menu Item custom action to the SharePoint Add-in project.
Add a Ribbon custom action to the SharePoint Add-in project.
Set the add-in start page to the host web home page.
Build and run the solution.
To create the SharePoint Add-in and remote web projects
Open Visual Studio as administrator. (To do this, right-click the Visual Studio icon on the Start menu, and select Run as administrator.)
Create the provider-hosted SharePoint Add-in as explained in Get started creating provider-hosted SharePoint Add-ins, and name it CustomActionsApp.
To add an add-in webpage for the custom actions
After the Visual Studio solution has been created, right-click the web application project (not the SharePoint Add-in project) and add a new Web Form by selecting Add > New Item > Web > Web Form. Name the form CustomActionTarget.aspx.
In the CustomActionTarget.aspx file, replace the entire html element and its children with the following HTML code. Leave all the markup above the html element as it is. The HTML code contains JavaScript that performs the following tasks:
Provides a placeholder for the query string parameters.
Extracts the parameters from the query string.
Renders the parameters in the placeholder.
Important
The ItemURL and ItemID tokens only get passed when there is an item selected. In a production quality SharePoint Add-in, your code needs to handle situations where no item is selected. In this example, the code alerts the user that no item has been selected.
<html xmlns="http://www.w3.org/1999/xhtml"> <head> <title>Custom action target</title> </head> <body> <h2>Query string parameters passed by the custom action:</h2> <!-- Placeholder for query string parameters --> <ul id="qsparams"/> <!-- Main JavaScript function, renders the query string parameters --> <script lang="javascript"> var params = document.URL.split("?")[1].split("&"); var paramsHTML = ""; // Extracts the parameters from the query string. // Parameters are URLencoded, decode for rendering // in page. for (var i = 0; i < params.length; i = i + 1) { params[i] = decodeURIComponent(params[i]); paramsHTML += "<li>" + params[i] + "</li>"; } // Alert the user when no item has been selected. // (The SPListItemId is the 5th parameter.) if (params[5] === undefined) { paramsHTML += "<div> <h3> No item has been selected from the list. Please select an item. </h3> </div> "; } // Render parameters in the placeholder. document.getElementById("qsparams").innerHTML = paramsHTML; </script> </body> </html>
To add a Menu Item custom action to the SharePoint Add-in project
Right-click the SharePoint Add-in project, and select Add > New Item > Office/SharePoint > Menu Item Custom Action.
Keep the default name, and then select Add.
The Create Custom Action for Menu Item Wizard asks you a series of questions. Give the answers from the following table:
Table 2. Menu Item custom action properties
Property question Answer Where do you want to expose the custom action? Select Host Web. Where is the custom action scoped to? Select List Template. Which particular item is the custom action scoped to? Select Document Library. What is the text on the menu item? Enter My Custom Action. Where does the custom action navigate to? Select the CustomActionAppWeb\CustomActionTarget.aspx page. Select Finish.
Visual Studio generates the following markup in the elements.xml file of the menu item custom action feature:
<?xml version="1.0" encoding="utf-8"?> <Elements xmlns="http://schemas.microsoft.com/sharepoint/"> <!-- RegistrationId attribute is the list type id, in this case, a document library (id=101). --> <CustomAction Id="65695319-4784-478e-8dcd-4e541cb1d682.CustomAction" RegistrationType="List" RegistrationId="101" Location="EditControlBlock" Sequence="10001" Title="Invoke custom action"> <!-- Update the Url below to the page you want the custom action to use. Start the URL with the token ~remoteAppUrl if the page is in the associated web project, use ~appWebUrl if page is in the add-in project. --> <UrlAction Url= "~remoteAppUrl/CustomActionTarget.aspx?{StandardTokens}&amp;SPListItemId={ItemId}&amp;SPListId={ListId}" /> </CustomAction> </Elements>
Add the following query parameters to the end of the Url attribute of the UrlAction element:
&amp;SPSource={Source}&amp;SPListURLDir={ListUrlDir}&amp;SPItemURL={ItemUrl}The UrlAction element should look like the following:
<UrlAction Url= "~remoteAppUrl/CustomActionTarget.aspx?{StandardTokens}&amp;SPListItemId={ItemId}&amp;SPListId={ListId}&amp;SPSource={Source}&amp;SPListURLDir={ListUrlDir}&amp;SPItemURL={ItemUrl}" />
Note
In this example, the remote webpage opens in a full window when the user selects the custom action from the menu. Custom menu actions can also open a remote webpage in a dialog box by using the HostWebDialog attribute. For more information, see SharePoint-Add-in-Localization.
To add a Ribbon custom action to the SharePoint Add-in project
Right-click the SharePoint Add-in project, and select Add > New Item > Office/SharePoint > Ribbon Custom Action.
Keep the default name, and then select Add.
The Create Custom Action for Ribbon Wizard asks you a series of questions. Give the answers from the following table:
Table 3. Ribbon custom action properties
Property question Answer Where do you want to expose the custom action? Select Host Web. Where is the custom action scoped to? Select List Template. Which particular item is the custom action scoped to? Select Document Library. Where is the control located? Select Ribbon.Documents.Manage. What is the text on the menu item? Enter My Custom Ribbon Button. Where does the custom action navigate to? Select the CustomActionAppWeb\CustomActionTarget.aspx page. Visual Studio generates the following markup in the elements.xml file of the Ribbon custom action feature:
<?xml version="1.0" encoding="utf-8"?> <Elements xmlns="http://schemas.microsoft.com/sharepoint/"> <CustomAction Id="85691508-c076-4f43-93d4-96b4d5253a09.RibbonCustomAction1" RegistrationType="List" RegistrationId="101" Location="CommandUI.Ribbon" Sequence="10001" Title="Invoke &apos;RibbonCustomAction1&apos; action"> <CommandUIExtension> <!-- Update the UI definitions below with the controls and the command actions that you want to enable for the custom action. --> <CommandUIDefinitions> <CommandUIDefinition Location="Ribbon.Documents.Manage.Controls._children"> <Button Id="Ribbon.Documents.Manage.RibbonCustomAction1Button" Alt="My Custom Ribbon Button" Sequence="100" Command="Invoke_RibbonCustomAction1ButtonRequest" LabelText="My Custom Ribbon Button" TemplateAlias="o1" Image32by32="_layouts/15/images/placeholder32x32.png" Image16by16="_layouts/15/images/placeholder16x16.png" /> </CommandUIDefinition> </CommandUIDefinitions> <CommandUIHandlers> <CommandUIHandler Command="Invoke_RibbonCustomAction1ButtonRequest" CommandAction="~remoteAppUrl/CustomActionTarget.aspx?{StandardTokens}&amp;SPListItemId={SelectedItemId}&amp;SPListId={SelectedListId}"/> </CommandUIHandlers> </CommandUIExtension > </CustomAction> </Elements>
Add the following query parameters to the end of the CommandAction attribute of the CommandUIHandler element:
&amp;SPSource={Source}&amp;SPListURLDir={ListUrlDir}The CommandUIHandler element should look like the following:
<CommandUIHandler Command="Invoke_RibbonCustomAction1ButtonRequest" CommandAction="~remoteAppUrl/CustomActionTarget.aspx?{StandardTokens}&amp;SPListItemId={SelectedItemId}&amp;SPListId={SelectedListId}&amp;SPSource={Source}&amp;SPListURLDir={ListUrlDir}" />Note
Ribbon custom actions use SelectedListId and SelectedItemId. ListId and ItemId work only with menu item custom actions.
To set the add-in start page to the host web home page
The continuing sample SharePoint Add-in doesn't have any add-in web, and its remote web application exists only to host the form. So the start page of the add-in should be set to the home page of the host web.
To begin, select the SharePoint Add-in project (not the web application project) in Solution Explorer, and copy the value of the Site URL property, including the protocol (for example
https://contoso.sharepoint.com) into the clipboard.Open the add-in manifest, and then paste the URL into the Start Page box.
Optionally, you can delete the Default.aspx page from the web application project, because it is not used in the SharePoint Add-in.
To build and run the solution
Select the F5 key.
Note
When you select F5, Visual Studio builds the solution, deploys the add-in, and opens the permissions page for the add-in.
Select the Trust It button. The default page of your developer site opens.
Navigate to any document library in the host web.
Launching a custom menu action

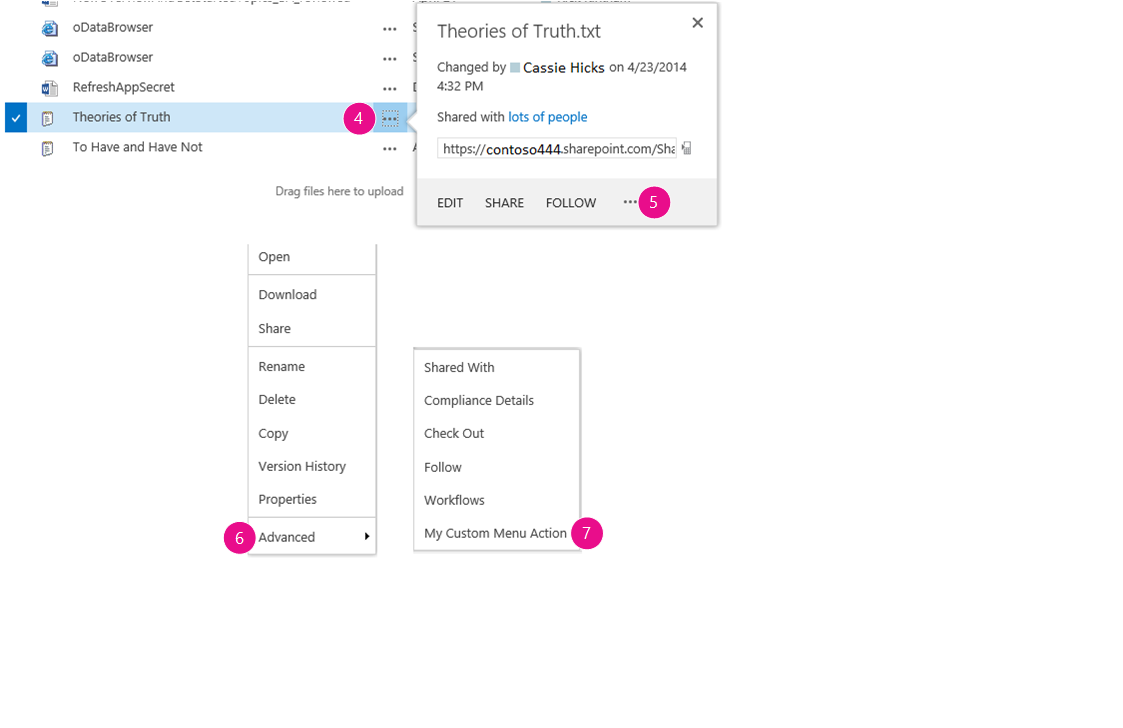
Select the callout button ( ...) for any document. The callout opens.
Select the callout button ( ...) on the callout.
Select Advanced.
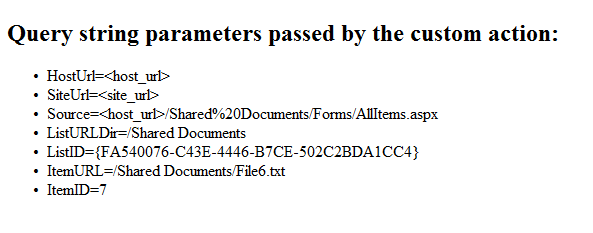
Select My Custom Menu Action in the context menu. You should see something like the following on the remote webpage that opens:
Remote webpage with parameters from the custom action

Select the Back button on your browser to return to the library.
Launching a custom ribbon action

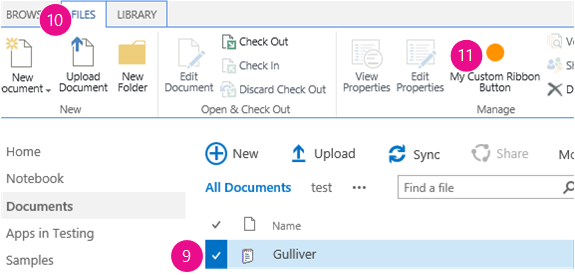
Select any document.
Open the File tab on the ribbon.
Select My Custom Ribbon Button. You see the same remote webpage.
Troubleshooting the solution
| Problem | Solution |
|---|---|
| Visual Studio does not open the browser after you select the F5 key. | Set the SharePoint Add-in project as the startup project. |
| The tokens in the URL are not resolved after you select the F5 key in Visual Studio. | Go to the Site Contents page in the host web, and select the icon for your add-in. |