Customize a list view in SharePoint Add-ins using client-side rendering
Important
The SharePoint Add-In model in SharePoint Online has been deprecated as of November 27th 2023, checkout the full retirement announcement to learn more.
Deprecation means that the feature will not get any new investments, but it's still supported. SharePoint add-in model is retired fully on April 2nd, 2026 and is no longer available after that time. Primary replacement technology for the SharePoint add-in model is SharePoint Framework (SPFx) which continues to be supported also in future.
In SharePoint, client-side rendering provides a way for you to produce your own output for a set of controls that are hosted on a SharePoint page. It enables you to use well-known technologies, such as HTML and JavaScript, to define the rendering logic of SharePoint list views. With client-side rendering, you can specify your own JavaScript resources and host them in the data storage options that are available to your add-ins, such as in a document library. A SharePoint-hosted add-in includes only SharePoint components. A SharePoint-hosted add-in has its resources in an isolated subsite of the host web, called the add-in web.
Prerequisites for using the examples in this article
To follow the steps in this example, you need the following:
Visual Studio 2015 and the latest Microsoft Office Developer Tools
A SharePoint development environment (add-in isolation required for on-premises scenarios)
For guidance about how to set up a development environment that fits your needs, see Two types of SharePoint Add-ins: SharePoint-hosted and provider-hosted.
Core concepts to help you understand list view customization with client-side rendering
The following table lists useful articles that can help you understand the concepts that are involved in a list view customization scenario.
| Article title | Description |
|---|---|
| SharePoint Add-ins | Learn about the new add-in model in Microsoft SharePoint that enables you to create add-ins, which are small, easy-to-use solutions for end users. |
| UX design for SharePoint Add-ins | Learn about the UX options that you have when you are building SharePoint Add-ins. |
| Host webs, add-in webs, and SharePoint components in SharePoint | Learn about the difference between host webs and add-in webs. Find out which SharePoint components can be included in a SharePoint Add-in, which components are deployed to the host web, which components are deployed to the add-in web, and how the add-in web is deployed in an isolated domain. |
Code example: Customize a list view by using client-side rendering
The following steps show you how to customize a list view that is deployed to the add-in web by using client-side rendering.
Create the SharePoint Add-in project.
Create a new list definition with a custom view.
Provide the custom rendering logic in a JavaScript file.
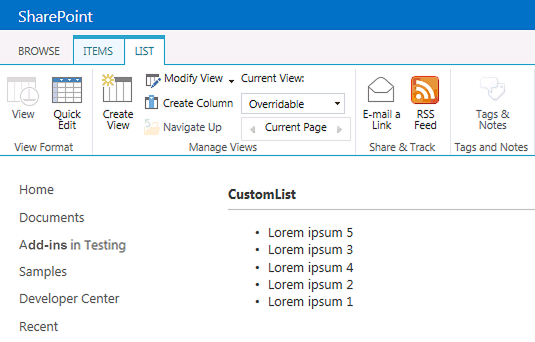
The following figure shows a client-side rendered view of an announcements list.
Custom view of an announcements list

To create the SharePoint Add-in project
Open Visual Studio 2015 as administrator. (To do this, right-click the Visual Studio icon on the Start menu, and select Run as administrator.)
Create a new project using the SharePoint Add-in template.
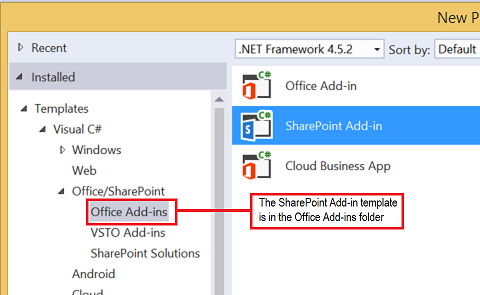
The following figure shows the location of the SharePoint Add-in template in Visual Studio 2015, under Templates > Visual C# > Office/SharePoint > Office Add-ins.
Add-in for SharePoint Visual Studio template

Provide the URL of the SharePoint website that you want to use for debugging.
Select SharePoint-hosted as the hosting option for your add-in.
To create a new list definition
Right-click the SharePoint Add-in project, and add a new List item. Create a customizable list based on Announcements.
Copy the following markup and paste it in the Views element in the Schema.xml file of your list feature. The markup performs the following tasks:
Declares a new view named Overridable with a BaseViewID=2.
Provides a value for the JSLink element that points to a JavaScript file that is provisioned with the add-in.
Note
The JSLink property is not supported on Survey or Events lists. A SharePoint calendar is an Events list.
<View BaseViewID="2"
    Name="8d2719f3-c3c3-415b-989d-33840d8e2ddb"
    DisplayName="Overridable"
    Type="HTML"
    WebPartZoneID="Main"
    SetupPath="pages\viewpage.aspx"
    Url="Overridable.aspx"
    DefaultView="TRUE">
<ViewFields>
    <FieldRef Name="Title" />
</ViewFields>
<Query />
<Toolbar Type="Standard" />
<XslLink>main.xsl</XslLink>
<JSLink Default="TRUE">~site/Scripts/CSRListView.js</JSLink>
</View>
To provide the custom rendering logic in a JavaScript file
Right-click the Scripts folder, and add a new JavaScript file. Name the file CSRListView.js.
Copy the following code and paste it in the CSRListView.js file. The code performs the following tasks:
Provides event handlers for the PreRender and PostRender events.
Provides templates for the Header, Footer, and Item template sets.
Registers the templates.
(function () {
    // Initialize the variable that stores the objects.
    var overrideCtx = {};
    overrideCtx.Templates = {};

    // Assign functions or plain html strings to the templateset objects:
    // header, footer and item.
    overrideCtx.Templates.Header = "<B><#=ctx.ListTitle#></B>" +
        "<hr><ul id='unorderedlist'>";

    // This template is assigned to the CustomItem function.
    overrideCtx.Templates.Item = customItem;
    overrideCtx.Templates.Footer = "</ul>";

    // Set the template to the:
    //  Custom list definition ID
    //  Base view ID
    overrideCtx.BaseViewID = 2;
    overrideCtx.ListTemplateType = 10057;

    // Assign a function to handle the
    // PreRender and PostRender events
    overrideCtx.OnPreRender = preRenderHandler;
    overrideCtx.OnPostRender = postRenderHandler;

    // Register the template overrides.
    SPClientTemplates.TemplateManager.RegisterTemplateOverrides(overrideCtx);
})();

// This function builds the output for the item template.
// It uses the context object to access announcement data.
function customItem(ctx) {

    // Build a listitem entry for every announcement in the list.
    var ret = "<li>" + ctx.CurrentItem.Title + "</li>";
    return ret;
}

// The preRenderHandler attends the OnPreRender event
function preRenderHandler(ctx) {

    // Override the default title with user input.
    ctx.ListTitle = prompt("Type a title", ctx.ListTitle);
}

// The postRenderHandler attends the OnPostRender event
function postRenderHandler(ctx) {

    // You can manipulate the DOM in the postRender event
    var ulObj;
    var i, j;

    ulObj = document.getElementById("unorderedlist");

    // Reverse order the list.
    for (i = 1; i < ulObj.children.length; i++) {
        var x = ulObj.children[i];
        for (j = 1; j < ulObj.children.length; j++) {
            var y = ulObj.children[j];
            if(x.innerText<y.innerText){
                ulObj.insertBefore(y, x);
            }
        }
    }
}
To build and run the solution
Select the F5 key.
Note
When you select F5, Visual Studio builds the solution, deploys the add-in, and opens the permissions page for the add-in.
Select the Trust It button.
Go to your custom List by entering the /Lists/<your_list_instance> address relative to your add-in directory in the add-in web domain (not the host web domain). Add one or two announcements. On the ribbon, select the Overridable view.