練習 - 建立並部署範本規格
注意
當您第一次啟動沙箱並接受條款時,您的 Microsoft 帳戶會與名為「Microsoft Learn 沙箱」的新 Azure 目錄建立關聯。 系統也會將您新增至名為「指引訂用帳戶」的特殊訂用帳戶。
在您的玩具公司,您的小組現已使用 Azure 一段時間,而且您已建立許多日常使用的範本。 您決定採用一個範本並建立範本規格。您要從用來建立 Azure Cosmos DB 帳戶的範本開始。
您的小組決定必須在所有 Azure Cosmos DB 帳戶上設定連續備份。 因此,您想要將備份包含在透過範本規格佈建的 Azure Cosmos DB 帳戶預設設定中。
在此練習中,您會以範本規格形式發佈 Azure Cosmos DB 範本。
在此過程中,您將會:
- 建立將用來作為範本規格的範本。
- 更新範本,以確保參數容易理解並使用。
- 發佈範本規格。
- 使用 Azure 入口網站來驗證範本規格。
- 部署範本規格以進行測試。
- 驗證部署。
此練習使用適用於 Visual Studio Code 的 Bicep 延伸模組。 請務必在 Visual Studio Code 中安裝此延伸模組。
建立範本
您可以從小組建立的其中一個範本開始。 該範本會部署 Azure Cosmos DB 帳戶,並將其設定為啟用連續備份。
打開 Visual Studio Code。
建立名為 main.bicep 的新檔案。
儲存空檔案,讓 Visual Studio Code 載入 Bicep 工具。
您可以選取 [檔案]>[另存新檔],或在 Windows 中選取Ctrl+S (macOS 為 ⌘+S)。 請務必記住您儲存檔案的位置。 例如,您可能需要建立指令碼資料夾來儲存檔案。
將下列程式碼複製到 main.bicep:
param location string = resourceGroup().location
param cosmosDBAccountName string = 'toy-${uniqueString(resourceGroup().id)}'

resource cosmosDBAccount 'Microsoft.DocumentDB/databaseAccounts@2021-04-15' = {
  name: cosmosDBAccountName
  kind: 'GlobalDocumentDB'
  location: location
  properties: {
    consistencyPolicy: {
      defaultConsistencyLevel: 'Session'
    }
    locations: [
      {
        locationName: location
        failoverPriority: 0
        isZoneRedundant: false
      }
    ]
    databaseAccountOfferType: 'Standard'
    enableAutomaticFailover: false
    enableMultipleWriteLocations: false
    backupPolicy: {
      type: 'Continuous'
    }
  }
}
請注意,您已將
backupPolicy設定為Continuous。 此值會將 Azure Cosmos DB 設定為連續 (而不是定期) 備份您的資料。儲存檔案。
打開 Visual Studio Code。
建立稱為 azuredeploy.json 的新檔案。
儲存空白檔案,讓 Visual Studio Code 能夠載入 Azure Resource Manager 範本 (ARM 範本) 工具。
您可以選取 [檔案]>[另存新檔],或在 Windows 中選取Ctrl+S (macOS 為 ⌘+S)。 請務必記住您儲存檔案的位置。 例如,您可能需要建立指令碼資料夾來儲存檔案。
將下列程式碼複製到 azuredeploy.js 中:
{
  "$schema": "https://schema.management.azure.com/schemas/2019-04-01/deploymentTemplate.json#",
  "contentVersion": "1.0.0.0",
  "parameters": {
    "location": {
      "type": "string",
      "defaultValue": "[resourceGroup().location]"
    },
    "cosmosDBAccountName": {
      "type": "string",
      "defaultValue": "[concat('toy-', uniqueString(resourceGroup().id))]"
    }
  },
  "resources": [
    {
      "type": "Microsoft.DocumentDB/databaseAccounts",
      "apiVersion": "2021-04-15",
      "name": "[parameters('cosmosDBAccountName')]",
      "kind": "GlobalDocumentDB",
      "location": "[parameters('location')]",
      "properties": {
        "consistencyPolicy": {
          "defaultConsistencyLevel": "Session"
        },
        "locations": [
          {
            "locationName": "[parameters('location')]",
            "failoverPriority": 0,
            "isZoneRedundant": false
          }
        ],
        "databaseAccountOfferType": "Standard",
        "enableAutomaticFailover": false,
        "enableMultipleWriteLocations": false,
        "backupPolicy": {
          "type": "Continuous"
        }
      }
    }
  ]
}
請注意,您已將
backupPolicy設定為Continuous。 此值會將 Azure Cosmos DB 設定為連續 (而不是定期) 備份您的資料。儲存檔案。
讓參數更容易理解
當您使用範本規格時,請務必考慮其他人員如何使用您的範本。 此檢閱對參數而言特別重要,因為這是其他人員與您的程式碼互動的主要方式。 小組範本中的參數不包含描述或有關如何使用這些參數的其他提示,因此您可在這裡新增此資訊。
新增描述,以更新
location參數定義:@description('The Azure region into which the Cosmos DB resources should be deployed.') param location string = resourceGroup().location更新
cosmosDBAccountName參數定義以新增描述,並指定最小與最大名稱長度:@description('The name of the Cosmos DB account. This name must be globally unique, and it must only include lowercase letters, numbers, and hyphens.') @minLength(3) @maxLength(44) param cosmosDBAccountName string = 'toy-${uniqueString(resourceGroup().id)}'儲存檔案。
新增描述,以更新
location參數定義:"location": { "type": "string", "defaultValue": "[resourceGroup().location]", "metadata": { "description": "The Azure region into which the Cosmos DB resources should be deployed." } },更新
cosmosDBAccountName參數定義以新增描述,並指定最小與最大名稱長度:"cosmosDBAccountName": { "type": "string", "defaultValue": "[concat('toy-', uniqueString(resourceGroup().id))]", "maxLength": 44, "minLength": 3, "metadata": { "description": "The name of the Cosmos DB account. This name must be globally unique, and it must only include lowercase letters, numbers, and hyphens." } }儲存檔案。
登入 Azure
若要將此範本部署至 Azure,您必須從 Visual Studio Code 終端機登入您的 Azure 帳戶。 請確定您已安裝 Azure CLI,並記得使用您用來啟動沙箱的相同帳戶登入。
在 [終端機] 功能表上,選取 [新增終端機]。 終端機視窗通常隨即在畫面的下半部開啟。
如果終端視窗右側顯示的殼層為 [bash],則正確的殼層隨即開啟,而您可以跳至下一節。

如果出現 bash 以外的殼層,請選取殼層下拉式清單箭號,然後選取 [Azure Cloud Shell (Bash)]。
![Visual Studio Code 終端視窗的螢幕擷取畫面,其中顯示終端殼層下拉式清單並已選取 [Git Bash (預設)]。](../includes/media/select-shell-bash.png)
在終端機殼層清單中,選取 [bash]。
在終端機中,前往您儲存範本的目錄。 例如,若將範本儲存於 templates 資料夾,則可使用此命令:
cd templates
安裝 Bicep
執行以下命令,確保您有最新版本 Bicep:
az bicep install && az bicep upgrade
登入 Azure
在 Visual Studio Code 終端中,執行下列命令以登入 Azure:
az login在開啟的瀏覽器中,登入您的 Azure 帳戶。
Visual Studio Code 終端機會顯示與此帳戶相關聯的訂用帳戶清單。
將您在此工作階段中執行的所有 Azure CLI 命令,設定為預設的訂用帳戶。
az account set --subscription "Concierge Subscription"注意
如果您最近使用多個沙箱,則終端機可能會顯示多個「指引訂用帳戶」執行個體。 在此情況下,請使用接下來的兩個步驟來將其設定為預設訂用帳戶。 如果上述命令成功,且只列出一個「指引訂用帳戶」,則請略過接下來的兩個步驟。
取得指引訂用帳戶識別碼。
 az account list \
   --refresh \
   --query "[?contains(name, 'Concierge Subscription')].id" \
   --output table
使用訂用帳戶識別碼設定預設訂用帳戶。 將 {your subscription ID} 取代為最新的指引訂用帳戶識別碼。
az account set --subscription {your subscription ID}
設定預設資源群組
使用 Azure CLI 時,您可以設定預設的資源群組,並省略本練習中其餘的 Azure CLI 命令參數。 將預設值設定為在沙箱環境中為您建立的資源群組。
az configure --defaults group="<rgn>[sandbox resource group name]</rgn>"
若要將此範本部署至 Azure,請從 Visual Studio Code 終端登入 Azure 帳戶。 請確定您已安裝 Azure PowerShell,並登入啟動沙箱的相同帳戶。
在 [終端機] 功能表上,選取 [新增終端機]。 終端機視窗通常隨即在畫面的下半部開啟。
如果終端視窗右側顯示的殼層是 powershell 或 pwsh,則已開啟正確的殼層,而您可以跳至下一節。
![Visual Studio Code 終端機視窗的螢幕擷取畫面,其中殼層下拉式清單中顯示 [pwsh] 選項。](../includes/media/pwsh.png)
如果出現 powershell 或 pwsh 以外的殼層,則請選取殼層下拉式清單箭號,然後選取 [PowerShell]。
![Visual Studio Code 終端機視窗的螢幕擷取畫面,其中顯示終端機殼層下拉式清單且已選取 [PowerShell]。](../includes/media/select-shell-powershell.png)
在終端機殼層清單中,選取 [powershell] 或 [pwsh]。
在終端機中,前往您儲存範本的目錄。 例如,若將範本儲存在 templates 資料夾,則可使用此命令:
Set-Location -Path templates
安裝 Bicep CLI
若要從 Azure PowerShell 使用 Bicep,請安裝 Bicep CLI。
使用 Azure PowerShell 登入 Azure
在 Visual Studio Code 終端中,執行下列命令:
Connect-AzAccount瀏覽器隨即開啟,讓您可以登入您的 Azure 帳戶。
登入 Azure 之後,您會在終端機中看到與此帳戶相關聯的訂用帳戶清單。
如果您已啟動沙箱,則會顯示名為「指引訂用帳戶」的訂用帳戶。 請在接下來的練習中使用此訂用帳戶。
將您在此工作階段中執行的所有 Azure PowerShell 命令,設定為預設的訂用帳戶。
$context = Get-AzSubscription -SubscriptionName 'Concierge Subscription'
Set-AzContext $context
注意
如果您最近使用多個沙箱,則終端機可能會顯示多個「指引訂用帳戶」執行個體。 在此情況下,請使用接下來的兩個步驟來將其設定為預設訂用帳戶。 如果上述命令成功,且只列出一個「指引訂用帳戶」,則請略過接下來的兩個步驟。
取得訂用帳戶識別碼。 執行下列命令會列出您的訂用帳戶與其識別碼。 尋找
Concierge Subscription,然後複製第二個資料行的識別碼。 其看起來像aaaa0a0a-bb1b-cc2c-dd3d-eeeeee4e4e4e。Get-AzSubscription將您使用中的訂用帳戶變更為「指引訂用帳戶」。 請務必將 {Your subscription ID} 取代為您複製的訂用帳戶。
$context = Get-AzSubscription -SubscriptionId {Your subscription ID}
Set-AzContext $context
設定預設資源群組
您可以設定預設資源群組,並省略本練習中其餘的 Azure PowerShell 命令參數。 將此預設值設定為在沙箱環境中為您建立的資源群組。
Set-AzDefault -ResourceGroupName <rgn>[sandbox resource group name]</rgn>
若要將此範本部署至 Azure,您必須從 Visual Studio Code 終端機登入您的 Azure 帳戶。 請確定您已安裝 Azure CLI,並記得使用您用來啟動沙箱的相同帳戶登入。
在 [終端機] 功能表上,選取 [新增終端機]。 終端機視窗通常隨即在畫面的下半部開啟。
如果終端視窗右側顯示的殼層為 [bash],則正確的殼層隨即開啟,而您可以跳至下一節。

如果出現 bash 以外的殼層,請選取殼層下拉式清單箭號,然後選取 [Azure Cloud Shell (Bash)]。
![Visual Studio Code 終端視窗的螢幕擷取畫面,其中顯示終端殼層下拉式清單並已選取 [Git Bash (預設)]。](../includes/media/select-shell-bash.png)
在終端機殼層清單中,選取 [bash]。

在終端機中,前往您儲存範本的目錄。 例如,若將範本儲存於 templates 資料夾,則可使用此命令:
cd templates
登入 Azure
在 Visual Studio Code 終端中,執行下列命令以登入 Azure:
az login在開啟的瀏覽器中,登入您的 Azure 帳戶。
Visual Studio Code 終端機會顯示與此帳戶相關聯的訂用帳戶清單。
將您在此工作階段中執行的所有 Azure CLI 命令,設定為預設的訂用帳戶。
az account set --subscription "Concierge Subscription"注意
如果您最近使用多個沙箱,則終端機可能會顯示多個「指引訂用帳戶」執行個體。 在此情況下,請使用接下來的兩個步驟來將其設定為預設訂用帳戶。 如果上述命令成功,且只列出一個「指引訂用帳戶」,則請略過接下來的兩個步驟。
取得指引訂用帳戶識別碼。
 az account list \
   --refresh \
   --query "[?contains(name, 'Concierge Subscription')].id" \
   --output table
使用訂用帳戶識別碼設定預設訂用帳戶。 將 {your subscription ID} 取代為最新的指引訂用帳戶識別碼。
az account set --subscription {your subscription ID}
設定預設資源群組
使用 Azure CLI 時,您可以設定預設的資源群組,並省略本練習中其餘的 Azure CLI 命令參數。 將預設值設定為在沙箱環境中為您建立的資源群組。
az configure --defaults group="<rgn>[sandbox resource group name]</rgn>"
若要將此範本部署至 Azure,請從 Visual Studio Code 終端登入 Azure 帳戶。 請確定您已安裝 Azure PowerShell,並登入啟動沙箱的相同帳戶。
在 [終端機] 功能表上,選取 [新增終端機]。 終端機視窗通常隨即在畫面的下半部開啟。
如果終端視窗右側顯示的殼層是 powershell 或 pwsh,則已開啟正確的殼層,而您可以跳至下一節。
![Visual Studio Code 終端機視窗的螢幕擷取畫面,其中殼層下拉式清單中顯示 [pwsh] 選項。](../includes/media/pwsh.png)
如果出現 powershell 或 pwsh 以外的殼層,則請選取殼層下拉式清單箭號,然後選取 [PowerShell]。
![Visual Studio Code 終端機視窗的螢幕擷取畫面,其中顯示終端機殼層下拉式清單且已選取 [PowerShell]。](../includes/media/select-shell-powershell.png)
在終端機殼層清單中,選取 [powershell] 或 [pwsh]。

在終端機中,前往您儲存範本的目錄。 例如,若將範本儲存在 templates 資料夾,則可使用此命令:
Set-Location -Path templates
使用 Azure PowerShell 登入 Azure
在 Visual Studio Code 終端中,執行下列命令:
Connect-AzAccount瀏覽器隨即開啟,讓您可以登入您的 Azure 帳戶。
登入 Azure 之後,您會在終端機中看到與此帳戶相關聯的訂用帳戶清單。
如果您已啟動沙箱,則會顯示名為「指引訂用帳戶」的訂用帳戶。 請在接下來的練習中使用此訂用帳戶。
將您在此工作階段中執行的所有 Azure PowerShell 命令,設定為預設的訂用帳戶。
$context = Get-AzSubscription -SubscriptionName 'Concierge Subscription'
Set-AzContext $context
注意
如果您最近使用多個沙箱,則終端機可能會顯示多個「指引訂用帳戶」執行個體。 在此情況下,請使用接下來的兩個步驟來將其設定為預設訂用帳戶。 如果上述命令成功,且只列出一個「指引訂用帳戶」,則請略過接下來的兩個步驟。
取得訂用帳戶識別碼。 執行下列命令會列出您的訂用帳戶與其識別碼。 尋找
Concierge Subscription,然後複製第二個資料行的識別碼。 其看起來像aaaa0a0a-bb1b-cc2c-dd3d-eeeeee4e4e4e。Get-AzSubscription將您使用中的訂用帳戶變更為「指引訂用帳戶」。 請務必將 {Your subscription ID} 取代為您複製的訂用帳戶。
$context = Get-AzSubscription -SubscriptionId {Your subscription ID}
Set-AzContext $context
設定預設資源群組
您可以設定預設資源群組,並省略本練習中其餘的 Azure PowerShell 命令參數。 將此預設值設定為在沙箱環境中為您建立的資源群組。
Set-AzDefault -ResourceGroupName <rgn>[sandbox resource group name]</rgn>
以範本規格形式發佈範本
在 Visual Studio Code 終端中,使用這個 Azure PowerShell Cmdlet 來發佈範本規格:
New-AzTemplateSpec `
  -ResourceGroupName <rgn>[sandbox resource group name]</rgn> `
  -Name ToyCosmosDBAccount `
  -Location westus `
  -DisplayName 'Cosmos DB account' `
  -Description "This template spec creates a Cosmos DB account that meets our company's requirements." `
  -Version '1.0' `
  -TemplateFile main.bicep
New-AzTemplateSpec `
  -ResourceGroupName <rgn>[sandbox resource group name]</rgn> `
  -Name ToyCosmosDBAccount `
  -Location westus `
  -DisplayName 'Cosmos DB account' `
  -Description "This template spec creates a Cosmos DB account that meets our company's requirements." `
  -Version '1.0' `
  -TemplateFile azuredeploy.json
在 Visual Studio Code 終端機中,使用這個 Azure CLI 命令來發佈範本規格:
az ts create \
  --name ToyCosmosDBAccount \
  --location westus \
  --display-name "Cosmos DB account" \
  --description "This template spec creates a Cosmos DB account that meets our company's requirements." \
  --version 1.0 \
  --template-file main.bicep
az ts create \
  --name ToyCosmosDBAccount \
  --location westus \
  --display-name "Cosmos DB account" \
  --description "This template spec creates a Cosmos DB account that meets our company's requirements." \
  --version 1.0 \
  --template-file azuredeploy.json
使用 Azure 入口網站來驗證範本規格
前往 Azure 入口網站,並確定您在沙箱訂用帳戶中:
- 在頁面右上角選取您的虛擬人偶。
- 選取 [切換目錄]。 在清單中,選擇 [Microsoft Learn 沙箱] 目錄。
在左側面板中,選取 [資源群組]。
選取 [沙箱資源群組名稱]。
請注意,範本規格包含於資源清單中: 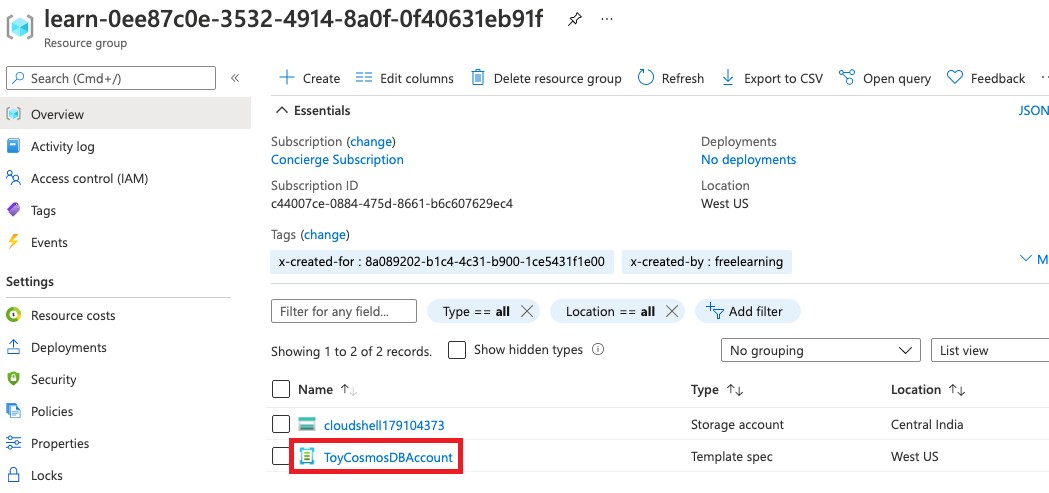
選取 [ToyCosmosDBAccount] 以開啟範本規格。版本與範本檔案都是可見的。
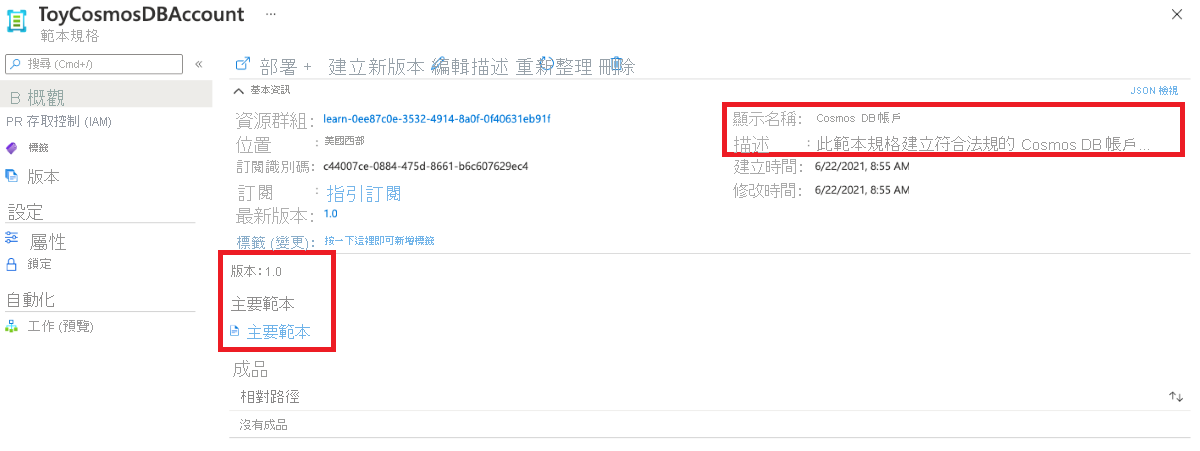
部署範本規格
為了簡單起見,您會將範本規格部署到範本規格本身儲存所在的相同沙箱資源群組中。 一般來說,您會將範本規格維持在不同的資源群組中。 不過,這兩種方法的步驟都一樣。
透過執行下列 Azure PowerShell 命令來取得範本規格版本的資源識別碼:
$templateSpecVersionResourceId = (`
   Get-AzTemplateSpec `
      -ResourceGroupName <rgn>[sandbox resource group name]</rgn> `
      -Name ToyCosmosDBAccount `
      -Version 1.0 `
   ).Versions[0].Id
請注意,您會使用
Versions屬性。 當您部署範本規格時,需參考要所要使用特定版本範本規格的資源識別碼。在 Visual Studio Code 終端中,使用這個 Azure PowerShell 命令來部署範本規格:
New-AzResourceGroupDeployment -TemplateSpecId $templateSpecVersionResourceId
透過執行下列 Azure CLI 命令來取得範本規格版本的資源識別碼:
id=$(az ts show \
 --name ToyCosmosDBAccount \
 --resource-group "<rgn>[sandbox resource group name]</rgn>" \
 --version "1.0" \
 --query "id")
在 Visual Studio Code 終端機中,使用這個 Azure CLI 命令來部署範本規格:
az deployment group create --template-spec $id
部署可能需要一或兩分鐘才能完成。
確認您的部署
在瀏覽器中,返回 Azure 入口網站。 移至您的資源群組。
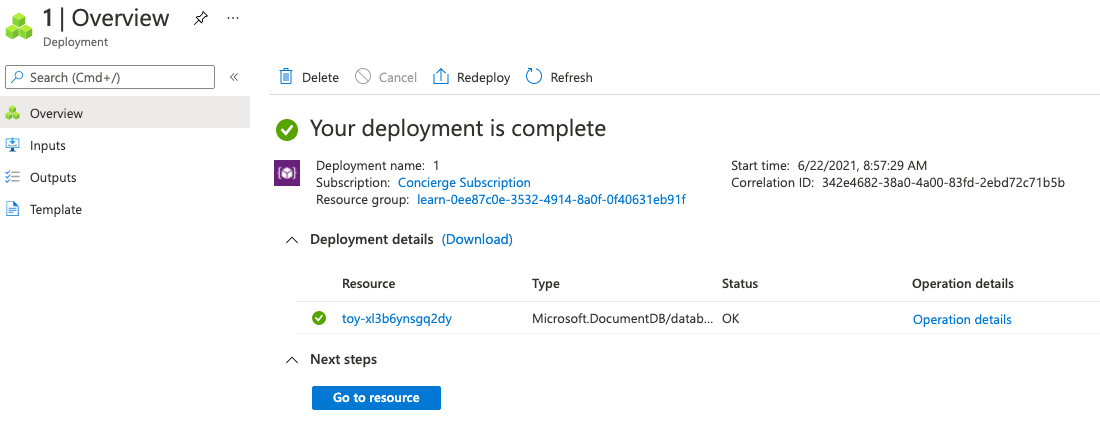
在 [部署] 旁,選取 [1 個成功] 連結以查看部署的詳細資料。

選取部署。

您的部署名稱看起來可能與範例中的部署名稱不同。
選取 [部署詳細資料] 以將其展開。 確認已部署 Azure Cosmos DB 帳戶。
