練習 - 使用迴圈部署多個資源
到目前為止,Bicep 範本已部署單一 Azure SQL 邏輯伺服器,其中包含針對實際執行環境的審核設定。 您現在需要部署多部邏輯伺服器,在貴公司推出新智慧型泰迪熊的每個區域中各一個。
在本練習中,您將擴充先前建立的 Bicep 程式碼,以便您可以將資料庫的執行個體部署到多個 Azure 區域。
在此過程中,您將會:
- 將您現有的 Bicep 程式碼移至模組。
- 使用複製迴圈建立新的 Bicep 檔案,以多次部署模組的資源。
- 部署 Bicep 檔,並確認資源的部署。
- 修改參數以新增其他位置、重新部署檔案,然後確認已部署新的資源。
將資源移至模組
在 Visual Studio Code 中,於 main.bicep 檔案建立所在的相同資料夾中建立名為 modules 的新資料夾。
將 main.bicep 檔案移到您剛才建立的 modules 資料夾中。
將 main.bicep 檔案重新命名為 database.bicep。
使用複製迴圈部署多個執行個體
建立新的 main.bicep 檔案,以取代您剛移動和重新命名的檔案。
開啟新的 main.bicep 檔案,然後新增下列參數:
@description('The Azure regions into which the resources should be deployed.')
param locations array = [
  'westeurope'
  'eastus2'
]

@secure()
@description('The administrator login username for the SQL server.')
param sqlServerAdministratorLogin string

@secure()
@description('The administrator login password for the SQL server.')
param sqlServerAdministratorLoginPassword string
在參數宣告下方,新增下列模組宣告:
module databases 'modules/database.bicep' = [for location in locations: {
  name: 'database-${location}'
  params: {
    location: location
    sqlServerAdministratorLogin: sqlServerAdministratorLogin
    sqlServerAdministratorLoginPassword: sqlServerAdministratorLoginPassword
  }
}]
請注意,模組宣告會針對
locations陣列參數中的所有值進行迴圈。儲存對檔案所做的變更。
驗證 Bicep 檔案
完成上述所有變更之後,main.bicep 檔案看起來應該像下列範例:
@description('The Azure regions into which the resources should be deployed.')
param locations array = [
  'westeurope'
  'eastus2'
]

@secure()
@description('The administrator login username for the SQL server.')
param sqlServerAdministratorLogin string

@secure()
@description('The administrator login password for the SQL server.')
param sqlServerAdministratorLoginPassword string

module databases 'modules/database.bicep' = [for location in locations: {
  name: 'database-${location}'
  params: {
    location: location
    sqlServerAdministratorLogin: sqlServerAdministratorLogin
    sqlServerAdministratorLoginPassword: sqlServerAdministratorLoginPassword
  }
}]
database.bicep 檔案看起來應該像下列範例:
@description('The Azure region into which the resources should be deployed.')
param location string

@secure()
@description('The administrator login username for the SQL server.')
param sqlServerAdministratorLogin string

@secure()
@description('The administrator login password for the SQL server.')
param sqlServerAdministratorLoginPassword string

@description('The name and tier of the SQL database SKU.')
param sqlDatabaseSku object = {
  name: 'Standard'
  tier: 'Standard'
}

@description('The name of the environment. This must be Development or Production.')
@allowed([
  'Development'
  'Production'
])
param environmentName string = 'Development'

@description('The name of the audit storage account SKU.')
param auditStorageAccountSkuName string = 'Standard_LRS'

var sqlServerName = 'teddy${location}${uniqueString(resourceGroup().id)}'
var sqlDatabaseName = 'TeddyBear'
var auditingEnabled = environmentName == 'Production'
var auditStorageAccountName = take('bearaudit${location}${uniqueString(resourceGroup().id)}', 24)

resource sqlServer 'Microsoft.Sql/servers@2023-08-01-preview' = {
  name: sqlServerName
  location: location
  properties: {
    administratorLogin: sqlServerAdministratorLogin
    administratorLoginPassword: sqlServerAdministratorLoginPassword
  }
}

resource sqlDatabase 'Microsoft.Sql/servers/databases@2023-08-01-preview' = {
  parent: sqlServer
  name: sqlDatabaseName
  location: location
  sku: sqlDatabaseSku
}

resource auditStorageAccount 'Microsoft.Storage/storageAccounts@2023-05-01' = if (auditingEnabled) {
  name: auditStorageAccountName
  location: location
  sku: {
    name: auditStorageAccountSkuName
  }
  kind: 'StorageV2'
}

resource sqlServerAudit 'Microsoft.Sql/servers/auditingSettings@2023-08-01-preview' = if (auditingEnabled) {
  parent: sqlServer
  name: 'default'
  properties: {
    state: 'Enabled'
    storageEndpoint: environmentName == 'Production' ? auditStorageAccount.properties.primaryEndpoints.blob : ''
    storageAccountAccessKey: environmentName == 'Production' ? listKeys(auditStorageAccount.id, auditStorageAccount.apiVersion).keys[0].value : ''
  }
}
否則,請複製範例或調整範本,以符合範例。
將 Bicep 範本部署至 Azure
在 Visual Studio Code 終端機中,透過執行下列程式碼,將 Bicep 範本部署到 Azure:
az deployment group create --template-file main.bicep
在 Visual Studio Code 終端機中,透過執行下列 Azure PowerShell 命令,將 Bicep 範本部署到 Azure:
New-AzResourceGroupDeployment -TemplateFile main.bicep
警告
請務必使用您先前所用相同的登入和密碼,否則部署將無法成功完成。
等待部署完成。
檢查部署
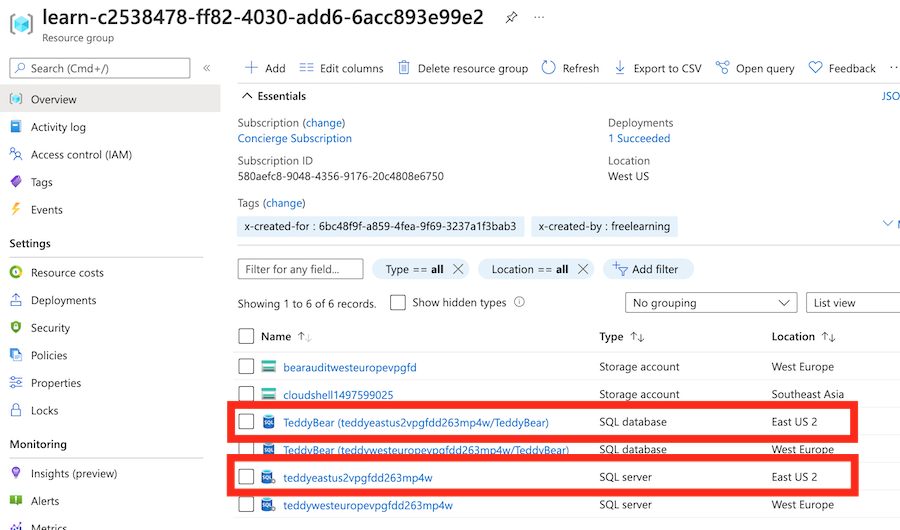
部署完成之後,部署完成後,您需要驗證新的邏輯伺服器和資料庫是否已部署以及它們是否位於正確的 Azure 區域。
選取 [沙箱資源群組名稱]。
確認新的邏輯伺服器和資料庫位於美國東部 2 區域,也就是您在
locations參數預設值中指定的值。
將頁面在瀏覽器中保持開啟。 您稍後將再次檢查部署。
使用邏輯伺服器的其他位置,將範本更新並重新部署至 Azure
泰迪熊玩具小組即將重新啟動,這次目標為亞洲。 小組要求您在東亞區域中部署新的伺服器和資料庫。 若要這樣做,您必須更新 Bicep 參數並重新部署範本。
返回 Visual Studio Code。 在 main.bicep 檔案的頂部,將新值新增至
locations陣列:@description('The Azure regions into which the resources should be deployed.') param locations array = [ 'westeurope' 'eastus2' 'eastasia' ]儲存對檔案所做的變更。
在 Visual Studio Code 終端機中,透過執行下列程式碼重新部署檔案:
az deployment group create --template-file main.bicep
返回 Visual Studio Code。 在 main.bicep 檔案的頂部,將新值新增至
locations陣列:@description('The Azure regions into which the resources should be deployed.') param locations array = [ 'westeurope' 'eastus2' 'eastasia' ]儲存對檔案所做的變更。
在 Visual Studio Code 終端機中,透過執行下列程式碼重新部署檔案:
New-AzResourceGroupDeployment -TemplateFile main.bicep
警告
請務必使用您先前所用相同的登入和密碼,否則部署將無法成功完成。
等待部署完成。
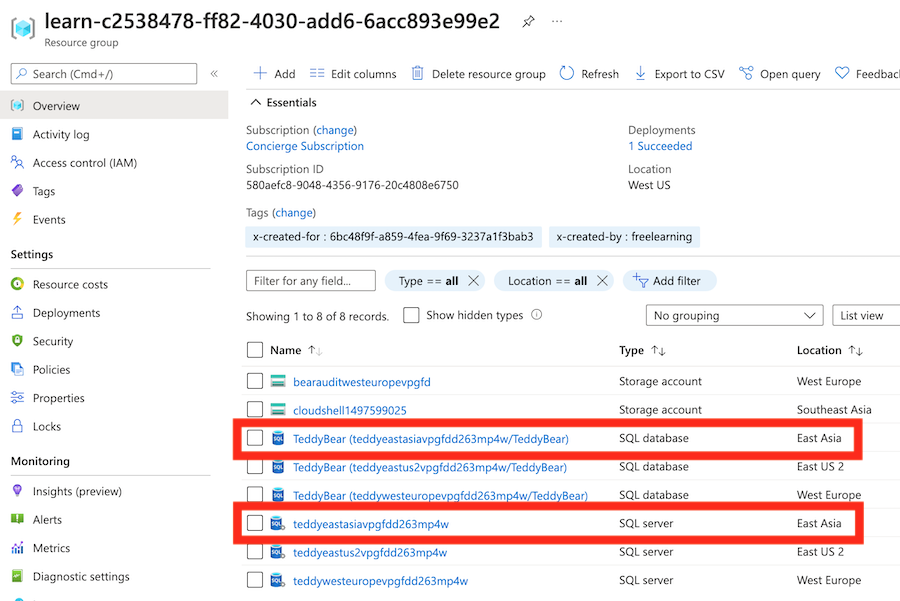
確認重新部署
既然已重新部署資源,建議您確認是否已在東亞區域中建立額外的邏輯伺服器和資料庫資源。
