練習 - 執行程式碼涵蓋範圍測試
與您用於單元測試的工具很類似,您用於程式碼涵蓋範圍的工具,取決於程式設計語言和應用程式架構。
當您以 .NET 應用程式為目標,在 Linux 上執行時,coverlet 是常用的選項。 Coverlet 是適用於 .NET 的跨平台程式碼涵蓋範圍程式庫。
如何使用 .NET 完成程式碼涵蓋範圍?
收集程式碼涵蓋範圍的方式取決於使用哪些程式設計語言和架構,以及有哪些程式碼涵蓋範圍工具可用。
在我們的 Tailspin 案例中,我們發現:
Windows 上的 Visual Studio 可提供一個執行程式碼涵蓋範圍的方式。
然而,因為我們是在 Linux 上建置,所以可以使用 coverlet 這個適用於 .NET 的跨平台程式碼涵蓋範圍程式庫。
單元測試專案需要 coverlet.msbuild NuGet 套件。
程式碼涵蓋範圍結果會寫入至 XML 檔案,以便能夠使用其他工具來處理。 Azure Pipelines 支援 Cobertura 和 JaCoCo 涵蓋範圍結果格式。
在此課程模組中,我們使用 Cobertura。
若要將 Cobertura 涵蓋範圍結果轉換成人類看得懂的格式,我們可以使用名為 ReportGenerator 的工具。
ReportGenerator 提供許多包括 HTML 在內的格式。 HTML 格式會為針對 .NET 專案中的每個類別建立詳細報表。
具體來說,有一個稱為 HtmlInline_AzurePipelines 的 HTML 格式,其會提供符合 Azure Pipelines 的視覺外觀。
如何管理 .NET 工具?
.NET 工具是包含主控台應用程式的特殊 NuGet 套件,例如 ReportGenerator。 您可以全域工具或本機工具的方式來管理 .NET 工具。
全域工具會安裝在集中的位置,並可從任何目錄中呼叫。 電腦上的所有目錄都會使用一個通用工具版本。
本機工具是一個更佳隔離的複本,其是以特定目錄為範圍的 .NET 工具。 範圍可讓不同目錄包含相同工具的不同版本。
您可以使用「資訊清單檔案」來管理指定目錄的本機工具。 這個檔案是 JSON 格式,通常會命名為 dotnet-tools.js。 資訊清單檔可讓您描述建立或執行應用程式時所需的特定工具版本。
當您在原始檔控制和應用程式來源中包含資訊清單檔時,開發人員和組建系統可以執行 dotnet tool restore 命令來安裝資訊清單檔案中列出的所有工具。 當您需要較新版本的本機工具時,您只需要更新資訊清單檔中的版本即可。
為了讓事情保持更加隔離,您會在本課程模組中使用本機工具。 您會建立包含 ReportGenerator 工具的工具資訊清單。 您也會修改組建管線,以安裝 ReportGenerator 工具,將程式碼涵蓋範圍結果轉換為人們可讀取的格式。
在本機執行程式碼涵蓋範圍
在您撰寫任何管線程式碼之前,您可以嘗試以手動方式驗證程序。
在 Visual Studio Code 中,開啟整合式終端。
執行下列
dotnet new命令以建立本機工具資訊清單檔案。dotnet new tool-manifest此命令會建立名 .config/dotnet-tools.json 的檔案。
執行下列
dotnet tool install命令來安裝 ReportGenerator:dotnet tool install dotnet-reportgenerator-globaltool此命令會安裝
ReportGenerator的最新版本,並將一個項目新增至工具資訊清單檔。執行下列
dotnet add package命令,以將coverlet.msbuild套件新增至 TTailspin.SpaceGame.Web.Tests 專案:dotnet add Tailspin.SpaceGame.Web.Tests package coverlet.msbuild執行以下
dotnet test命令以執行單元測試並收集程式碼涵蓋範圍:注意
如果您在 Visual Studio 中使用 PowerShell 終端機,則行接續字元是倒單引號 (`),因此請使用該字元取代多行命令的反斜線字元 (\)。
dotnet test --no-build \
  --configuration Release \
  /p:CollectCoverage=true \
  /p:CoverletOutputFormat=cobertura \
  /p:CoverletOutput=./TestResults/Coverage/
如果命令失敗,請嘗試以如下方式來執行:
MSYS2_ARG_CONV_EXCL="*" dotnet test --no-build \
  --configuration Release \
  /p:CollectCoverage=true \
  /p:CoverletOutputFormat=cobertura \
  /p:CoverletOutput=./TestResults/Coverage/
此命令類似於您先前執行的命令。
/p:旗標會告知 coverlet 使用哪一種程式碼涵蓋範圍格式,以及將結果放置在哪個位置。執行下列
dotnet tool run命令,以使用ReportGenerator將 Cobertura 檔案轉換為 HTML:dotnet tool run reportgenerator \ -- -reports:./Tailspin.SpaceGame.Web.Tests/TestResults/Coverage/coverage.cobertura.xml \ -targetdir:./CodeCoverage \ -reporttypes:HtmlInline_AzurePipelines您會在專案根目錄的 CodeCoverage 資料夾中看到許多 HTML 檔案。
在 Visual Studio Code 中,展開 [CodeCoverage] 資料夾,以滑鼠右鍵按一下 [index.htm],然後選取 [在檔案總管顯示] (在 macOS 上顯示搜尋工具 或在 Linux 上顯示 [開啟包含的資料夾])。
從 Windows 檔案總管 (在 macOS 上為尋找工具),按兩下 index.htm 以在網頁瀏覽器中開啟。
您會看到涵蓋範圍報表摘要。
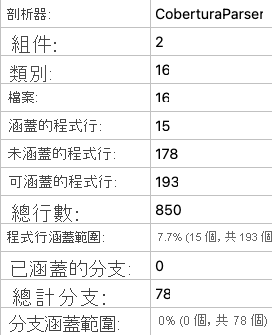
捲動到頁面底部,以查看依類別類型區分的涵蓋範圍細目。
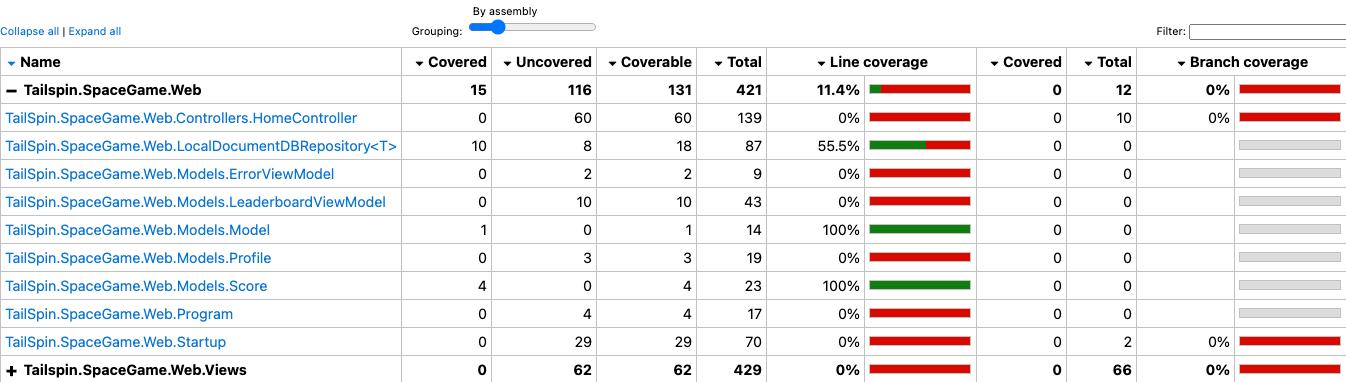
選取
TailSpin.SpaceGame.Web.LocalDocumentDBRepository<T>的連結來查看進一步的詳細資料。您會看到單元測試涵蓋了
GetItemsAsync方法,而CountItemsAsync方法沒有涵蓋範圍。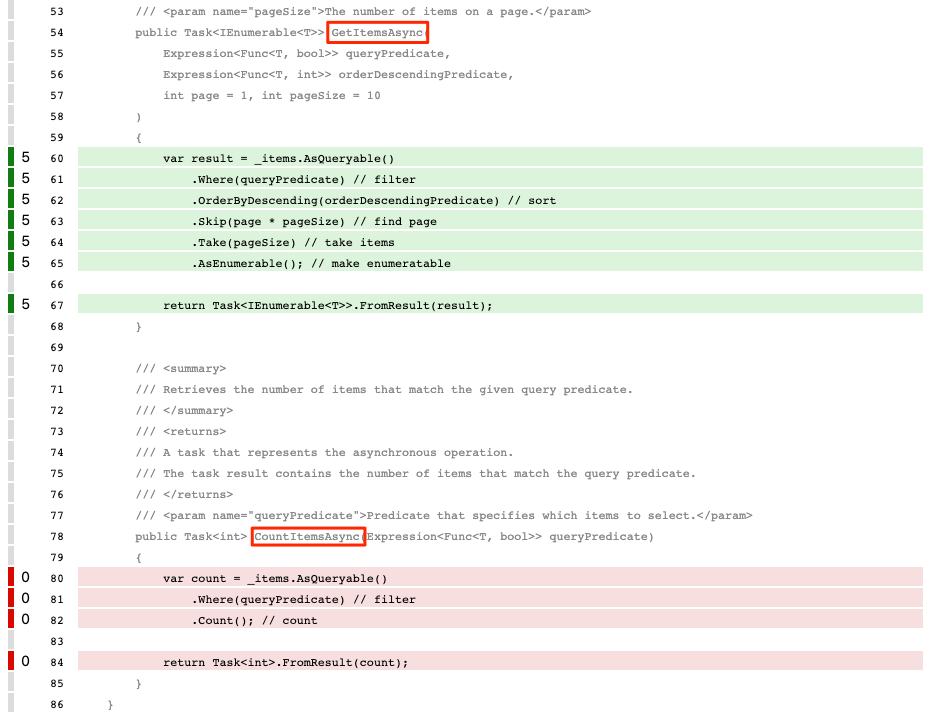
這很合理,因為
FetchOnlyRequestedGameRegion測試方法會呼叫GetItemsAsync方法,但不會呼叫CountItemsAsync方法。 (請參閱 DocumentDBRepository_GetItemsAsyncShould.cs 檔案,以檢閱測試程式碼。)
建立分支
您現在可以在本機建置程式碼涵蓋範圍報表,所以您已經能夠將工作新增至執行相同工作的組建管線。
在此區段中,您會建立名為 code-coverage 的分支 (基於 unit-tests 分支),以保存您的工作。 在實務上,您通常會從 main 分支建立此分支。
在 Visual Studio Code 中,開啟整合式終端。
從終端機中,執行下列
git checkout命令來建立名為code-coverage的分支:git checkout -B code-coverage
新增建置工作
在本節中,您會將測量程式碼涵蓋範圍的工作新增至組建管線。
在 Visual Studio Code 中修改 azure-pipelines.yml,如下所示:
trigger:
- '*'

pool:
  vmImage: 'ubuntu-20.04'
  demands:
  - npm

variables:
  buildConfiguration: 'Release'
  wwwrootDir: 'Tailspin.SpaceGame.Web/wwwroot'
  dotnetSdkVersion: '6.x'

steps:
- task: UseDotNet@2
  displayName: 'Use .NET SDK $(dotnetSdkVersion)'
  inputs:
    version: '$(dotnetSdkVersion)'

- task: Npm@1
  displayName: 'Run npm install'
  inputs:
    verbose: false

- script: './node_modules/.bin/node-sass $(wwwrootDir) --output $(wwwrootDir)'
  displayName: 'Compile Sass assets'

- task: gulp@1
  displayName: 'Run gulp tasks'

- script: 'echo "$(Build.DefinitionName), $(Build.BuildId), $(Build.BuildNumber)" > buildinfo.txt'
  displayName: 'Write build info'
  workingDirectory: $(wwwrootDir)

- task: DotNetCoreCLI@2
  displayName: 'Restore project dependencies'
  inputs:
    command: 'restore'
    projects: '**/*.csproj'

- task: DotNetCoreCLI@2
  displayName: 'Build the project - $(buildConfiguration)'
  inputs:
    command: 'build'
    arguments: '--no-restore --configuration $(buildConfiguration)'
    projects: '**/*.csproj'

- task: DotNetCoreCLI@2
  displayName: 'Install .NET tools from local manifest'
  inputs:
    command: custom
    custom: tool
    arguments: 'restore'

- task: DotNetCoreCLI@2
  displayName: 'Run unit tests - $(buildConfiguration)'
  inputs:
    command: 'test'
    arguments: '--no-build --configuration $(buildConfiguration) /p:CollectCoverage=true /p:CoverletOutputFormat=cobertura /p:CoverletOutput=$(Build.SourcesDirectory)/TestResults/Coverage/'
    publishTestResults: true
    projects: '**/*.Tests.csproj'

- task: DotNetCoreCLI@2
  displayName: 'Create code coverage report'
  inputs:
    command: custom
    custom: tool
    arguments: 'run reportgenerator -reports:$(Build.SourcesDirectory)/**/coverage.cobertura.xml -targetdir:$(Build.SourcesDirectory)/CodeCoverage -reporttypes:HtmlInline_AzurePipelines'

- task: PublishCodeCoverageResults@1
  displayName: 'Publish code coverage report'
  inputs:
    codeCoverageTool: 'cobertura'
    summaryFileLocation: '$(Build.SourcesDirectory)/**/coverage.cobertura.xml'

- task: DotNetCoreCLI@2
  displayName: 'Publish the project - $(buildConfiguration)'
  inputs:
    command: 'publish'
    projects: '**/*.csproj'
    publishWebProjects: false
    arguments: '--no-build --configuration $(buildConfiguration) --output $(Build.ArtifactStagingDirectory)/$(buildConfiguration)'
    zipAfterPublish: true

- task: PublishBuildArtifacts@1
  displayName: 'Publish Artifact: drop'
  condition: succeeded()
此版本是以您現有的組態為依據。 以下是新功能的摘要:
Azure Pipelines 工作 顯示名稱 描述 DotNetCoreCLI@2從本機資訊清單安裝 .NET 工具 安裝資訊清單檔中所列的工具,dotnet-tools.json DotNetCoreCLI@2執行單元測試 - $(buildConfiguration) 執行單元測試並收集 Cobertura 格式的程式碼涵蓋範圍 DotNetCoreCLI@2建立程式碼涵蓋範圍報表 將 Cobertura 輸出轉換為 HTML PublishCodeCoverageResults@1發佈程式碼涵蓋範圍報表 將報表發佈至管線
認可變更並將分支推送至 GitHub
接著,您會將變更推送至 GitHub,並看到此管線執行。 回想一下,您目前是在 code-coverage 分支中。
雖然並非必要,但您可以在這裡個別新增和認可每個檔案,讓每個變更與描述性認可訊息建立關聯。
在 Visual Studio Code 中,移至終端機。
新增並認可 Tailspin.SpaceGame.Web.Tests.csproj 檔案,該檔案現在包含
coverlet.msbuild套件的參考:git add Tailspin.SpaceGame.Web.Tests/Tailspin.SpaceGame.Web.Tests.csproj git commit -m "Add coverlet.msbuild package"新增並認可工具資訊清單檔,dotnet-tools.json:
git add .config/dotnet-tools.json
git commit -m "Add code coverage"
新增並認可 azure-pipelines.yml,其中包含您已更新的組建組態:
git add azure-pipelines.yml
git commit -m "Add code coverage"
將
code-coverage分支推送至 GitHub。git push origin code-coverage
觀察 Azure Pipelines 執行測試
您可以在這裡查看管線中的測試執行,然後從 Azure Test Plans 將結果視覺化。
從 Azure Pipelines 追蹤組建的每個步驟。
當組建完成時,請返回 [摘要] 頁面,然後選取 [程式碼涵蓋範圍] 索引標籤。
當您在本機執行測試時,會看到相同的結果。
![顯示 [程式碼涵蓋範圍] 索引標籤的 Azure Pipelines 螢幕擷取畫面,其中 [程式碼涵蓋範圍] 報表摘要顯示 7.7% 直線涵蓋範圍。](../../azure-devops/run-quality-tests-build-pipeline/media/6-coverage-report-pipeline.png)
您可以從 Azure Pipelines 探索結果,作為選擇性步驟。
新增儀表板小工具
在上一個區段中,您已將 [測試結果趨勢] 小工具新增至儀表板,讓其他人快速檢閱一段時間的測試結果趨勢。
現在您將會新增可摘要說明程式碼涵蓋範圍的第二個小工具。
從新的瀏覽器索引標籤中,前往 marketplace.visualstudio.com。
在 [Azure DevOps] 索引標籤上,搜尋 [程式碼涵蓋範圍]。
選取由 Shane Davis 發佈的 [程式碼涵蓋範圍小工具]。
選取 [免費取得]。
從下拉式清單中選取您的 Azure DevOps 組織。
選取安裝。
返回 Azure DevOps。
移至 [總覽]>[儀表板]。
選取 [編輯]。
搜尋 [程式碼涵蓋範圍],然後選取 [程式碼涵蓋範圍]。

將 [程式碼涵蓋範圍] 拖曳至畫布。
選取齒輪圖示以設定小工具。
請保留所有預設設定,以下除外:
- 寬度:輸入 2
- 組建定義:選取您的管線
- 涵蓋範圍測量:選取 [行]
選取 [儲存]。
選取 [完成編輯]。
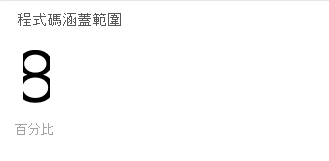
小工具會顯示您的單元測試所涵蓋的程式碼百分比。
您現在可以在管線中設定程式碼涵蓋範圍。 雖然您現有的程式碼涵蓋範圍偏低,但您會有能夠隨時間過去來改善的基準。
之後,您可以設定 coverlet 檢查您的測試是否提供涵蓋範圍的最小閾值。 視您的需求而定,您的閾值可能是 30%、50% 或 80% 的涵蓋範圍。 如果您的測試涵蓋範圍少於這個數量,建置將會失敗。
移除程式碼涵蓋範圍檔案
請回想,您之前執行 Reportgenerator時,有許多 HTML 檔案會出現在專案根目錄的 CodeCoverage 資料夾中。
這些 HTML 檔案不應包含在原始檔控制中,且您不再需要這些檔案。 雖然專案的 .gitignore 檔案已設定成會忽略 CodeCoverage 目錄中的任何項目,但仍建議您刪除這些檔案,使其不會在後續的課程模組中新增至您的 Git 存放庫。
在 Visual Studio Code 中,移至終端機視窗,然後在專案的根目錄中執行下列命令:
rm -rf CodeCoverage/