產生新專案︰深入探討,第二部分
在產生新專案︰深入探討,第一部分中,我們了解如何填入 [新增專案] 對話方塊。 假設您已選取 [Visual C# Windows 應用程式],填寫 [名稱] 和 [位置] 文字方塊,然後按一下 [確定]。
產生方案檔案
選擇應用程式範本會指示 Visual Studio 解壓縮和開啟對應的 .vstemplate 檔案,並啟動範本來解譯此檔案中的 XML 命令。 這些命令會在新的或現有的方案中建立專案和專案項目。
此範本從包含 .vstemplate 檔案的相同 .zip 資料夾中解壓縮來源檔案 (稱為項目範本)。 範本會將這些檔案複製到新專案中,並進行相應的自訂。
範本參數取代
當範本將項目範本複製到新專案時,它會將所有範本參數替換為字串以自訂檔案。 範本參數是前面和後面加上貨幣符號的特殊權杖,例如:$date$。
讓我們看看典型的專案項目範本。 在 Program Files\Microsoft Visual Studio 8\Common7\IDE\ProjectTemplates\CSharp\Windows\1033\WindowsApplication.zip 資料夾中擷取和檢查 Program.cs。
using System;
using System.Collections.Generic;
using System.Windows.Forms;

namespace $safeprojectname$
{
    static class Program
    {
        // source code deleted here for brevity
    }
}
如果您建立名為 Simple 的新 Windows 應用程式專案,範本會將 $safeprojectname$ 參數替換為專案的名稱。
using System;
using System.Collections.Generic;
using System.Windows.Forms;

namespace Simple
{
    static class Program
    {
        // source code deleted here for brevity
    }
}
如需完整的範本參數清單,請參閱範本參數。
查看 .VSTemplate 檔案的內部
基本 .vstemplate 檔案具有此格式
<VSTemplate Version="2.0.0"     xmlns="http://schemas.microsoft.com/developer/vstemplate/2005"     Type="Project">
    <TemplateData>
    </TemplateData>
    <TemplateContent>
    </TemplateContent>
</VSTemplate>
我們查看<產生新專案︰深入探討,第一部分>中的 TemplateData 一節。 本節中的標籤可用來控制 [新增專案] 對話方塊的外觀。
<TemplateContent> 區段中的標籤可控制新專案和專案項目的產生。 以下是 \Program Files\Microsoft Visual Studio 8\Common7\IDE\ProjectTemplates\CSharp\Windows\1033\WindowsApplication.zip 資料夾中 cswindowsapplication.vstemplate 檔案的 <TemplateContent> 區段。
<TemplateContent>
  <Project File="WindowsApplication.csproj" ReplaceParameters="true">
    <ProjectItem ReplaceParameters="true"
      TargetFileName="Properties\AssemblyInfo.cs">
      AssemblyInfo.cs
    </ProjectItem>
    <ProjectItem TargetFileName="Properties\Resources.resx">
      Resources.resx
    </ProjectItem>
    <ProjectItem ReplaceParameters="true"       TargetFileName="Properties\Resources.Designer.cs">
      Resources.Designer.cs
    </ProjectItem>
    <ProjectItem TargetFileName="Properties\Settings.settings">
      Settings.settings
    </ProjectItem>
    <ProjectItem ReplaceParameters="true"       TargetFileName="Properties\Settings.Designer.cs">
      Settings.Designer.cs
    </ProjectItem>
    <ProjectItem ReplaceParameters="true" OpenInEditor="true">
      Form1.cs
    </ProjectItem>
    <ProjectItem ReplaceParameters="true">
      Form1.Designer.cs
    </ProjectItem>
    <ProjectItem ReplaceParameters="true">
      Program.cs
    </ProjectItem>
  </Project>
</TemplateContent>
<Project> 標籤控制專案的產生,而 <ProjectItem> 標籤控制專案項目的產生。 如果參數 ReplaceParameters 為 true,範本將自訂專案檔案或項目中的所有範本參數。 在這種情況下,除了 Settings.settings 之外,所有專案項目都是自訂的。
TargetFileName 參數指定所產生專案檔案或項目的名稱和相對路徑。 這可讓您為專案建立資料夾結構。 如果未指定這個引數,則專案項目將與專案項目範本具有相同的名稱。
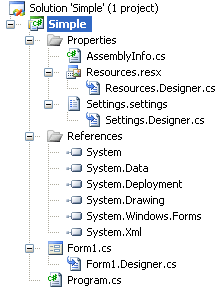
產生的 Windows 應用程式資料夾結構如下所示:

範本中第一個且唯一的 <Project> 標籤的內容如下:
<Project File="WindowsApplication.csproj" ReplaceParameters="true">
這指示 [新增專案] 範本藉由複製和自訂範本項目 windowsapplication.csproj 來建立 Simple.csproj 專案檔案。
設計工具與參考
您可以在 [方案總管] 中看到 Properties 資料夾存在,並包含預期的檔案。 但是專案參考和設計工具檔案相依性又如何呢?例如 Resources.Designer.cs 到 Resources.resx,以及 Form1.Designer.cs 到 Form1.cs 這些是在產生 Simple.csproj 檔案時在該檔案中設定的。
以下是從 Simple.csproj 建立專案參考的 <ItemGroup>:
<ItemGroup>
    <Reference Include="System" />
    <Reference Include="System.Data" />
    <Reference Include="System.Deployment" />
    <Reference Include="System.Drawing" />
    <Reference Include="System.Windows.Forms" />
    <Reference Include="System.Xml" />
</ItemGroup>
您可以看到 [方案總管] 中顯示六個專案參考。 以下是另一個 <ItemGroup> 的區段。 為了清楚起見,已刪除許多程式碼行。 此區段使 Settings.Designer.cs 相依於 Settings.settings:
<ItemGroup>
    <Compile Include="Properties\Settings.Designer.cs">
        <DependentUpon>Settings.settings</DependentUpon>
    </Compile>
</ItemGroup>