使用 Windows ML API 在 Windows 應用程式中部署數據分析模型
在本教學課程的上一個部分中,您已瞭解如何以 ONNX 格式建置和導出模型。 現在,我們將示範如何將導出的模型內嵌至 Windows 應用程式,並藉由呼叫 Windows ML API 在裝置上本機執行。
完成時,您將有一個可運作的數據分析應用程式。
關於範例應用程式
在本教學課程的此步驟中,您將建立可分析鳶尾花表格式數據的應用程式。 應用程式可讓您新增具有必要輸入資訊的 Excel 檔案,或手動輸入輸入參數 – 鳶尾花的花瓣長度和寬度,以 cm 為單位。這些功能將由您在上一個部分中建置和定型的本機儲存類神經網路 ONNX 模型處理。 根據模型輸出,應用程式會顯示正確的鳶尾花類型。
在這裡,我們將逐步引導您完成該程式。
注意
如果您選擇使用預先定義的程式代碼範例,則可以複製 方案檔。 複製存放庫、流覽至此範例,並使用 Visual Studio 開啟 Iris Data Analysis.csproj 檔案。跳至 此頁面的 [啟動應用程式 ] 部分,以查看其使用中。
接下來,我們將引導您如何建立應用程式並新增 Windows ML 程式代碼。
建立 Windows ML Desktop (C#) 應用程式
若要建立運作中的 Windows ML 應用程式,您必須執行下列動作:
- 載入機器學習模型。
- 系結模型的輸入和輸出。
- 評估模型並顯示有意義的結果。
您也需要建立基本 UI,以提供更佳的用戶體驗。
在 Visual Studio 中開啟新專案
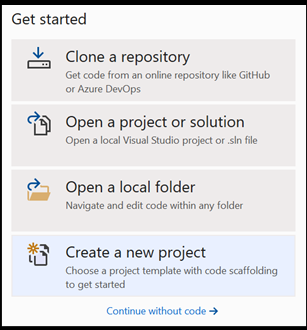
- 這就開始吧。 開啟 Visual Studio,然後選擇
Create a new project。

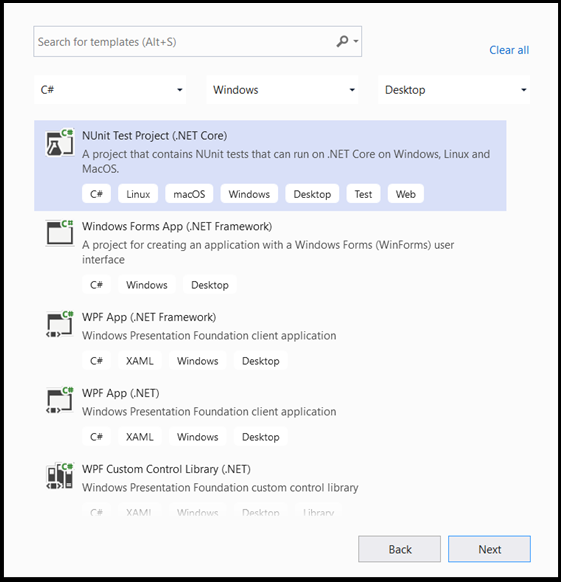
- 在搜尋列中,選擇
C#作為語言、Windows作為目標平臺,以及Dektop作為項目類型。 選取NUnit Test Project (.NET Core)作為專案類型,然後選取next以開啟專案的組態視窗。

- 在設定視窗中,執行下列動作:
- 命名專案。 在這裡,我們稱之為 鳶尾花數據分析。
- 選擇專案的位置。
- 如果您使用 VS2019,請確定
Create directory for solution已核取 。 - 如果您使用 VS2017,請確定
Place solution and project in the same directory未核取。
按 create 以建立您的專案。 最低目標版本視窗可能會快顯。 請確定您的最低版本已設定為 Windows 10 版本 1809 (10.0;組建 17763) 或更高版本。
- 建立項目之後,流覽至專案資料夾、開啟 assets 資料夾
[….\DataClassifier\Assets],然後將檔案Network.onnx複製到此位置。
探索專案方案
讓我們探索您的專案方案。
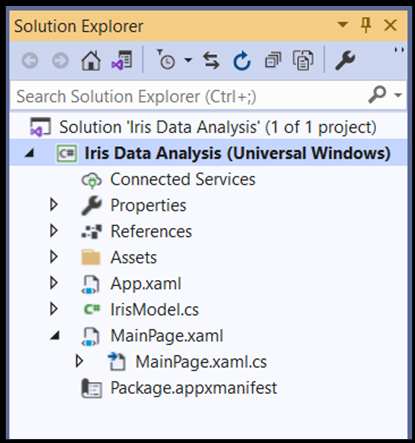
Visual Studio 會自動在 方案總管 內建立數個 cs 程式代碼檔案。 MainPage.xaml 包含 GUI 的 XAML 程式代碼,並 MainPage.xaml.cs 包含您的應用程式程式碼。 如果您之前已建立 UWP 應用程式,則這些檔案應該非常熟悉。
雖然我們已將檔案 Network.onnx 新增至 assets 資料夾,但我們需要正確地將它新增至此專案。
- 以滑鼠右鍵按下 方案總管中的 Assets 資料夾, 然後選擇
Add > Existing Item。 - 瀏覽至 內的
Iris Data Analysis [….\Iris Data Analysis \Assets]Assets 資料夾,尋找Network.onnx model您先前在該處複製的 ,然後選取Add。 - 若要確保您編譯應用程式時模型會建置,請以滑鼠右鍵按下
Network.onnx檔案,然後選取Properties。 將Build Action設定為Content。
您也需要建立新的 cs 程式代碼類別檔案,以容納一些額外的機器學習程式碼,其中包括將呼叫 Windows ML API 的類別和方法。
- 以滑鼠右鍵按下 Visual Studio 中的專案名稱,然後選擇
add與new item。 開啟視窗中,選擇Class並為其命名 -在這裡,我們使用IrisModel.cs。 新的類別檔案會在您的專案下提出上訴。
 .
.
建立 機器學習 程序代碼
在此步驟中,我們將建立所有類別和方法,以呼叫 Windows 機器學習 API。 這些可讓您在專案中載入、系結及評估 ONNX 機器學習模型。
按兩下檔案
IrisModel.cs。將using語句取代為下列專案,以取得您需要之所有 API 的存取權。
using System;
using System.Linq;
using System.Threading.Tasks;
using Windows.AI.MachineLearning;
using Windows.Storage;
初始化機器學習類別
我們需要新增數個類別,IrisModel.cs以協助您與 Windows 機器學習 API 互動。
若要存取已定型的機器學習模型,我們將使用 類別 LearningModel 。 這個類別是命名空間的 Windows.AI.MachineLearning 一部分,代表定型的機器學習模型。 具現化之後, LearningModel 就是您用來與 Windows ML API 互動的主要物件。
若要評估學習模型,您必須建立評估會話。 若要這樣做,您可以使用 類別 LearningModelSession 。 這個類別可用來評估機器學習模型,並將模型系結至裝置,然後執行並評估模型。 當您使用此 API 建立工作階段時,也可以選取裝置來執行您的模型(預設值是您的 CPU)。
此外,您必須指定機器學習模型的輸出標籤。 您可以稍後將這些標籤連接到模型的預測輸出。
注意
若要深入瞭解 LearningModel 和類別,請檢閱 LearningModel 類別檔和 LearningModelSession 類別檔LearningModelSession。
- 將下列程式代碼複製到
IrisModel.cs檔案。
class IrisModel
    {
        private LearningModel _learning_model;
        private LearningModelSession _session;
        private String[] _labels = { "Iris-setosa", "Iris-versicolor", "Iris-virginica"};
載入模型
接下來,您必須載入機器學習模型並建立工作階段,您將使用您剛才定義的類別來執行此作業。 若要載入模型,您將使用 類別的LearningModel數個靜態方法-在我們的案例中,我們將使用LoadFrom 儲存體 FileAsync,這可讓您從ISorageFile異步方式載入 ONNX 模型。
注意
若要深入瞭解載入模型的其他方式,請檢閱 載入模型檔。
- 將下列程式代碼複製到
IrisModel.cs檔案。
public async Task Initialize()
{
    // Load and create the model and session
    var modelFile = await StorageFile.GetFileFromApplicationUriAsync(new Uri($"ms-appx:///Assets//Network.onnx"));
    _learning_model = await LearningModel.LoadFromStorageFileAsync(modelFile);
    _session = new LearningModelSession(_learning_model);
}
定義模型輸入張量
現在,我們將根據您的模型需求定義正確的輸入。 您在上一個部分中建置的網路模型有四個輸入值。 每個輸入值都代表鳶尾花四個特徵的可能大小:公分的花瓣長度、cm 的花瓣寬度和 cm 的花瓣寬度。根據此輸入,模型會傳回最適合這些參數的虹膜類型。 您必須將輸入值的大小限制為有效的邏輯值 - 在本教學課程中,我們將使用下列專案:
- 頭片長度 - 1 釐米到 100 釐米
- 九角寬度 – 1 釐米到 8 釐米
- 花瓣長度 – 0.5 釐米到 10 厘米
- 花瓣寬度 – 0.1 釐米至 5 厘米
- 將下列程式代碼複製到
IrisModel.cs檔案。
private float _sepal_length = 1.0f;
public float Sepal_Length
{
    get
    {
        return _sepal_length;
    }
    set
    {
        // validate range [1,10]
        if (value >= 1 && value <= 10)
        {
            _sepal_length = value;
        }
    }
}

private float _sepal_width = 1.0f;
public float Sepal_Width
{
    get
    {
        return _sepal_width;
    }
    set
    {
        // validate range [1, 8]
        if (value >= 1 && value <= 8)
        {
            _sepal_width = value;
        }
    }
}

private float _petal_length = 0.5f;
public float Petal_Length
{
    get
    {
        return _petal_length;
    }
    set
    {
        // validate range [0.5, 10]
        if (value >= 0.5 && value <= 10)
        {
            _petal_length = value;
        }
    }
}

private float _petal_width = 0.1f;
public float Petal_Width
{
    get
    {
        return _petal_width;
    }
    set
    {
        // validate range [0.1, 5]
        if (value >= 0.1 && value <= 5)
        {
            _petal_width = value;
        }
    }
}
Windows ML API 接受 ONNX 模型所支援之四個描述性類別的輸入值:張量、序列、地圖和影像。 在此情況下,模型需要在 float32[batch_size,4] 圖形中使用 32 位張量 float 物件。 由於批次大小為 1,輸入張量圖形為 [1x4]。
若要建立張量輸入,您將使用 TensorFloat 類別。
類別 TensorFloat 是命名空間的 Windows.AI.MachineLearning 一部分,可用來定義 32 位浮點數物件 - 32 位浮點值的張量。 這個類別包含數個實用的方法來建置張量。 在您的案例中 ,您將使用 CreateFromArray 方法來在模型所需的確切大小中建置張量輸入。 我們將在評估方法內新增該呼叫。
系結和評估模型
既然您已定義模型輸入張量,並具現化定型的模型和會話,現在可以建立方法來系結和評估已定型的機器學習模型。
此方法是機器學習應用程式的關鍵部分。 它包含輸入值的張量化,以及模型輸入的系結。 您稍後會在應用程式程式代碼中使用此模型來評估模型。
若要系結輸入和輸出,您可以使用 類別 LearningModelBinding 。 機器學習模型具有輸入和輸出功能,可將資訊傳入和傳出模型。 請注意,Windows ML API 必須支援必要的功能。 類別 LearningModelBinding 會套用至 LearningModelSession ,以將值系結至具名輸入和輸出功能。
類別 LearningModelBinding 有數個預先定義的方法,可用來將值系結至那些具名功能。 在這裡,您將使用 Bind 方法將值系結至模型。
若要評估您的模型並接收其結果,您可以從 中呼叫 relevent 預先定義的疏散方法 LearningModelSession - 在您的案例中 Evaluate 為 方法。 此方法會提供您需要的功能,並使用 類別所提供的 LearningModelBinding 特徵值來評估機器學習模型。
注意
若要瞭解另一個評估方法來執行模型,請檢閱 LearningModelSession 類別檔,檢查哪些方法可以在 LearningModelSession 上實作。
擷取並顯示結果
此模型會以 Tensor 浮點數輸出形式傳回預測值。 您現在必須擷取模型輸出並顯示正確的結果。 若要這樣做,您會在述詞輸出上執行 GetAsVectorView() 函式,將張量格式轉換成向量。
此模型會傳回三個機率值,分別代表一個特定的鳶尾花類型。 您必須傳回機率最高的標籤。
- 將下列程式代碼複製到
IrisModel.cs檔案。
internal String Evaluate()
{
    // input tensor shape is [1x4]
    long[] shape = new long[2];
    shape[0] = 1;
    shape[1] = 4;

    // set up the input tensor
    float[] input_data = new float[4];
    input_data[0] = _sepal_length;
    input_data[1] = _sepal_width;
    input_data[2] = _petal_length;
    input_data[3] = _petal_width;
    TensorFloat tensor_float = TensorFloat.CreateFromArray(shape, input_data);

    // bind the tensor to "input"
    var binding = new LearningModelBinding(_session);
    binding.Bind("input", tensor_float);

    // evaluate
    var results = _session.Evaluate(binding, "");

    // get the results
    TensorFloat prediction = (TensorFloat)results.Outputs.First().Value;
    var prediction_data = prediction.GetAsVectorView();

    // find the highest predicted value
    int max_index = 0;
    float max_value = 0;
    for (int i = 0; i < prediction_data.Count; i++)
    {
        var val = prediction_data.ElementAt(i);
        if (val > max_value)
        {
            max_value = val;
            max_index = i;
        }
    }

    // return the label corresponding to the highest predicted value
    return _labels.ElementAt(max_index);
}
您現在已完成程式代碼的機器學習部分。 現在,您可以輕鬆地將模型與 Windows 應用程式整合。 在本教學課程的最後一個部分中,我們已使用您已建立的方法,提供基本的 Windows GUI 和控制程式碼來測試模型。
建立應用程式 GUI
若要為您的應用程式建立 GUI 應用程式程式碼,請按兩下程式
MainPage.xaml代碼檔案,然後為您的 GUI 開啟預先定義的範本。將下列程式代碼複製貼到
MainPage.xaml列底下的“Background="{ThemeResource ApplicationPageBackgroundThemeBrush}" " Height="939">。
    <Grid Margin="30,30,30,30">
        <Grid.RowDefinitions>
            <RowDefinition Height="Auto"/>
            <RowDefinition Height="Auto"/>
            <RowDefinition Height="Auto"/>
            <RowDefinition Height="Auto"/>
            <RowDefinition Height="Auto"/>
        </Grid.RowDefinitions>
        <TextBlock x:Name="title" HorizontalAlignment="Left" Text="Data Analysis App - Windows ML" TextWrapping="Wrap" VerticalAlignment="Top" FontSize="32" TextDecorations="Underline" FontWeight="Bold"/>
        <TextBlock x:Name="subtitle" HorizontalAlignment="Left" Text="Provide the input :" TextWrapping="Wrap" VerticalAlignment="Top" FontSize="20" Grid.Row="1" FontWeight="Bold"/>
        <Grid Grid.Row="2">
            <Grid.RowDefinitions>
                <RowDefinition Height="Auto"/>
                <RowDefinition Height="Auto"/>
                <RowDefinition Height="Auto"/>
                <RowDefinition Height="Auto"/>
            </Grid.RowDefinitions>
            <Grid.ColumnDefinitions>
                <ColumnDefinition Width="Auto"/>
                <ColumnDefinition Width="Auto"/>
            </Grid.ColumnDefinitions>
            <TextBlock x:Name="sepal_length" Text="sepal length in mm [range of 10 - 100]:" VerticalAlignment="Center"/>
            <TextBlock x:Name="sepal_width" Text="sepal width in mm [range of 10 - 80]:" VerticalAlignment="Center" Grid.Row="1"/>
            <TextBlock x:Name="petal_length" Text="petal length in mm [range of 5 - 100]:" VerticalAlignment="Center" Grid.Row="2"/>
            <TextBlock x:Name="petal_width" Text="sepal width in mm [range of 1 - 50]:" VerticalAlignment="Center" Grid.Row="3"/>

            <Slider x:Name="sepal_length_input" Minimum="10" Maximum="100" Orientation="Horizontal" Grid.Column="1" Width="200" ValueChanged="sepal_length_input_ValueChanged"/>
            <Slider x:Name="sepal_width_input" Minimum="10" Maximum="80" Orientation="Horizontal" Grid.Row="1" Grid.Column="1" Width="200" ValueChanged="sepal_width_input_ValueChanged"/>
            <Slider x:Name="petal_length_input" Minimum="5" Maximum="100" Orientation="Horizontal" Grid.Row="2" Grid.Column="1" Width="200" ValueChanged="petal_length_input_ValueChanged"/>
            <Slider x:Name="petal_width_input" Minimum="1" Maximum="50" Orientation="Horizontal" Grid.Row="3" Grid.Column="1" Width="200" ValueChanged="petal_width_input_ValueChanged"/>
        </Grid>
        <TextBlock x:Name="output" Text="Output:" FontSize="20" FontWeight="Bold" Grid.Row="3"/>
        <Grid Grid.Row="4">
            <Grid.ColumnDefinitions>
                <ColumnDefinition Width="Auto"/>
                <ColumnDefinition Width="Auto"/>
            </Grid.ColumnDefinitions>
            <TextBlock x:Name="output_subtitle" Text="Based on the information provided, the Iris type is:"/>
            <TextBlock x:Name="model_output" Text="Model output" FontStyle="Italic"  Grid.Column="1" Margin="10,0,0,0"/>
        </Grid>
    </Grid>
建立應用程控
應用程式應用程式的主要 MainPage.xaml.cs方法,以及執行模型並執行輸出的數個步驟:
- 您將具現化您先前在本教學課程中建立之
IrisModel類別的新物件。 - 您將呼叫
Evaluate()您在模型上一個元件中建置的方法。 這個方法將套用四次,每個輸入參數各一個:花瓣長度、花瓣寬度、花瓣長度和花瓣寬度。
應用程式會根據機器學習預測演算法顯示結果。
- 若要建立應用程控程式代碼,請按兩下程式
MainPage.xaml.cs代碼檔案並新增下列程式代碼。
using Windows.UI.Xaml.Controls;
using Windows.UI.Xaml.Controls.Primitives;
// The Blank Page item template is documented at https://go.microsoft.com/fwlink/?LinkId=402352&clcid=0x409

namespace Iris_Data_Analysis
{
    /// <summary>
    /// An empty page that can be used on its own or navigated to within a Frame.
    /// </summary>
    public sealed partial class MainPage : Page
    {
        private IrisModel _iris_model;

        public MainPage()
        {
            this.InitializeComponent();
            _iris_model = new IrisModel();
#pragma warning disable CS4014 // Because this call is not awaited, execution of the current method continues before the call is completed
            _iris_model.Initialize();
#pragma warning restore CS4014 // Because this call is not awaited, execution of the current method continues before the call is completed
        }

        private void sepal_length_input_ValueChanged(object sender, RangeBaseValueChangedEventArgs e)
        {
            if (_iris_model != null)
            {
                _iris_model.Sepal_Length = (float)sepal_length_input.Value / 10.0f;
                model_output.Text = _iris_model.Evaluate();
            }
        }

        private void sepal_width_input_ValueChanged(object sender, RangeBaseValueChangedEventArgs e)
        {
            if (_iris_model != null)
            {
                _iris_model.Sepal_Width = (float)sepal_width_input.Value / 10.0f;
                model_output.Text = _iris_model.Evaluate();
            }
        }

        private void petal_length_input_ValueChanged(object sender, RangeBaseValueChangedEventArgs e)
        {
            if (_iris_model != null)
            {
                _iris_model.Petal_Length = (float)petal_length_input.Value / 10.0f;
                model_output.Text = _iris_model.Evaluate();
            }
        }

        private void petal_width_input_ValueChanged(object sender, RangeBaseValueChangedEventArgs e)
        {
            if (_iris_model != null)
            {
                _iris_model.Petal_Width = (float)petal_width_input.Value / 10.0f;
                model_output.Text = _iris_model.Evaluate();
            }
        }
    }
}
啟動應用程式
現在您已準備好啟動應用程式並查看結果。
啟用開發人員模式,並從 Visual Studio 測試您的應用程式。 請確定頂端工具列中的下拉選單設定為 Debug。 如果您的裝置是 64 位,請將 [方案平臺] 變更為 x64,以在本機計算機上執行專案,如果專案為 32 位,請將 x86 變更為 x86。
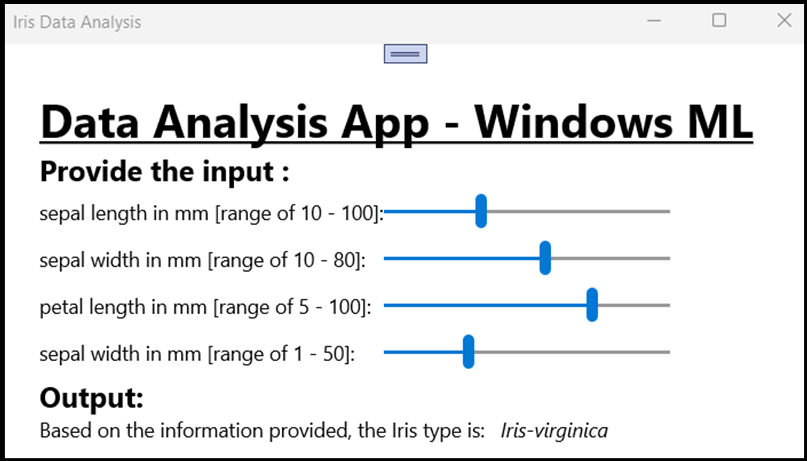
應用程式 GUI 包含四個滑桿,可變更必要參數的輸入。 輸入中的任何變更都會根據預測演算法產生新的輸出。 輸出會顯示在輸入滑桿下方。
您可以看到,指定的花瓣長度 = 40mm,花瓣寬度 = 50,花瓣長度 = 75,而花瓣寬度 = 15,應用程式會產生 Iris-versicolor 類型的輸入!

摘要
您剛建立第一個 Windows 機器學習 應用程式,從模型建立到成功執行。
其他資源
若要深入了解此教學課程中提及的主題,請瀏覽下列資源:
- Windows ML 工具:深入瞭解 Windows ML 儀錶板、WinMLRunner 和 mglen Windows ML 程式代碼產生器等工具。
- ONNX 模型:深入瞭解 ONNX 格式。
- Windows ML 效能和記憶體:深入瞭解如何使用 Windows ML 管理應用程式效能。
- Windows 機器學習 API 參考:深入瞭解 Windows ML API 的三個領域。