教學課程:建置以多個平台為目標的簡單相片檢視器
建立較簡單的相片檢視器 WinUI 3 應用程式之後,您可能想知道如何觸達更多使用者,而不需要重寫您的應用程式。 本教學課程使用 Uno Platform 擴充您現有 C# WinUI 3 應用程式的觸達範圍,在原生行動裝置、Web 和桌面之間重複使用商務邏輯和 UI 層。 只要對簡單相片檢視器應用程式進行最少的變更,我們就能對於移植到這些平台的應用程式執行應用程式執的像素完美複本。

必要條件
設定您的開發電腦 (請參閱 開始使用 WinUI)
ASP.NET 和 Web 開發工作負載 (適用於 WebAssembly 開發)

已安裝 .NET 多平臺應用程式 UI 開發(適用於 iOS、Android、Mac Catalyst 開發)

已安裝 .NET 桌面開發 (適用於 Gtk、Wpf 和 Linux Framebuffer 開發)

完成您的環境
如果您已安裝命令列提示字元,請開啟 Windows 終端機,或從 [開始] 功能表開啟 命令提示字元或 Windows Powershell。
安裝或更新
uno-check工具:使用下列命令:
dotnet tool install -g uno.check若要更新此工具,如果您先前已安裝舊版:
dotnet tool update -g uno.check
使用下列命令執行工具:
uno-check遵循工具所提供的指示。 因為它需要修改系統,所以系統可能會提示您提高權限。
安裝 Uno Platform 解決方案範本
啟動 Visual Studio,然後按一下 Continue without code。 從功能表列按一下 Extensions ->Manage Extensions。

在 [擴充功能管理員] 中,展開線上節點並搜尋 Uno、安裝 Uno Platform 延伸模組,或從 Visual Studio Marketplace 下載並安裝它,然後重新啟動 Visual Studio。
![Visual Studio 中 [管理延伸模組] 視窗的螢幕快照,其中具有 Uno Platform 擴充功能作為搜尋結果。](../images/uno/uno-extensions.png)
建立應用程式
既然我們已經準備建立多平台應用程式,我們將採取的方法就是建立新的 Uno Platform 應用程式。 我們將從上一個教學課程的 SimplePhotos WinUI 3 專案將程式碼複製到我們的多平台專案中。 這是可能的,因為 Uno Platform 可讓您重複使用現有的程式碼基底。 對於每個平台所提供的 OS API 相依的功能,您可以輕鬆地讓這些功能隨著時間而運作。 如果您有想要移植到其他平台的現有應用程式,此方法特別有用。
很快,您將能夠獲得這種方法的優點,因為您能夠藉由熟悉的 XAML 類別以及您已經擁有的程式碼基底,鎖定更多平台為目標。
開啟 Visual Studio,並透過 File>New>Project 建立新專案:
![[建立新專案] 對話框的螢幕快照。](../images/uno/uno-create-project.png)
搜尋 Uno,並且選取 Uno Platform App 專案範本:
![[建立新專案] 對話框的螢幕快照,其中 Uno Platform 應用程式作為選取的項目類型。](../images/uno/uno-new-project.png)
使用 Visual Studio 的開始頁面之中的 Uno Platform App 類型建立新的 C# 解決方案。 為了避免與上一個教學課程中的程式碼發生衝突,我們將為此解決方案提供不同的名稱「UnoSimplePhotos」。 指定專案名稱、解決方案名稱和目錄。 在此範例中,我們的 UnoSimplePhotos 多平台專案屬於將存在於 C:\Projects 中的 UnoSimplePhotos 解決方案:
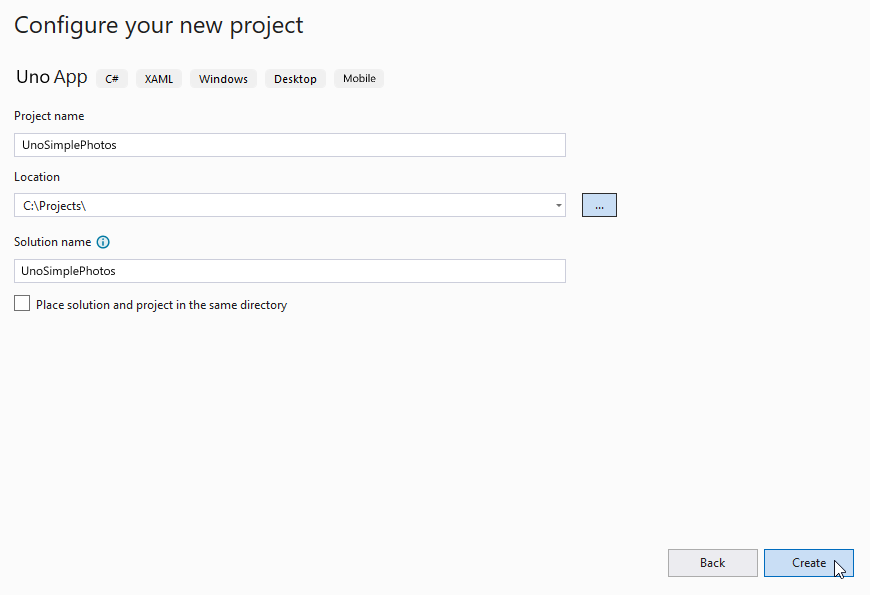
現在,您將選擇基底範本來建立簡單的相片庫應用程式多平台。
Uno Platform App 範本提供兩個 預設選項,可讓您快速開始使用空白解決方案或預設設定,其中包含 Uno.Material 和 Uno.Toolkit 程式庫的參考。 預設設定也包含 Uno.Extensions,用於相依性插入、設定、瀏覽和記錄。 此外,它會使用 MVUX 取代 MVVM,使其成為快速建置實際應用程式的絕佳起點。
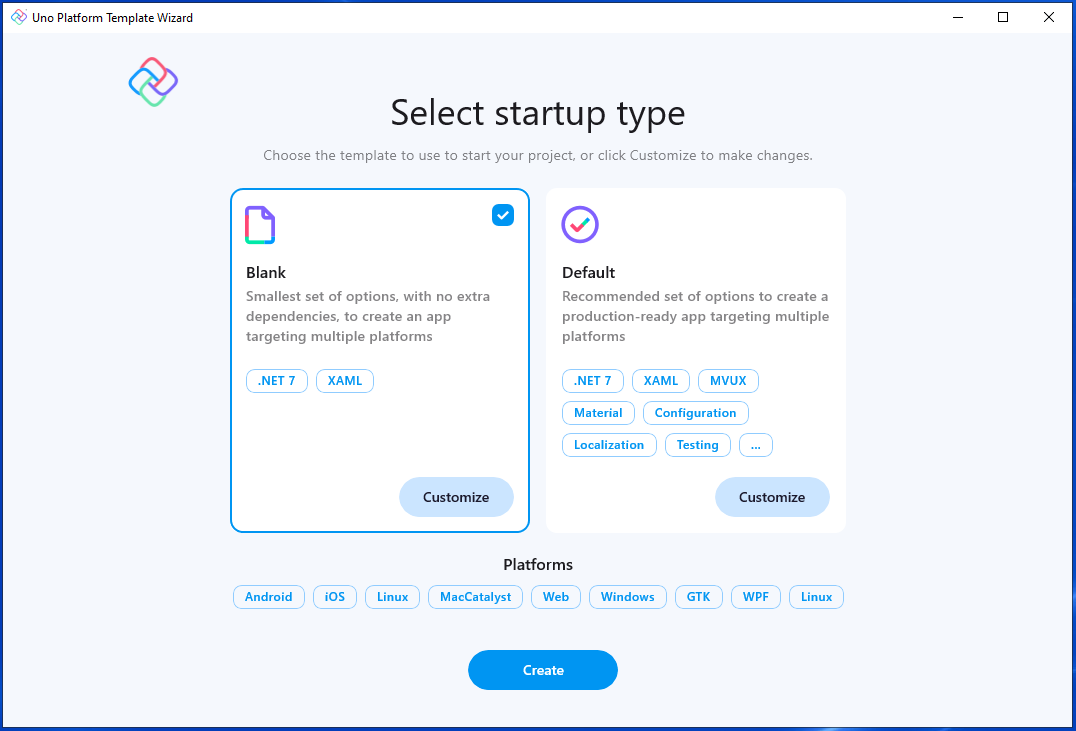
若要讓專案保持簡單,請選取 [空白] 預設值。 然後按一下 [建立] 按鈕。 等候專案建立以及其相依性還原。
編輯器頂部的橫幅可能會要求重新載入專案,請按一下 [重新載入專案]:

您應該會在 [方案總管] 中看到下列預設檔案結構:
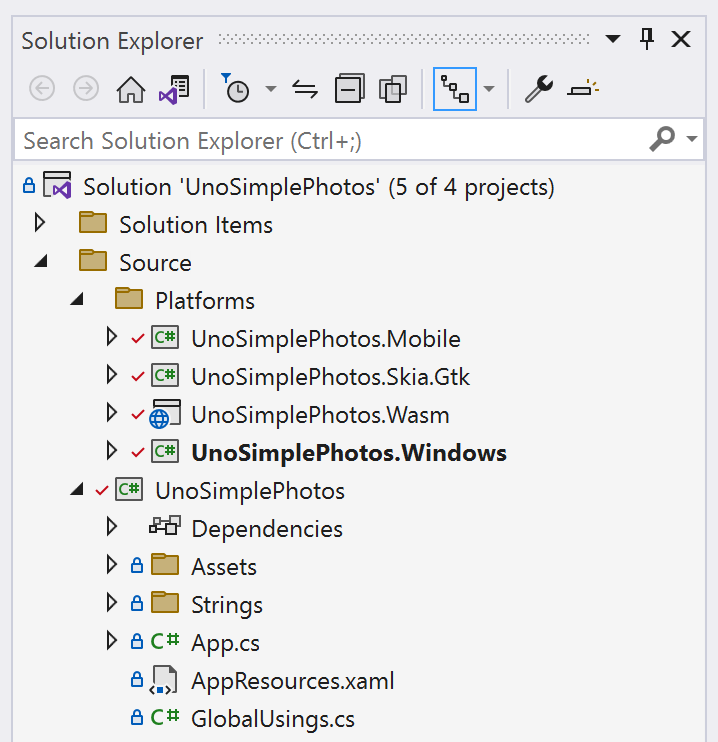
將影像資產新增到專案
您的應用程式需要一些影像才能顯示。 您可以使用上一個教學課程中的相同影像。
在 UnoSimplePhotos 專案中,建立名稱為 Assets 的新資料夾,並將 JPG 影像檔複製到 Samples 子資料夾。 資料夾 Assets 結構現在看起來應該如下所示:
![Visual Studio 中 [方案總管] 窗格的螢幕快照,其中已新增新的檔案和資料夾。](images/uno/solution-explorer-uno-project-new-files.png)
如需建立 Assets 資料夾並新增影像的詳細資訊,請參閱關於資產和影像顯示的 Uno Platform 文件。
正在準備您的應用程式
既然您已產生多平台 WinUI 應用程式的功能起點,您可以從桌面專案將程式碼複製到其中。
複製檢視
因為 Uno Platform 可讓您使用您已熟悉的 XAML 類別,因此您可以複製您在上一個教學課程中建立的相同程式碼。
返回上一個教學課程中的 SimplePhotos 專案。 在 [方案總管] 中,尋找名稱為 MainWindow.xaml 的檔案並加以開啟。 觀察檢視的內容是在 Window 元素內定義,而不是 Page。 這是因為桌面專案是 WinUI 3 應用程式,它可以使用 Window 元素來定義檢視的內容:
<Window x:Class="SimplePhotos.MainWindow"
        xmlns="http://schemas.microsoft.com/winfx/2006/xaml/presentation"
        xmlns:x="http://schemas.microsoft.com/winfx/2006/xaml"
        xmlns:local="using:SimplePhotos"
        xmlns:d="http://schemas.microsoft.com/expression/blend/2008"
        xmlns:mc="http://schemas.openxmlformats.org/markup-compatibility/2006"
        mc:Ignorable="d">

    <Grid>
        <Grid.Resources>
            <DataTemplate x:Key="ImageGridView_ItemTemplate"
                          x:DataType="local:ImageFileInfo">
                <Grid Height="300"
                      Width="300"
                      Margin="8">
                    <Grid.RowDefinitions>
                        <RowDefinition />
                        <RowDefinition Height="Auto" />
                    </Grid.RowDefinitions>

                    <Image x:Name="ItemImage"
                           Source="Assets/StoreLogo.png"
                           Stretch="Uniform" />

                    <StackPanel Orientation="Vertical"
                                Grid.Row="1">
                        <TextBlock Text="{x:Bind ImageTitle}"
                                   HorizontalAlignment="Center"
                                   Style="{StaticResource SubtitleTextBlockStyle}" />
                        <StackPanel Orientation="Horizontal"
                                    HorizontalAlignment="Center">
                            <TextBlock Text="{x:Bind ImageFileType}"
                                       HorizontalAlignment="Center"
                                       Style="{StaticResource CaptionTextBlockStyle}" />
                            <TextBlock Text="{x:Bind ImageDimensions}"
                                       HorizontalAlignment="Center"
                                       Style="{StaticResource CaptionTextBlockStyle}"
                                       Margin="8,0,0,0" />
                        </StackPanel>

                        <RatingControl Value="{x:Bind ImageRating}"
                                       IsReadOnly="True"/>
                    </StackPanel>
                </Grid>
            </DataTemplate>

            <Style x:Key="ImageGridView_ItemContainerStyle"
                   TargetType="GridViewItem">
                <Setter Property="Background"
                        Value="Gray"/>
                <Setter Property="Margin"
                        Value="8"/>
            </Style>

            <ItemsPanelTemplate x:Key="ImageGridView_ItemsPanelTemplate">
                    <ItemsWrapGrid Orientation="Horizontal"
                                   HorizontalAlignment="Center"/>
                </ItemsPanelTemplate>
        </Grid.Resources>

        <GridView x:Name="ImageGridView"
                  ItemsSource="{x:Bind Images}"
                  ItemTemplate="{StaticResource ImageGridView_ItemTemplate}"
                  ItemContainerStyle="{StaticResource ImageGridView_ItemContainerStyle}"
                  ItemsPanel="{StaticResource ImageGridView_ItemsPanelTemplate}"
                  ContainerContentChanging="ImageGridView_ContainerContentChanging" />
    </Grid>
</Window>
Uno Platform 在 Window 元素中找到的控制項進行的多平台實作,例如 GridView、Image 和 RatingControl,可確保檢視本身可在全部支援的平台上運作,而且只需一些簡單的工作。 複製此 Window 的內容,並且在 UnoSimplePhotos Uno Platform 專案的 MainPage.xaml 檔案之中的 Page 元素貼上。 MainPage 檢視 XAML 看起來應該如下所示:
<Page x:Class="UnoSimplePhotos.MainPage"
      xmlns="http://schemas.microsoft.com/winfx/2006/xaml/presentation"
      xmlns:x="http://schemas.microsoft.com/winfx/2006/xaml"
      xmlns:local="using:UnoSimplePhotos"
      xmlns:d="http://schemas.microsoft.com/expression/blend/2008"
      xmlns:mc="http://schemas.openxmlformats.org/markup-compatibility/2006"
      mc:Ignorable="d">

    <Grid>
        <Grid.Resources>
            <DataTemplate x:Key="ImageGridView_ItemTemplate"
                          x:DataType="local:ImageFileInfo">
                <Grid Height="300"
                      Width="300"
                      Margin="8">
                    <Grid.RowDefinitions>
                        <RowDefinition />
                        <RowDefinition Height="Auto" />
                    </Grid.RowDefinitions>

                    <Image x:Name="ItemImage"
                           Source="Assets/StoreLogo.png"
                           Stretch="Uniform" />

                    <StackPanel Orientation="Vertical"
                                Grid.Row="1">
                        <TextBlock Text="{x:Bind ImageTitle}"
                                   HorizontalAlignment="Center"
                                   Style="{StaticResource SubtitleTextBlockStyle}" />
                        <StackPanel Orientation="Horizontal"
                                    HorizontalAlignment="Center">
                            <TextBlock Text="{x:Bind ImageFileType}"
                                       HorizontalAlignment="Center"
                                       Style="{StaticResource CaptionTextBlockStyle}" />
                            <TextBlock Text="{x:Bind ImageDimensions}"
                                       HorizontalAlignment="Center"
                                       Style="{StaticResource CaptionTextBlockStyle}"
                                       Margin="8,0,0,0" />
                        </StackPanel>

                        <RatingControl Value="{x:Bind ImageRating}"
                                       IsReadOnly="True"/>
                    </StackPanel>
                </Grid>
            </DataTemplate>

            <Style x:Key="ImageGridView_ItemContainerStyle"
                   TargetType="GridViewItem">
                <Setter Property="Background"
                        Value="Gray"/>
                <Setter Property="Margin"
                        Value="8"/>
            </Style>

            <ItemsPanelTemplate x:Key="ImageGridView_ItemsPanelTemplate">
                <ItemsWrapGrid Orientation="Horizontal"
                               HorizontalAlignment="Center"/>
            </ItemsPanelTemplate>
        </Grid.Resources>

        <GridView x:Name="ImageGridView"
                  ItemsSource="{x:Bind Images}"
                  ItemTemplate="{StaticResource ImageGridView_ItemTemplate}"
                  ItemContainerStyle="{StaticResource ImageGridView_ItemContainerStyle}"
                  ItemsPanel="{StaticResource ImageGridView_ItemsPanelTemplate}"
                  ContainerContentChanging="ImageGridView_ContainerContentChanging">
        </GridView>
    </Grid>
</Page>
您可能還記得桌面解決方案也有包含 MainWindow.xaml.cs 程式碼後置的檔案,這可以對應到檢視。 在 Uno Platform 專案中,我們複製的 MainPage 檢視有關的程式碼後置會包含在 MainPage.xaml.cs 檔案中。
若要帶入此程式碼後置多平台,我們應該先將下列內容移轉到 MainPage.xaml.cs 檔案:
Images屬性:提供GridView影像檔的可觀察集合建構函式的內容:呼叫
GetItemsAsync()以代表影像檔的項目填入Images集合移除
ImageGridView控制項ItemsSource屬性的手動修改ImageGridView_ContainerContentChanging方法:做為策略的一部分,用來在項目捲動到檢視時逐步載入GridView項目ShowImage方法:將影像檔載入GridViewGetItemsAsync方法:從Samples資料夾取得影像資產檔案LoadImageInfoAsync方法:從已建立的StorageFile建構ImageFileInfo物件
移動全部專案之後,MainPage.xaml.cs 現在看起來應該如下所示:
using Microsoft.UI.Xaml.Controls;
using System.Collections.ObjectModel;
using Windows.Storage;
using Windows.Storage.Search;

namespace UnoSimplePhotos;

public sealed partial class MainPage : Page
{
    public ObservableCollection<ImageFileInfo> Images { get; }
    = new ObservableCollection<ImageFileInfo>();

    public MainPage()
    {
        this.InitializeComponent();
        GetItemsAsync();
    }

    private void ImageGridView_ContainerContentChanging(ListViewBase sender,
        ContainerContentChangingEventArgs args)
    {
        if (args.InRecycleQueue)
        {
            var templateRoot = args.ItemContainer.ContentTemplateRoot as Grid;
            var image = templateRoot.FindName("ItemImage") as Image;
            image.Source = null;
        }

        if (args.Phase == 0)
        {
            args.RegisterUpdateCallback(ShowImage);
            args.Handled = true;
        }
    }

    private async void ShowImage(ListViewBase sender, ContainerContentChangingEventArgs args)
    {
        if (args.Phase == 1)
        {
            // It's phase 1, so show this item's image.
            var templateRoot = args.ItemContainer.ContentTemplateRoot as Grid;
            var image = templateRoot.FindName("ItemImage") as Image;
            var item = args.Item as ImageFileInfo;
            image.Source = await item.GetImageThumbnailAsync();
        }
    }

    private async Task GetItemsAsync()
    {
        StorageFolder appInstalledFolder = Package.Current.InstalledLocation;
        StorageFolder picturesFolder = await appInstalledFolder.GetFolderAsync("Assets\\Samples");

        var result = picturesFolder.CreateFileQueryWithOptions(new QueryOptions());

        IReadOnlyList<StorageFile> imageFiles = await result.GetFilesAsync();
        foreach (StorageFile file in imageFiles)
        {
            Images.Add(await LoadImageInfoAsync(file));
        }
    }

    public async static Task<ImageFileInfo> LoadImageInfoAsync(StorageFile file)
    {
        var properties = await file.Properties.GetImagePropertiesAsync();
        ImageFileInfo info = new(properties,
                                    file, file.DisplayName, file.DisplayType);

        return info;
    }
}
注意
Uno 應用程式專案中的檔案應該使用 UnoSimplePhotos 做為命名空間。
到目前為止,我們處理的主要檢視檔案包含桌面解決方案的全部功能。 複製 ImageFileInfo.cs 模型檔案之後,我們將瞭解如何修改桌面導向的程式碼區塊,以取得多平台相容性。
從桌面專案複製 ImageFileInfo 並且在 ImageFileInfo.cs 檔案貼上。 進行下列變更:
將命名空間重新命名稱為
UnoSimplePhotos,而不是SimplePhotos:// Found towards the top of the file namespace UnoSimplePhotos;將
OnPropertyChanged方法的參數類型變更為可為 Null:// string -> string? protected void OnPropertyChanged([CallerMemberName] string? propertyName = null) ...使
PropertyChangedEventHandler可為 Null:// PropertyChangedEventHandler -> PropertyChangedEventHandler? public event PropertyChangedEventHandler? PropertyChanged;
放在一起,檔案看起來應該如下所示:
using Microsoft.UI.Xaml.Media.Imaging;
using System.ComponentModel;
using System.Runtime.CompilerServices;
using Windows.Storage;
using Windows.Storage.FileProperties;
using Windows.Storage.Streams;
using ThumbnailMode = Windows.Storage.FileProperties.ThumbnailMode;

namespace UnoSimplePhotos;

public class ImageFileInfo : INotifyPropertyChanged
{
    public ImageFileInfo(ImageProperties properties,
        StorageFile imageFile,
        string name,
        string type)
    {
        ImageProperties = properties;
        ImageName = name;
        ImageFileType = type;
        ImageFile = imageFile;
        var rating = (int)properties.Rating;
        var random = new Random();
        ImageRating = rating == 0 ? random.Next(1, 5) : rating;
    }

    public StorageFile ImageFile { get; }

    public ImageProperties ImageProperties { get; }

    public async Task<BitmapImage> GetImageSourceAsync()
    {
        using IRandomAccessStream fileStream = await ImageFile.OpenReadAsync();

        // Create a bitmap to be the image source.
        BitmapImage bitmapImage = new();
        bitmapImage.SetSource(fileStream);

        return bitmapImage;
    }

    public async Task<BitmapImage> GetImageThumbnailAsync()
    {
        StorageItemThumbnail thumbnail =
            await ImageFile.GetThumbnailAsync(ThumbnailMode.PicturesView);
        // Create a bitmap to be the image source.
        var bitmapImage = new BitmapImage();
        bitmapImage.SetSource(thumbnail);
        thumbnail.Dispose();

        return bitmapImage;
    }

    public string ImageName { get; }

    public string ImageFileType { get; }

    public string ImageDimensions => $"{ImageProperties.Width} x {ImageProperties.Height}";

    public string ImageTitle
    {
        get => string.IsNullOrEmpty(ImageProperties.Title) ? ImageName : ImageProperties.Title;
        set
        {
            if (ImageProperties.Title != value)
            {
                ImageProperties.Title = value;
                _ = ImageProperties.SavePropertiesAsync();
                OnPropertyChanged();
            }
        }
    }

    public int ImageRating
    {
        get => (int)ImageProperties.Rating;
        set
        {
            if (ImageProperties.Rating != value)
            {
                ImageProperties.Rating = (uint)value;
                _ = ImageProperties.SavePropertiesAsync();
                OnPropertyChanged();
            }
        }
    }

    public event PropertyChangedEventHandler? PropertyChanged;

    protected void OnPropertyChanged([CallerMemberName] string? propertyName = null) =>
        PropertyChanged?.Invoke(this, new PropertyChangedEventArgs(propertyName));
}
這個類別將做為模型來表示 GridView 中的影像檔。 雖然在技術上目前應該可以執行應用程式,但可能無法正確轉譯影像或顯示其屬性。 在下一節中,我們將對這些複製的檔案進行一組變更,使其在多平台內容中相容。
使用前置處理器指示詞
在上一個教學課程的桌面專案中,MainPage.xaml.cs 檔案包含 GetItemsAsync 方法,該方法會列舉代表已安裝套件位置的 StorageFolder 之中的項目。 因為該位置無法在 WebAssembly 等特定平台上使用,因此我們必須變更此方法,使其與全部平台相容。 我們會據此對 ImageFileInfo 類別進行一些變更,以確保相容性。
首先,對 GetItemsAsync 方法進行必要的變更。 使用下列程式碼取代 MainPage.xaml.cs 檔案中的 GetItemsAsync 方法:
private async Task GetItemsAsync()
{
#if WINDOWS
    StorageFolder appInstalledFolder = Package.Current.InstalledLocation;
    StorageFolder picturesFolder = await appInstalledFolder.GetFolderAsync("UnoSimplePhotos\\Assets\\Samples");

    var result = picturesFolder.CreateFileQueryWithOptions(new QueryOptions());

    IReadOnlyList<StorageFile> imageFiles = await result.GetFilesAsync();
#else
    var imageFileNames = Enumerable.Range(1, 20).Select(i => new Uri($"ms-appx:///UnoSimplePhotos/Assets/Samples/{i}.jpg"));
    var imageFiles = new List<StorageFile>();

    foreach (var file in imageFileNames)
    {
        imageFiles.Add(await StorageFile.GetFileFromApplicationUriAsync(file));
    }
#endif
    foreach (StorageFile file in imageFiles)
    {
        Images.Add(await LoadImageInfoAsync(file));
    }
}
這個方法現在使用前置處理器指示詞來判斷要根據平台執行的程式碼。 在 Windows 上,該方法會取得代表已安裝套件位置的 StorageFolder,並從中傳回 Samples 資料夾。 在其他平台上,該方法最多可以有 20 個,使用 Uri 表示影像檔,從 Samples 資料夾取得影像檔。
接下來,調整 LoadImageInfoAsync 方法以配合我們對 GetItemsAsync 方法所做的變更。 使用下列程式碼取代 MainPage.xaml.cs 檔案中的 LoadImageInfoAsync 方法:
public async static Task<ImageFileInfo> LoadImageInfoAsync(StorageFile file)
{
#if WINDOWS
    var properties = await file.Properties.GetImagePropertiesAsync();
    ImageFileInfo info = new(properties,
                                file, file.DisplayName, $"{file.FileType} file");
#else
    ImageFileInfo info = new(file, file.DisplayName, $"{file.FileType} file");
#endif
    return info;
}
與 GetItemsAsync 方法類似,這個方法現在會使用前置處理器指示詞來判斷要根據平台執行的程式碼。 在 Windows 上,該方法會從 StorageFile 取得 ImageProperties,並用它來建立 ImageFileInfo 物件。 在其他平台上,該方法會建構不含 ImageProperties 參數的 ImageFileInfo 物件。 稍後會對 ImageFileInfo 類別進行修改,以配合這項變更。
控制項,例如 GridView 允許漸進式載入更新的項目容器內容,因為它們會捲動到檢視區。 這是使用 ContainerContentChanging 事件所完成。 在上一個教學課程的桌面專案中,ImageGridView_ContainerContentChanging 方法會使用此事件將影像檔載入 GridView。 由於全部平台上都不支援此事件的某些層面,因此我們必須變更此方法,使其與它們相容。
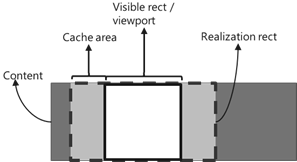
例如,在 Windows 以外的平台上目前不支援 ContainerContentChangingEventArgs.Phase 屬性。 我們需要對 ImageGridView_ContainerContentChanging 方法進行變更,以配合這項變更。 使用下列程式碼取代 MainPage.xaml.cs 檔案中的 ImageGridView_ContainerContentChanging 方法:
private void ImageGridView_ContainerContentChanging(
ListViewBase sender,
ContainerContentChangingEventArgs args)
{

    if (args.InRecycleQueue)
    {
        var templateRoot = args.ItemContainer.ContentTemplateRoot as Grid;
        var image = templateRoot?.FindName("ItemImage") as Image;
        if (image is not null)
        {
            image.Source = null;
        }
    }

#if WINDOWS
        if (args.Phase == 0)
        {
            args.RegisterUpdateCallback(ShowImage);
            args.Handled = true;
        }
#else
    ShowImage(sender, args);
#endif
}
現在,只有在平台是 Windows 時,才會使用 ContainerContentChangingEventArgs.RegisterUpdateCallback() 註冊特殊化回呼。 否則會直接呼叫 ShowImage 方法。 我們也需要對 ShowImage 方法進行變更,才能與對 ImageGridView_ContainerContentChanging 方法進行的變更一起運作。 使用下列程式碼取代 MainPage.xaml.cs 檔案中的 ShowImage 方法:
private async void ShowImage(ListViewBase sender, ContainerContentChangingEventArgs args)
{
    if (
#if WINDOWS
            args.Phase == 1
#else
        true
#endif
        )
    {

        // It's phase 1, so show this item's image.
        var templateRoot = args.ItemContainer.ContentTemplateRoot as Grid;
        var image = templateRoot?.FindName("ItemImage") as Image;
        var item = args.Item as ImageFileInfo;
#if WINDOWS
        if (image is not null && item is not null)
        {
            image.Source = await item.GetImageThumbnailAsync();
        }
#else
        if (item is not null)
        {
            await item.GetImageSourceAsync();
        }
#endif
    }
}
同樣地,前置處理器指示詞可確保 ContainerContentChangingEventArgs.Phase 屬性只用於支援它的平台上。 我們使用先前未使用的 GetImageSourceAsync() 方法,將影像檔載入非 Windows 平台上的 GridView。 此時,我們將藉由編輯 ImageFileInfo 類別來配合上述所做的變更。
為其他平台建立個別的程式碼路徑
更新 ImageFileInfo.cs 以包含稱為 ImageSource 的新屬性,該屬性將用來載入影像檔。
public BitmapImage? ImageSource { get; private set; }
因為 Web 之類的平台不支援 Windows 上隨時可用的進階圖像檔案屬性,因此我們會新增不需要具 ImageProperties 型別參數的建構函式多載。 使用下列程式碼,在現有多載之後新增多載:
public ImageFileInfo(StorageFile imageFile,
    string name,
    string type)
{
    ImageName = name;
    ImageFileType = type;
    ImageFile = imageFile;
}
這個建構函式多載是用來在 Windows 以外的平台上建構 ImageFileInfo 物件。 因為我們這麼做了,所以讓 ImageProperties 屬性可為 Null 很合理。 使用下列程式碼將 ImageProperties 屬性更新為可為 Null:
public ImageProperties? ImageProperties { get; }
更新 GetImageSourceAsync 方法以使用 ImageSource 屬性,而不是只傳回 BitmapImage 物件。 使用下列程式碼取代 ImageFileInfo.cs 檔案中的 GetImageSourceAsync 方法:
public async Task<BitmapImage> GetImageSourceAsync()
{
    using IRandomAccessStream fileStream = await ImageFile.OpenReadAsync();

    // Create a bitmap to be the image source.
    BitmapImage bitmapImage = new();
    bitmapImage.SetSource(fileStream);

    ImageSource = bitmapImage;
    PropertyChanged?.Invoke(this, new PropertyChangedEventArgs(nameof(ImageSource)));

    return bitmapImage;
}
若要避免在 Null 時取得的 ImageProperties 值,請進行下列變更:
修改
ImageDimensions屬性以使用 Null 條件運算子:public string ImageDimensions => $"{ImageProperties?.Width} x {ImageProperties?.Height}";變更
ImageTitle屬性以使用 Null 條件運算子:public string ImageTitle { get => string.IsNullOrEmpty(ImageProperties?.Title) ? ImageName : ImageProperties?.Title; set { if (ImageProperties is not null) { if (ImageProperties.Title != value) { ImageProperties.Title = value; _ = ImageProperties.SavePropertiesAsync(); OnPropertyChanged(); } } } }針對示範目的產生隨機星級評等,將
ImageRating變更為不依賴ImageProperties:public int ImageRating { get => (int)((ImageProperties?.Rating == null || ImageProperties.Rating == 0) ? (uint)Random.Shared.Next(1, 5) : ImageProperties.Rating); set { if (ImageProperties is not null) { if (ImageProperties.Rating != value) { ImageProperties.Rating = (uint)value; _ = ImageProperties.SavePropertiesAsync(); OnPropertyChanged(); } } } }更新產生隨機整數的建構函式,以便不再執行此動作:
public ImageFileInfo(ImageProperties properties, StorageFile imageFile, string name, string type) { ImageProperties = properties; ImageName = name; ImageFileType = type; ImageFile = imageFile; }
使用這些編輯,ImageFileInfo 類別應該包含下列程式碼。 它現在有 Windows 以外的平台新分隔的程式碼路徑:
using Microsoft.UI.Xaml.Media.Imaging;
using System.ComponentModel;
using System.Runtime.CompilerServices;
using Windows.Storage;
using Windows.Storage.FileProperties;
using Windows.Storage.Streams;
using ThumbnailMode = Windows.Storage.FileProperties.ThumbnailMode;
namespace UnoSimplePhotos;
public class ImageFileInfo : INotifyPropertyChanged
{
public BitmapImage? ImageSource { get; private set; }
public ImageFileInfo(ImageProperties properties,
StorageFile imageFile,
string name,
string type)
{
ImageProperties = properties;
ImageName = name;
ImageFileType = type;
ImageFile = imageFile;
}
public ImageFileInfo(StorageFile imageFile,
string name,
string type)
{
ImageName = name;
ImageFileType = type;
ImageFile = imageFile;
}
public StorageFile ImageFile { get; }
public ImageProperties? ImageProperties { get; }
public async Task<BitmapImage> GetImageSourceAsync()
{
using IRandomAccessStream fileStream = await ImageFile.OpenReadAsync();
// Create a bitmap to be the image source.
BitmapImage bitmapImage = new();
bitmapImage.SetSource(fileStream);
ImageSource = bitmapImage;
PropertyChanged?.Invoke(this, new PropertyChangedEventArgs(nameof(ImageSource)));
return bitmapImage;
}
public async Task<BitmapImage> GetImageThumbnailAsync()
{
StorageItemThumbnail thumbnail =
await ImageFile.GetThumbnailAsync(ThumbnailMode.PicturesView);
// Create a bitmap to be the image source.
var bitmapImage = new BitmapImage();
bitmapImage.SetSource(thumbnail);
thumbnail.Dispose();
return bitmapImage;
}
public string ImageName { get; }
public string ImageFileType { get; }
public string ImageDimensions => $"{ImageProperties?.Width} x {ImageProperties?.Height}";
public string ImageTitle
{
get => string.IsNullOrEmpty(ImageProperties?.Title) ? ImageName : ImageProperties.Title;
set
{
if (ImageProperties is not null)
{
if (ImageProperties.Title != value)
{
ImageProperties.Title = value;
_ = ImageProperties.SavePropertiesAsync();
OnPropertyChanged();
}
}
}
}
public int ImageRating
{
    get => (int)((ImageProperties?.Rating == null || ImageProperties.Rating == 0) ? (uint)Random.Shared.Next(1, 5) : ImageProperties.Rating);
    set
    {
        if (ImageProperties is not null)
        {
            if (ImageProperties.Rating != value)
            {
                ImageProperties.Rating = (uint)value;
                _ = ImageProperties.SavePropertiesAsync();
                OnPropertyChanged();
            }
        }
    }
}
public event PropertyChangedEventHandler? PropertyChanged;
protected void OnPropertyChanged([CallerMemberName] string? propertyName = null) =>
PropertyChanged?.Invoke(this, new PropertyChangedEventArgs(propertyName));
}
這個 ImageFileInfo 類別用來表示 GridView 中的影像檔。 最後,我們會對檔案進行變更 MainPage.xaml,以配合模型的變更。
使用平台特定的 XAML 標記
我們的檢視標記中有幾個項目應該只在 Windows 上進行評估。 在 MainPage.xaml 檔案的 Page 元素上新增命名空間,如下所示:
...
xmlns:win="http://schemas.microsoft.com/winfx/2006/xaml/presentation"
現在,在 MainPage.xaml 中,以下列程式碼取代 GridView 元素上的 ItemsPanel 屬性 Setter:
win:ItemsPanel="{StaticResource ImageGridView_ItemsPanelTemplate}"
在屬性名稱前面加上 win:,確保屬性只會在 Windows 上設定。 在 ImageGridView_ItemTemplate 資源內再次執行此動作。 我們只想要載入在 Windows 上使用 ImageDimensions 屬性的元素。 以下列程式碼取代使用 ImageDimensions 屬性的 TextBlock 元素:
<win:TextBlock Text="{x:Bind ImageDimensions}"
               HorizontalAlignment="Center"
               Style="{StaticResource CaptionTextBlockStyle}"
               Margin="8,0,0,0" />
MainPage.xaml 檔案現在看起來應該如下所示:
<Page x:Class="UnoSimplePhotos.MainPage"
      xmlns="http://schemas.microsoft.com/winfx/2006/xaml/presentation"
      xmlns:x="http://schemas.microsoft.com/winfx/2006/xaml"
      xmlns:local="using:UnoSimplePhotos"
      xmlns:d="http://schemas.microsoft.com/expression/blend/2008"
      xmlns:mc="http://schemas.openxmlformats.org/markup-compatibility/2006"
      xmlns:win="http://schemas.microsoft.com/winfx/2006/xaml/presentation"
      mc:Ignorable="d"
      Background="{ThemeResource ApplicationPageBackgroundThemeBrush}">

    <Grid>
        <Grid.Resources>
            <DataTemplate x:Key="ImageGridView_ItemTemplate"
                          x:DataType="local:ImageFileInfo">
                <Grid Height="300"
                      Width="300"
                      Margin="8">
                    <Grid.RowDefinitions>
                        <RowDefinition />
                        <RowDefinition Height="Auto" />
                    </Grid.RowDefinitions>

                    <Image x:Name="ItemImage"
                           Source="{x:Bind ImageSource}"
                           Stretch="Uniform" />

                    <StackPanel Orientation="Vertical"
                                Grid.Row="1">
                        <TextBlock Text="{x:Bind ImageTitle}"
                                   HorizontalAlignment="Center"
                                   Style="{StaticResource SubtitleTextBlockStyle}" />
                        <StackPanel Orientation="Horizontal"
                                    HorizontalAlignment="Center">
                            <TextBlock Text="{x:Bind ImageFileType}"
                                       HorizontalAlignment="Center"
                                       Style="{StaticResource CaptionTextBlockStyle}" />
                            <win:TextBlock Text="{x:Bind ImageDimensions}"
                                           HorizontalAlignment="Center"
                                           Style="{StaticResource CaptionTextBlockStyle}"
                                           Margin="8,0,0,0" />
                        </StackPanel>

                        <RatingControl Value="{x:Bind ImageRating}"
                                       IsReadOnly="True" />
                    </StackPanel>
                </Grid>
            </DataTemplate>

            <Style x:Key="ImageGridView_ItemContainerStyle"
                   TargetType="GridViewItem">
                <Setter Property="Background"
                        Value="Gray" />
                <Setter Property="Margin"
                        Value="8"/>
            </Style>

            <ItemsPanelTemplate x:Key="ImageGridView_ItemsPanelTemplate">
                <ItemsWrapGrid Orientation="Horizontal"
                               HorizontalAlignment="Center"/>
            </ItemsPanelTemplate>
        </Grid.Resources>

        <GridView x:Name="ImageGridView"
                  ItemsSource="{x:Bind Images, Mode=OneWay}"
                  win:ItemsPanel="{StaticResource ImageGridView_ItemsPanelTemplate}"
                  ContainerContentChanging="ImageGridView_ContainerContentChanging"
                  ItemContainerStyle="{StaticResource ImageGridView_ItemContainerStyle}"
                  ItemTemplate="{StaticResource ImageGridView_ItemTemplate}" />
    </Grid>
</Page>
執行應用程式
啟動 UnoSimplePhotos.Windows 目標。 觀察此 WinUI 應用程式與上一個教學課程非常類似。
您現在可以在任何支援的平台上建置並執行您的應用程式。 若要這麼做,您可以使用偵錯工具列下拉式清單來選取要部署的目標平台:
若要執行 WebAssembly (Wasm) 前端:
- 以滑鼠右鍵按一下
UnoSimplePhotos.Wasm專案,選取 [設定為啟始專案] - 按下
UnoSimplePhotos.Wasm按鈕以部署應用程式 - 如有需要,您可以新增並使用
UnoSimplePhotos.Server專案做為替代方案
- 以滑鼠右鍵按一下
若要針對 iOS 進行偵錯:
以滑鼠右鍵按一下
UnoSimplePhotos.Mobile專案,並且選取 [設定為啟始專案]在偵錯工具列下拉式清單中,選取使用中的 iOS 裝置或模擬器。 您必須與 Mac 配對,才能運作。
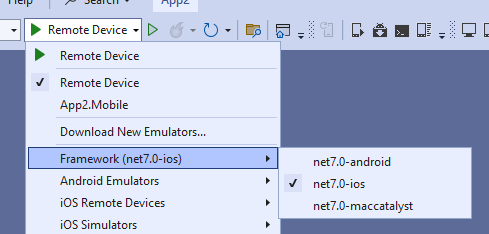
若要針對 Mac Catalyst 進行偵錯:
- 以滑鼠右鍵按一下
UnoSimplePhotos.Mobile專案,並且選取 [設定為啟始專案] - 在偵錯工具列下拉式清單中,選取遠端 macOS 裝置。 您必須與一個配對,才能運作。
- 以滑鼠右鍵按一下
若要對 Android 平台進行偵錯:
- 以滑鼠右鍵按一下
UnoSimplePhotos.Mobile專案,並且選取 [設定為啟始專案] - 在偵錯工具列下拉式清單中,選取使用中的 Android 裝置或模擬器
- 在 [裝置] 子功能表中選取使用中的裝置
- 以滑鼠右鍵按一下
若要使用 Skia GTK 在 Linux 上偵錯:
- 以滑鼠右鍵按一下
UnoSimplePhotos.Skia.Gtk專案,並且選取 [設定為啟始專案] - 按下
UnoSimplePhotos.Skia.Gtk按鈕以部署應用程式
- 以滑鼠右鍵按一下
