HoloLens (第 1 代) 和 Azure 305:函式和記憶體
注意
混合實境學院教學課程的設計是以 HoloLens (第 1 代) 和混合實境沉浸式頭戴裝置為準。 因此,對於仍在尋找這些裝置開發指引的開發人員而言,我們覺得這些教學課程很重要。 這些教學課程不會使用用於 HoloLens 2 的最新工具組或互動進行更新。 系統會保留這些資訊,以繼續在支援的裝置上運作。 未來將會張貼一系列新的教學課程,以示範如何為 HoloLens 2 進行開發。 張貼這些教學課程的連結將會更新此通知。
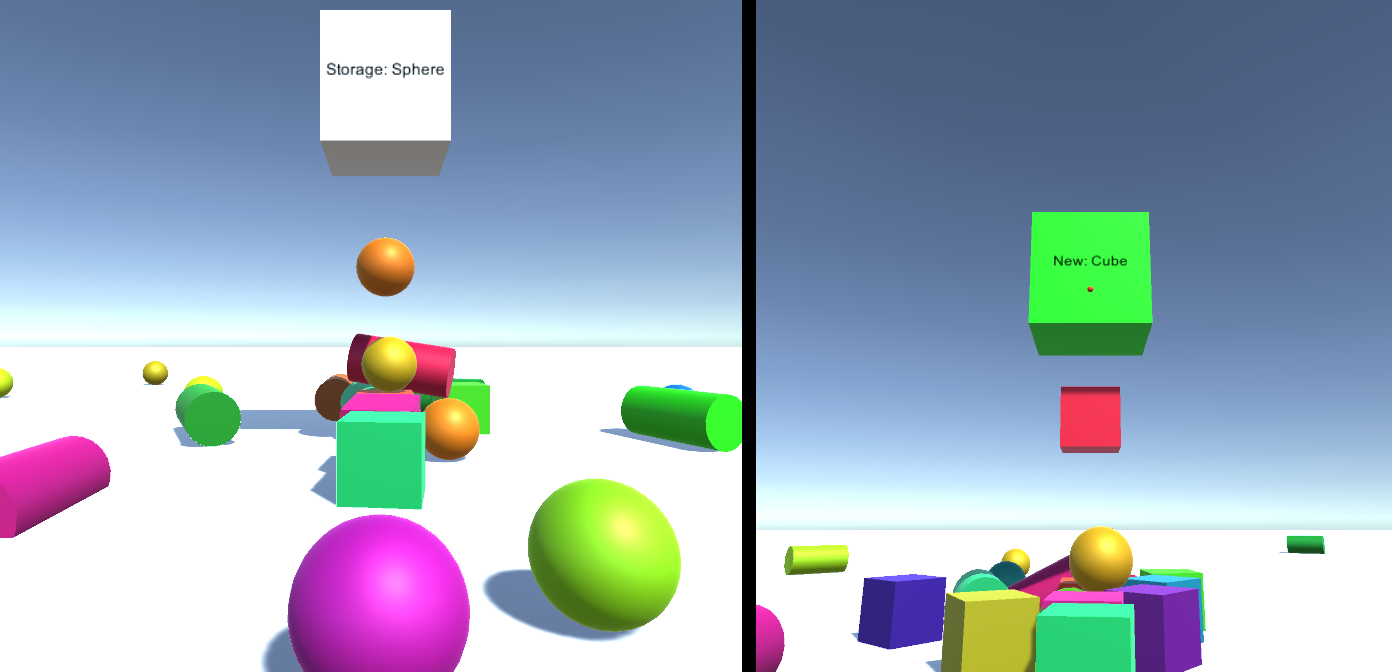
在此課程中,您將瞭解如何在混合實境應用程式中建立和使用 Azure Functions,並將數據與 Azure 儲存體 資源一起儲存。
Azure Functions 是一項Microsoft服務,可讓開發人員在 Azure 中執行小型程式代碼「函式」。 這提供將工作委派給雲端的方式,而不是您的本機應用程式,這有許多優點。 Azure Functions 支援數種開發語言,包括 C#、F#、Node.js、Java 和 PHP。 如需詳細資訊,請流覽 Azure Functions 文章。
Azure 儲存體 是一項Microsoft雲端服務,可讓開發人員儲存數據,並具備高可用性、安全、持久、可調整和備援的保險。 這表示Microsoft會為您處理所有維護和重大問題。 如需詳細資訊,請流覽 Azure 儲存體 文章。
完成本課程之後,您將會有混合實境沉浸式頭戴式裝置應用程式,其可以執行下列動作:
- 允許使用者注視場景。
- 當使用者注視 3D 'button' 時,觸發物件的繁衍。
- Azure 函式會選擇繁衍的物件。
- 當每個物件繁衍時,應用程式會將物件類型儲存在位於 Azure 儲存體 的 Azure 檔案中。
- 第二次載入時, 會擷取 Azure 檔案 數據,並用來重新執行應用程式先前實例的繁衍動作。
在您的應用程式中,您應該瞭解如何將結果與設計整合。 本課程旨在教導您如何整合 Azure 服務與 Unity 專案。 您的工作是使用您在此課程中取得的知識來增強混合實境應用程式。
裝置支援
| 課程 | HoloLens | 沉浸式頭戴裝置 |
|---|---|---|
| MR 和 Azure 305:函式和記憶體 | ✔️ | ✔️ |
注意
雖然本課程主要著重於 Windows Mixed Reality 沉浸式 (VR) 頭戴式裝置,但您也可以將此課程中學到的內容套用至 Microsoft HoloLens。 隨著您遵循課程,您將會看到任何您可能需要採用以支援 HoloLens 變更的附注。
必要條件
注意
本教學課程專為具備 Unity 和 C# 基本經驗的開發人員所設計。 另請注意,本檔內的必要條件和書面指示代表在撰寫期間經過測試和驗證的內容(2018 年 5 月)。 您可以自由使用最新的軟體,如安裝工具文章中所列,不過不應該假設本課程中的資訊會完全符合您在較新的軟體中找到的內容,而不是下面所列的內容。
針對此課程,我們建議使用下列硬體和軟體:
- 開發計算機, 與 Windows Mixed Reality 相容以進行沉浸式 (VR) 頭戴式裝置開發
- 已啟用開發人員模式的 Windows 10 Fall Creators Update (或更新版本)
- 最新的 Windows 10 SDK
- Unity 2017.4
- Visual Studio 2017
- 已啟用開發人員模式的 Windows Mixed Reality 沉浸式 (VR) 頭戴式裝置或Microsoft HoloLens
- 用來建立 Azure 資源的 Azure 帳戶訂用帳戶
- Azure 設定和數據擷取的因特網存取
在您開始使用 Intune 之前
為了避免建置此專案時發生問題,強烈建議您在根資料夾或近根資料夾中建立本教學課程中所提及的專案(長文件夾路徑在建置時可能會導致問題)。
第 1 章 - Azure 入口網站
若要使用 Azure 儲存體 服務,您必須在 Azure 入口網站 中建立和設定記憶體帳戶。
登入 Azure 入口網站。
注意
如果您還沒有 Azure 帳戶,則必須建立一個帳戶。 如果您在教室或實驗室情況中遵循本教學課程,請洽詢您的講師或其中一名監看員,以協助設定您的新帳戶。
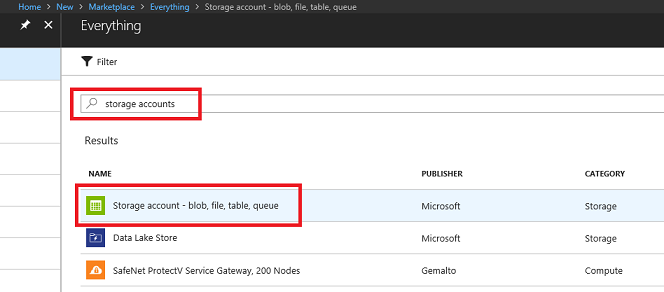
登入之後,按兩下左上角的 [ 新增 ],然後搜尋 記憶體帳戶,然後按兩下 Enter。
注意
[新增] 一詞可能已取代為在較新的入口網站中建立資源。
新頁面將提供 Azure 儲存體 帳戶服務的描述。 在此提示的左下角,選取 [ 建立] 按鈕,以建立與這項服務的關聯。
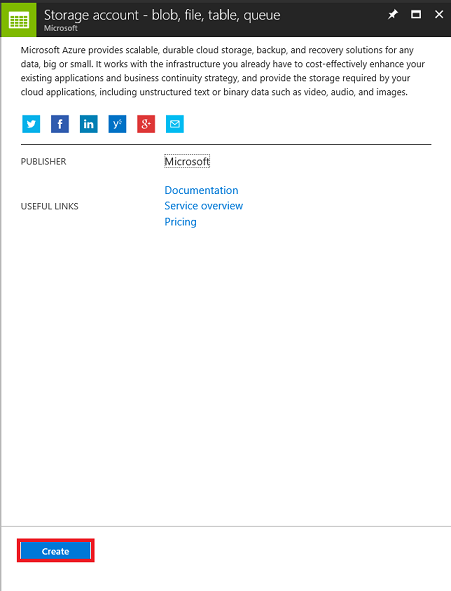
按兩下 [建立]:
插入帳戶的 [名稱],請注意此欄位只接受數位和小寫字母。
針對 [部署模型],選取 [資源管理員]。
針對 [帳戶種類],選取 [記憶體][一般用途 v1]。
判斷資源群組的位置(如果您要建立新的資源群組)。 在理想情況下,位置位於應用程式執行所在的區域中。 某些 Azure 資產僅適用於特定區域。
針對 [復寫],選取 [讀取存取- 異地備援記憶體 ][RA-GRS]。
針對 [效能],請選取 [標準]。
將 [安全傳輸] 保留為 [已停用]。
選取 [訂用帳戶]。
選擇資源群組或建立新的群組。 資源群組提供一種方式來監視、控制存取、布建和管理 Azure 資產集合的計費。 建議將所有與單一專案相關聯的 Azure 服務(例如,例如這些實驗室)保留在通用資源群組之下。
如果您想要深入瞭解 Azure 資源群組,請 瀏覽資源群組文章。
您也必須確認您已瞭解此服務適用的條款和條件。
選取 建立。
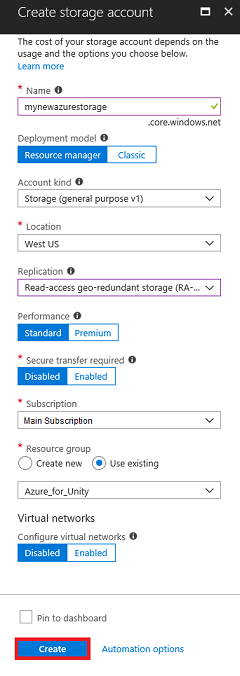
按兩下 [ 建立] 之後,您必須等候服務建立,這可能需要一分鐘的時間。
建立服務實例之後,入口網站中就會顯示通知。

按兩下通知以探索新的服務實例。
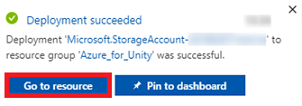
按兩下通知中的 [ 移至資源 ] 按鈕,以探索新的服務實例。 系統會帶您前往新的 記憶體帳戶 服務實例。
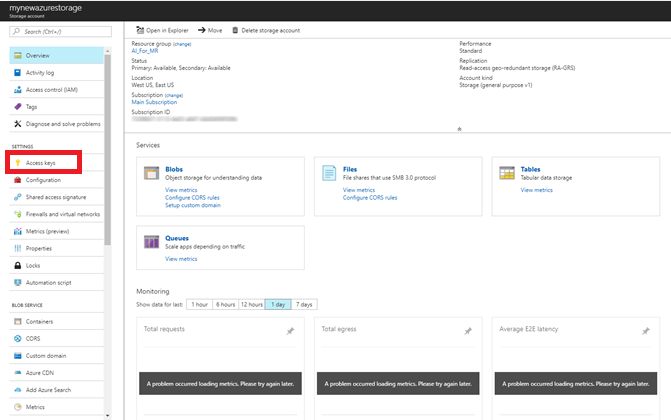
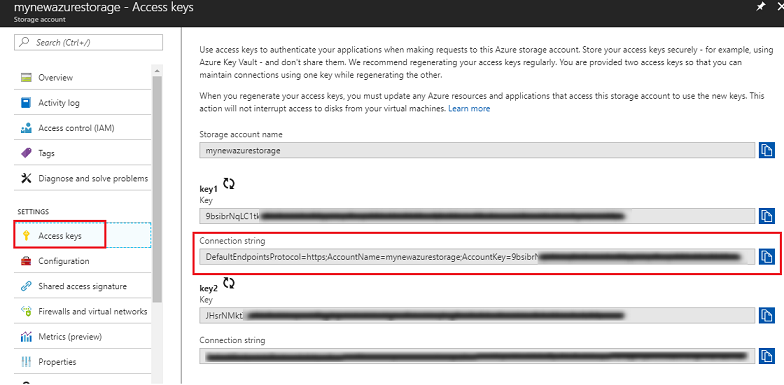
按兩下 [ 存取金鑰],以顯示此雲端服務的端點。 使用 記事本 或類似的密鑰,複製其中一個金鑰以供稍後使用。 此外,請注意 連接字串 值,因為它將用於 AzureServices 類別中,稍後您將建立。
第 2 章 - 設定 Azure 函式
您現在會在 Azure 服務中撰寫 Azure 函 式。
您可以使用 Azure 函 式,在程式代碼中使用傳統函式執行幾乎任何動作,其差異在於此函式可由任何具有認證的應用程式存取您的 Azure 帳戶。
若要建立 Azure 函式:
從您的 Azure 入口網站中,按下左上角的 [新增],然後搜尋函式應用程式,然後按兩下 Enter。

注意
[新增] 一詞可能已取代為在較新的入口網站中建立資源。
新頁面將提供 Azure 函式 App Service 的描述。 在此提示的左下角,選取 [ 建立] 按鈕,以建立與這項服務的關聯。
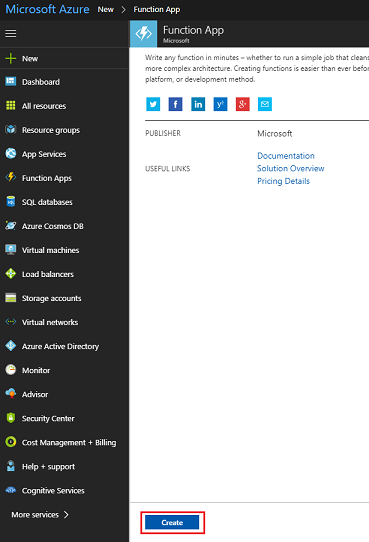
按兩下 [建立]:
提供應用程式名稱。 這裡只能使用字母和數字(允許大寫或小寫)。
選取您慣用的 訂用帳戶。
選擇資源群組或建立新的群組。 資源群組提供一種方式來監視、控制存取、布建和管理 Azure 資產集合的計費。 建議將所有與單一專案相關聯的 Azure 服務(例如,例如這些實驗室)保留在通用資源群組之下。
如果您想要深入瞭解 Azure 資源群組,請 瀏覽資源群組文章。
在此練習中,選取 [Windows ] 作為所選 的 OS。
針對主控方案選取 [取用方案]。
判斷資源群組的位置(如果您要建立新的資源群組)。 在理想情況下,位置位於應用程式執行所在的區域中。 某些 Azure 資產僅適用於特定區域。 為了獲得最佳效能,請選取與記憶體帳戶相同的區域。
針對 [記憶體],選取 [使用現有的],然後使用下拉功能表,尋找您先前建立的記憶體。
讓 Application Insights 離開此練習。
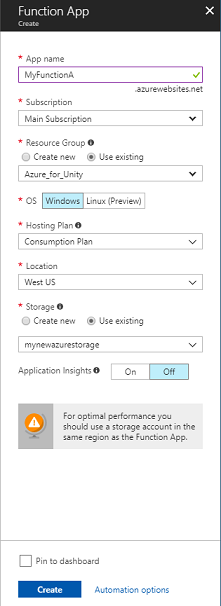
按下 [建立] 按鈕。
按兩下 [ 建立] 之後,您必須等候服務建立,這可能需要一分鐘的時間。
建立服務實例之後,入口網站中就會顯示通知。

按兩下通知以探索新的服務實例。
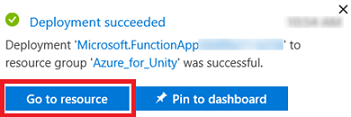
按兩下通知中的 [ 移至資源 ] 按鈕,以探索新的服務實例。 系統會帶您前往新的 函式 App Service 實例。
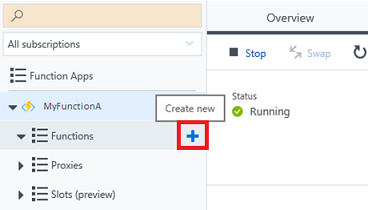
在 [函式應用程式] 儀錶板上,將滑鼠停留在左側面板內,然後按兩下 +(加號)符號。
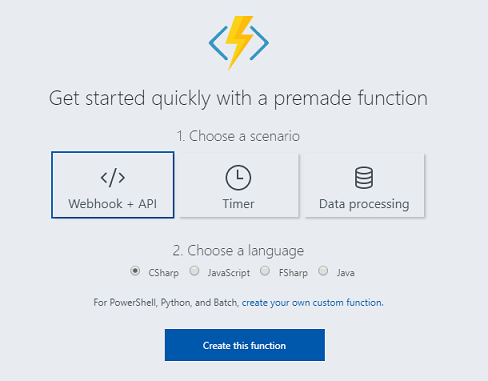
在下一個頁面上,確定 已選取 [Webhook + API ],針對 [選擇語言], 選取 [CSharp],因為這會是本教學課程所使用的語言。 最後,按兩下 [ 建立此函式 ] 按鈕。
如果不是的話,您應該前往代碼頁 (run.csx),如果不是的話,請按兩下左側面板內 [函式] 清單中的新建立的函式。
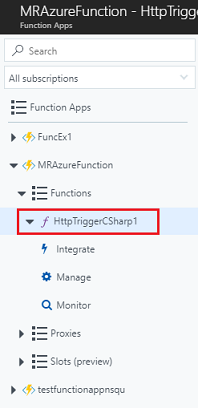
將下列程式代碼複製到您的函式。 呼叫時,此函式只會傳回介於 0 到 2 之間的隨機整數。 別擔心現有的程序代碼,請隨意貼到其頂端。
using System.Net; using System.Threading.Tasks; public static int Run(CustomObject req, TraceWriter log) { Random rnd = new Random(); int randomInt = rnd.Next(0, 3); return randomInt; } public class CustomObject { public String name {get; set;} }選取儲存。
結果看起來應該像下面的影像。
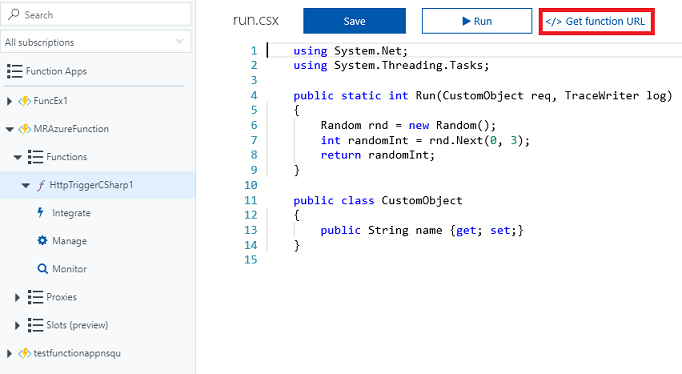
按兩下 [ 取得函式URL ],並記 下顯示的端點 。 您必須將它插入 AzureServices 類別,稍後將在本課程中建立。

第 3 章 - 設定 Unity 專案
以下是使用混合實境進行開發的一般設定,因此是其他專案的良好範本。
設定及測試混合實境沉浸式頭戴式裝置。
注意
本課程不需要運動控制器。 如果您需要設定沉浸式頭戴裝置的支援,請 流覽混合實境設定文章。
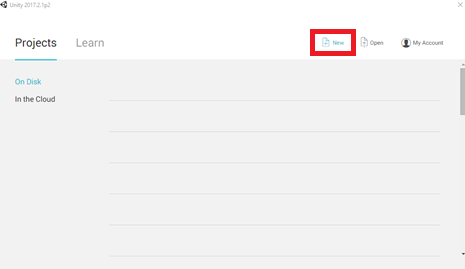
開啟 Unity,然後按兩下 [ 新增]。
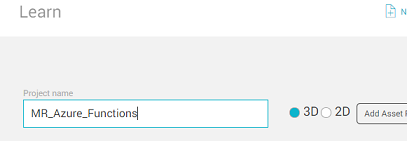
您現在必須提供 Unity 項目名稱。 插入 MR_Azure_Functions。 請確定專案類型已設定為 3D。 將 [ 位置 ] 設定為您適當的位置(請記住,更接近根目錄會更好)。 然後按兩下 [ 建立專案]。
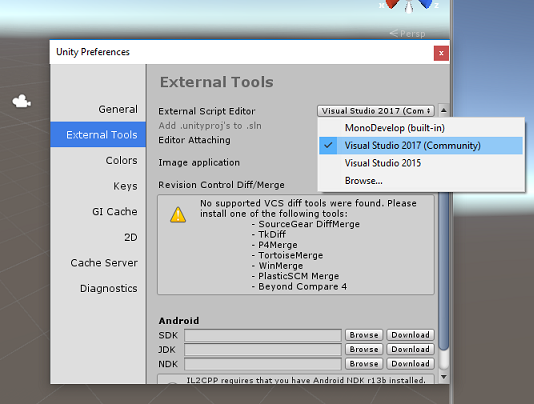
在 Unity 開啟時,值得檢查預設 的腳本編輯器 設定為 Visual Studio。 移至 [ 編輯>喜好設定 ],然後從新視窗流覽至 [外部工具]。 將外部腳本編輯器變更為 Visual Studio 2017。 關閉 [喜好設定] 視窗。
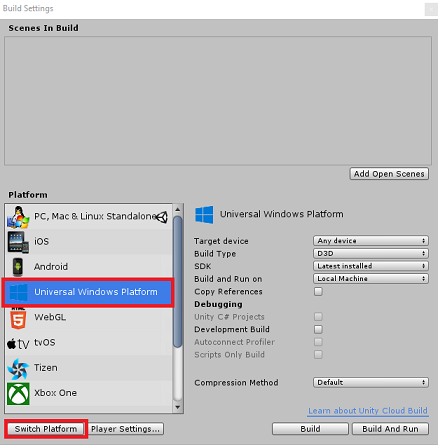
接下來,移至 [檔案>建置設定],然後按兩下 [切換平臺] 按鈕,將平臺切換為 通用 Windows 平台。
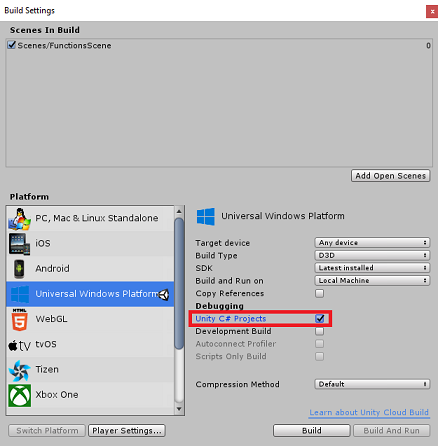
移至 [ 檔案>建置設定 ],並確定:
目標裝置 會設定為 [任何裝置]。
若為 Microsoft HoloLens,請將 [目標裝置] 設定為 [HoloLens]。
組建類型 設定為 D3D
SDK 設定為 [最新安裝]
Visual Studio 版本 設定為 [最新安裝]
[建置並執行 ] 設定為 [ 本機計算機]
儲存場景並將它新增至組建。
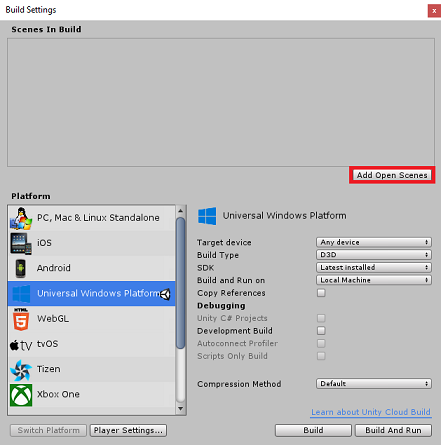
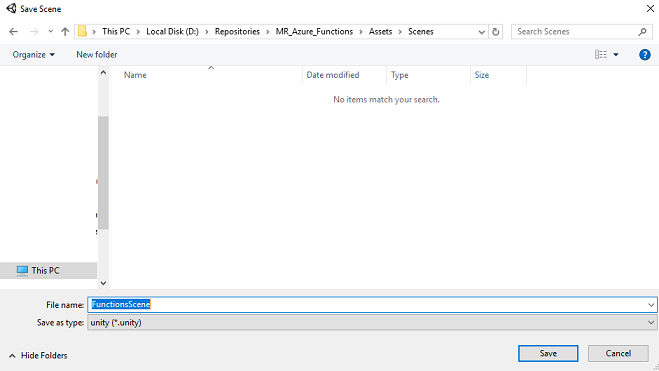
選取 [ 新增開啟場景] 來執行此動作。 隨即會出現儲存視窗。
為此建立新的資料夾,以及任何未來場景,然後選取 [新增資料夾] 按鈕,以建立新的資料夾 ,並將它命名為 Scenes。
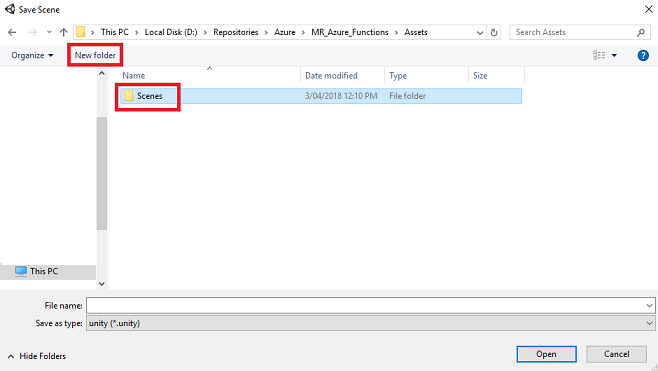
開啟新建立 的 Scenes 資料夾,然後在 [檔名: 文字] 字段中輸入 FunctionsScene,然後按 [ 儲存]。
[建置設定] 中的其餘設定現在應該保留為預設值。
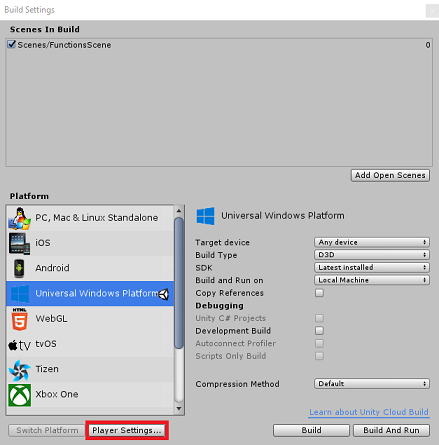
在 [建置設定] 視窗中,按兩下 [播放程序設定] 按鈕,這會在 Inspector 所在的空間中開啟相關的面板。
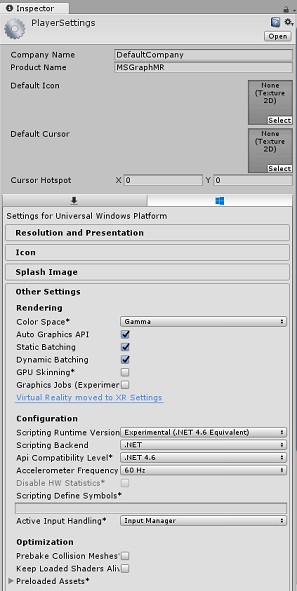
在此面板中,需要驗證一些設定:
在 [ 其他設定] 索引標籤中:
- 腳本運行時間版本應該是實驗性 (.NET 4.6 對等專案),這會觸發需要重新啟動編輯器。
- 腳本後端 應該是 .NET
- API 相容性層級 應該是 .NET 4.6
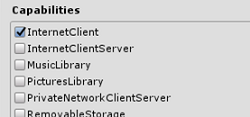
在 [發佈設定] 索引標籤的 [功能] 底下,檢查:
InternetClient
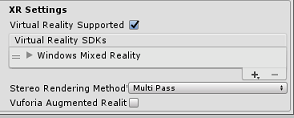
在面板的進一步下,在 [XR 設定] 中,勾選 [支援虛擬實境],確定已新增 Windows Mixed Reality SDK。
回到 [組建設定] Unity C# 專案不再呈現灰色;勾選此旁邊的複選框。
關閉 [建置設定] 視窗。
儲存場景和專案(檔案>儲存場景/檔案>儲存專案)。
第 4 章 - 設定主相機
重要
如果您想要略過本課程的 Unity 設定 元件,並繼續直接進入程式碼,請隨意 下載此 .unitypackage,並將其匯入您的專案做為 自定義套件。 這也會包含下一章中的 DLL。 匯入之後,請從 第 7 章繼續進行。
在 [ 階層面板] 中,您會發現名為 Main Camera 的物件,此物件代表您在應用程式「內部」之後的「頭部」檢視點。
使用您前面的 Unity 儀錶板,選取 主要相機 GameObject。 您會注意到 偵測器面板 (通常位於儀錶板右側)會顯示該 GameObject 的各種元件, 頂端的 Transform ,後面接著 Camera,以及一些其他元件。 您必須重設主相機的轉換,使其正確定位。
若要這樣做,請選取相機轉換元件旁的齒輪圖示,然後選取 [重設]。
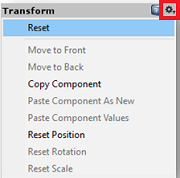
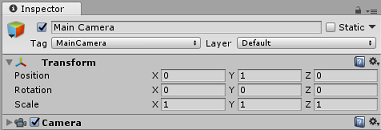
然後更新 轉換 元件,如下所示:
轉換 - 位置
| X | Y | Z |
|---|---|---|
| 0 | 1 | 0 |
轉換 - 旋轉
| X | Y | Z |
|---|---|---|
| 0 | 0 | 0 |
轉換 - 調整
| X | Y | Z |
|---|---|---|
| 1 | 1 | 1 |
第 5 章 - 設定 Unity 場景
以滑鼠右鍵按兩下階層面板的空白區域,在 [3D 物件] 底下新增平面。
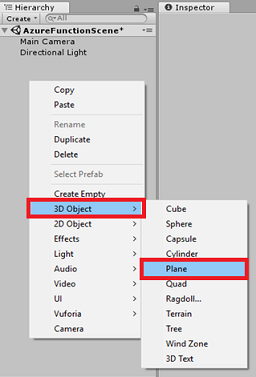
選取 [平面] 物件之後,在 [偵測器面板] 中變更下列參數:
轉換 - 位置
| X | Y | Z |
|---|---|---|
| 0 | 0 | 4 |
轉換 - 調整
| X | Y | Z |
|---|---|---|
| 10 | 1 | 10 |
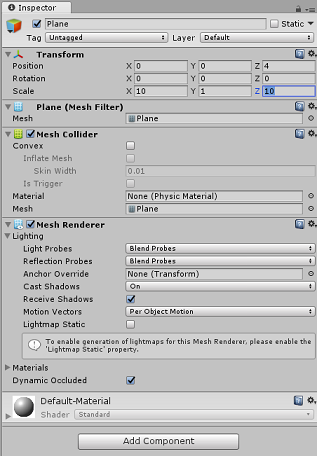
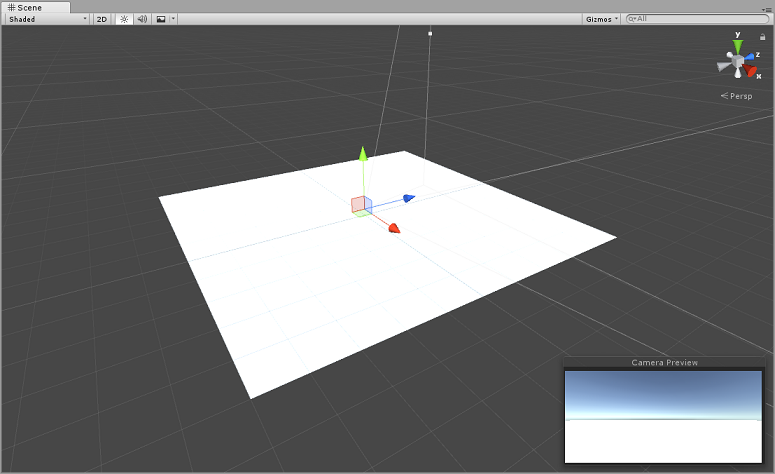
以滑鼠右鍵按兩下階層面板的空白區域,在 [3D 物件] 底下新增 Cube。
將 Cube 重新命名為 GazeButton (選取 Cube 時,按 'F2')。
變更偵測器面板中轉換位置的下列參數:
X Y Z 0 3 5 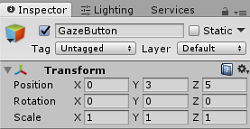
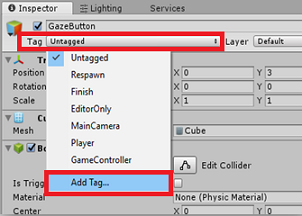
按兩下 [標籤] 下拉式按鈕,然後按兩下 [新增卷標] 以開啟 [卷標和圖層] 窗格。
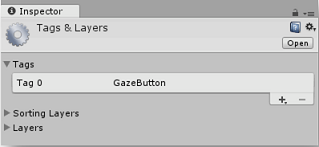
選取 +(加號)按鈕,然後在 [新增標籤名稱] 字段中輸入 GazeButton,然後按 [儲存]。

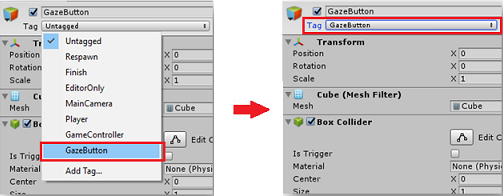
按兩下 [階層面板] 中的 GazeButton 物件,然後在 [偵測器面板] 中指派新建立的 GazeButton 標記。
以滑鼠右鍵按兩下 [階層] 面板中的 GazeButton 物件,然後新增 Empty GameObject (這會新增為子物件)。
選取新的物件,並將它重新命名為 ShapeSpawnPoint。
變更偵測器面板中轉換位置的下列參數:
X Y Z 0 -1 0 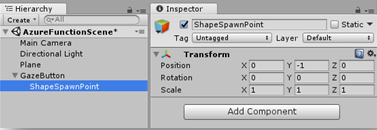
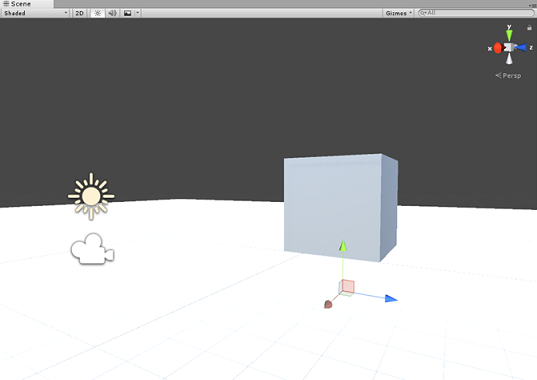
接下來,您將建立 3D Text 物件,以提供 Azure 服務狀態的意見反應。
以滑鼠右鍵按兩下階層面板中的 GazeButton,然後將 3D 物件>3D Text 物件新增為子系。
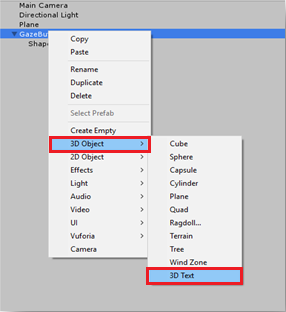
將 3D Text 物件重新命名為 AzureStatusText。
變更 AzureStatusText 物件轉換位置,如下所示:
X Y Z 0 0 -0.6 變更 AzureStatusText 物件 Transform Scale,如下所示: | X | Y | Z | | :---: | :---: | :---: | | 0.1 | 0.1 | 0.1 | 0.1 | 0.1 |
注意
如果它似乎是非中心,請不要擔心,因為當下列文字網格元件更新時,將會修正此問題。
變更 Text Mesh 元件以符合下列專案:
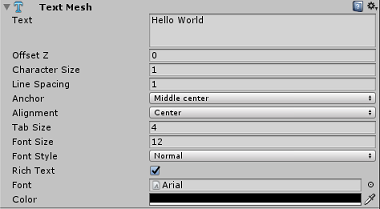
提示
此處選取的色彩是 Hex 色彩: 000000FF,不過您可以隨意選擇自己的色彩,只要確定它是可讀的。
您的階層面板結構現在看起來應該像這樣:
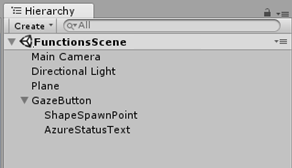
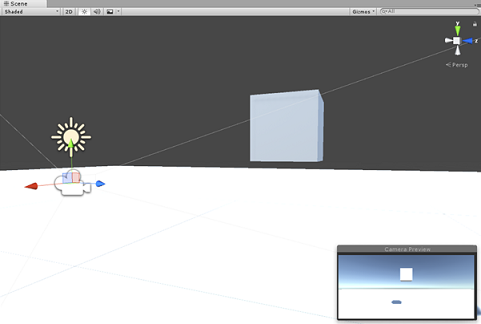
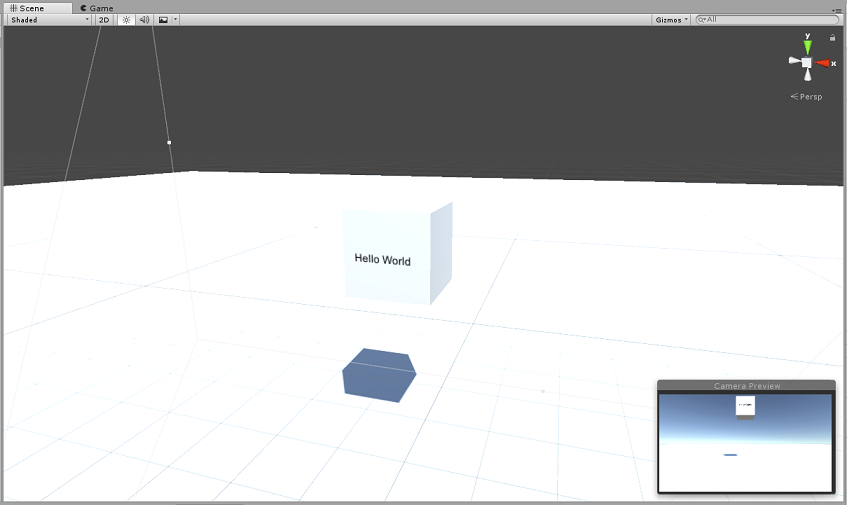
您的場景現在看起來應該像這樣:
第 6 章 - 匯入 Unity Azure 儲存體
您將使用適用於 Unity 的 Azure 儲存體 (其本身會利用適用於 Azure 的 .Net SDK)。 如需詳細資訊,請參閱適用於 Unity 的 Azure 儲存體 一文。
Unity 中目前有已知問題,需要在匯入之後重新設定外掛程式。 這些步驟(本節中的 4 - 7)在 Bug 解決之後將不再需要。
若要將 SDK 匯入您自己的專案,請確定您已從 GitHub 下載最新的 『.unitypackage』。 然後執行下列動作:
使用 [資產>匯入套件自定義套件>] 功能表選項,將 .unitypackage 檔案新增至 Unity。
在快顯的 [匯入 Unity 套件] 方塊中,您可以選取 [外掛程式>記憶體] 底下的所有專案。 取消核取其他所有專案,因為本課程不需要。
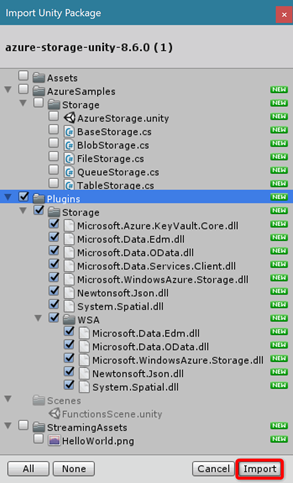
按兩下 [ 匯 入] 按鈕,將專案新增至您的專案。
移至 [外掛程式] 底下的 [記憶體] 資料夾,在 [專案] 檢視中,只選取下列外掛程式:
Microsoft.Data.Edm
Microsoft.Data.OData
Microsoft.WindowsAzure.Storage
Newtonsoft.Json
System.Spatial
![取消核取 [任何平臺]](images/azurelabs-lab5-46.png)
選取這些特定外掛程式后,取消核取 [任何平臺],然後取消核取 [WSAPlayer],然後按兩下 [套用]。
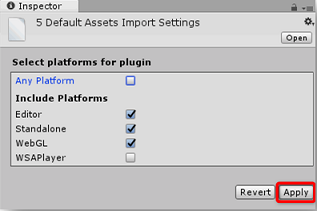
注意
我們會將這些特定外掛程式標示為只能在 Unity 編輯器中使用。 這是因為 WSA 資料夾中有不同版本的相同外掛程式,將在專案從 Unity 匯出之後使用。
在 [ 記憶體 外掛程式] 資料夾中,只選取:
Microsoft.Data.Services.Client
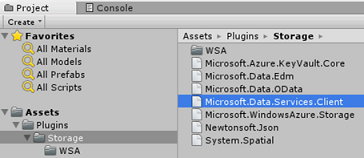
核取 [平台設定] 底下的 [不要處理] 方塊,然後按兩下 [套用]。
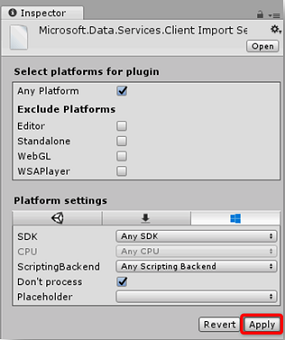
注意
我們正在標示此外掛程式「不要處理」,因為 Unity 元件修補程式處理此外掛程式時發生困難。 即使未處理外掛程式,外掛程式仍可運作。
第 7 章 - 建立 AzureServices 類別
您要建立的第一個類別是 AzureServices 類別 。
AzureServices 類別將負責:
儲存 Azure 帳戶認證。
呼叫您的 Azure 應用程式函式。
上傳和下載 Azure 雲端記憶體中的數據檔。
若要建立此類別:
以滑鼠右鍵按兩下 [資產資料夾],位於 [項目面板] 的 [建立>資料夾]。 將資料夾 命名為文稿。
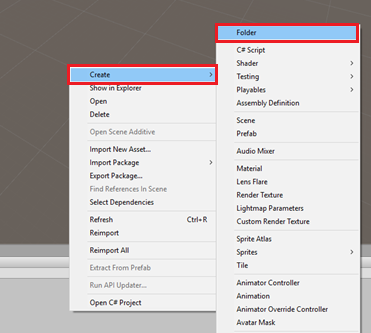
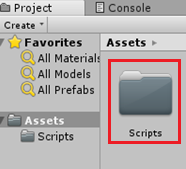
按兩下剛建立的資料夾,以開啟它。
以滑鼠右鍵按兩下資料夾內的 [建立>C# 腳稿]。 呼叫腳本 AzureServices。
按兩下新的 AzureServices 類別,以使用 Visual Studio 開啟它。
將下列命名空間新增至 AzureServices 頂端:
    using System;
    using System.Threading.Tasks;
    using UnityEngine;
    using Microsoft.WindowsAzure.Storage;
    using Microsoft.WindowsAzure.Storage.File;
    using System.IO;
    using System.Net;
在 AzureServices 類別內新增下列 Inspector Fields:
    /// <summary>
    /// Provides Singleton-like behavior to this class.
    /// </summary>
    public static AzureServices instance;

    /// <summary>
    /// Reference Target for AzureStatusText Text Mesh object
    /// </summary>
    public TextMesh azureStatusText;
然後在 AzureServices 類別內新增下列成員變數:
    /// <summary>
    /// Holds the Azure Function endpoint - Insert your Azure Function
    /// Connection String here.
    /// </summary>

    private readonly string azureFunctionEndpoint = "--Insert here you AzureFunction Endpoint--";

    /// <summary>
    /// Holds the Storage Connection String - Insert your Azure Storage
    /// Connection String here.
    /// </summary>
    private readonly string storageConnectionString = "--Insert here you AzureStorage Connection String--";

    /// <summary>
    /// Name of the Cloud Share - Hosts directories.
    /// </summary>
    private const string fileShare = "fileshare";

    /// <summary>
    /// Name of a Directory within the Share
    /// </summary>
    private const string storageDirectory = "storagedirectory";

    /// <summary>
    /// The Cloud File
    /// </summary>
    private CloudFile shapeIndexCloudFile;

    /// <summary>
    /// The Linked Storage Account
    /// </summary>
    private CloudStorageAccount storageAccount;

    /// <summary>
    /// The Cloud Client
    /// </summary>
    private CloudFileClient fileClient;

    /// <summary>
    /// The Cloud Share - Hosts Directories
    /// </summary>
    private CloudFileShare share;

    /// <summary>
    /// The Directory in the share that will host the Cloud file
    /// </summary>
    private CloudFileDirectory dir;
重要
請務必使用 Azure 入口網站中找到的 Azure 記憶體值取代端點和 連接字串 值
現在必須新增 Awake() 和 Start() 方法的程式代碼。 當 類別初始化時,將會呼叫這些方法:
    private void Awake()
    {
        instance = this;
    }

    // Use this for initialization
    private void Start()
    {
        // Set the Status text to loading, whilst attempting connection to Azure.
        azureStatusText.text = "Loading...";
    }

    /// <summary>
    /// Call to the Azure Function App to request a Shape.
    /// </summary>
    public async void CallAzureFunctionForNextShape()
    {

    }
重要
刪除 Update() 方法,因為這個類別不會使用它。
將變更儲存在Visual Studio中,然後返回 Unity。
按兩下 AzureServices 類別,從 [文稿] 資料夾拖曳至 [階層面板] 中的 [主要相機] 物件。
選取 Main Camera,然後從 GazeButton 物件下方擷取 AzureStatusText 子物件,並將它放在 Inspector 中的 AzureStatusText 參考目標欄位中,以提供 AzureServices 腳本的參考。

第 8 章 - 建立 ShapeFactory 類別
要建立的下一個腳本是 ShapeFactory 類別。 此類別的角色是在要求時建立新的圖形,並保留在 圖形歷程記錄清單中建立之圖形的歷程記錄。 每次建立圖形時,都會在 AzureService 類別中更新 [圖形歷程記錄] 列表,然後儲存在 Azure 儲存體 中。 當應用程式啟動時,如果在 Azure 儲存體 中找到儲存的檔案,則會擷取並重新執行圖形歷程記錄清單,並提供產生的圖形是否來自記憶體或新的 3D Text 物件。
若要建立此類別:
移至您先前建立的 Scripts 資料夾。
以滑鼠右鍵按兩下資料夾內的 [建立>C# 腳稿]。 呼叫 ShapeFactory 腳本。
按兩下新的 ShapeFactory 腳本,以使用 Visual Studio 開啟它。
確定 ShapeFactory 類別包含下列命名空間:
    using System.Collections.Generic;
    using UnityEngine;
將如下所示的變數新增至 ShapeFactory 類別,並以下列變數取代 Start() 和 Awake() 函式:
    /// <summary>
    /// Provide this class Singleton-like behaviour
    /// </summary>
    [HideInInspector]
    public static ShapeFactory instance;

    /// <summary>
    /// Provides an Inspector exposed reference to ShapeSpawnPoint
    /// </summary>
    [SerializeField]
    public Transform spawnPoint;

    /// <summary>
    /// Shape History Index
    /// </summary>
    [HideInInspector]
    public List<int> shapeHistoryList;

    /// <summary>
    /// Shapes Enum for selecting required shape
    /// </summary>
    private enum Shapes { Cube, Sphere, Cylinder }

    private void Awake()
    {
        instance = this;
    }

    private void Start()
    {
        shapeHistoryList = new List<int>();
    }
CreateShape() 方法會根據提供的整數參數產生基本圖形。 布爾值參數可用來指定目前建立的圖形是否來自記憶體或新的圖形。 將下列程式代碼放在 ShapeFactory 類別的下列方法下方:
    /// <summary>
    /// Use the Shape Enum to spawn a new Primitive object in the scene
    /// </summary>
    /// <param name="shape">Enumerator Number for Shape</param>
    /// <param name="storageShape">Provides whether this is new or old</param>
    internal void CreateShape(int shape, bool storageSpace)
    {
        Shapes primitive = (Shapes)shape;
        GameObject newObject = null;
        string shapeText = storageSpace == true ? "Storage: " : "New: ";

        AzureServices.instance.azureStatusText.text = string.Format("{0}{1}", shapeText, primitive.ToString());

        switch (primitive)
        {
            case Shapes.Cube:
            newObject = GameObject.CreatePrimitive(PrimitiveType.Cube);
            break;

            case Shapes.Sphere:
            newObject = GameObject.CreatePrimitive(PrimitiveType.Sphere);
            break;

            case Shapes.Cylinder:
            newObject = GameObject.CreatePrimitive(PrimitiveType.Cylinder);
            break;
        }

        if (newObject != null)
        {
            newObject.transform.position = spawnPoint.position;

            newObject.transform.localScale = new Vector3(0.5f, 0.5f, 0.5f);

            newObject.AddComponent<Rigidbody>().useGravity = true;

            newObject.GetComponent<Renderer>().material.color = UnityEngine.Random.ColorHSV(0f, 1f, 1f, 1f, 0.5f, 1f);
        }
    }
請務必先在Visual Studio中儲存變更,再返回 Unity。
回到 Unity 編輯器,按兩下 ShapeFactory 類別,並將其從 [腳稿] 資料夾拖曳至 [階層面板] 中的 Main Camera 物件。
選取主相機時,您會發現 ShapeFactory 腳本元件遺漏 Spawn Point 參考。 若要修正此問題,請將 ShapeSpawnPoint 物件從 階層面板 拖曳至 Spawn Point 參考目標。

第 9 章 - 建立 Gaze 類別
您需要建立的最後一個腳本是 Gaze 類別。
此類別負責建立 將投射自 Main Camera 的 Raycast ,以偵測使用者正在查看的物件。 在此情況下,Raycast 必須識別使用者是否正在查看 場景中的 GazeButton 物件,並觸發行為。
若要建立此類別:
移至您先前建立的 Scripts 資料夾。
以滑鼠右鍵按兩下 [項目面板],[建立>C# 腳本]。 呼叫腳本 Gaze。
按兩下新的 注視 腳本,以使用 Visual Studio 開啟它。
請確定文稿頂端包含下列命名空間:
using UnityEngine;然後在 Gaze 類別內新增下列變數:
    /// <summary>
    /// Provides Singleton-like behavior to this class.
    /// </summary>
    public static Gaze instance;

    /// <summary>
    /// The Tag which the Gaze will use to interact with objects. Can also be set in editor.
    /// </summary>
    public string InteractibleTag = "GazeButton";

    /// <summary>
    /// The layer which will be detected by the Gaze ('~0' equals everything).
    /// </summary>
    public LayerMask LayerMask = ~0;

    /// <summary>
    /// The Max Distance the gaze should travel, if it has not hit anything.
    /// </summary>
    public float GazeMaxDistance = 300;

    /// <summary>
    /// The size of the cursor, which will be created.
    /// </summary>
    public Vector3 CursorSize = new Vector3(0.05f, 0.05f, 0.05f);

    /// <summary>
    /// The color of the cursor - can be set in editor.
    /// </summary>
    public Color CursorColour = Color.HSVToRGB(0.0223f, 0.7922f, 1.000f);

    /// <summary>
    /// Provides when the gaze is ready to start working (based upon whether
    /// Azure connects successfully).
    /// </summary>
    internal bool GazeEnabled = false;

    /// <summary>
    /// The currently focused object.
    /// </summary>
    internal GameObject FocusedObject { get; private set; }

    /// <summary>
    /// The object which was last focused on.
    /// </summary>
    internal GameObject _oldFocusedObject { get; private set; }

    /// <summary>
    /// The info taken from the last hit.
    /// </summary>
    internal RaycastHit HitInfo { get; private set; }

    /// <summary>
    /// The cursor object.
    /// </summary>
    internal GameObject Cursor { get; private set; }

    /// <summary>
    /// Provides whether the raycast has hit something.
    /// </summary>
    internal bool Hit { get; private set; }

    /// <summary>
    /// This will store the position which the ray last hit.
    /// </summary>
    internal Vector3 Position { get; private set; }

    /// <summary>
    /// This will store the normal, of the ray from its last hit.
    /// </summary>
    internal Vector3 Normal { get; private set; }

    /// <summary>
    /// The start point of the gaze ray cast.
    /// </summary>
    private Vector3 _gazeOrigin;

    /// <summary>
    /// The direction in which the gaze should be.
    /// </summary>
    private Vector3 _gazeDirection;
重要
其中有些變數可以在編輯器中編輯。
現在必須新增 Awake() 和 Start() 方法的程式代碼。
    /// <summary>
    /// The method used after initialization of the scene, though before Start().
    /// </summary>
    private void Awake()
    {
        // Set this class to behave similar to singleton
        instance = this;
    }

    /// <summary>
    /// Start method used upon initialization.
    /// </summary>
    private void Start()
    {
        FocusedObject = null;
        Cursor = CreateCursor();
    }
新增下列程式代碼,此程式代碼會在啟動時建立游標物件,以及 Update() 方法,此方法會執行 Raycast 方法,以及正在切換 GazeEnabled 布爾值的位置:
    /// <summary>
    /// Method to create a cursor object.
    /// </summary>
    /// <returns></returns>
    private GameObject CreateCursor()
    {
        GameObject newCursor = GameObject.CreatePrimitive(PrimitiveType.Sphere);
        newCursor.SetActive(false);

        // Remove the collider, so it doesn't block raycast.
        Destroy(newCursor.GetComponent<SphereCollider>());
        newCursor.transform.localScale = CursorSize;

        newCursor.GetComponent<MeshRenderer>().material = new Material(Shader.Find("Diffuse"))
        {
            color = CursorColour
        };

        newCursor.name = "Cursor";

        newCursor.SetActive(true);

        return newCursor;
    }

    /// <summary>
    /// Called every frame
    /// </summary>
    private void Update()
    {
        if(GazeEnabled == true)
        {
            _gazeOrigin = Camera.main.transform.position;

            _gazeDirection = Camera.main.transform.forward;

            UpdateRaycast();
        }
    }
接下來, 新增 UpdateRaycast() 方法,此方法會投影 Raycast 並偵測命中目標。
    private void UpdateRaycast()
    {
        // Set the old focused gameobject.
        _oldFocusedObject = FocusedObject;

        RaycastHit hitInfo;

        // Initialise Raycasting.
        Hit = Physics.Raycast(_gazeOrigin,
            _gazeDirection,
            out hitInfo,
            GazeMaxDistance, LayerMask);

        HitInfo = hitInfo;

        // Check whether raycast has hit.
        if (Hit == true)
        {
            Position = hitInfo.point;

            Normal = hitInfo.normal;

            // Check whether the hit has a collider.
            if (hitInfo.collider != null)
            {
                // Set the focused object with what the user just looked at.
                FocusedObject = hitInfo.collider.gameObject;
            }
            else
            {
                // Object looked on is not valid, set focused gameobject to null.
                FocusedObject = null;
            }
        }
        else
        {
            // No object looked upon, set focused gameobject to null.
            FocusedObject = null;

            // Provide default position for cursor.
            Position = _gazeOrigin + (_gazeDirection * GazeMaxDistance);

            // Provide a default normal.
            Normal = _gazeDirection;
        }

        // Lerp the cursor to the given position, which helps to stabilize the gaze.
        Cursor.transform.position = Vector3.Lerp(Cursor.transform.position, Position, 0.6f);

        // Check whether the previous focused object is this same
        //    object. If so, reset the focused object.
        if (FocusedObject != _oldFocusedObject)
        {
            ResetFocusedObject();

            if (FocusedObject != null)
            {
            if (FocusedObject.CompareTag(InteractibleTag.ToString()))
            {
                    // Set the Focused object to green - success!
                    FocusedObject.GetComponent<Renderer>().material.color = Color.green;

                    // Start the Azure Function, to provide the next shape!
                    AzureServices.instance.CallAzureFunctionForNextShape();
                }
            }
        }
    }
最後,新增 ResetFocusedObject() 方法,這個方法會切換 GazeButton 物件的目前色彩,指出它是否正在建立新的圖形。
    /// <summary>
    /// Reset the old focused object, stop the gaze timer, and send data if it
    /// is greater than one.
    /// </summary>
    private void ResetFocusedObject()
    {
        // Ensure the old focused object is not null.
        if (_oldFocusedObject != null)
        {
            if (_oldFocusedObject.CompareTag(InteractibleTag.ToString()))
            {
                // Set the old focused object to red - its original state.
                _oldFocusedObject.GetComponent<Renderer>().material.color = Color.red;
            }
        }
    }
在 Visual Studio 中儲存變更,再返回 Unity。
按兩下 [注視] 類別,然後將 [腳稿] 資料夾拖曳至 [階層面板] 中的 [主要相機] 物件。
第 10 章 - 完成 AzureServices 類別
備妥其他腳本后,現在可以 完成 AzureServices 類別。 這可透過下列方式達成:
新增名為 CreateCloudIdentityAsync()的新方法,以設定與 Azure 通訊所需的驗證變數。
這個方法也會檢查先前儲存的檔案是否存在,其中包含圖形清單。
如果找到檔案,它會停用使用者注視,並根據圖形模式觸發圖形建立,如儲存在 Azure 儲存體 檔案中。 使用者可以看到此情況,因為 文字網格 會根據圖形原點提供顯示「記憶體」或「新增」。
如果找不到任何檔案,則會啟用 Gaze,讓使用者在查看 場景中的 GazeButton 物件時建立圖形。
    /// <summary>
    /// Create the references necessary to log into Azure
    /// </summary>
    private async void CreateCloudIdentityAsync()
    {
        // Retrieve storage account information from connection string
        storageAccount = CloudStorageAccount.Parse(storageConnectionString);

        // Create a file client for interacting with the file service.
        fileClient = storageAccount.CreateCloudFileClient();

        // Create a share for organizing files and directories within the storage account.
        share = fileClient.GetShareReference(fileShare);

        await share.CreateIfNotExistsAsync();

        // Get a reference to the root directory of the share.
        CloudFileDirectory root = share.GetRootDirectoryReference();

        // Create a directory under the root directory
        dir = root.GetDirectoryReference(storageDirectory);

        await dir.CreateIfNotExistsAsync();

        //Check if the there is a stored text file containing the list
        shapeIndexCloudFile = dir.GetFileReference("TextShapeFile");

        if (!await shapeIndexCloudFile.ExistsAsync())
        {
            // File not found, enable gaze for shapes creation
            Gaze.instance.GazeEnabled = true;

            azureStatusText.text = "No Shape\nFile!";
        }
        else
        {
            // The file has been found, disable gaze and get the list from the file
            Gaze.instance.GazeEnabled = false;

            azureStatusText.text = "Shape File\nFound!";

            await ReplicateListFromAzureAsync();
        }
    }
下一個代碼段來自 Start() 方法;其中會呼叫 CreateCloudIdentityAsyncAsync() 方法。 您可以隨意複製您目前的 Start() 方法,如下所示:
    private void Start()
    {
        // Disable TLS cert checks only while in Unity Editor (until Unity adds support for TLS)
#if UNITY_EDITOR
        ServicePointManager.ServerCertificateValidationCallback = delegate { return true; };
#endif

        // Set the Status text to loading, whilst attempting connection to Azure.
        azureStatusText.text = "Loading...";

        //Creating the references necessary to log into Azure and check if the Storage Directory is empty
        CreateCloudIdentityAsync();
    }
填入 CallAzureFunctionForNextShape()方法的程序代碼。 您將使用先前建立 的 Azure 函式應用程式 來要求圖形索引。 收到新圖形之後,這個方法會將圖形傳送至 ShapeFactory 類別,以在場景中建立新的圖形。 使用下列程式代碼來完成 CallAzureFunctionForNextShape()主體。
    /// <summary>
    /// Call to the Azure Function App to request a Shape.
    /// </summary>
    public async void CallAzureFunctionForNextShape()
    {
        int azureRandomInt = 0;

        // Call Azure function
        HttpWebRequest webRequest = WebRequest.CreateHttp(azureFunctionEndpoint);

        WebResponse response = await webRequest.GetResponseAsync();

        // Read response as string
        using (Stream stream = response.GetResponseStream())
        {
            StreamReader reader = new StreamReader(stream);

            String responseString = reader.ReadToEnd();

            //parse result as integer
            Int32.TryParse(responseString, out azureRandomInt);
        }

        //add random int from Azure to the ShapeIndexList
        ShapeFactory.instance.shapeHistoryList.Add(azureRandomInt);

        ShapeFactory.instance.CreateShape(azureRandomInt, false);

        //Save to Azure storage
        await UploadListToAzureAsync();
    }
新增方法來建立字串,方法是串連儲存在圖形歷程記錄清單中的整數,並將它儲存在 Azure 儲存體 檔案中。
    /// <summary>
    /// Upload the locally stored List to Azure
    /// </summary>
    private async Task UploadListToAzureAsync()
    {
        // Uploading a local file to the directory created above
        string listToString = string.Join(",", ShapeFactory.instance.shapeHistoryList.ToArray());

        await shapeIndexCloudFile.UploadTextAsync(listToString);
    }
新增 方法,以擷取儲存在檔案中的文字,其位於 Azure 儲存體 檔案中,並將它還原串行化成清單。
完成此程序之後,方法會重新啟用注視,讓使用者可以將更多圖形新增至場景。
    ///<summary>
    /// Get the List stored in Azure and use the data retrieved to replicate
    /// a Shape creation pattern
    ///</summary>
    private async Task ReplicateListFromAzureAsync()
    {
        string azureTextFileContent = await shapeIndexCloudFile.DownloadTextAsync();

        string[] shapes = azureTextFileContent.Split(new char[] { ',' });

        foreach (string shape in shapes)
        {
            int i;

            Int32.TryParse(shape.ToString(), out i);

            ShapeFactory.instance.shapeHistoryList.Add(i);

            ShapeFactory.instance.CreateShape(i, true);

            await Task.Delay(500);
        }

        Gaze.instance.GazeEnabled = true;

        azureStatusText.text = "Load Complete!";
    }
在 Visual Studio 中儲存變更,再返回 Unity。
第 11 章 - 建置 UWP 解決方案
若要開始建置程式:
移至 [檔案>建置設定]。
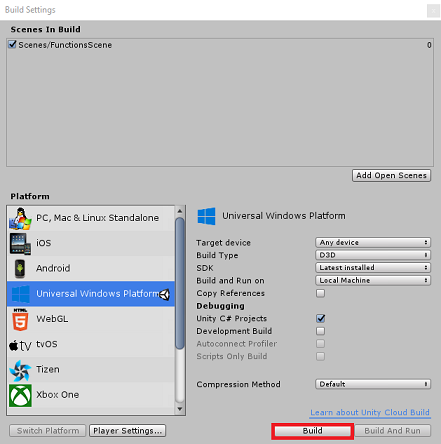
按兩下 [ 建置]。 Unity 會啟動 檔案總管 視窗,您需要在其中建立,然後選取要建置應用程式的資料夾。 立即建立該資料夾,並將它命名為 應用程式。 然後選取 [ 應用程式 ] 資料夾,然後按 [選取資料夾]。
Unity 將會開始將您的專案建置至 App 資料夾。
一旦 Unity 完成建置(可能需要一些時間),它會在組建的位置開啟 檔案總管 視窗(請檢查您的任務列,因為它可能不一定會出現在您的視窗上方,但會通知您新增視窗)。
第 12 章 - 部署您的應用程式
若要部署您的應用程式:
流覽至上一章中建立的應用程式資料夾。 您會看到具有應用程式名稱的檔案,擴展名為 '.sln',您應該按兩下它,以便在Visual Studio 中開啟它。
在 [解決方案平臺] 中,選取 [x86] [本機計算機]。
在 [解決方案組態] 中,選取 [偵錯]。
針對 Microsoft HoloLens,您可能會發現將它設定為 遠端電腦會比較容易,因此您不會繫結到您的電腦。 不過,您也必須執行下列動作:
- 瞭解 HoloLens 的 IP 位址,您可以在 [設定>網络與因特網>Wi-Fi>進階選項] 中找到;IPv4 是您應該使用的位址。
- 確定開發人員模式為開啟;請參閱適用於開發人員的設定>更新與安全性。>

移至 [ 建置] 功能表,然後按下 [ 部署方案 ] 將應用程式側載至您的電腦。
您的應用程式現在應該會出現在已安裝的應用程式清單中,準備好啟動並測試!
您已完成的 Azure Functions 和記憶體應用程式
恭喜,您建置了混合實境應用程式,可同時運用 Azure Functions 和 Azure 儲存體 服務。 您的應用程式將能夠繪製儲存的數據,並根據該數據提供動作。

額外練習
練習 1
建立第二個繁衍點,並記錄從中建立物件的繁衍點。 載入資料檔時,請重新執行從原先建立的位置繁衍的圖形。
練習 2
建立重新啟動應用程式的方式,而不必每次重新開啟它。 載入場景 是開始的好位置。 這麼做之後,請建立一種方式,以清除 Azure 儲存體 中的預存清單,以便輕鬆地從您的應用程式重設。