Enrich Windows workstation and server data with a local script (Public preview)
Note
This feature is in PREVIEW. The Azure Preview Supplemental Terms include other legal terms that apply to Azure features that are in beta, preview, or otherwise not yet released into general availability.
In addition to detecting OT devices on your network, use Defender for IoT to discover Microsoft Windows workstations and servers and enrich workstation and server data for devices already detected. Same as other detected devices, detected Windows workstations and servers are displayed in the Device inventory. The Device inventory pages on the sensor show enriched data about Windows devices, including data about the Windows operating system and applications installed, patch-level data, open ports, and more.
This article describes how to use a Defender for IoT Windows-based WMI tool to get extended information from Windows devices, such as workstations, servers, and more. Run the WMI script on your Windows devices to get extended information, increasing your device inventory and security coverage. While you can also use scheduled WMI scans to obtain this data, scripts can be run locally for regulated networks with waterfalls and one-way elements if WMI connectivity isn't possible.
The script described in this article returns the following details about each detected device:
- IP address
- MAC address
- Operating system
- Service pack
- Installed programs
- Last knowledge base update
If an OT network sensor has already detected the device, running the script outlined in this article retrieves the device's information and enrichment data.
Prerequisites
Before performing the procedures in this article, you must have:
An OT network sensor installed, configured, and activated.
Access to your OT network sensor as an Admin user. For more information, see On-premises users and roles for OT monitoring with Defender for IoT.
Administrator permissions on any devices where you intend to run the script.
Supported operating systems
The script described in this article is supported for the following Windows operating systems:
- Windows XP
- Windows 7
- Windows 10
- Windows 11
- Windows Server 2003/2008/2012/2016/2019/2022
Download and run the script
This procedure describes how to deploy and run a script on the Windows workstation and servers that you want to monitor in Defender for IoT.
The script detects enriched Windows data, and is run as a utility and not an installed program. Running the script doesn't affect the endpoint. You may want to deploy the script once, or using ongoing automation, using standard automated deployment methods and tools.
Sign into your OT sensor console, and select System Settings > Import Settings > Windows Information.
Select Download script. Your browser might ask you if you want to keep the file, select Keep or any similar options.
Copy the file to a local drive and unzip it. The following file appears:
Extract_system_info.bat
Run the
Extract_system_info.batfile.You'll be asked whether you want to display errors on screen or not. Make you own selection.
After the script runs to probe the registry, an output file appears with the registry information. The filename indicates the current date and time of the snapshot with the following syntax: [current date time]_system_info_extractor.
Files generated by the script:
- Remain on the local drive until you delete them.
- Are overwritten if you run the script again on the same day.
- Include an errorOutput file that is empty if no errors occurred during the running of the script.
Import device details
After having run the script as described earlier, import the generated data to your sensor to view the device details in the Device inventory.
To import device details to your sensor:
Use standard, automated methods and tools to move the generated files from each Windows endpoint to a location accessible from your OT sensors.
Don't update filenames or separate the files from each other.
Sign into your OT sensor console, and select System Settings > Import Settings > Windows Information.
Select Import File, and then select the relevant file.
View devices applications report
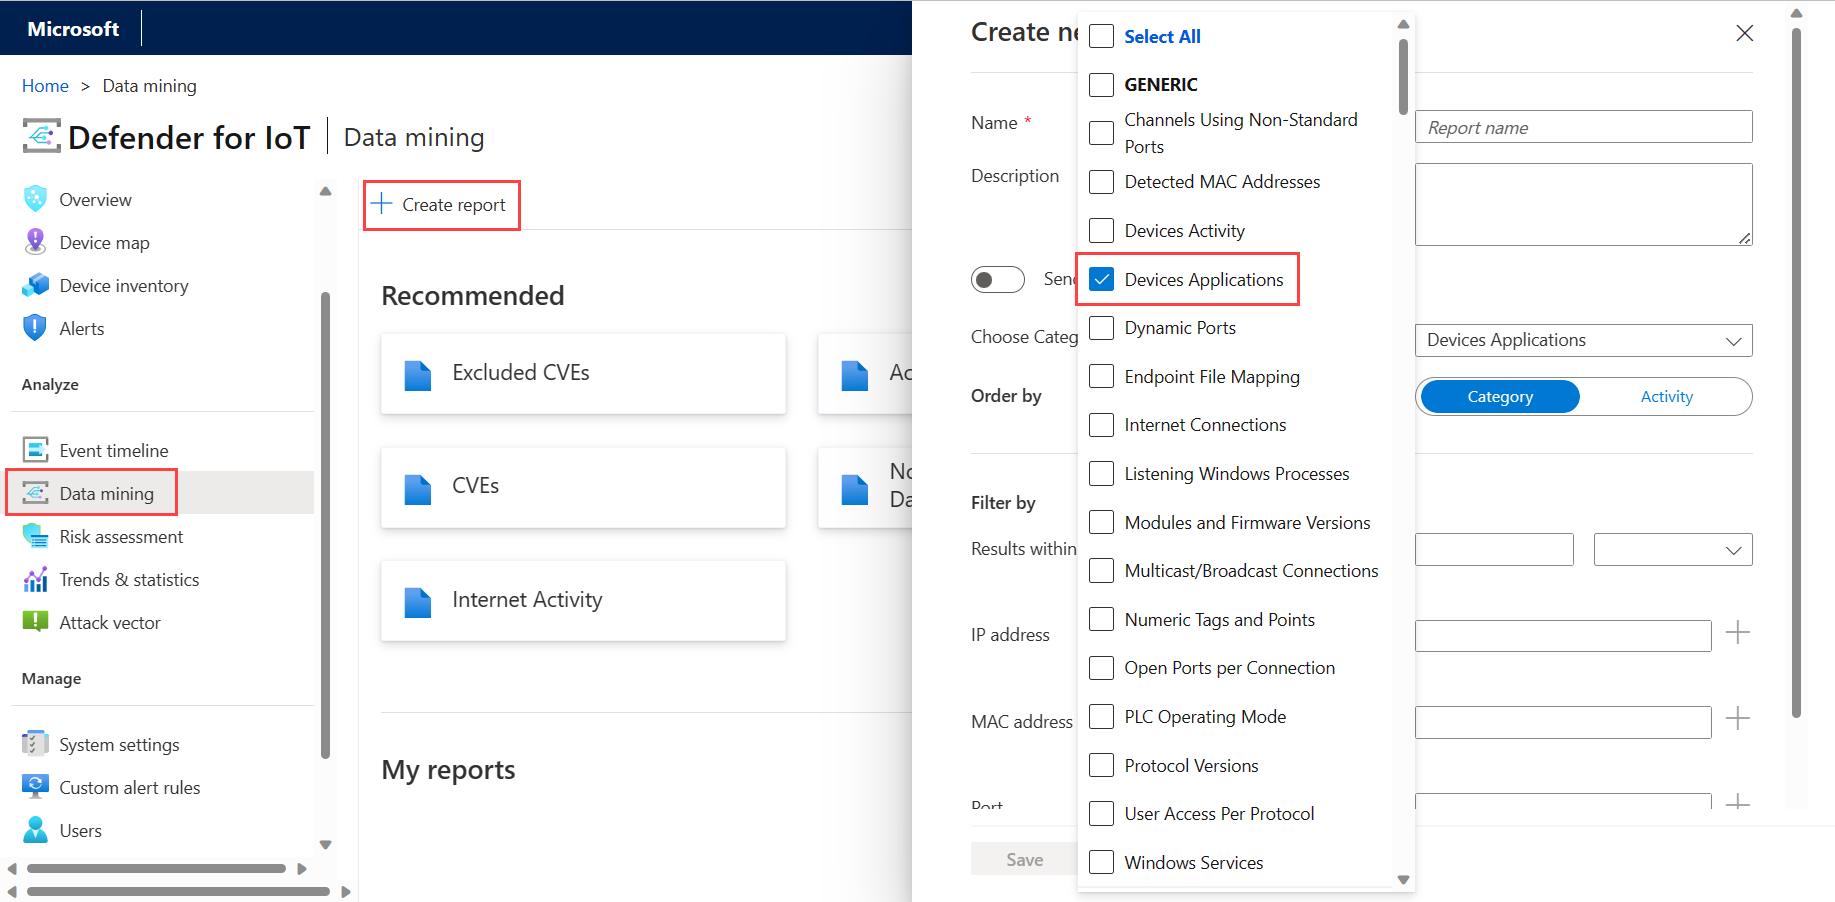
After downloading and running the script, then importing the generated data to your sensor, you can view your devices applications with a custom data mining report.
To view the devices applications:
Sign into your OT sensor console, and select Data mining.
Select + Create report to create a custom report. In the Choose Category field, select Devices Applications. For example:
Your devices applications report is shown in the My reports area.
Next steps
For more information, see Detect Windows workstations and servers with a local script and Import extra data for detected OT devices.


