Step 5: Identity mapping
This is Step 5 in a solution designed to complete a Cross-tenant OneDrive migration. To learn more, see Cross-tenant OneDrive migration overview.
- Step 1: Connect to the source and the target tenants
- Step 2: Establish trust between the source and the target tenant
- Step 3: Verify trust has been established
- Step 4: Pre-create users and groups
- Step 5: Prepare identity mapping
- Step 6: Start a Cross-tenant OneDrive migration
- Step 7: Post migration steps
Create the identity mapping file
In this step of the cross-tenant migration process, you're going to create a single CSV (comma separated values) file that contains the mapping of the users and groups on the source tenant to their corresponding users and groups on the target tenant.
We recommend that you take the time to verify your mappings, ensuring they're accurate before starting any migrations to the target tenant.
There's a one-to-one relationship in the identity mapping file. You can't map the same user to multiple users in the target tenant. For example, if you have instances where the admin is the owner of multiple OneDrive accounts, the ownership must be changed to match the corresponding user you wish to migrate from Source to Target. If you don't, those account files won't migrate.
Example: In this example, the admin owns multiple OneDrive accounts.
| Source Tenant Owner | Target Tenant User |
|---|---|
| admin@source.com | new.userA@target.com |
| admin@source.com | new.userB@target.com |
| admin@source.com | new.userC@target.com |
Cross-tenant migration supports this scenario:
Example:
| Source Tenant Owner | Target Tenant User |
|---|---|
| userA@source.com | new.userA@target.com |
| userB@source.com | new.userB@target.com |
| userC@source.com | new.userC@target.com |
Create the CSV file
There are six columns needed in your CSV file. The first three are your source values, each providing detail about where your data is currently located. The remaining three columns are the corresponding info on the target tenant. All six columns must be accounted for in the file. Create your file in Excel and save it as a .csv file.
Users and groups are included in the same file. Depending on whether it's a user or group, what you enter in the column is different. In each of the columns enter values as shown in the examples. Do NOT include column headings.
| Column | User | Group |
|---|---|---|
| 1 | User | Group |
| 2 | SourceTenantCompanyID | SourceTenantCompanyID |
| 3 | SourceUserUpn | SourceGroupObjectID |
| 4 | TargetUserUpn | TargetGroupObjectID |
| 5 | TargetUserEmail | GroupName |
| 6 | UserType | GroupType |
Important
Do NOT include column headings in your CSV file. In the examples below we include them for illustrative purposes only.
Users. Enter your values as shown in this example for Users:


Groups. Enter your values as shown in this example for Groups:

Example:

Guest users. You can map guest accounts in the source tenant to member accounts in the target tenant. You can also map a guest account in the source to a guest account in the target if the guest has been previously created. Enter your values as shown in this example for guests:


Multiple users and groups in a CSV file:
Example:

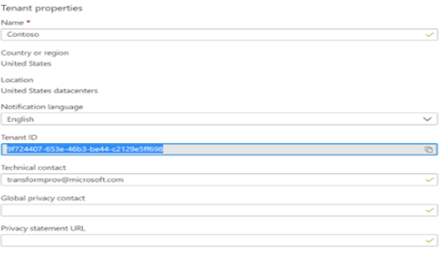
Obtain the source tenant company ID
To obtain Source Tenant Company ID:
- Sign in as Admin to your Azure portal
- Select or Search for Microsoft Entra ID.
- Scroll down on the left-hand panel and select Properties.
- Locate the Tenant ID Field. The required Tenant ID will be in that box.

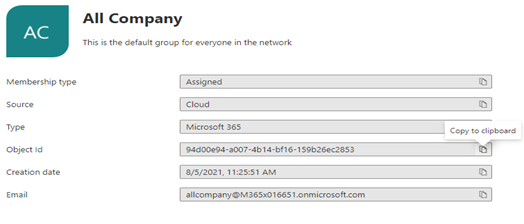
To obtain source group object ID:
- Sign in to source tenant as Admin to Azure Groups.
- Search for your required group(s).
- Select the required Group instance and then Copy to clipboard. Paste this value in the sourceGroupObjectId column of your mapping CSV file.
- If you have multiple Groups to map, then repeat these steps for each group.

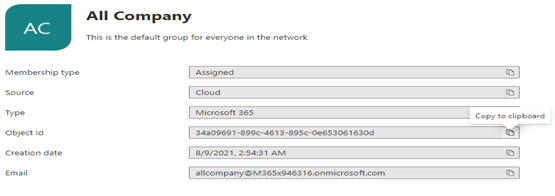
To obtain target group object ID:
- Sign in to Target tenant as Admin to Azure Groups
- Search for your required group(s).
- Select the required group instance and then Copy to clipboard. Paste this value in the targetGroupObjectId column of your mapping CSV file.
- If you have multiple groups to map, then repeat the above process to obtain those specific targetGroupObjectId's.
- For the GroupName, use the same ID as the TargetGroupObjectId you obtained.

Upload the identity map
Once the identity mapping file has been prepared, the SharePoint Administrator on the target tenant uploads the file to SharePoint. This will allow identity mapping to occur automatically as part of the cross-tenant migration.
Important
Before you run the Add-SPOTenantIdentityMap -IdentityMapPath command, save and close the identitymap.csv file on your Desktop/OneDrive/SharePoint. If the file remains open, you will receive the following error.
Add-SPOTenantIdentityMap: The process cannot access the file 'C:\Users\myuser\Test-Identity-Map.csv' because it is being used by another process.
- To upload the identity Map on the target tenant, run the following command. For -IdentityMapPath, provide the full path and filename of the identity mapping CSV file.
Add-SPOTenantIdentityMap -IdentityMapPath <identitymap.csv>
Important
If you make or need to make any changes to your Identity Map during the lifecycle of the migration you must run the Add-SPOTenantIdentityMap -IdentityMapPath <identitymap.csv> command every time a change is made to ensure those changes are applied to the migration.
Uploading any new identity map will overwrite the current one. Make sure that any revision or addition includes ALL users and groups for the full migration. Your identity map should always include everyone you're wanting to migrate.
To look at the mapping entries in the identity mapping file for a particular user, use the command Get-SPOTenantIdentityMappingUser with Field as SourceUserKey and Value as the UPN of the user you are moving.
Example:
get-spoTenantIdentityMappingUser -Field SourceUserKey -Value usera@Contoso.onmicrosoft.com
Verify cross-tenant compatibility status
Before starting any cross-tenant migrations, make sure that both SharePoint database schemas are up to date and compatible between source and target.
To perform this check, run the below cmdlet on your Source tenant.
Get-SPOCrossTenantCompatibilityStatus -PartnerCrossTenantHostURL [Target tenant hostname]

Get-SPOCrossTenantCompatibilityStatus -PartnerCrossTenantHostURL https://m365x12395529-my.sharepoint.com
- If the tenant status shows as Compatible or Warning, you can then proceed with the next step of starting cross-tenant migrations.
- If the tenant status shows as Incompatible, your tenants will need to be patched/updated to ensure compatibility.
| Status | Can proceed with migration |
|---|---|
| Compatible | Yes |
| Warning | Yes |
| Incompatible | No |
Note
We recommend waiting a period of 48 hours. If your tenants are still reporting as incompatible, contact support.
We recommend performing the compatibility status check on a frequent basis and prior to starting ANY instances of cross tenant migrations. If the tenants are not compatible, this can result in cross-tenant migrations failing.